This documentation will outline the basic usage of the ‘Custom Registration Fields‘ addon. In order to use this addon, you will need the base WP Affiliate plugin.
Overview of the ‘Custom Registration Fields’ Addon
The main WP Affiliate Platform plugin comes with a registration form where your potential affiliates can come and enter in their basic details to sign up as an affiliate. The basic registration form asks your potential affiliate form their name, their addresses, an affiliate ID and a password (which should be 5 characters or more). The ‘Custom Registration Fields‘ addon gives you the ability to add additional fields to the basic registration form. Adding custom fields to the affiliate registration allows you to ask questions that are specific to your website. For example, you may wish to ask your potential affiliates ‘How many visitors do you receive per month?‘. Using this addon, you can create either text or checkbox fields.
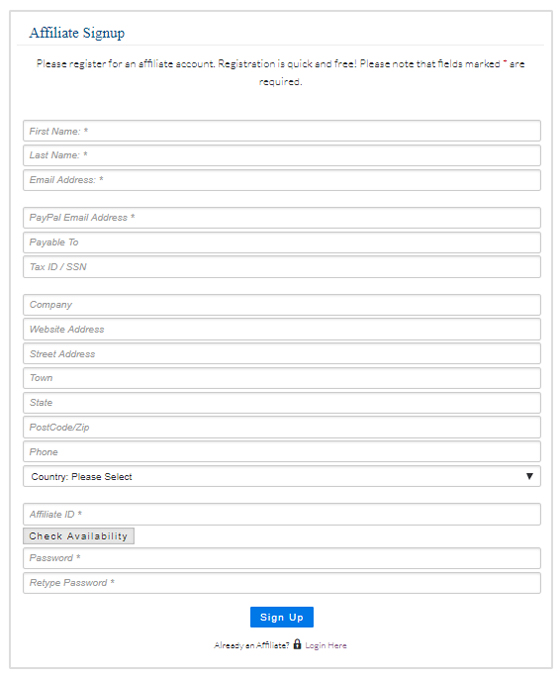
Example: The Basic Affiliate Registration Form
Below is a screenshot of the basic registration form that comes with the ‘Affiliate Platform‘ plugin. If you require additional fields, you will need the ‘Custom Registration Fields‘ addon.
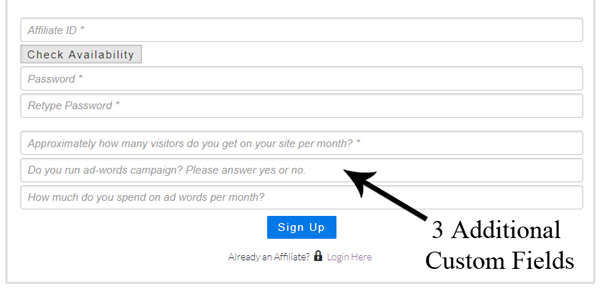
Example: The Basic Affiliate Registration Form with Additional Fields
In the below example, the additional fields were added using the ‘Custom Registration Fields’ addon.
How to Add Custom Fields to Your Affiliate Registration Form
Step 1) You will need both the ‘Affiliate Platform‘ plugin and the ‘Custom Registration Fields‘ addon installed and activated on your WordPress site.
Step 2) After you install the ‘Custom Registration Fields‘ addon you will notice a new menu titled ‘Custom Fields‘ under the ‘WP Affiliate‘ plugin.
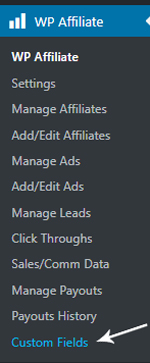
Step 3) Click on the ‘Custom Fields‘ menu. This will take you to the ‘Custom Registration Fields Settings‘ page.
Step 4) Click the ‘Add New‘ button to add a new field to your affiliate registration form.
Step 5) Select either a ‘Text‘ field or a ‘Checkbox‘ field from the drop down menu. A text field will allow your affiliates to enter in a answer while a checkbox field will require them to either check a circle if the question applies to them or leave it blank if it doesn’t.
Step 6) In the ‘Input Field Label‘ field, type the question you would like to ask or a statement that requires a response. This will be the text shown on the registration page.
Step 7) Mark the checkbox if you would like to make this field required. Leave the checkbox blank if you do not wish for this to be a required field.
Step 8) Enter in ‘Help Text‘ if needed. This will show up below the field.
Step 9) Configure the fields you wish to add to your affiliate registration page. Once complete, ensure you ‘Save Settings‘.
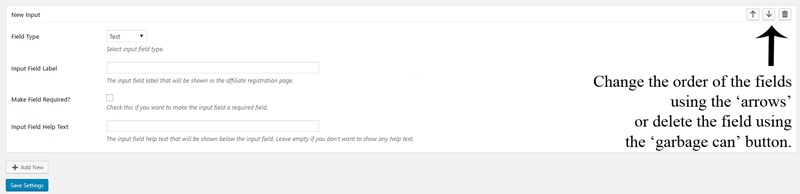
Example: Deleting and Reordering Fields
Use the arrow buttons on each field section to reorder the fields you create. If you wish to delete a field, simply click the ‘garbage can’ button.
Custom Fields within the Affiliate Registration Form
Once you have configured your custom fields for the affiliate registration form and clicked the ‘Save Settings’ button, these fields will become a part of the form. If you have made any of these fields ‘required’, your customer will need to respond to them before submitting their registration. Required fields are marked with a star as shown below.
Example: Three Custom Text Fields
In the example below, the first of the three text fields is required. This means a customer will need to respond to the question before being able to ‘Sign Up’.

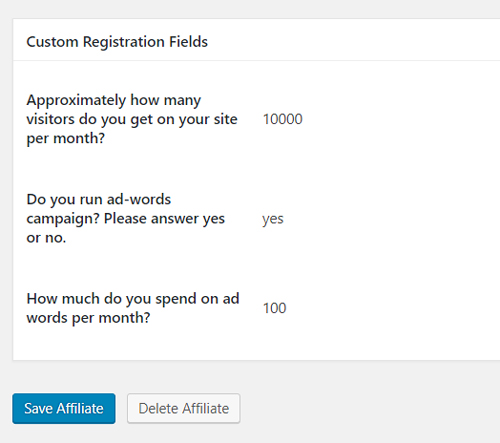
Viewing the Affiliates Registration Details (Including Custom Fields)
Once you have an affiliate, you can view their details in your WP dashboard.
Step 1) Click on the ‘Manage Affiliates‘ menu under the ‘WP Affiliate‘ plugin.
Step 2) Click the ‘Edit‘ button for the affiliate you would like to view.
Step 3) The ‘Custom Registration Fields‘ are located towards the end of the affiliates profile.
Example: Affiliates Custom Fields
Get this Addon
The price of this addon is $29.00
Please contact us to purchase this addon.
Leave a Reply