WP PDF Stamper

WordPress plugin to stamp and securely sell your PDF files

  • PDF Stamper Documentation
  • PDF Stamper Plugin
  • Projects

PDF Stamper – Creating a Download Now Button for eMember Members

If you offer PDF files to your eMember members then this feature may be helpful for you.

The PDF Stamper plugin lets you create a download now button for your eMember members. A logged in eMember user can use that button  to download the PDF file. The plugin will stamp the file with the eMember user’s details (name and email address) at the time of download.

Use the following shortcode to place a PDF download now button for eMember members:

[stamper_download_button_for_emember file_url="example.com/url-to-your-file.pdf" button_text="Download Now"]

Using a Custom Button Image with the Download Now Button

You can use a custom button image for the download now button instead of the text. Use the “button_image” parameter in the shortcode to use your custom button image for the button. Below is an example:

[stamper_download_button_for_emember file_url="example.com/url-to-your-file.pdf" button_image="example.com/custom-image-url"]

Opening the PDF Download in a New Window

Use the “new_window” parameter in the shortcode to open the download in a new window. Example shortcode usage below:

[stamper_download_button_for_emember file_url="example.com/url-to-your-file.pdf" button_text="Download Now" new_window="1"]

What Variables Can be Stamped?

This shortcode can only stamp the following variables.

  • {customer_name} – This will be replaced with the name of the member
  • {first_name} – This will be replaced with the first name of the member
  • {last_name} – This will be replaced with the last name of the member
  • {customer_email} – This will be replaced with the email address of the member
  • {date} – Stamping date
  • {customer_phone} – Member’s phone number (only available if you are using the phone number field in eMember)
  • {customer_address} – Member’s address (only available if you are using the address fields in eMember)

Filed Under: Additional Resources, Integration Tagged With: stamp customer details, WP PDF Stamper

WooCommerce and PDF Stamper Integration

The WP PDF Stamper plugin can be integrated with the WooCommerce plugin so your customers get a stamped copy of the PDF file when it is sold via the WooCommerce plugin.

How the PDF Stamping Process Works with WooCommerce

The following points show the usual flow of events that you can expect from the integration:

  1. A customer want to purchase your WooCommerce product (A PDF file), so he pays for the product.
  2. After the payment, the customer gets a download link to download the PDF file(s).
  3. When the customer click on the download link, the PDF stamper will stamp the file and serve the stamped copy of the PDF file to the customer.

Your customers will always see/receive the stamped copy of the PDF file when they go to download a PDF file that they purchased.

How to Integrate Stamper with WooCommerce

Step 1) Install the PDF stamper plugin

Step 2) Go to the following settings area of the PDF Stamper plugin:

PDF Stamper settings -> Integration Settings -> WooCommerce Integration

Step 3) Check the “Enable WooCommerce Integration” field.

woocommerce integration

Step 4) Save the settings.

Filed Under: Integration Tagged With: 3rd Party Integration, Integration, woocommerce, WP PDF Stamper

WP PDF Stamper and ClickBank Integration

The WP PDF Stamper plugin can be integrated with ClickBank payments. This can be useful when you want to sell your ClickBank eBooks from your WordPress site and want to stamp the PDF eBooks with the customer name and email address before giving it to them.

What can you expect from this integration?

The following points shows the flow of events:

  • You add an eBook product to your Clickbank account.
  • You want to sell this product from your WordPress site so you add a buy button for this product on a page.
  • When the customers click the buy button they will be sent to the clickbank for payment processing.
  • Once the payment is processed Clickbank will redirect this customer to a page on your site. This is called a “Thank You” page (you create this page in WordPress).
  • The PDF stamper plugin will stamp the PDF eBook associated with this product with the customer’s name and email address. Clickbank does not send the customer’s address back to us so we can only use the name and email address for stamping purpose.
  • The PDF stamper plugin will then send an email to this customer will a link to download this stamped PDF eBook.

The Integration Steps

The following steps outlines what you need to do to achieve the above:

Step 1: Create your “Thank You” page in WordPress with the message that you want to give to your customer when they land on this page after the payment (You probably want to thank your customer for making a purchase and tell them that they will receive an email). Place the following shortcode in this page:

[pdf_stamper_clickbank_purchase]

Take note of this “Thank You” page URL so you can use it as the return URL when you create your ClickBank product in step 2.

Step 2: Create your product in Clickbank. Note the product ID of this product (every product in Clickbank has a product ID associated with it)

Step 3: Place the buy button on a sales page. You can get the button code from ClickBank. A typical button code looks like the following:

<form action="http://item.vendor.pay.clickbank.net" method="post">
<input type="submit" value="Buy Now" />
</form>

Step 4: Use notepad or a similar software to open the “clickbank-config.php” file from the “api” directory (you can find this inside the WP PDF Stamper plugin package)

Step 5: Find the following block of text in this “clickbank-config.php” file:

$pdf_stamper_clickbank_items = array(
'1' => 'http://www.example.com/myfiles/product1.pdf',
'2' => 'http://www.example.com/myfiles/product2.pdf',
);

This basically tells the PDF stamper which file to stamp and send for which product. The two entries represent two products. These are just example values… you can add as many product information as you like.

Each product entry has a product ID and the PDF file’s URL. In the above example the product IDs are 1 and 2. You can change these values or add new entries.

Lets say, you have a Clickbank product that has a product ID of 122 and the PDF file for this product is stored in “http://www.your-domain.com/wp-content/uploads/my-ebook.pdf”.  Then the entry for this will look like the following:

'122' => 'http://www.your-domain.com/wp-content/uploads/my-ebook.pdf',

Step 6: Once you are done editing the file with your product information you can upload this file to your server using a FTP program (example, FileZilla). Upload the file to the following directory

wp-content/plugins/wp-pdf-stamper/api

Step 7: Finally, enable the ClickBank integration and specify your link security secret key in the settings menu of the PDF Stamper plugin.

Clickbank Integration Settings

Now do a test transaction and make sure things are working as expected.

Filed Under: Integration Tagged With: 3rd Party Integration, Clickbank Integration, Integration

How to Integrate the PDF Stamper with the WP eStore plugin

The WP PDF Stamper can be easily integrated with the WP eStore plugin. All you have to do is:

  • Create a product for your eBook in WP eStore (use the URL of this PDF fie in the “Digital Product URL” field)
  • Then simply check the “Stamp the PDF File” checkbox for this eBook products that you are configuring (You can find the “Addon Setttings” section shown in the following screenshot in the “Add/Edit Product” menu).

Integrating WP eStore with PDF Stamper

When you make a sale of this eBook product the eStore plugin will communicate with the PDF Stamper plugin and make a copy of the original PDF file then stamp it and send the encrypted download link for the stamped PDF eBook to the customer. So now, you have the original location of your eBook safe as it is hidden and at the same time you have given a stamped copy of the book to your customer which should discourage sharing of the eBook.

Filed Under: Integration Tagged With: Integration, WP PDF Stamper

PayPal Buy Now Button and PDF Stamper Integration Guide

The WP PDF Stamper plugin can be integrated with a plain PayPal Buy Now button so you can send a stamped copy of your eBook that you are selling after the customer makes a purchase.

To use a PayPal Buy Now button with WP PDF Stamper, you need two pieces of information:

  1. The URL of the PDF eBook that you are selling
  2. The URL of the IPN handling script

For this integration you simply have to specify the URL of the eBook that you are selling in the “custom” field of the button and set the “notify_url” value to the IPN (Instant Payment Notification) handling script that comes with the plugin. You can get the value of the IPN handling script URL from the “Integration Settings” menu of this plugin.  This URL should look similar to the following:

http://www.your-domain.com/?pdfs_pp_ipn=process

You need to specify the URL of this IPN handling script in your PayPal button’s code (you specify this URL in the “notify_url” field). For example:

<input name="notify_url" type="hidden" value="http://www.your-domain.com/?pdfs_pp_ipn=process" />

This basically tells PayPal to send the payment confirmation notification to this script so the sale can be processed (stamp the eBook and email it to the buyer).

There is one other piece of information that you need to include in the button which is the URL of the PDF eBook. This is the file that the plugin will make a copy of then stamp it with the customer details and send it via email. You can specify the URL of the PDF eBook in the “custom” field of the PayPal button. For example:

<input name="custom" type="hidden" value="http://www.your-domain.com/wp-content/uploads/my-ebook.pdf" />

Example Button Code

The following is an example button code that shows how the button code looks

  • PayPal Buy Now Button Code Example

Integrating with a PayPal Hosted Button

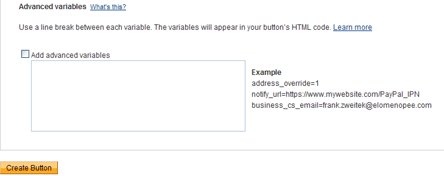
If you are creating a PayPal Hosted Buy Now button from your PayPal account then you simply have to add the necessary information in the advanced variables section of the button. When you create your button on PayPal, from the “Merchant Services” menu, you will be able to specify some advanced variables in “Step 3” of the button creation process.

Option to specify advanced variables

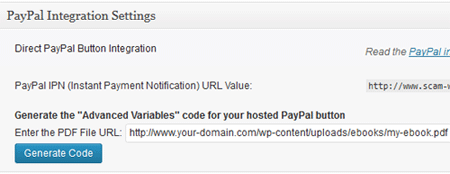
Go to the “Integration Settings” menu of this plugin and use the interface to generate the advanced variables code for your button. The following screenshot shows an example of this settings menu

pdf-stamper-paypal-integration-settings

Enter the URL of the eBook (PDF file) that you are selling then hit the “Generate Code” button and it will generate the code for you. The code will look similar to the following:

notify_url=http://www.your-domain.com/?pdfs_pp_ipn=process
custom=http://www.your-domain-name.com/wp-content/uploads/my-ebook.pdf

Once you have the code ready, check the “add advanced variables” checkbox in your PayPal button creation interface then copy and paste the code.

After generating the PayPal button code, you can copy the button code and paste it on the eBook selling page of your site (your landing page).

When someone makes a purchase using this button, the WP PDF Stamper plugin will stamp a copy of the original eBook with the customer details and send it to him via email.

PayPal IPN Feature

The PayPal IPN feature needs to be enabled in your PayPal account for this to work. Normally, the IPN feature is enabled by default. If you disabled it before then you will need to re-enable that option. This video tutorial shows how to check and enable the IPN feature.

Filed Under: Integration Tagged With: 3rd Party Integration, Integration, WP PDF Stamper

Third (3rd) Party Integration Guide (HTTP GET Method)

This documentation is only for developers. If you are not a developer with good PHP coding skills then you have no need to read this.

It is very hard to troubleshoot another coder’s code. So if you use this documentation and do a custom integration yourself then please note that we cannot offer you any support in terms of what is wrong with your code. You will need to hire us to take a look at your code and correct any mistakes you made.

It is possible to integrate a 3rd party software with the WP PDF Stamper using the HTTP GET method. All you need to do is construct the GET values then add it to the URL of the API and execute it.

GET Values

WP PDF Stamper expects a certain set of variables to be sent to it via HTTP GET method. These variables are:

Mandatory Variables

  • Secret Key: A Secret API key (you can find this value in the settings menu of this plugin)
  • Source File URL: The URL of the source file that needs to be stamped (a copy of the source file will be stamped to keep the source file intact)

Optional Variables

  • Customer Name: The name of the customer
  • Customer Email: The email address of the customer
  • Customer Address: The customer’s address
  • Customer Phone: The customer’s phone number

Return Value

Upon successful processing, WP PDF Stamper will return a plain text message that will have two lines similar to the following:

Success!
http://examle.com/wp-content/plugins/wp-pdf-stamper/stamped-files/test-ebook_4c05fffce4de3.pdf

or

Error!
Secret key is invalid

  1. The first line is an indication of success or error
  2. The second line is the result. In the event of success, it will contain the URL of the stamped file (this is a copy of the source file but stamped with the appropriate information)

Sample Code Example

Construct the GET values

The following is an example of name/value pair that can be used in a HTTP GET Request (each name/value pair is separated by an “&” character):

secret_key=4bc671656782.45045137&source_file=http://www.example.com/wp-content/uploads/my-ebook.pdf&customer_name=jon doe&[email protected]&customer_address=123 Some Street, San Jose, CA - 95130, U.S.A

Creating the full URL

Once you have the GET name/value pair data ready you simply have to join it with the API/POST URL with a “?” character. The API/POST URL for your site can be found on the “Integration help” menu of the plugin. It will look similar to the following:

http://www.example.com/wp-content/plugins/wp-pdf-stamper/api/stamp_api.php

So the full URL should look similar to the following:

http://www.example.com/wp-content/plugins/wp-pdf-stamper/api/stamp_api.php?secret_key=4bc671656782.45045137&source_file=http://www.example.com/wp-content/uploads/my-ebook.pdf&customer_name=jon doe&[email protected]&customer_address=123 Some Street, San Jose, CA - 95130, U.S.A

You should be able to paste the recently created URL in the browser’s address bar and test how it works.

Filed Under: Integration Tagged With: 3rd Party Integration, Integration, WP PDF Stamper

Third (3rd) Party Integration Guide (HTTP POST Method)

This documentation is only for developers. If you are not a developer with good PHP coding skills then you have no need to read this.

It is very hard to troubleshoot another coder’s code. So if you use this documentation and do a custom integration yourself then please note that we cannot offer you any support in terms of what is wrong with your code. You will need to hire us to take a look at your code and correct any mistakes you made.

Overview

Integrating a 3rd party payment system or shopping cart with WP PDF Stamper is possible. The integration process can be accomplished in three steps, namely:

  1. Generate POST data
  2. Send POST data to the POST URL
  3. Process the returned data

POST Values

WP PDF Stamper expects a certain set of variables to be sent to it via HTTP POST. These variables are:

Mandatory Variables

  • Secret Key:  A Secret API key (you can find this value in the settings menu of this plugin)
  • Source File URL: The URL of the source file that needs to be stamped (a copy of the source file will be stamped to keep the source file intact)

Optional Variables

  • Customer Name: The name of the customer
  • Customer Email: The email address of the customer
  • Customer Address: The customer’s address

Return Value

Upon successful processing, WP PDF Stamper will return a plain text message that will have two lines similar to the following:

Success!
http://examle.com/wp-content/plugins/wp-pdf-stamper/stamped-files/test-ebook_4c05fffce4de3.pdf

or

Error!
Secret key is invalid

  1. The first line is an indication of success or error
  2. The second line is the result. In the event of success, it will contain the URL of the stamped file (this is a copy of the source file but stamped with the appropriate information)

Sample PHP Code

The following link has a sample PHP code that shows how easy it is to integrate with WP PDF Stamper.

  • Sample Integration PHP Code

Filed Under: Integration Tagged With: Integration, WP PDF Stamper

Get WP PDF Stamper

Featured WordPress Plugins

WP Express Checkout Plugin
wordpress_estore_icon
wordpress membership plugin icon
WordPress Lightbox Ultimate Plugin
wordpress_affiliate_plugin_icon

Copyright © 2025 | WordPress PDF Stamper