Integrating WishList with the WP eStore plugin is very easy. First you should read the integration scenario post from the following URL to get a visualization of what to expect from this integration though:
You also need to make sure that you have the latest version of WishList Members pluign. Move to the next section when you are ready to do the integration.
What Info will You Need?
You will need 3 pieces of information from WishList members plugin to configure a “Buy Now”, “Subscribe” or “Add to Cart” button that integrates with the WP eStore plugin. The info you need  are:
- The Post URL
- The Secret Word
- Membership Level SKU Number
All these information can be found on the “Integration” tab of the WishList members plugin (Select Generic System integration)
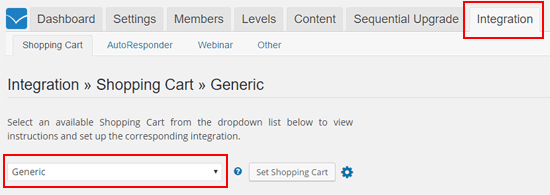
WP eStore Settings for WishList Members Integration
Step 1) Go to the “3rd Party Integration” tab from the settings menu of WP eStore plugin.
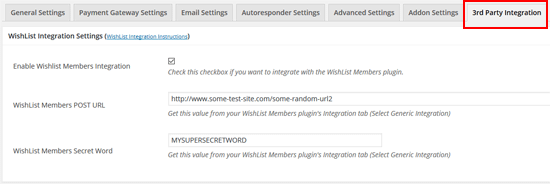
Step 2) Check the “Enable Wishlist Members Integration” checkbox from the “WishList Integration Settings” section.
Step 3) Fill in the “POST URL” and the “Secret Word” in the corresponding fields and save the settings by clicking the “Update” button.
Step 4) When configuring an eStore product, use the Membership Level SKU (this is number that corresponds to a particular membership level of your WishList members plugin) in the “Reference Text” field under the Additional product details section of the product.

Now, when someone pays using that eStore product, the plugin will know which membership level to create for that user. Once the user makes a payment, the plugin will talk to the WishList members plugin to create a membership account and send an email which will have a link to complete the registration.
Handling the Thank You Page URL
The user needs to click on the unique link sent to them via email in order to complete the registration after payment. So you can send the users to a generic “Thank You” page (after payment) where you instruct them to check the email for the special registration link and click on it.
What to Do When You Have Multiple Membership Levels?
Create a new eStore product for each of your membership levels and use the corresponding SKU value of the level in the reference text field of the eStore product.
Note: We provide technical support for our premium plugins via our customer only support forum