Tips and Tricks WP eCommerce

eCommerce Solution for WordPress Blog

  • Home
  • eCommerce Plugins
  • WP eStore Documentation
  • WP Shopping Cart Doc

WP Payment Gateway Bundle – Configuring One or Multiple Payment Gateways

When you first install the WP eStore plugin, you will see that only the PayPal payment gateway is enabled by default. Most users only use the PayPal standard gateway so that option is automatically enabled for you in the settings when you install the plugin.

However, you have the freedom to uncheck/disable PayPal checkout from the settings and enable any other payment gateway that you prefer to use at any time.

There are two types of setups you can go after with the gateway checkout option for your store:

  1. You can process all of your checkouts using ONE payment gateway
  2. You can give your users an option to choose which gateway they want to use for a checkout

1. Using One Gateway For All Chekcout

This setup is the widely used setup. All of your customers will checkout via the payment gateway that you specified (the customers don’t have a choice). For example, when you specify PayPal gateway, all of your customers will be able to checkout via PayPal.

Lets say you have added the Payment Gateway Bundle addon and you want to process checkout via Google Checkout. You would do the following to achieve this:

  • Go to WP eStore Settings -> Payment Gateway Settings and make sure all the payment gateways offered in eStore are unchecked/disabled.
  • Go to payment gateway bundle addon settings -> Gateway Settings menu and check the “Use Google Checkout Payment Gateway” checkbox to enable Google checkout.

Now, when your customers add items to the shopping cart and click the checkout button, they will be able to pay you for the items via Google Checkout.

2. Using Multiple Gateways At the Same Time

You can use this setup to give your customers the choice of choosing the payment method for a checkout from a range of selections. For example, you can enable both PayPal and Google Checkout gateways and the customers will be able to choose which one they want to use and make then payment.

Lets say, you want to use both PayPal and Google Checkout at the same time. You would do the following to achieve this setup:

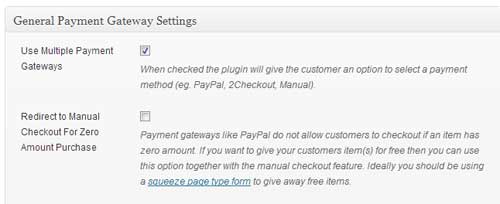
  • Go to WP eStore Settings -> Payment Gateway Settings and make sure to enable/check the “Use Multiple Payment Gateways” option.
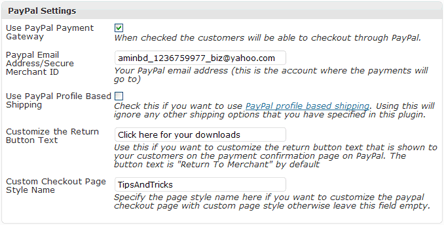
  • Go to the “PayPal” settings section and make sure the “Use PayPal Payment Gateway” field is checked
  • Make sure to enter your correct PayPal merchant account details in there too
  • Go to payment gateway bundle addon settings -> Gateway Settings menu and check the “Use Google Checkout Payment Gateway” checkbox
  • Make sure to enter your correct Google Checkout merchant account details in there too

Now, when your customers add items to the shopping cart, they will be able to select between PayPal or Google Checkout to make the payment for the items.

You can enable as many gateways as you wish (you will of-course need to have a merchant account with the gateway you select).

The following screenshot gives you an idea of how your customers can select a payment method when they are about to do a checkout.
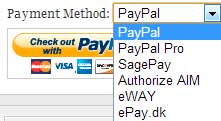
Multiple payment gateways
WP Payment Gateway Bundle – CCBILL Setup

After you install the WP Payment Gateway Bundle plugin you will need to configure some CCBILL specific settings in the plugin which you will need to obtain from your CCBILL merchant account.

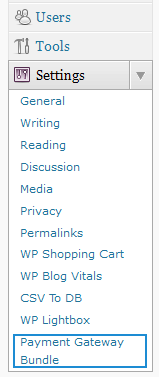
You can find the CCBILL specific settings under the Gateway Settings tab when you go to the payment gateway bundle plugin’s settings menu. The following screenshot shows how you can access the settings page of this plugin:

Payment Gateway Bundle Plugin Settings

Payment Gateway Bundle Plugin Settings

In order to configure the CCBILL portion of the payment gateway bundle you will need to obtain the required details from your CCBILL account by following the steps outlined below:

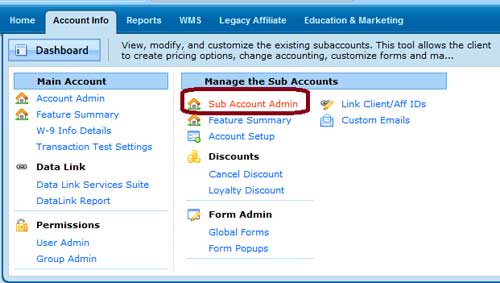
Step 1: Login to your CCBILL account and switch to the Account Info tab. Now click on the Sub Account Admin link under Manage the Sub Accounts. Choose the sub account that you want to use for this integration (If you don’t have a sub account yet create one first).

CCBILL Setup

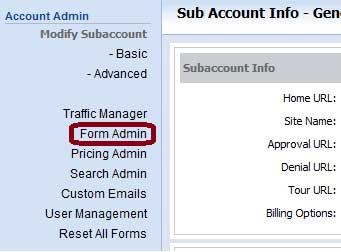
Step 2: Click on the Form Admin option

CCBILL Setup

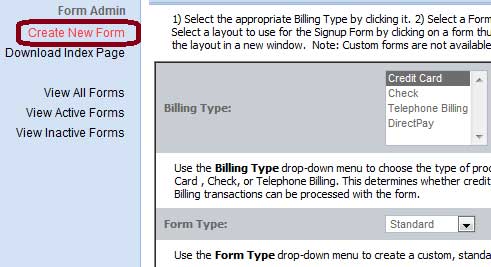
Step 3: You will be able to manage all the forms (under this sub account) from the Form Admin menu. Now create a new form specifically for this integration (we will be using a standard form with credit card options for the time being).

CCBILL Setup

Step 4: Once you set up the form you need to enable Dynamic Pricing option on this form (Contact CCBILL if you cannot enable it manually).

Step 5: Go back to the Sub Account Admin panel. There are some details that you can update here.

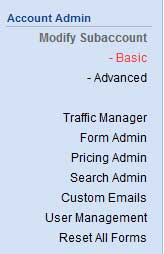
a) First, click on the Basic option.

CCBILL Setup

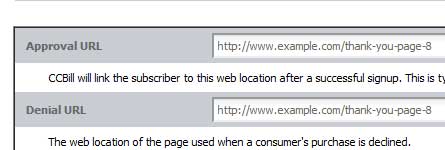
Specify a page URL for transaction approval (A page on your site where the customer will be redirected to after a successful transaction) and denial (A page on your site where the customer will be redirected to if the transaction is denied)

CCBILL Setup

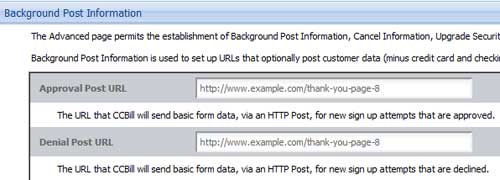
b) Now click on the Advanced option. Specify a URL in the Approval Post URL and Denial Post URL fields (this is where CCBILL will send transaction related data. You can just specify your transaction approval page URL here).

CCBILL Setup

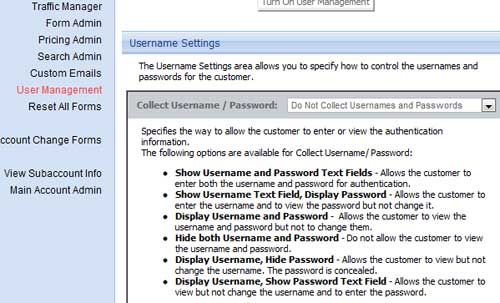
c) Finally, click on the User Management option. There is a select box called Collect Username/Password. Set this value to Do not Collect Usernames and Passwords.

CCBILL Setup

Make sure to reset all the forms after you make any changes.

Step 6: Contact CCBILL to generate a Salt value for you. It will be used to create a hash (encoded data) which can be verified by CCBILL.

Step 7: Now from your eStore plugin menu in your WordPress administration panel, go to CCBILL Settings (under Payment Gateway Bundle->Gateway Settings) and check Use CCBILL Payment Gateway option.

Step 8: Enter your Client Account Number

Step 9: Enter your Client Sub Account Number

Step 10: Enter the Form Name

Step 11: Enter the Salt Value

Step 12: Hit the Update button at the bottom to save the settings and now you are ready to use CCBILL with the WP Payment Gateway Bundle Plugin

CCBILL Subscription Setup

If you want to use the subscription feature of CCBILL you need to configure a webhook URL where CCBILL will send notification of events happened in your account.

To create a new webhook switch to Sub Account Admin (under Account Info)  from your CCBILL account Dashboard.

ccbill setup

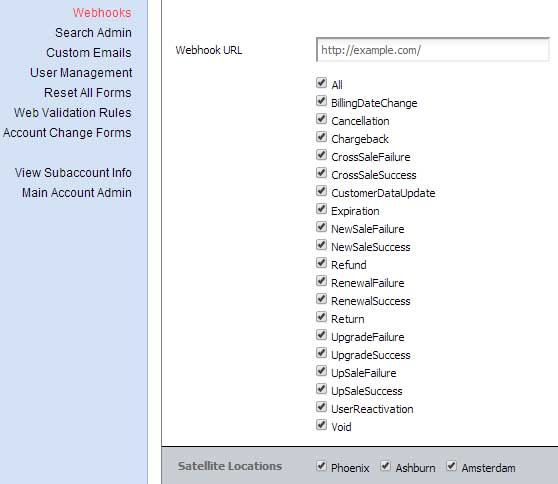
Click Webhooks and set the Webhook URL to the site where you are using the payment gateway bundle addon. Click All so CCBILL sends notification for all the events.

ccbill-webhook

Select a location (Satellite Locations) closer to your server. If you are not sure simply keep all of them selected (CCBILL will automatically choose the most effective server from your selections).

Once you are done click the Update button which will finish creating the webhook.

CCBILL Payment Button Configuration

Now that you have the setup done you can either place a buy now button or a subscription button for a WP eStore product using one of the following shortcodes:

Shortcode for Buy Now button:

[wp_eStore_buy_now_for_specific_gateway id="1" gateway="ccbill" button_text="Buy It Now"]

Here, id = The Unique ID of the eStore product, gateway = the payment gateway you are using to accept payment with this button, button_text = The text you want to display for this button [this field is optional. You don’t need to include this parameter if you want to use the default button name].

Shortcode for Subscription button:

[wp_pg_eStore_subscription_button id="1" gateway="ccbill_subsc"]

Here, id = The Unique ID of the eStore subscription product, gateway = the payment gateway you are using to accept payment with this button.

Important Notes

CCBILL doesn’t offer the same level of flexibility that PayPal does when it comes to creating a subscription/recurring payment. CCBILL has some restrictions for recurring payment which we have to abide by in our plugin.

  • The minimum amount (both trial & recurring) that can be set is $2.95 (upto $100.00 maximum)
  • If you specify a trial period for a product it has to be between 2 to 365 days.
  • The recurring period can only be set on a monthly basis. For example: 1 month, 2 months, 3 months or 30 days, 60 days, 90 days (you cannot set a value like 15 days, 25 days or 45 days). If you want to set a value over 3 months you may need to get permission from CCBILL.
  • A Once off payment doesn’t apply on CCBILL subscription. So entering -1 in the Recurring Billing Count field will not work.
  • Reattempt on failure option is not applicable for CCBILL subscription.
  • Free trial is not available for CCBILL subscription. So specifying 0 in the Trial Billing Amount field won’t work.
  • Recurring Billing Count field represents the total number of occurrences of the subscription (including trial, if any)

Using CCBILL in Sandbox Mode

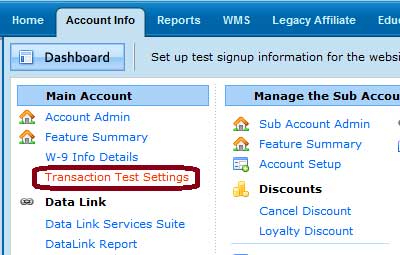
In addition to checking the Enable Sandbox/Testing Mode option in the Settings, you will actually have to set up a test user on your CCBILL account to run a transaction in sandbox mode.

You can set up a test user from the Transaction Test Settings option (under Main Account).

CCBILL Test User Setup


WP Payment Gateway Bundle – Freshbooks Setup

After you install the WP Payment Gateway Bundle plugin you will need to configure some FreshBook specific settings in the plugin which you will need to obtain from your FreshBooks account.

You can find the FreshBooks specific settings under the “Gateway Settings” tab when you go to the payment gateway bundle plugin’s settings menu. The following screenshot shows how you can access the settings page of this plugin:

Payment Gateway Bundle Plugin Settings

Payment Gateway Bundle Plugin Settings

In order to configure the FreshBooks portion of the payment gateway bundle you will need to obtain the required details from your FreshBooks account by following the steps outlined below:

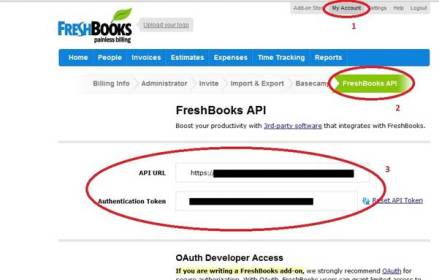
Step 1: Log in to your FreshBooks account and click on the My Account link and then click on the FreshBooks API menu item (see 1 and 2 in figure below).

Step 2: Copy the values for the API URL and Authentication Token fields as shown by “3” in the figure below.

Getting Freshbooks API Details

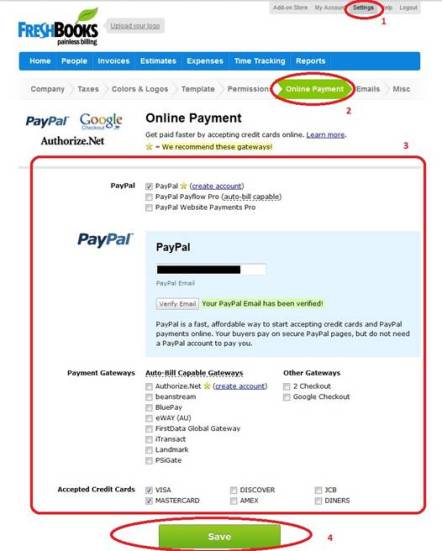
Step 3: Now ensure that you have configured your FreshBooks account so it can accept online payments by going to Settings and then clicking Online Payment as shown in the figure below:

Freshbooks Online Payment Setup

You can specify various payment options as shown in “3” in the figure above and once you have selected options you want, click on the “Save” button to save you your changes.

Step 4: Now from your eStore plugin menu in your WordPress administration panel, go to Freshbooks Settings (under Payment Gateway Bundle->Gateway Settings) and check “Use Freshbooks Payment Gateway” option.

Step 5: Enter your API URL.

Step 6: Enter your Authentication token.

Step 7: Enter a selector Label for Freshbooks or you can leave this as default. (This text will be displayed in the select box if a customer chooses Freshbooks for checkout).

Step 8: Hit the “Update” button at the bottom to save the settings and now you are ready to use Freshbooks with the WP Payment Gateway Bundle Plugin.

WP Payment Gateway Bundle – eWAY Gateway Setup

After you install the WP Payment Gateway Bundle plugin you will need to configure some eWAY specific settings in the plugin and in your eWAY merchant profile account. You can find the eWAY specific settings under the “Gateway Settings” tab when you go to the payment gateway bundle plugin’s settings menu. The following screenshot shows how you can access the settings page of this plugin:

Payment Gateway Bundle Plugin Settings

Payment Gateway Bundle Plugin Settings

In order to complete the eWAY profile settings simply follow the steps outlined below so after a payment, eWAY can send payment notification to the plugin for post payment processing.

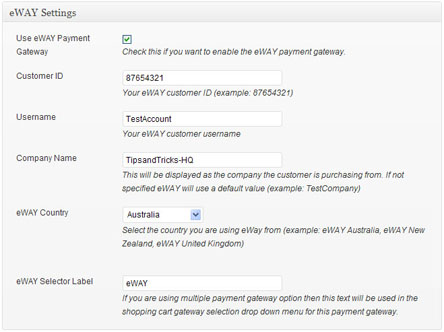
eWAY Settings Menu

Step 1: Check the “Use eWAY Payment Gateway” option from the eWAY Settings section.

Step 2: Enter your eWAY Customer ID

Step 3: Enter your eWAY username

Step 4: Enter a Company Name (optional)

Step 5: Select the country you are using eWAY from.

Step 6: Enter a selector Label for eWAY (This text will be displayed in the select box if a customer chooses eWAY for checkout)

Step 7: Hit the “Update” button at the bottom to save the settings and now you are ready to use eWAY with the WP Payment Gateway Bundle Plugin.

2Checkout Payment Gateway Setup

2Chekcout payment gateway doesn’t seem to have the INS (instant payment notification) turned on by default. So you need to specify in your 2Checkout account that you want to send payment notification to the WP eStore plugin after a checkout. This will allow the plugin to do the post payment operation after a sale takes place via the 2Checkout gateway.

2Checkout INS (Instant Notification System) Setup

Step 1) Log into your 2Checkout vendor/merchant account.

Step 2) Click on the “Webhooks” menu link (see the following screenshot)

2checkout-ins-webhooks-menu-example

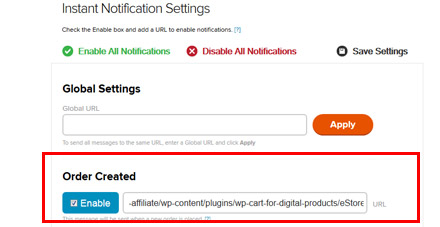
Step 3) Enable the “Order Crated” notification option (see the following screenshot)

2checkout-vendor-order-creation-ins

Step 4) Enter the following value in the “URL” field:

http://www.example.com/?estore_2co_ipn=process

Replace “http://www.example.com” with your own site URL.

Step 5) Save this settings change by clicking the “Save Settings” link at the bottom of the page.

Setting up the 2Checkout Secret Word

You can setup your secret word from your 2Checkout merchant account:

  • Log in to your 2Checkout account.
  • Click the ACCOUNT tab.
  • Click on SITE MANAGEMENT sub tab.
  • Scroll down to find the Secret Word field and change it.
  • Save the changes

What to expect after this setup

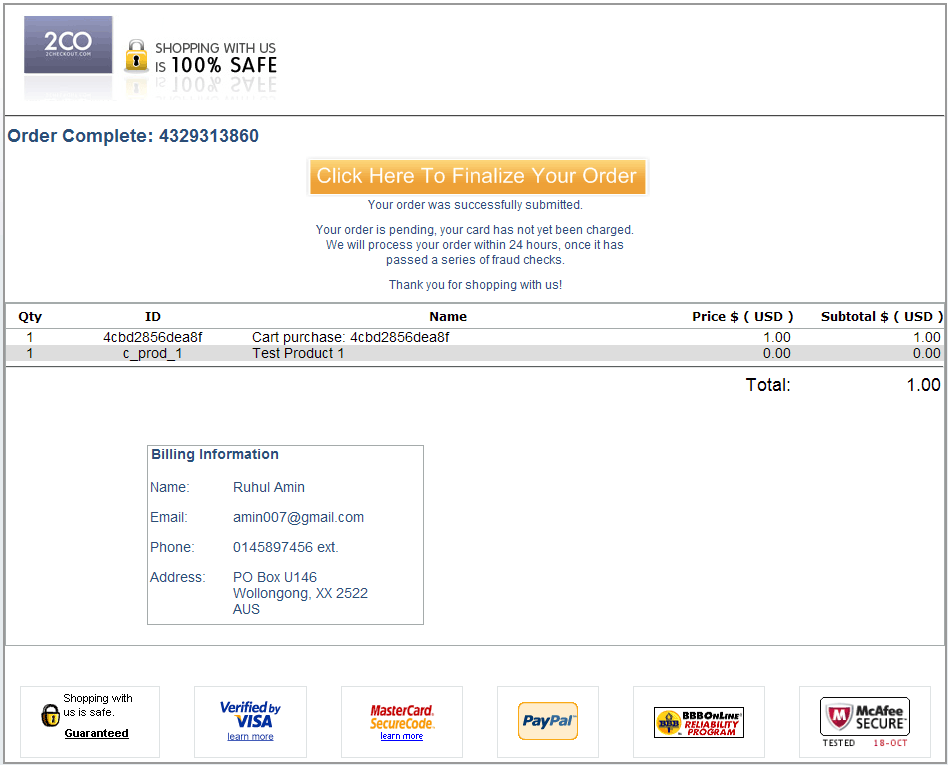
Once you have completed the above setup your customers will see a page similar to the following screenshot after they enter their credit card details when making a payment.

2Checkout Post Payment Confirmation Page

When they click on the “Click Here To Finalize Your Order” button the payment will be finalized and 2Checkout will send the payment notification to the plugin so WP eStore can continue with the post payment processing (for example, send the product download link(s) via email to the customer).

Limitations

2Checkout doesn’t have a PayPal PDT like feature where the transaction details are available on the “Thank You” page when a customer lands on that page after the payment. This means eStore cannot display the product download links on the “Thank You” page (eStore only gives the download links after it verifies the payment details).

WP eStore Payment Gateways

There are 4 payment gateways available in the core plugin that you can use to accept payment from your customers when using the WP eStore plugin.

  • PayPal (Your customers can pay using a Credit Card or their PayPal account)
  • Authorize.net (Your customers can pay using a Credit Card or Bank account)
  • 2Checkout (Your customers can pay using a Credit Card or PayPal)
  • Manual/Offline (Customers can pay using cash, cheque or bank transfer)

There are a lot of free and premium payment gateways for WP eStore that you can add via addon/extension plugins. Check the supported payment gateways page for a full list of supported gateways.

You can make all of them available so your customers can decide which one they want to use to pay you or you can selectively make one or two of them available. I personally use only PayPal to process all my payments for my products (www.tipsandtricks-hq.com/checkout).

WP eStore Payment Gateway Settings

WP eStore PayPal Payment Gateway Settings

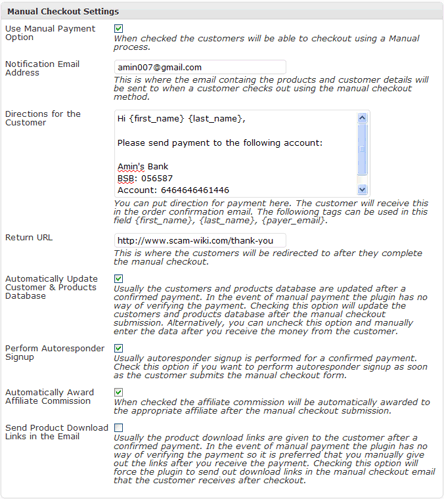
WP eStore Manual Payment Settings

WP eStore 2Checkout Payment Gateway Settings

WP eStore Authorize.net Payment Gateway Settings

If you want to use multiple payment gateways then select the “Use Multiple Payment Gateways” checkbox and then select which ones you want to use (eg. PayPal, Manual, 2Checkout).
If you want to use only one of them then leave the “Use Multiple Payment Gateways” checkbox unchecked and simply select the payment gateway you want to use.

Using 2Checkout Gateway in eStore

  • 2Checkout Payment Gateway Setup

Using Authorize.net Gateway in eStore

In order to use the Authorize.net gateway in eStore you need to go to the Payment gateway settings and then the “Authorize.net Settings” section and fill in your merchant details.

If you want to use more than one gateway at the same time (example, PayPal and Authorize.net) then check the “Use Multiple Payment Gateways” field under the “General Payment Gateway” section of this payment gateway settings page.

Notes

Please note that PayPal is the most advanced payment gateway in the world. When you are using some of the other payment gateways (example: 2checkout, authorize.net), some eStore features may not be available simply because these gateways don’t offer those advanced controls and features.

« Previous Page

Your Shopping Cart

Shopping Cart Empty
Shopping Cart is Empty
Visit The Shop

Search

Featured Documents

Stylish Product Display Options for WP eStore WP eStore Quick Setup and Usage Video Tutorial WP eStore Shortcodes and Functions Reference WordPress eStore Plugin Features WordPress eStore Plugin Demo What Our Customers Have to Say About Our Products WordPress eStore WishList (Feature Suggestions) WordPress eStore Frequently Asked Questions (FAQ) How to Show Add to Cart buttons

Featured Plugins

wordpress_estore_icon
wordpress membership plugin icon
WP Express Checkout Plugin
Lightbox Ultimate Plugin
wordpress_affiliate_plugin_icon

Copyright © 2023 | eCommerce Plugins