Tips and Tricks WP eCommerce

eCommerce Solution for WordPress Blog

  • Home
  • eCommerce Plugins
  • WP eStore Documentation
  • WP Shopping Cart Doc

WP eStore Stylish Squeeze Form Addon

The eStore Stylish Squeeze Form Addon allows you to create a nice looking squeeze form using a shortcode.

A squeeze form will help you build an email list by giving a digital download away for free.

Using the Stylish Squeeze Form Addon

When this addon is active, you you can use a shortcode like the following to create a stylish squeeze form anywhere on your WordPress site:

[wp_eStore_ssf id=2]

2 is the eStore product ID in the above shortcode.

Here is a screenshot of how a stylish squeeze form looks like:
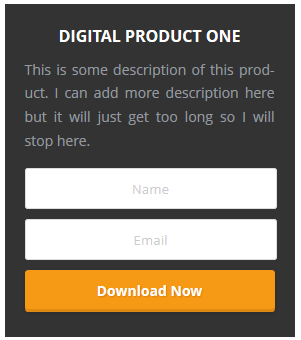
stylish squeeze form

Here is an example of a shortcode where you can customize the “Download” button text via the shortcode:

[wp_eStore_ssf id=1 button_text="Download Now"]

Stylish Squeeze Form Template 2

The 2nd template shows the thumbnail image of the product. The following screenshot shows how it looks:
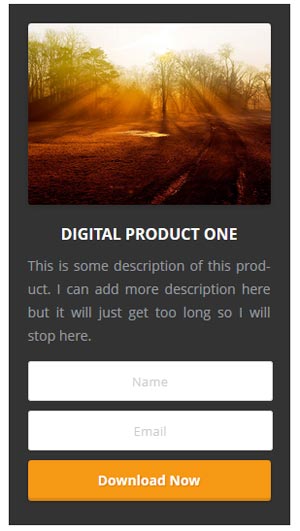
stylish squeeze form template 2

Here is an example of a shortcode that uses template 2:

[wp_eStore_ssf id=1 template=2]

Stylish Squeeze Form Template 3

Here is an example of how the 3rd template looks like:

stylish-squeeze-form-template3-example

Use the following shortcode to use template 3:

[wp_eStore_ssf id=1 template=3]

Stylish Squeeze Form Template 4

Here is an exmaple of how the 4th template looks like

stylish-squeeze-form-template-4-example

Use the following shortcode to use template 4:

[wp_eStore_ssf id=1 template=4]

AddOn Price

The eStore Subscription Coupons Addon is FREE for all customers who purchased WP eStore plugin from us.

Download the Addon (v1.4)

You can download this addon from the addon download area of our customer only support forum.

Installing the Stylish Squeeze Form Addon

You can install this addon the same way you install any WordPress plugin:

  • Go to the Add New plugins screen in your WordPress admin area
  • Click the upload tab
  • Browse for the addon file (estore-stylish-squeeze-form.zip)
  • Click Install Now and then activate the plugin

General Note

Please note that some of these free eStore addons are developed by our users in the community. So they do not have any advanced customization option. The description above explains exactly what this addon does.
WP eStore Subscription Coupon/Discount Addon

The eStore Subscription Coupon addon allows your customers to apply a coupon/discount on your PayPal subscription products.

Using the eStore Subscription Coupons Addon

When this addon is active, your customers will get a chance to enter a discount coupon when they purchase a subscription.

Simply create a subscription product (if you haven’t done so already) and place the subscription button on a post/page (your landing page). When a user clicks the “Subscribe” button they will be sent to a page where they can choose to enter a coupon to get a discount on the recurring price.

If they do not wish to apply any coupon they will be charged the normal recurring price.

AddOn Price

The eStore Subscription Coupons Addon is FREE for all customers who purchased WP eStore plugin from us.

Download the Addon (v1.6)

You can download this addon from the addon download area of our customer only support forum.

Installing the Subscription Coupon Discount Addon

You can install this addon the same way you install any WordPress plugin:

  • Go to the Add New plugins screen in your WordPress admin area
  • Click the upload tab
  • Browse for the addon file (eStore-subscription-discount.zip)
  • Click Install Now and then activate the plugin

General Note

Please note that some of these free eStore addons are developed by our users in the community. So they do not have any advanced customization option. The description above explains exactly what this addon does.
WP eStore Dynamic Coupons/Discounts Addon

The eStore Dynamic Coupons addon allows you to dynamically generate one time usage coupons for your customers after the purchase. This addon will generate unique coupon codes on a per transaction basis. You can specify the discount amount for these coupons.

AddOn Price

The eStore Dynamic Coupons Addon is FREE for all customers who purchased WP eStore plugin from us.

Download the Addon (v1.7)

You can download this addon from the addon download area of our customer only support forum.

Installing the Addon

You can install this addon the same way you install any WordPress plugin:

  • Go to the “Add New” plugins screen in your WordPress admin area
  • Click the “upload” tab
  • Browse for the addon file (eStore-dynamic-coupons.zip)
  • Click “Install Now” and then activate the plugin

Using the eStore Dynamic Coupons Addon

Use the following documentation to learn how to use this addon.

  • eStore dynamic coupons addon documentation
  • Configuring Automatic Discounts for Members

General Note

Please note that some of these free eStore addons are developed by our users in the community. So they do not have any advanced customization option. The description above explains exactly what this addon does.

Selling Audio/MP3/Music Files Using WP eStore Plugin

There are a few different ways you can configure the plugin and sell your music/mp3/audio files using the WP eStore plugin. Go through all these options and see which one works best for you.

Make sure to watch the basic setup video tutorial to familiarize yourself with WP eStore plugin before following any of the methods below.

1. Option One

Step i) Create a WordPress post or page (this will be your landing page for the audio/mp3 file you want to sell).

Step ii) Add the full details of the audio file along with any necessary images and videos for it to the page you just created. You have complete freedom in designing this page using the standard WordPress page editor.

Step iii) Use any WordPress audio player plugin to embed a preview for the audio file that you are selling on this page. Here are two potential audio players that you can use:

  • Compact WordPress Audio Player
  • WP Audio Player

Step iv) Create a WP eStore product for this audio file (lets say the eStore product ID is 1)

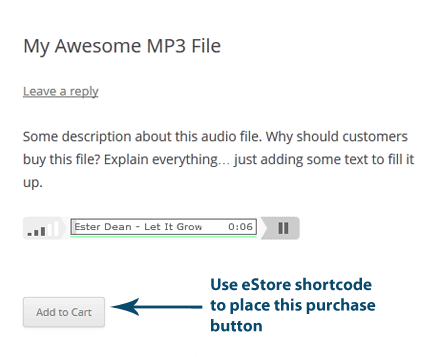
Step v) Use a WP eStore shortcode to place a purchase button on this page (this button lets your customer purchase the audio file).

Here is an example screenshot of how your WordPress page will look like when you use the above option:

sell-mp3-file-with-estore-option-1

2. Option Two

In this option we will take advantage of WP eStore’s fancy product display templates.

Step i) Create a WP eStore product for your audio file as usual.

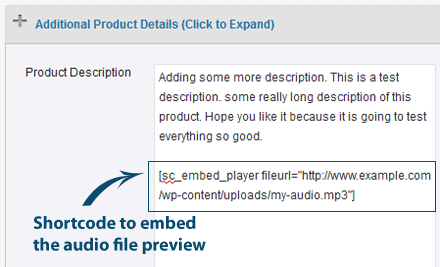
Step ii) Use any audio player plugin to add an audio file preview in the “Product Description” field of the product.

sell-mp3-file-with-estore-option-2-step-1

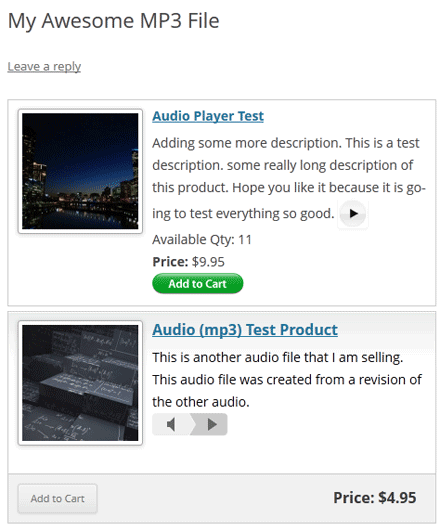
Step iii) Use an eStore fancy display shortcode to show the product so your customers can purchase the item. WP eStore has a few fancy display templates that you can use.

Here is an example screenshot of how your WordPress page will look like when you use the above option:

sell-mp3-file-with-estore-option-2-step-2

3. Option Three

In this option we will take advantage of WP eStore’s fancy product display templates that were designed specifically for selling audio/mp3 files.

Step i) Install the compact audio player plugin (if you don’t have it already)

Step ii) Create an eStore product for your audio file.

Step iii) Use eStore’s fancy display template 12 to place the product on a WordPress page.

Here is an example screenshot of how your audio product will look like when you use the above option:

fancy 12 product display template

WP eStore Advanced Variations UI Addon

The standard variation control feature of eStore is very lightweight and works for most users. However, we have seen a few users making mistakes while configuring variations so we have created this addon which has a user friendly interface for creating product variations.

The eStore Advanced Variations UI addon simply replaces the standard “Variations” configuration section in the “Add/Edit” products page with a user-friendly configuration form. You can also manage the inventory of the variations using this addon.

AddOn Price

The eStore Advanced Variations UI Addon is FREE for all customers who purchased WP eStore plugin from us.

Download the Addon

You can download this addon from the addon download area of our customer only support forum.

Installing the Addon

You can install this addon the same way you install any WordPress plugin:

  • Go to the Add New plugins screen in your WordPress admin area
  • Click the upload tab
  • Browse for the plugin file (eStore-advanced-variations-ui.zip)
  • Click Install Now and then activate the plugin

Using the eStore Advanced Variations UI Addon

Use the following documentation to learn how to use this addon.

WP eStore Variations UI addon documentation

Also watch the following video tutorial:

General Note

Please note that some of these free eStore addons are developed by our users in the community. So they do not have any advanced customization option. The description above explains exactly what this addon does.
Getting Started with WP Payment Gateway Bundle Addon

If you have just installed the Payment Gateway Bundle Addon for the first time, this guide will help you set up your site so it’s ready to accept payment via one of your preferred payment gateways.

The Payment Gateway Bundle is an Addon for the WP eStore plugin. So before you move on to the Payment Gateway Bundle setup you need to make sure that you are familiar with WP eStore plugin configuration. Here is what you need to do:

Step 1

Watch the eStore’s basic setup video tutorials and complete the required setup of the plugin so you can start selling (Ignore this step if you have done this already).

Step 2

Once you have configured WP eStore plugin, created a product, placed an “Add to Cart” button on your site, you can go to the next step.

Step 3

Install the WP Payment Gateway Bundle Addon (if you haven’t installed it already).

  • Go to the Add New plugins screen in your WordPress admin area
  • Click the upload tab
  • Browse for the plugin file (wp-payment-gateway.zip)
  • Click Install Now and then activate the plugin

Step 4

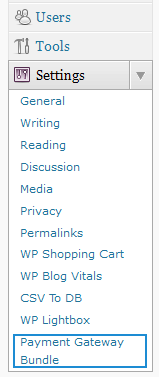
Go to Settings > Payment Gateway Bundle interface from your WordPress admin dashboard.

Step 5

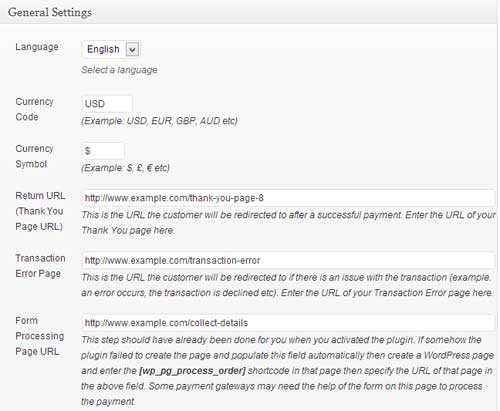
Configure and save the general settings of the Payment Gateway Bundle extension. The general settings page has two sections:

a) General Settings

This section allows you to set your language, currency code, currency symbol etc.

Also, there are some pages that automatically gets created for you when you first install the addon (simply check the settings and verify that a URL value exists in the field in question):

  • Return URL: The Page where your users will be redirected to after a successful transaction. You can also use this page to deliver digital downloads to your customers after the transaction.
  • Transaction Error Page: The page where your users will be redirected to if there is an issue with the transaction.
  • Form Processing Page URL: The page where your users fill up the details before they make the payment.

Please make sure that none of the fields are empty. If a page didn’t get created for some reason, you should read the help text for the field and create the page manually.

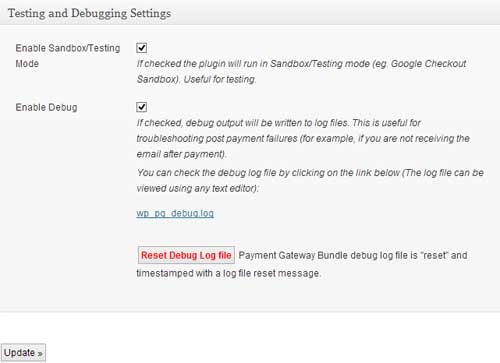
b) Testing and Debugging Settings

This section allows you to run a transaction in test mode (if you need).

There is also a debug option. You can enable this to track every step of a user’s transaction (This can help you quickly identify a transaction failure and why it happened). You should keep this option enabled if you are having an issue with getting the plugin to work correctly.

Hit the Update button to save the changes.

Step 6

Switch to the Gateway Settings tab at the top of the page.

This is where you can fill up the API details specific to the payment gateway you want to use.

We have documentation that explains how to setup each payment gateway supported by the Payment Gateway Bundle addon. Please make sure to check the gateway specific documentation (marked blue in the screenshot below) before you enter any information.

Click the Update button to save the settings.

Step 7

Read this documentation to learn how to setup the WP eStore plugin to use ONE payment gateway or show a selection of multiple gateways (the ones that you have enabled).

If you show multiple gateways, your customers will be able to choose the checkout option they want to use.

WP eStore Browse Products by Category Addon

The eStore browse products by category addon can be useful for users who have a lot of products and categories and want their visitors to be able to browse their products by categories.

AddOn Price

The eStore Browse Products by Category Addon is FREE for all customers who purchased WP eStore plugin from us.

Download the Addon

You can download this addon from the addon download area of our customer only support forum.

Installing the Addon

You can install this addon the same way you install any WordPress plugin:

  • Go to the Add New plugins screen in your WordPress admin area
  • Click the upload tab
  • Browse for the plugin file (eStore-browse-products-by-category.zip)
  • Click Install Now and then activate the plugin

Using the eStore Browse Products by Category Addon

After you install this addon using the above instruction do the following:

Step 1) Install the Extra eStore Shortocodes addon (if you haven’t done so already). The extra eStore shortcodes addon has a few nice functions that this addon utilizes.

Step 2) Create a WordPress page where you want to list your products by category.

Step 3) Enter the following shortcode in this page:

[wp_eStore_browse_by_category]

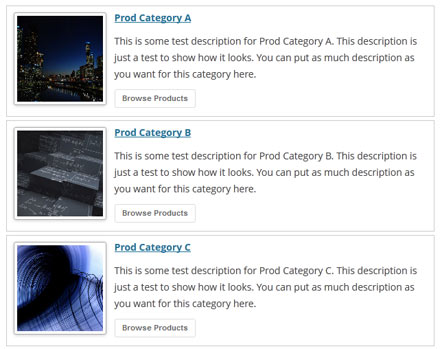
Now your visitors can go to this page and browse your products by categories and add products to the shopping cart. The following screenshot shows an example of how the categories will be listed:

Fancy Display Template for the Product Listing

By default, the products are listed using the fancy 1 display template (when someone clicks on “Browse Products” link of a category). If you want to use a different template, then you can use the “product_listing_style” parameter in the shortcode to specify the template number.

Example shortcode usage below:

[wp_eStore_browse_by_category product_listing_style="14"]

It will use fancy 14 display template to show the product listing when someone clicks on “Browse Products” link of a category.

General Note

Please note that some of these free eStore addons are developed by our users in the community. So they do not have any advanced customization option. The description above explains exactly what this addon does.
WP eStore Review

Here are a few WP eStore plugin reviews that some users have wrote on their sites and requested us to show it here.

  • WP eStore Review on Lunarlog
  • WP eStore Review on WPCheatSheets
  • WP eStore Review on PluginsWP.net
  • WP eStore Review on WPSolutionsHQ
  • WP eStore Review on v7n forum
  • WP eStore Review on CreativeDesignStudios
  • WP eStore Review on WPeCommerce
  • WP eStore Review on resellrightsonline
  • WP eStore Review on merlinsemporium
  • WP eStore Review on CharityCason

Note on Reviews: Some reviews are written by our competitors and some are written by affiliates. Reviews can be biased against us if it was written by our competitor or an affiliate of our competitor. It can be biased towards us if the user who wrote the review happens to be our affiliate. So please apply your own judgement when reading a review.

How to Create PayPal Donation Button

WordPress eStore allows you to create Donate button functionality so you can accept donation for a cause. The donation type buttons takes the user directly to the PayPal payment page for payment when clicked.

Creating a PayPal Donate Button

Step 1) Create an eStore product the same way you configure any eStore product. You can watch our video tutorials if you don’t know how to create a product in eStore.

Set the product price to 0.00 (zero) if you want to allow your users to be able to specify the donation amount when they make the payment.

Alternatively, set the product price value to a fixed amount (example: 25.00) to accept donation for that amount only.

Step 2) Create a WordPress post or page where you want to place the “Donate” button. You can explain why people should donate to your on this page.

Step 3) Use the following shortcode where you want eStore to put the donate button on the page (you created this in step 2):

[wp_eStore_donate id=1]

1 is the product id of the product you created in step 1.

Here is a live example of a PayPal donate button created with WP eStore. Click on it to see how it works:

You can use the PayPal donation button shortcode anywhere on your site to place a donate button. For example, if you want to place a donate button on your sidebar then add a “Text Widget” to the sidebar and use the above mentioned shortocde.

When the users go to the PayPal payment page, they will be able to enter a donation amount and pay. They can also make that a recurring donation payment (if they want to). See example below:

paypal-donation-payment-example

Customizing the “Donate” Button

Option 1) Using a Custom Button Image

You can use a custom image for your donate button to make it look pretty. The following documentation explains how to use a custom button image for any eStore product.

  • How to use a custom button image for a product

Option 2) Customizing the Text of the Button

If you want to use a custom text for the button (instead of using a custom button image), you can do that too. You can add a parameter called “button_text” to specify the text you want to use for the donate button.

Here is an example usage:

[wp_eStore_donate id=1 button_text="Donate Money via PayPal"]

The above shortcode will create a donate button with the text Donate Money via PayPal for product 1.

WP eStore Tweet For Download Addon

The Tweet For Download plugin allows website owners to offer a free downloadable eStore product in exchange for a tweet.

The flow of events works like this:

  • A visitor arrives at the website and notices that there is a free download available.
  • When the visitor clicks on the button to download the file, they will be asked to tweet a predefined message. They will also be asked to “follow” the website owner’s twitter account.
  • If the visitor agrees and proceeds with the tweet, the plugin will automatically connect to twitter and send the tweet.
  • When the tweet has been sent the plugin will automatically redirect the user back to a page where they will receive their free download.

Using the eStore Tweet for Download Addon

Please see the following document for how to use the eStore Tweet for Download Addon:

  • eStore Tweet for Download Addon Usage

AddOn Price

The eStore Tweet to download Addon is FREE for all customers who purchased WP eStore plugin from us.

Download the eStore Tweet For Download Addon (v1.3)

You can download this addon from the addon download area of our customer only support forum

  • Addon download area

General Note

Please note that some of these free eStore addons are developed by our users in the community. So they do not have any advanced customization option. The description above explains exactly what this addon does.
« Previous Page
Next Page »

Your Shopping Cart

Shopping Cart Empty
Shopping Cart is Empty
Visit The Shop

Search

Featured Documents

Stylish Product Display Options for WP eStore WP eStore Quick Setup and Usage Video Tutorial WP eStore Shortcodes and Functions Reference WordPress eStore Plugin Features WordPress eStore Plugin Demo What Our Customers Have to Say About Our Products WordPress eStore WishList (Feature Suggestions) WordPress eStore Frequently Asked Questions (FAQ) How to Show Add to Cart buttons

Featured Plugins

WP Express Checkout Plugin
wordpress_estore_icon
wordpress membership plugin icon
wordpress_affiliate_plugin_icon

Copyright © 2025 | eCommerce Plugins