Tips and Tricks WP eCommerce

eCommerce Solution for WordPress Blog

  • Home
  • eCommerce Plugins
  • WP eStore Documentation
  • WP Shopping Cart Doc

Create a Grid Display for Your Products Using the WP eStore Plugin

You can show your products in nice grid display using the WP eStore plugin. First, make sure that you have the following installed:

  1. WP eStore
  2. Extra eStore Shortcodes Addon

Fancy Display Templates that Support Grid Display

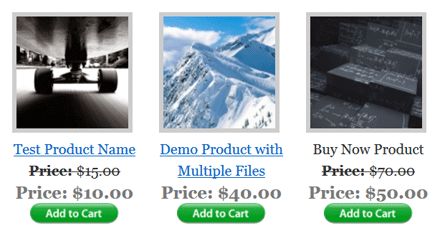
You will need to pick which fancy template you want to use for your grid display.

The following fancy display templates can be used to make a grid layout

  • Fancy 3
  • Fancy 5
  • Fancy 6
  • Fancy 11
  • Fancy 13
  • Fancy 14
  • Fancy 17

You can find an example of all the Fancy display templates here.

Steps for Making a Grid Display

Step 1: Install the WP eStore plugin and Extra eStore Shortcodes Addon (if you haven’t done it already).

Step 2: Choose which display template you want to use. Lets say you want to use fancy display template 3.

Step 3: Choose which category display option you want to use. You can see all the options here.

Step 4:  Now, create a new WordPress page or post and use the category product display shortcode (using your preferred display template) and it will automatically show all the products from that category in a grid layout.

Example: Below is an example shortcode that will show all products from category 1 using the a grid layout:

[wp_eStore_category_products_fancy id=1 style=3]

Using the style parameter you can modify which display template you want to use for your grid layout. In this example we are using the fancy display template 3:

estore-product-grid-display-example

Note: You can also use the display all products shortcode found here to show all your products in a grid layout.

WP eStore Addon – Bitcoin via Bitpay Payment Gateway

This addon allows you to do shopping cart checkout using bitpay payment gateway.

AddOn Price

The eStore Bitcoin via Bitpay addon is FREE for all customers who purchased WP eStore plugin from us.

Download the Addon

You can download this addon from the gateway addon download area of our support forum.

Installation

You can install this addon the same way you install any WordPress plugin:

  • Go to the “Add New” plugins screen in your WordPress admin area
  • Click the “upload” tab
  • Browse for the addon file (eStore-bitpay-gateway-addon.zip)
  • Click “Install Now” and then activate the plugin

Using Bitpay Payment Gateway Addon

Once you install addon you will need to configure some Bitpay specific settings. You can find the settings page under the eStore bitpay menu of WP eStore plugin. The following screenshot shows how you can access the settings page of this addon:

screenshot showing how to access the bitpay addon in the estore settings

In order to complete the settings simply follow the steps outlined below:

Step 1: Enable “bitpay” from the settings section of the addon.

Step 2: Enter the API key for your bitpay merchant account.

screenshot showing the settings menu for bitpay addon

Step 3: Select the speed at which your bitcoin transaction will register as confirmed.

  • Low: An invoice is considered to be “confirmed” after 6 block confirmations (~1 hour)
  • Medium: An invoice is considered to be “confirmed” after 1 block confirmation (~10 minutes)
  • High: An invoice is considered to be “confirmed” immediately upon receipt of payment

Step 4: Enter your preferred checkout text for bitpay (example: bitpay). This text will be used in the eStore shopping cart gateway selection drop down menu if you are using multiple payment gateway options.

Step 5: Enter a title for the order information page. This page will be used to collect order information from your users.

Now hit the Update button and your site will be ready to accept payments using bitpay gateway.

WP eStore Addon – Google Wallet For Digital Goods Payment Gateway

This addon allows you to do a one-item checkout using Google Wallet For Digital Goods payment gateway.

Download the Addon

You can download this addon from the gateway addon download area of our support forum.

Installation

You can install this addon the same way you install any WordPress plugin:

  • Go to the “Add New” plugins screen in your WordPress admin area
  • Click the “upload” tab
  • Browse for the addon file (eStore-google-wallet-digital-goods.zip)
  • Click “Install Now” and then activate the plugin

Using Google Wallet For Digital Goods Payment Gateway Addon

Once you install addon you will need to configure some Google Wallet For Digital Goods specific settings. You can find the settings page under the eStore Google Wallet for Digital Goods menu of WP eStore plugin. The following screenshot shows how you can access the settings page of this addon:

screenshot showing how to access the google wallet for digital goods addon in the estore settings

In order to complete the settings simply follow the steps outlined below:

Step 1: Enable “Google Wallet for Digital Goods” from the settings section of the addon.

Step 2: Fill in the API details. There are two pieces of API information that you need to enter in the settings:

  • Your Google Wallet for Digital Goods Seller Identifier
  • Your Google Wallet for Digital Goods Seller Secret

screenshot showing the settings menu for google wallet for digital goods addon

Step 3: Copy the Postback URL for your site. Now go to the settings menu of your Google Wallet for digital goods merchant account and specify it in the Postback URL field.

screenshot showing how to retrieve google wallet for digital goods api credentials

This is where you will also find your Seller ID and Secret Key. Once you are done click the Save button.

Step 4: Enter a title for the order information page. This page will be used to collect order information from your users.

Now hit the Update button and your site will be ready to accept payments using Google Wallet for Digital Goods.

One-item checkout button shortcode

Embed the following shortcode on a WordPress post/page so your users can purchase with Google Wallet for digital goods gateway:

[wp_eStore_buy_now_for_specific_gateway id="1" gateway="google_wallet_dg"]

Replace 1 with your eStore product ID.

WP eStore Bulk Discount AddOn

The eStore Bulk Discount addon allows your customers to automatically get a discount based on the number of items they are purchasing.

Installing the eStore Bulk Discount Addon

You can install this addon the same way you install any WordPress plugin:

  • Go to the “Add New” plugins screen in your WordPress admin area
  • Click the “upload” tab
  • Browse for the addon file (eStore-bulk-discount.zip)
  • Click “Install Now” and then activate the plugin

Using this Addon

When this addon is active, You can easily configure some conditions that will be used to automatically apply a discount on the shopping cart.

To configure a new discount condition click on the “eStore bulk discount” sub-menu under the WP eStore plugin menu.

screenshot showing how to access the estore bulk discount addon menu

To add a new discount condition you need to enter the following information:

  • From (Quantity): The minimum number of items required to apply this coupon. For example – 7.
  • To (Quantity): The maximum number of items required in the shopping cart to apply this coupon. For example- 9.
  • Discount Rate (%): The rate of discount in percentage that will be applied on the shopping cart. For example – 20.

Click the “Save” button which will add the new discount condition.

screenshot showing how to configure a bulk discount condition

How Does the Discount Condition Work

Suppose, you configured one coupon condition and a user just came to your site to do a shopping cart checkout. If the  user has 7-9 items in the shopping cart a 20% discount will be automatically applied to the total cart amount. You can add as many conditions as you want.

AddOn Price

The eStore Bulk Discount Addon is FREE for all customers who purchased WP eStore plugin from us.

Download the Addon (v1.3)

You can download this addon from the addon download area of our customer only support forum.

General Note

Please note that some of these free eStore addons are developed by our users in the community. So they do not have any advanced customization option. The description above explains exactly what this addon does.

WP eStore Addon – File Download Stats

The eStore File Download Stats addon allows you to see which encrypted download links have been used by your users.

Installing the File Download Stats Addon

You can install this addon the same way you install any WordPress plugin:

  • Go to the “Add New” plugins screen in your WordPress admin area
  • Click the “upload” tab
  • Browse for the plugin file (eStore-file-download-stats.zip)
  • Click “Install Now” and then activate the plugin

Using the File Download Stats Addon

You can go to the download link stats menu in eStore admin dashboard to see the download stats of the encrypted links.

file download stats addon menu

You can selectively (between any date range) view the stats of all the purchased file downloads.

estore-download-stats-addon-interface

AddOn Price

The eStore File Download Stats Addon is FREE for all customers who purchased WP eStore plugin from us.

Download the Addon (v1.1)

You can download this addon from the addon download area of our customer only support forum.

General Note

Please note that some of these free eStore addons are developed by our users in the community. So they do not have any advanced customization option. The description above explains exactly what this addon does.

WP eStore – Save and Retrieve Cart Feature

You can enable the save and retrieve cart feature from the eStore settings menu by checking the “Enable Save and Retrieve Cart Feature” option.

When this feature is enabled, your customers will be able to add items to the shopping cart then save it. This will allow them to retrieve a previously saved cart and complete the checkout.

Add the following shortcode on a post, page or sidebar which will show a save and retrieve shopping cart section to allow your customers to save the current shopping cart or retrieve a previously saved cart.

[wp_eStore_save_retrieve_cart]

This is how it works in general:

  1. A customer visits your site
  2. Adds item(s) to the shopping cart
  3. Hits the save cart button which gives a unique “ID” to the customer
  4. This “ID” can be used later to retrieve an already saved cart and complete the checkout


WP eStore MailPoet Newsletter (formerly Wysija) Integration Addon

The eStore Mailpoet Newsletters integration addon allows you to add your eStore plugin customers to the Mailpoet/Wysija list after a purchase.

Installing the Mailpoet Newsletter Integration Addon

You can install this addon the same way you install any WordPress plugin:

  • Go to the “Add New” plugins screen in your WordPress admin area
  • Click the “upload” tab
  • Browse for the plugin file (estore-wysija-newsletter-addon.zip)
  • Click “Install Now” and then activate the plugin

Using the eStore Mailpoet Newsletters Addon

After you install this addon using the above instruction do the following:

Step 1) Create a new list in the MailPoet Newsletters plugin (if you haven’t done so already). Now edit the list you just created and find the unique ID assigned to it.

To edit a list you need to go to MailPoet -> Lists and select the “Edit” option under the list.

mailpoet-lists-menu-screenshot-1

Once you click the “Edit” option you will be able to find the list ID from your browser’s address bar.

mailpoet-list-id-from-the-list-edit-interface

Step 2) Edit the eStore product which you would like to link to your MailPoet list and specify the list ID in the List Name field.

specify list id in product configuration

Save the product and you are done! Now every time  there is a new transaction/squeeze page form submission for this product, the customer will be automatically added to your MailPoet list (ID 3 in the above example).

AddOn Price

The MailPoet newsletter Addon is FREE for all customers who purchased WP eStore plugin from us.

Download the Addon

You can download this addon from the addon download area of our customer only support forum.

General Note

Please note that some of these free eStore addons are developed by our users in the community. So they do not have any advanced customization option. The description above explains exactly what this addon does.

WP eStore Addon – eWAY Rapid 3.0 Payment Gateway

This addon allows you to do a shopping cart checkout using eWAY 3.0 Rapid payment gateway.

Download the Addon

You can download this addon from the gateway addon download area of our support forum.

Installation

You can install this addon the same way you install any WordPress plugin:

  • Go to the “Add New” plugins screen in your WordPress admin area
  • Click the “upload” tab
  • Browse for the addon file (eStore-eway-rapid.zip)
  • Click “Install Now” and then activate the plugin

Using eWAY Rapid 3.0 Payment Gateway Addon

Once you install addon you will need to configure some eWAY Rapid 3.0 specific settings. You can find the eWAY Rapid 3.0 specific settings under the eStore eway rapid menu of WP eStore plugin. The following screenshot shows how you can access the settings page of this addon:

screenshot showing how to access eway rapid addon settings from the eStore menu

In order to complete the eWAY Rapid 3.0 settings simply follow the steps outlined below:

Step 1: Check the “Enable eway rapid gateway” checkbox from the “Eway Gateway Settings” section of the addon.

Step 2: Fill in the API details. There are two pieces of API information that you need to enter in the settings:

  • Your eWAY Rapid 3.0 user API Key
  • Your eWAY Rapid 3.0 user password

screenshot showing eway rapid 3.0 addon settings

Step 3: Enter your preferred checkout text for eway rapid. This text will be used in the eStore shopping cart gateway selection drop down menu if you are using multiple payment gateway options.

Step 4: Enter a title for the order information page. This page will be used to collect order information from your users.

Now hit the Update button and your site will be ready to accept payments using eWAY Rapid 3.0.

How to create an API Key for eWAY Rapid 3.0

If you are not sure how you can create a new api key (also called Username) and password for your eWAY Rapid account you can follow the steps outlined below:

1) Log in to your partner portal account using the link below for your country

  • https://www.eway.com.au/PartnerPortal
  • https://www.eway.co.uk/PartnerPortal
  • https://www.eway.co.nz/PartnerPortal

2) Go to My Account > User Security > Create User and complete the form.

3) Click on Actions next to the new user and View API Key. This is your new API key and password for accessing Rapid API.

WP eStore Dime Sale and Time Sale Addon Plugin

The eStore Dime Sale and Time Sale addon plugin provides website owners the ability to setup a “dime sale” scenario when selling their eStore products.

This addon allows you to automatically increase the price of selected products based on a per-number-of-sales basis and/or a per-time-interval basis.

The Dime Sale addon allows you to easily configure the required parameters by simply editing your eStore products.

You can configure the following options when using the dime sale addon plugin:

  • Increment Price After Specified Number Of Sales
  • Number of Sales Per Price Increase
  • Price Increment Amount
  • Increment Price After an Interval
  • Price Increment Amount
  • Time Interval
  • Maximum Price

Dime Sale Addon Plugin Usage

Read the following documentation to learn how the dime sale addon plugin works

  • Dime sale and time sale addon plugin usage

How to Install the Dime Sale Addon

You can install this addon the same way you install any WordPress plugin:

  • Go to the “Add New” plugins screen in your WordPress admin area
  • Click the “upload” tab
  • Browse for the addon file (eStore-dime-sale-addon.zip)
  • Click “Install Now” and then activate the plugin

How to Get The Dime Sale Addon/Extension

Currently we are selling this addon to our WP eStore customers only.

The price of this addon is $39.95

WP eStore Blacklist Manager AddOn – Guard Your eStore Products Against Scammers

Get Some Piece Of Mind – Block Problematic Customers From Repeatedly Scamming You

Have you ever been the victim of online fraudsters or scammers who have sought to rob you of your precious income by stealing your downloads or products?

Have you had to repeatedly give refunds to people who never intended on paying for your products in the first place?

Do you have certain customers who have been nothing but trouble for you and your online business?

If at least one of the above questions triggered a weary answer of, then keep reading.

The Blacklist Manageris an eStore addon which allows you to blacklist certain customers based on criteria such as email and/or IP address.

When a customer has been blacklisted using this eStore addon they will be blocked from making a purchase from your store whenever they are matched to your blacklist.

This means that your digital downloads will be protected and the scammer will not be allowed to receive any download links.

You can look at this addon as an extra layer of security for the eCommerce aspect of your business which will help prevent certain people from repeatedly stealing from you.

The Blacklist Manager addon is designed to help you have more control over who you sell your products to by giving you the power to block certain people from making a purchase.

How it works:

Setup your blacklist filter criteria

You configure the Blacklist Manager addon to block certain customers based on IP address or email address or both.

This filtering system is useful because it allows you to fine-tune the granularity of how you want to block certain customers. 

Enter your blacklisted customer details

Via the user-friendly administration interface you enter the details of offending customers and build a “blacklist” of people you wish to block from your store.

The plugin will check your “blacklist” during every purchase transaction, and it will block any customer who matches the email address and/or IP address in the list.

Customers who are in the blacklist will be prevented from making a purchase

When someone in the blacklist attempts to make a purchase, they will be prevented from completing the transaction.

This means that any digital downloads or links will not be delivered to blacklisted people!

How Can My Online Business Benefit From This Addon?

To put it simply this addon will help you get on with your online business by minimizing the time you spend having to deal with scammers, fraudulent transactions and problematic customers.

Every hour spent trying to straighten out issues such as these is an hour wasted which you could have used on improving your business or spending time with your family.

Blacklist Manager Addon Features

Block people according to filter criteria

The Blacklist Manager addon has a flexible filtering system which allows you to block people based on their IP address and/or email address.

Build your blacklist entries via user-friendly interface

Creating individual blacklist entries is easily done by using the administration interface.

Bulk add blacklist entries

Blacklisting bulk email addresses and/or IP addresses can be done via the useful bulk add functionality.

Ability to “white-list” certain customers

The Blacklist Manager addon gives you the option of being able to white-list any entry in the blacklist table. As the site owner you may want to allow certain blacklisted customers to make purchases if you believe they were unjustly blacklisted.

Automatic email notification upon occurrence of blacklisted purchase event

This addon can be configured to send you an email to an address of your choice when any attempted purchases are made by people who are in your blacklist.

Event logger

There is a handy event logger user interface in the administration panel which provides information about purchase attempts made by anybody who is on the black or white list.

Usage Documentation

Read the blacklist manager addon usage documentation.

Get the Blacklist Manager Addon

This addon is no longer being sold.

« Previous Page
Next Page »

Your Shopping Cart

Shopping Cart Empty
Shopping Cart is Empty
Visit The Shop

Search

Featured Documents

Stylish Product Display Options for WP eStore WP eStore Quick Setup and Usage Video Tutorial WP eStore Shortcodes and Functions Reference WordPress eStore Plugin Features WordPress eStore Plugin Demo What Our Customers Have to Say About Our Products WordPress eStore WishList (Feature Suggestions) WordPress eStore Frequently Asked Questions (FAQ) How to Show Add to Cart buttons

Featured Plugins

WP Express Checkout Plugin
wordpress_estore_icon
wordpress membership plugin icon
wordpress_affiliate_plugin_icon

Copyright © 2025 | eCommerce Plugins