This page contains video tutorials for the Free Simple Shopping Cart plugin.
WP Simple Shopping Cart Installation and Usage Instructions
This page provides basic installation and setup instructions for the Simple Shopping Cart plugin. Please read this page thoroughly to gain a basic understanding of how to use the plugin.
Table of Contents
- Video Summary
- Simple Shopping Cart Plugin Installation
- Basic Settings Configuration
- Simple Shopping Cart Basic Usage
- Using Blocks to Insert Add to Cart Buttons and Shopping Cart
- Display a Product Box
- Using the Buttons and Cart From a Theme’s Template File
- Example Post/Page Editor Content with Shortcode
- Using an User Interface to Insert the Products
- Using a Compact Shopping Cart
- Always Show the Shopping Cart
- Using Shipping Option
- Using Variation Control Option
- Flagging an Item as Digital Only
- Selling Digital Media Files
- Specifying an Item Number or SKU
Video Summary
Simple Shopping Cart Plugin Installation
Install the WP Simple Shopping Cart plugin by searching for it in the ‘Add New Plugins‘ interface within your WordPress admin dashboard. You can search using the keyword “Simple Shopping Cart” to find it.

Click ‘Install Now‘, followed by ‘Activate‘ to enable the plugin on your site.
If you can’t use the above method, download the plugin’s zip file, unzip it, and upload the folder to your site’s “/wp-content/plugins/” directory. Next, activate the plugin via the “Plugins” menu in WordPress.
Basic Settings Configuration
Once the plugin is activated, visit the Settings menu to configure basic options, like your PayPal account details, currency code etc. The default settings are typically sufficient to begin with. You can always customize these settings later. Save the settings and proceed to the next step.
Afterwards, you’re ready to use the shortcode(s) to add products to a post, page, or sidebar as desired.
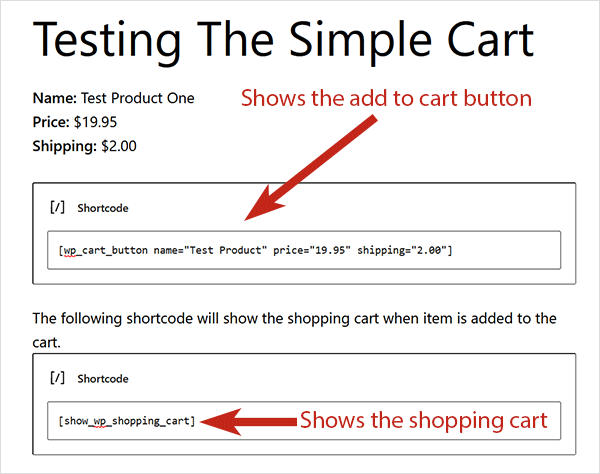
Simple Shopping Cart Basic Usage
Step 1) Inserting an Add to Cart Button
To insert an ‘Add to Cart’ button, simply place the following shortcode into a post or page alongside the product description. This will enable customers to click and add the item(s) to their shopping cart.
[wp_cart_button name="PRODUCT-NAME" price="PRODUCT-PRICE"]
Replace PRODUCT-NAME and PRODUCT-PRICE with the actual name and price.
Here is an example usage of the shortcode:
[wp_cart_button name="Test Product" price="19.95"]
Step 2) Inserting a Shopping Cart
To insert the shopping cart into a post/page/sidebar, simply add the following shortcode into a shortcode block.
[show_wp_shopping_cart]
Using Blocks to Insert Add to Cart Buttons and Shopping Cart
You can also use blocks instead of shortcodes to insert the add to cart buttons and the shopping cart. Follow these guidelines if you wish to utilize the blocks provided by the simple shopping cart plugin.
Display a Product Box
Read the How to display a product box documentation that explains how you can use a shortcode to display a nice product box for your product(s).
Using the Buttons and Cart From a Theme’s Template File
If you want to add a purchase button in your theme’s template file then do the following:
1. To add the Add to Cart button from template (.php) files use the following function:
<?php echo print_wp_cart_button_for_product('PRODUCT-NAME', PRODUCT-PRICE); ?>
Replace PRODUCT-NAME and PRODUCT-PRICE with the actual name and price. Example:
<?php echo print_wp_cart_button_for_product('wordpress', 7.50); ?>
2. To add the shopping cart to the sidebar, simply use the widget from the widgets menu or add the following line to your sidebar template file where you want the shopping cart to appear.
<?php echo print_wp_shopping_cart() ?>
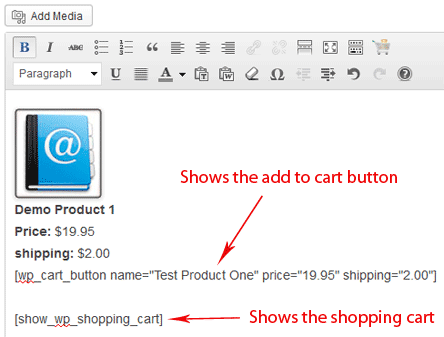
Example Post/Page Editor Content with Shortcode
The following is a screenshot of the WordPress post/page editor showing how the add to cart button and the shopping cart is inserted into a post or page.
Block/Gutenberg Editor Example
Classic Editor Example
Using an User Interface to Insert the Products
The plugin has a block inserter that you can use to add the blocks (instead of shortcodes) to your WordPress posts/pages. Read the Simple Cart Blocks documentation for details.
Using a Compact Shopping Cart
Use the following shortcode where you want to show the compact shopping cart:
[wp_compact_cart]
You can add this shortcode in a standard text widget to add the compact cart to the sidebar.
Always Show the Shopping Cart
The standard “show_wp_shopping_cart” shortcode only shows the cart when there are items in the cart. So it shows the cart when the visitor has clicked on an add to cart button and added item(s) to the cart. When the cart is empty, it simply hides the cart (nothing is shown).
If you want to show the cart all the time then use the following shortcode instead. It will show an empty cart message when there is nothing in the cart.
[always_show_wp_shopping_cart]
Using Shipping Option
1. To use shipping cost use the “shipping” argument in the shortcode. Here is an example usage:
[wp_cart_button name="Test Product" price="19.95" shipping="4.99"]
or use the following php function from your wordpress template files
<?php echo print_wp_cart_button_for_product('product name',price,shipping cost); ?>
Please see the How shipping Calculation Works post for more info.
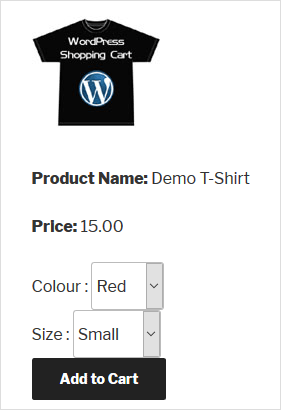
Using Variation Control Option
Variation Control can be used to create products similar to the following screenshot. Read the product variation setup documentation to learn more.
Flagging an Item as Digital Only
To mark an item as digital-only, add the digital="1" parameter to the shortcode. Digital-only items do not require a shipping address during checkout. Here’s an example of how to use the digital parameter in the shortcode:
[wp_cart_button name="Test Product" price="19.95" digital="1"]
Selling Digital Media Files
Read the media file selling usage documentation.
Specifying an Item Number or SKU
You can use the “item_number” parameter in the “add to cart” button shortcode to specify an “Item Number” or “SKU” for a product. This “item number” value will get sent to PayPal (when a customer does the checkout).
Below is an example shortcode:
[wp_cart_button name="Test Product" price="19.95" item_number="SKU12345"]
Visit the WordPress Simple Shopping Cart Documentation Index Page.