Tips and Tricks WP eCommerce

eCommerce Solution for WordPress Blog

  • Home
  • eCommerce Plugins
  • WP eStore Documentation
  • WP Shopping Cart Doc

WP Simple Cart – Collect Customer Input in the Shopping Cart

This is a premium add-on for the WP Simple Cart Plugin designed to collect customer input directly in the shopping cart at the time of checkout. It’s particularly beneficial for selling customizable products that require customer-specific information (for example, a name to be printed on the product).

With this add-on, you can easily configure custom input fields through its admin interface. These fields will then appear in the shopping cart, allowing your customers to provide the necessary information during checkout.

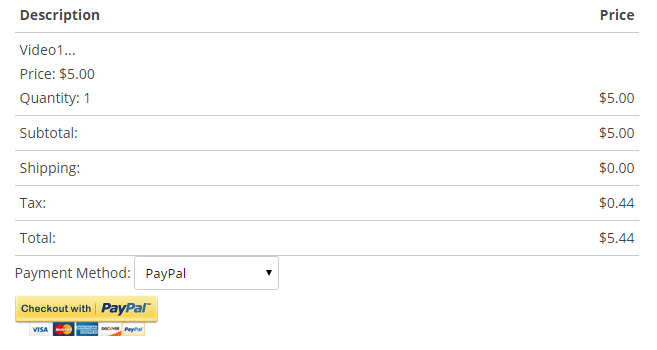
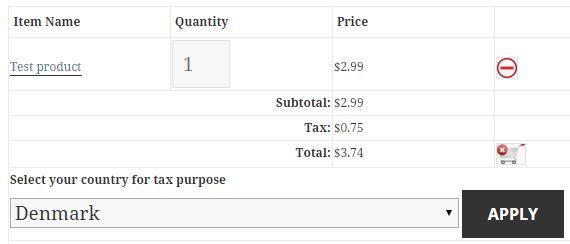
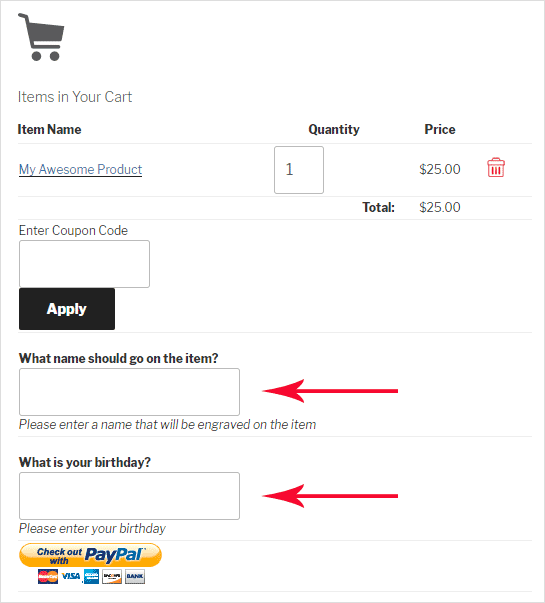
The input fields show up in the cart like the following example:

simple-cart-collect-customer-input-addon-screenshot

The input values entered by the customer will be saved with the customer’s order/transaction in the Simple Cart plugin’s menu.

This paid add-on can be purchased at the bottom of this page. We recommend users to carefully review the information provided here to fully understand its features before making a purchase. This ensures that the add-on meets your expectations and aligns with its capabilities.

Installing the Addon

You can install this addon the same way you install any WordPress plugin:

  • Go to the Add New plugins screen in your WordPress admin area
  • Click the upload tab
  • Browse for the addon file (simple-cart-collect-customer-input.zip)
  • Click Install Now and then activate the plugin

Using the Simple Cart Custom Input Addon

Step 1) Go to the Addon’s Menu

In order to configure the collect customer fields,  click on the Customer Input sub-menu under the Simple Cart menu of the plugin.

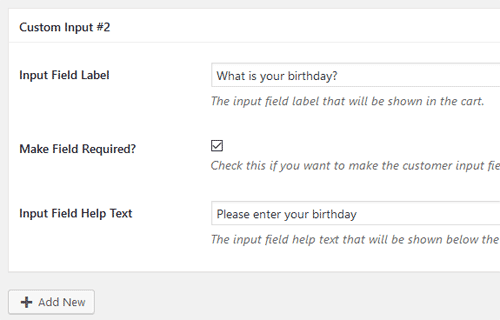
Step 2) Configure the Custom Fields

Click on the Add New button to add custom fields that you want to show in the cart to collect data.

Enter a label for the input field (the addon will use this label in the cart). You can specify a help text that will be shown below the text field.

Optionally, you can make the input field to be a required field (so customers have to enter a value before checkout).

configuring-custom-fields-screenshot

Step 3) Save the Settings

Once you are done configuring the fields, save the settings.

The input fields will just show up in the shopping cart.

Viewing the Custom Fields Value

You can edit/view a transaction from the Cart Orders menu which will show the customer input values. You can see the custom fields where you see the order details of the transaction.

Adding the Input Field Value to the Notification Email

You can optionally add this input field to the sale notification email also. Use the following email merge tag in the notification email settings:

{custom_fields}

Get the Simple Cart Customer Input Addon

The price of this addon is $39


WP eStore and ConvertKit Integration Addon

You can integrate the WP eStore plugin with Convertkit so that the customers can be automatically added to your ConvertKit sequence.

The users are added to the ConvertKit sequence when any of the following event happens:

  1. A customer purchases a product that has a ConvertKit sequence specified for it.
  2. A visitor submits a squeeze form for a product that has a ConvertKit sequence specified for it.

Installing the ConvertKit Addon

You can install this addon the same way you install any WordPress plugin:

  • Go to the Add New plugins screen in your WordPress admin area
  • Click the Upload button
  • Browse for the addon file (estore-convertkit-addon.zip)
  • Click Install Now and then activate the plugin

Addon Usage

Step 1) Click on the ConvertKit menu link from the main eStore plugin’s admin menu.

Step 2) Enable the integration then fill in the API key details. You can get the API details from your ConvertKit account.

Step 3) Edit the eStore product in question and specify your ConvertKit Sequence Name in the List Name field of the product.

Example value: my-cv-sequence

autoresponder-list-name-in-product

Get the ConvertKit Addon

The price of this addon is $39

WP eStore – Store Opening Hours AddOn

The eStore Opening Hours addon allows you to restrict purchases to certain times. You can configure as many opening/closing times for your shop (each day of the week) in the settings. When a visitor comes to a page to purchase something outside of the configured hours, a message will be displayed to them.

Installing the eStore Opening Hours Addon

You can install this addon the same way you install any WordPress plugin:

  • Go to the “Add New” plugins screen in your WordPress admin area
  • Click the “upload” tab
  • Browse for the addon file (estore-opening-hours.zip)
  • Click “Install Now” and then activate the plugin

Using this Addon

1) In order to configure opening hours for your store, click on the “eStore opening hours” sub-menu under the WP eStore plugin menu.

estore-opening-hours-menu

2) Add opening hours in a 24 hour time format.

estore-opening-hours-configuration

3) Enter the page/post IDs where you want to apply the configured hours.

estore-opening-hours-settings

4) Enter the message that you want to display to the users outside of opening hours.

5) Finally click the “Enable Opening Hours” checkbox.

The addon will not function until you enable this option. This is to make sure that you get some time to configure the hours for your store.

6) Click the Save button

How to Find the Post/Page ID

Each WordPress post or page has a unique ID with it. If your site uses web friendly permalink format, You might not be able to find the ID just by viewing the page. Here is a trick that you can apply to find the ID of a post/page:

1)Go to Pages -> All Pages or Posts -> All Posts.

wordpress-post-id

2) Hover your mouse over the Edit link.

3) The post/page ID should appear on the bottom left corner of your screen (it will be a numeric value).

Get the Opening Hours Addon

The price of this addon is $29

Please contact us to purchase this addon.

WP eStore TaxCloud Integration AddOn

The eStore TaxCloud addon allows you to integrate your store with taxcloud, a free sales tax management service, to automatically calculate tax for every address in the United States.

TaxCloud handles every aspect of sales tax management, from collecting to filing. It calculates tax in real time for every state, county, city and special jurisdiction in the US.

Installing the eStore TaxCloud Integration Addon

You can install this addon the same way you install any WordPress plugin:

  • Go to the “Add New” plugins screen in your WordPress admin area
  • Click the “upload” tab
  • Browse for the addon file (estore-taxcloud-integration.zip)
  • Click “Install Now” and then activate the plugin

Using this Addon

1) In order to integrate your store with TaxCloud click on the “TaxCloud” sub-menu under the WP eStore plugin menu.

screenshot showing the eStore taxcloud integration addon menu

2) Enter your TaxCloud credentials (API ID & API Key).

screenshot showing the eStore taxcloud addon settings menu

3) Enter your Store Address. TaxCloud requires this information to calculate tax during checkout.

4) Click the Save button

5) Now click on the Verify store address link. This is to make sure that TaxCloud can successfully locate the store address that you have entered. You only need to do it once.

How Does the TaxCloud Integration Addon Work

When a user clicks on the checkout button the addon will redirect the user to a page to collect the destination address.

screenshot showing the taxcloud address collection during checkout

Once the address is submitted, TaxCloud will verify the address and calculate tax based on the origin (Store address) and the destination.

screenshot showing taxcloud checkout process using eStore

After the transaction is processed, the addon will notify TaxCloud that the order has been completed.

International Sales

If you are selling to international customers also then there is an option for those customers to select the “Outside US” option to bypass this.

Get the TaxCloud Integration Addon

The price of this addon is $29

Please contact us to purchase this addon.

WP eStore Addon – USAePay Payment Gateway

This addon allows you to do shopping cart checkout using USAePay payment gateway.

AddOn Price

The eStore USAePay addon is FREE for all customers who purchased WP eStore plugin from us.

Download the Addon

You can download this addon from the gateway addon download area of our support forum.

Installation

You can install this addon the same way you install any WordPress plugin:

  • Go to the “Add New” plugins screen in your WordPress admin area
  • Click the “upload” tab
  • Browse for the addon file (eStore-usaepay-gateway.zip)
  • Click “Install Now” and then activate the plugin

Using USAePay Payment Gateway Addon

Once you install addon you will need to configure some USAePay specific settings. You can find the settings page under the eStore USAePay menu of WP eStore plugin. The following screenshot shows how you can access the settings page of this addon:

screenshot showing how to access the USAePay addon in the estore settings

In order to complete the settings simply follow the steps outlined below:

Step 1: Enable “USAePay” from the settings section of the addon.

Step 2: Enter your USAePay merchant account Source Key. You can retrieve it from your USAePay account (Settings->Source Keys).

screenshot showing the settings menu for USAePay addon

Step 3: Enter your preferred checkout text for USAePay gateway (example: USAePay). This text will be used in the eStore shopping cart gateway selection drop down menu if you are using multiple payment gateway options. Click the “Update” button.

Step 4: Login to your USAePay merchant account and Go to “Settings->Source Keys”.

Step 5: Edit your source key and enter a return URL in the Approved URL field of Payment Form Settings (preferably “Thank You” page). Make sure that “Transaction Result” is set to “Display Result and POST to URL”.

screenshot showing the payment form settings of USAePay gateway

Save the settings and your site will be ready to accept payments using USAePay gateway.

WP eStore Amount Based Shipping AddOn

The eStore Amount Based Shipping addon allows you to automatically apply a shipping amount to the cart based on a price range.

You can pre-configure how much shipping amount to apply for what price range.

Installing the eStore Amount Based Shipping Addon

You can install this addon the same way you install any WordPress plugin:

  • Go to the “Add New” plugins screen in your WordPress admin area
  • Click the “upload” tab
  • Browse for the addon file (eStore-amount-based-shipping.zip)
  • Click “Install Now” and then activate the plugin

Using this Addon

When this addon is active, You can easily configure some conditions that will be used to automatically apply the shipping amount to the shopping cart.

To configure a new shipping condition click on the “Amount based shipping” sub-menu under the WP eStore plugin menu.

screenshot showing the amount based shipping menu in the estore plugin

To add a new condition you need to enter the following information:

  • From (Amount): The minimum price amount required to apply this shipping amount. For example: 5.00
  • To (Amount): The maximum price amount required in the shopping cart to apply this shipping amount. For example: 7.00
  • Shipping Amount: The shipping amount that will be applied to the cart when the above condition is fulfilled. For example: 1.50

Click the “Save” button which will add the new shipping condition.

You can add as many conditions as you want.

screenshot showing the amount based shipping settings in the estore plugin

How Does the Amount Based Shipping Condition Work

Lets say, you configured one shipping condition and a user just came to your site to do a shopping cart checkout. If the total price amount (of physical products) in the shopping cart is between $5.00 and $7.00, a $1.50 shipping will be automatically applied to the cart.

In order for a product to be eligible for amount based shipping,

a) Digital Product URL field needs to be empty

b) Downloadable option needs to be disabled

screenshot showing the digital content details section of estore plugin

Otherwise the addon will consider it as a digital item and no shipping will apply.

AddOn Price

The eStore Amount Based Shipping Addon is FREE for all customers who purchased WP eStore plugin from us.

Download the Addon (v1.0.1)

You can download this addon from the addon download area of our customer only support forum.

General Note

Please note that some of these free eStore addons are developed by our users in the community. So they do not have any advanced customization option. The description above explains exactly what this addon does.

WP eStore Sendy Integration Addon

This addon plugin allow you to integrate WP eStore plugin with the Sendy Email Marketing solution. You can use it to add customers to your Sendy email list when someone purchase your product(s).

Installing the Sendy Integration Addon

You can install this addon the same way you install any WordPress plugin:

  • Go to the “Add New” plugins screen in your WordPress admin area
  • Click the “upload” tab
  • Browse for the plugin file (eStore-sendy-integration-addon.zip)
  • Click “Install Now” and then activate the plugin

Using the Sendy Integration AddOn

After you install this addon using the above instruction do the following:

Step 1) Go to the Sendy integration settings interface from your main eStore menu.

screenshot of sendy integration menu in the estore plugin

Step 2) Enter you Sendy Installation URL.

screenshot showing the sendy api details section in the estore plugin

Step 3) Edit the eStore product (the one that you want to link to Sendy list) and specify the list ID in the List Name field.

screenshot of sendy autoresponder section in the estore product interface

Save the product and you are done!

Now every time  there is a new transaction or squeeze page form submission for this product, the customer will be automatically added to your Sendy list.

How to Get The Sendy Integration Addon/Extension

The price of this addon is $29.95

Please contact us to purchase this addon.

WP eStore Table Rate Tax by Item Types AddOn

The eStore Table Rate Tax by Item Types addon allows you to charge tax in the shopping cart based on the user’s country and type of items.

Installing the eStore Table Rate Tax by Item Types Addon

You can install this addon the same way you install any WordPress plugin:

  • Go to the “Add New” plugins screen in your WordPress admin area
  • Click the “upload” tab
  • Browse for the addon file (estore-table-rate-tax-by-item-types.zip)
  • Click “Install Now” and then activate the plugin

Using this Addon

When this addon is active, You can easily configure rates that will be used to apply tax in the shopping cart based on the customer’s country.

To access the addon settings click on the “Table Rate Tax” sub-menu under the WP eStore plugin menu.

screenshot showing how to access the estore table rate tax addon by item types menu

To add a new tax zone you need to select a country, type of product and specify a tax rate for it (For example: 20).

Click the “Save” button which will add the zone.

If you do not wish to configure a rate for every country you can specify a flat rate (For example: 15). By default it is set to 0.

screenshot showing the settings of table rate tax by item types addon

screenshot showing the default options of table rate tax by item types addon

screenshot showing the countries configured in the table rate tax by item types addon


How Does It Work

Lets say, a customer is browsing your website from Denmark. When that user adds a digital product to the shopping cart a 25% tax/VAT will be automatically applied.

screenshot showing the eStore table rate tax addon by item types country dropdown in the shopping cart

The location of the user is determined based on the IP address. But they can also manually select their country (the addon will calculate the tax accordingly).

If the user is from a zone that you haven’t configured (Example: USA) a 15% tax will be automatically applied.

Tax will be applied the same way for physical products.

AddOn Price

The eStore Table Rate Tax by Item Types Addon is FREE for all customers who purchased WP eStore plugin from us.

Download the Addon (v1.0.1)

You can download this addon from the addon download area of our customer only support forum.

General Note

Please note that some of these free eStore addons are developed by our users in the community. So they do not have any advanced customization option. The description above explains exactly what this addon does.

Jrox Jam Affiliate Software Integration Addon

You can integrate the eStore plugin with Jrox Jam Affiliate software using this addon plugin. It allows you to track and generate commission for the customers that are referred by your affiliates.

Installing the Jam Affiliate Integration Addon

You can install this addon the same way you install any WordPress plugin:

  • Go to the “Add New” plugins screen in your WordPress admin area
  • Click the “upload” tab
  • Browse for the addon file (estore-jrox-jam-affiliate-integration.zip)
  • Click “Install Now” and then activate the plugin

Addon Usage

Step 1) Click on the “Jrox Jam Affiliate” menu link from the main eStore plugin’s admin menu.

Step 2) Specify the URL of the “sale.php” file of your Jrox JAM affiliate install.

jrox-jam-affiliate-integration-settings

Get the Jam Affiliate Integration Addon

The price of this addon is $29.95

Please contact us to purchase this addon.

WP eStore Country Blocking AddOn

The eStore Country Blocking addon prevents users of certain countries from being able to checkout.

You can also select to only block selling of digital products (instead of all products) to the selected countries.

Installing the eStore Country Blocking Addon

You can install this addon the same way you install any WordPress plugin:

  • Go to the “Add New” plugins screen in your WordPress admin area
  • Click the “upload” tab
  • Browse for the addon file (estore-country-blocking.zip)
  • Click “Install Now” and then activate the plugin

Using this Addon

To access the addon settings click on the “Country Blocking” sub-menu under the WP eStore plugin menu.

screenshot showing how to access the estore country blocking addon menu

Select one or more country which you wish to block by using the checkboxes.

screenshot showing how to select countries to block


How Does It Work

Lets say, a customer is browsing your website from Austria and you have blocked that country in the settings. When that user adds a product to the shopping cart an error message will be displayed instead of the checkout button.

screenshot showing the eStore country blocking addon demo

Get the Country Blocking Addon

Download the Country Blocking addon.

Next Page »

Your Shopping Cart

Shopping Cart Empty
Shopping Cart is Empty
Visit The Shop

Search

Featured Documents

Stylish Product Display Options for WP eStore WP eStore Quick Setup and Usage Video Tutorial WP eStore Shortcodes and Functions Reference WordPress eStore Plugin Features WordPress eStore Plugin Demo What Our Customers Have to Say About Our Products WordPress eStore WishList (Feature Suggestions) WordPress eStore Frequently Asked Questions (FAQ) How to Show Add to Cart buttons

Featured Plugins

WP Express Checkout Plugin
wordpress_estore_icon
wordpress membership plugin icon
wordpress_affiliate_plugin_icon

Copyright © 2025 | eCommerce Plugins