Tips and Tricks WP eCommerce

eCommerce Solution for WordPress Blog

  • Home
  • eCommerce Plugins
  • WP eStore Documentation
  • WP Shopping Cart Doc

WP eStore Table Rate Tax AddOn

The eStore Table Rate Tax addon allows you to charge tax in the shopping cart based on the user’s country.

Installing the eStore Table Rate Tax Addon

You can install this addon the same way you install any WordPress plugin:

  • Go to the “Add New” plugins screen in your WordPress admin area
  • Click the “upload” tab
  • Browse for the addon file (estore-table-rate-tax.zip)
  • Click “Install Now” and then activate the plugin

Using this Addon

When this addon is active, You can easily configure rates that will be used to apply tax in the shopping cart based on the customer’s country.

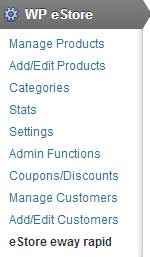
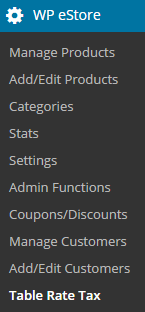
To access the addon settings click on the “Table Rate Tax” sub-menu under the WP eStore plugin menu.

screenshot showing how to access the estore table rate tax addon menu

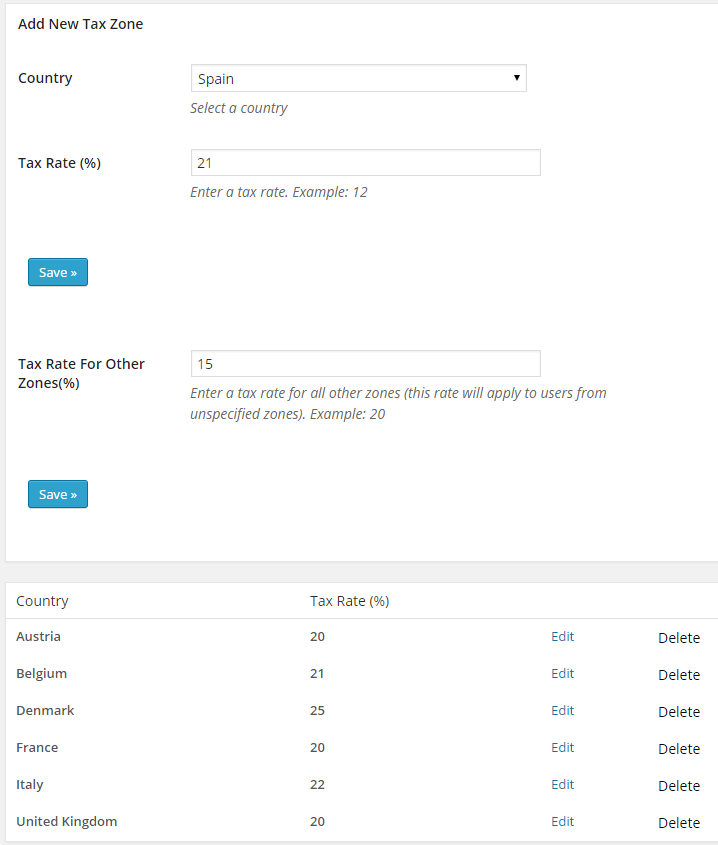
To add a new tax zone you need to select a country and specify a tax rate for it (For example: 20).

Click the “Save” button which will add the zone.

If you do not wish to configure a rate for every country you can specify a flat rate in the “Tax Rate For Other Zones” field (For example: 15). By default it is set to 0.

screenshot showing how to configure a table rate tax

How Does It Work

Lets say, a customer is browsing your website from Denmark. When that user adds a product to the shopping cart a 25% tax/VAT will be automatically applied.

screenshot showing the eStore table rate tax addon country dropdown

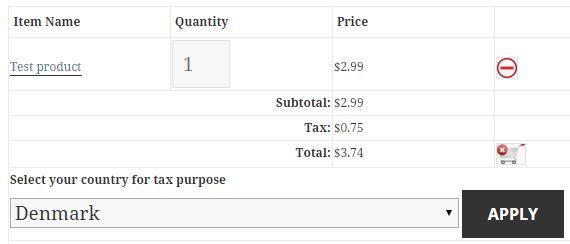
The location of the user is determined based on the IP address. But they can also manually select their country (the addon will calculate the tax accordingly).

If the user is from a zone that you haven’t configured (Example: USA) a 15% tax will be automatically applied.

AddOn Price

The eStore Table Rate Tax Addon is FREE for all customers who purchased WP eStore plugin from us.

Download the Addon (v1.0.1)

You can download this addon from the addon download area of our customer only support forum.

General Note

Please note that some of these free eStore addons are developed by our users in the community. So they do not have any advanced customization option. The description above explains exactly what this addon does.

WP Shopping Cart and MailChimp Integration

Want to keep your buyers up to speed on your newest products or specials? This guide will help you use MailChimp for WP Shopping Cart to automatically add customers to a mailing list when they purchase your products.

screenshot showing the mailchimp account dashboard

This paid add-on can be purchased at the bottom of this page. We recommend users to carefully review the information provided here to fully understand its features before making a purchase. This ensures that the add-on meets your expectations and aligns with its capabilities.

Installing the Addon

You can install this addon the same way you install any WordPress plugin:

  • Go to the Add New plugins screen in your WordPress admin area
  • Click the upload tab
  • Browse for the addon file (simple-cart-mailchimp-integration.zip)
  • Click Install Now and then activate the plugin

Setup and Configuration

Step 1) Create your list on MailChimp

To use the addon, you’ll need to have a MailChimp account, so create one now if you don’t already have one. Once you have signed into your MailChimp account, you can select Lists from the menu to create a new mailing list, or choose from lists you’ve created previously.

Step 2) Find and add your List Name

In your MailChimp account, open your list and select List Name & Defaults from the Settings menu. Copy the List Name displayed here to your clipboard.

screenshot showing how to find the mailchimp list id

Step 3) Enter the Mailchimp List Name in the Addon Settings

Now open MailChimp Addon Settings from the admin dashboard of your WordPress site, and paste the List Name you just copied into the List Name field.

simple-cart-mailchimp-addon-settings

Step 4) Create and add your API Key

In your MailChimp account, open your account/user page and get the API Key. Copy the long string of numbers and letters from the API Key field to your clipboard.

screenshot showing how to find the mailchimp api keys

In MailChimp Addon Settings, paste the text you just copied into the API Key field.

Step 5) Additional settings

Finally, determine if you need to change any of the additional settings. The default options work fine out-of-the-box.

Now, when you get an order via the simple shopping cart plugin, that customer will get added to your MailChimp list.

Get the Simple Cart MailChimp Addon

The price of this addon is $29


Adwords Conversion Tracking AddOn for Your Store

If you run Google Adwords campaigns and you want to know which of your keywords best leads to clicks and conversions, such as sales, conversion tracking can help you. The conversion tracking tool in AdWords can show you what happens after customers click your ad (for example, whether they purchased your product or not).

The eStore conversion tracking addon plugin adds conversion tracking functionality to your store.

Installing the Conversion Tracking Addon

You can install this addon the same way you install any WordPress plugin:

  • Go to the “Add New” plugins screen in your WordPress admin area
  • Click the “upload” tab
  • Browse for the addon file (estore-adwords-conversion-tracking.zip)
  • Click “Install Now” and then activate the plugin

Using This Addon

After you active this addon, You need to configure some settings related to this addon.

Click on the “Adwords Conversion” sub-menu under the eStore plugin’s admin menu.

You need the following two pieces of information from your Google Adwords account:

  1. Conversion Label
  2. Conversion ID

Follow this tutorial to get your conversion tracking code.

Your conversion tracking code should look like the following (the two pieces of information you need from this code is highlighted):

getting-adwords-conversion-id-and-label-values

Once you have the “Conversion Label and “Conversion ID” values, enter them in the settings of this addon:

adwords-conversion-tracking-settings

Save the settings and your store will start to do the conversion tracking.

Download the Addon (v1.0)

You can download this addon from the addon download area of our support forum.

Please note that some of these free eStore addons are developed by our users in the community. So they do not have any advanced customization option. The description above explains exactly what this addon does.

WP eStore Addon – Self Re-Download Digital Products

This eStore addon allows your customers to re-download the digital products they purchased via a page on your site.

This can be used if you want your customers to be able to download the latest version of a digital product by visiting a page on your site and filling out a form.

self-re-download-digital-products-form-screenshot

Installing the Self Re-Download Products Addon

You can install this addon the same way you install any WordPress plugin:

  • Go to the “Add New” plugins screen in your WordPress admin area
  • Click the “upload” tab
  • Browse for the addon file (estore-redownload-purchased-items.zip)
  • Click “Install Now” and then activate the plugin

Using this Addon

When this addon is active, You can configure some settings related to this addon. To configure this addon, click on the “Re-Download Form” sub-menu under the WP eStore plugin admin menu.

self-re-download-digital-products-addon-menu

Step 1) Create a new WordPress page where you want to offer this product re-download option.

Step 2) Add the following shortcode to this newly created page:

[eStore_product_download_form]

Step 3) Select this page from the settings interface of this addon.

You can optionally enable captcha on this digital product re-download form.

Now, your customers can go this page and enter some details (to verify their purchase) and re-download the digital items they purchased from you in the past.

AddOn Price

The Self Re-Download Digital Items Addon is FREE

Download the Addon (v1.1)

You can download this addon from the addon download area of our customer only support forum.

Please note that some of these free eStore addons are developed by our users in the community. So they do not have any advanced customization option. The description above explains exactly what this addon does.

WP eStore Addon – ComproPago Payment Gateway

This addon allows you to do shopping cart checkout using ComproPago payment gateway.

AddOn Price

The eStore ComproPago addon is FREE for all customers who purchased WP eStore plugin from us.

Download the Addon

You can download this addon from the gateway addon download area of our support forum.

Installation

You can install this addon the same way you install any WordPress plugin:

  • Go to the “Add New” plugins screen in your WordPress admin area
  • Click the “upload” tab
  • Browse for the addon file (eStore-compropago-gateway.zip)
  • Click “Install Now” and then activate the plugin

Using ComproPago Payment Gateway Addon

Once you install addon you will need to configure some ComproPago specific settings. You can find the settings page under the eStore ComproPago menu of WP eStore plugin. The following screenshot shows how you can access the settings page of this addon:

screenshot showing how to access the ComproPago addon in the estore settings

In order to complete the settings simply follow the steps outlined below:

Step 1: Enable “ComproPago” from the settings section of the addon.

Step 2: Enter your ComproPago merchant account Public Key. You can retrieve it by logging into your ComproPago account and clicking “Configuration”.

screenshot showing the settings menu for ComproPago addon

Step 3: Copy the webhook URL for your site and specify it in your ComproPago Merchant account. ComproPago will send notification to this URL when a transaction is processed.

screenshot showing how to configure a webhook in your ComproPago merchant account

Step 4: Enter your preferred checkout text for ComproPago gateway (example: ComproPago). This text will be used in the eStore shopping cart gateway selection drop down menu if you are using multiple payment gateway options.

Now hit the Update button and your site will be ready to accept payments using ComproPago gateway.

WP eStore Bulk Quantity Shipping AddOn

The eStore Bulk Quantity Shipping addon allows the shopping cart to automatically apply a shipping amount based on the number of items a user is purchasing.

You can pre-configure how much shipping to apply for which item quantity range.

How Does the Bulk Shipping Condition Work

Lets say, you configured one shipping condition and a user just came to your site to do a shopping cart checkout. If the user adds 7-9 items to the shopping cart, a $20 shipping will be automatically applied to the cart.

Installing the eStore Bulk Quantity Shipping Addon

You can install this addon the same way you install any WordPress plugin:

  • Go to the “Add New” plugins screen in your WordPress admin area
  • Click the “upload” tab
  • Browse for the addon file (eStore-bulk-qty-shipping.zip)
  • Click “Install Now” and then activate the plugin

Using this Addon

When this addon is active, You can easily configure some conditions that will be used to automatically apply the shipping amount on the shopping cart.

To configure a new shipping condition click on the “eStore bulk shipping” sub-menu under the WP eStore plugin menu.

screenshot showing how to access the estore bulk quantity shipping addon menu

To add a new condition you need to enter the following information:

  • From (Quantity): The minimum number of items required to apply this shipping amount. For example: 7
  • To (Quantity): The maximum number of items required in the shopping cart to apply this shipping amount. For example: 9
  • Shipping Amount: The shipping amount that will be applied to the cart when the above condition is fulfilled. For example: 20

Click the “Save” button which will add the new shipping condition.

You can add as many conditions as you want.

screenshot showing how to configure a bulk quantity shipping condition

Marking a Product to be a Physical Item

The bulk quantity shipping addon can override and apply the bulk shipping amount to the cart, if the product in question is a physical item. The way to mark a product to be a physical item is to add a shipping amount of 0.01 to the shipping cost of the item. So edit the WP eStore product in question and enter a value of 0.01 to the Item Shipping Cost field.

AddOn Price

The eStore Bulk Quantity Shipping Addon is FREE for all customers who purchased WP eStore plugin from us.

Download the Addon

You can download this addon from the addon download area of our customer only support forum.

General Note

Please note that some of these free eStore addons are developed by our users in the community. So they do not have any advanced customization option. The description above explains exactly what this addon does.

eStore MadMimi Integration Addon

This addon plugin allow you to integrate WP eStore plugin with the MadMimi Email Marketing solution. You can use it to add customers to your MadMimi email list when someone purchase your product(s).

Installing the MadMimi Integration Addon

You can install this addon the same way you install any WordPress plugin:

  • Go to the Add New plugins screen in your WordPress admin area
  • Click the upload tab
  • Browse for the plugin file (eStore-madmimi-integration-addon.zip)
  • Click Install Now and then activate the plugin

Using the MadMimi Integration AddOn

After you install this addon using the above instruction do the following:

Step 1) Go to the MadMimi integration settings interface from your main eStore menu.

mad-mimi-integration-menu

Step 2) Fill in the MadMimi Account Details

mad-mimi-integration-api-details

Step 3) Edit the eStore product (the one that you want to link to MadMimi list) and specify the list name in the List Name field.

mad-mimi-integration-list-name

Save the product and you are done!

Now every time  there is a new transaction or squeeze page form submission for this product, the customer will be automatically added to your MadMimi list.

AddOn Price

The MadMimi Integration Addon is FREE for all customers who purchased WP eStore plugin from us.

Download the Addon (v1.3)

You can download this addon from the addon download area of our customer only support forum.

Sell Birthday Greetings – eStore Addon

You can sell birthday greetings with this addon.

It lets your customers enter a message and a recipient’s email address then they purchase the gift item. The digital gift item (a birthday greeting video, audio, PDF etc) is delivered to the recipient with the message after the transaction.

sell-birthday-greetings-example

Usage

Lets say you want to sell a birthday gift item which you have configured in the eStore plugin. The ID of this eStore product is 1.

You can add the following shortcode to a WordPress page that will let your customers buy this item and specify a recipient’s email address and a special message:

[eStore_birthday_greeting id=”1″]

Get the Gift Voucher Addon

The price of this addon is $30.00

Please contact us to purchase this addon.

WP eStore Addon – eWAY Rapid 3.0 Payment Gateway

This addon allows you to do a shopping cart checkout using eWAY 3.0 Rapid payment gateway.

Download the Addon

You can download this addon from the gateway addon download area of our support forum.

Installation

You can install this addon the same way you install any WordPress plugin:

  • Go to the “Add New” plugins screen in your WordPress admin area
  • Click the “upload” tab
  • Browse for the addon file (eStore-eway-rapid.zip)
  • Click “Install Now” and then activate the plugin

Using eWAY Rapid 3.0 Payment Gateway Addon

Once you install addon you will need to configure some eWAY Rapid 3.0 specific settings. You can find the eWAY Rapid 3.0 specific settings under the eStore eway rapid menu of WP eStore plugin. The following screenshot shows how you can access the settings page of this addon:

screenshot showing how to access eway rapid addon settings from the eStore menu

In order to complete the eWAY Rapid 3.0 settings simply follow the steps outlined below:

Step 1: Check the “Enable eway rapid gateway” checkbox from the “Eway Gateway Settings” section of the addon.

Step 2: Fill in the API details. There are two pieces of API information that you need to enter in the settings:

  • Your eWAY Rapid 3.0 user API Key
  • Your eWAY Rapid 3.0 user password

screenshot showing eway rapid 3.0 addon settings

Step 3: Enter your preferred checkout text for eway rapid. This text will be used in the eStore shopping cart gateway selection drop down menu if you are using multiple payment gateway options.

Step 4: Enter a title for the order information page. This page will be used to collect order information from your users.

Now hit the Update button and your site will be ready to accept payments using eWAY Rapid 3.0.

How to create an API Key for eWAY Rapid 3.0

If you are not sure how you can create a new api key (also called Username) and password for your eWAY Rapid account you can follow the steps outlined below:

1) Log in to your partner portal account using the link below for your country

  • https://www.eway.com.au/PartnerPortal
  • https://www.eway.co.uk/PartnerPortal
  • https://www.eway.co.nz/PartnerPortal

2) Go to My Account > User Security > Create User and complete the form.

3) Click on Actions next to the new user and View API Key. This is your new API key and password for accessing Rapid API.

WP eStore Dime Sale and Time Sale Addon Plugin

The eStore Dime Sale and Time Sale addon plugin provides website owners the ability to setup a “dime sale” scenario when selling their eStore products.

This addon allows you to automatically increase the price of selected products based on a per-number-of-sales basis and/or a per-time-interval basis.

The Dime Sale addon allows you to easily configure the required parameters by simply editing your eStore products.

You can configure the following options when using the dime sale addon plugin:

  • Increment Price After Specified Number Of Sales
  • Number of Sales Per Price Increase
  • Price Increment Amount
  • Increment Price After an Interval
  • Price Increment Amount
  • Time Interval
  • Maximum Price

Dime Sale Addon Plugin Usage

Read the following documentation to learn how the dime sale addon plugin works

  • Dime sale and time sale addon plugin usage

How to Install the Dime Sale Addon

You can install this addon the same way you install any WordPress plugin:

  • Go to the “Add New” plugins screen in your WordPress admin area
  • Click the “upload” tab
  • Browse for the addon file (eStore-dime-sale-addon.zip)
  • Click “Install Now” and then activate the plugin

How to Get The Dime Sale Addon/Extension

Currently we are selling this addon to our WP eStore customers only.

The price of this addon is $39.95

« Previous Page
Next Page »

Your Shopping Cart

Shopping Cart Empty
Shopping Cart is Empty
Visit The Shop

Search

Featured Documents

Stylish Product Display Options for WP eStore WP eStore Quick Setup and Usage Video Tutorial WP eStore Shortcodes and Functions Reference WordPress eStore Plugin Features WordPress eStore Plugin Demo What Our Customers Have to Say About Our Products WordPress eStore WishList (Feature Suggestions) WordPress eStore Frequently Asked Questions (FAQ) How to Show Add to Cart buttons

Featured Plugins

WP Express Checkout Plugin
wordpress_estore_icon
wordpress membership plugin icon
wordpress_affiliate_plugin_icon

Copyright © 2025 | eCommerce Plugins