Tips and Tricks WP eCommerce

eCommerce Solution for WordPress Blog

  • Home
  • eCommerce Plugins
  • WP eStore Documentation
  • WP Shopping Cart Doc

WP eStore – Store Opening Hours AddOn

The eStore Opening Hours addon allows you to restrict purchases to certain times. You can configure as many opening/closing times for your shop (each day of the week) in the settings. When a visitor comes to a page to purchase something outside of the configured hours, a message will be displayed to them.

Installing the eStore Opening Hours Addon

You can install this addon the same way you install any WordPress plugin:

  • Go to the “Add New” plugins screen in your WordPress admin area
  • Click the “upload” tab
  • Browse for the addon file (estore-opening-hours.zip)
  • Click “Install Now” and then activate the plugin

Using this Addon

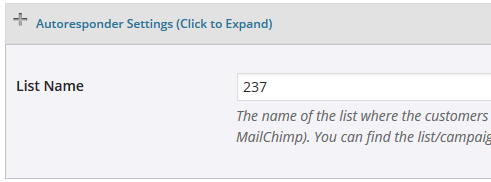
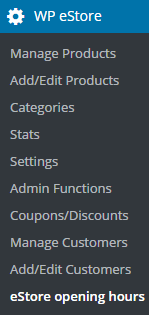
1) In order to configure opening hours for your store, click on the “eStore opening hours” sub-menu under the WP eStore plugin menu.

estore-opening-hours-menu

2) Add opening hours in a 24 hour time format.

estore-opening-hours-configuration

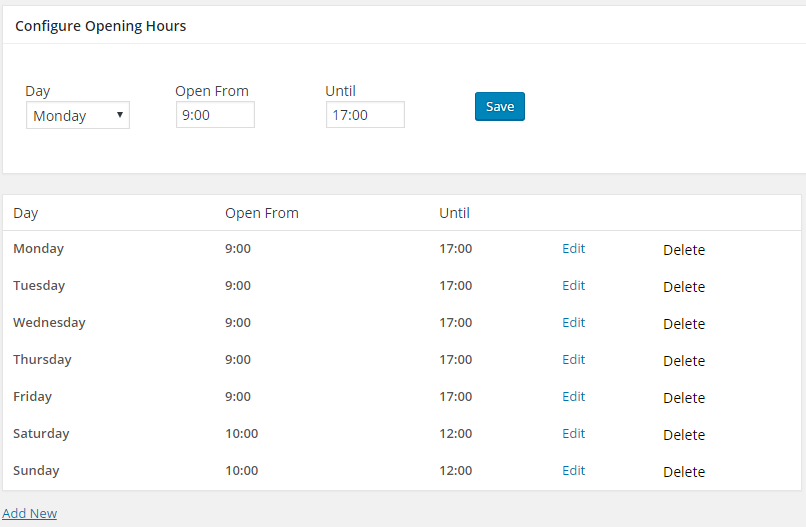
3) Enter the page/post IDs where you want to apply the configured hours.

estore-opening-hours-settings

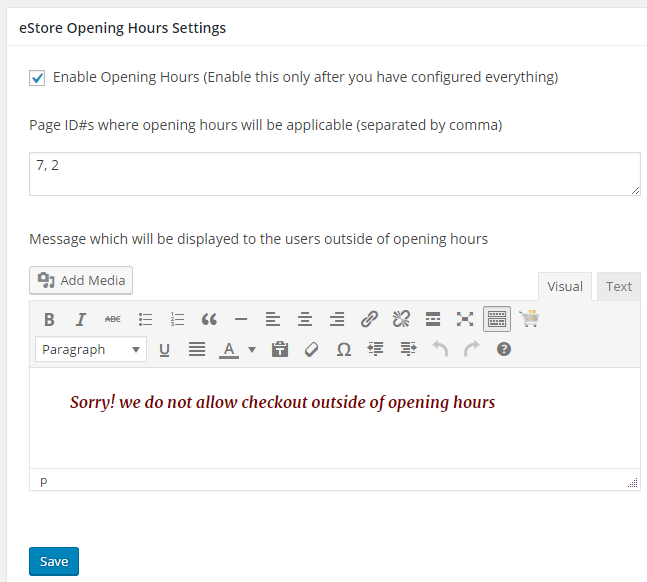
4) Enter the message that you want to display to the users outside of opening hours.

5) Finally click the “Enable Opening Hours” checkbox.

The addon will not function until you enable this option. This is to make sure that you get some time to configure the hours for your store.

6) Click the Save button

How to Find the Post/Page ID

Each WordPress post or page has a unique ID with it. If your site uses web friendly permalink format, You might not be able to find the ID just by viewing the page. Here is a trick that you can apply to find the ID of a post/page:

1)Go to Pages -> All Pages or Posts -> All Posts.

wordpress-post-id

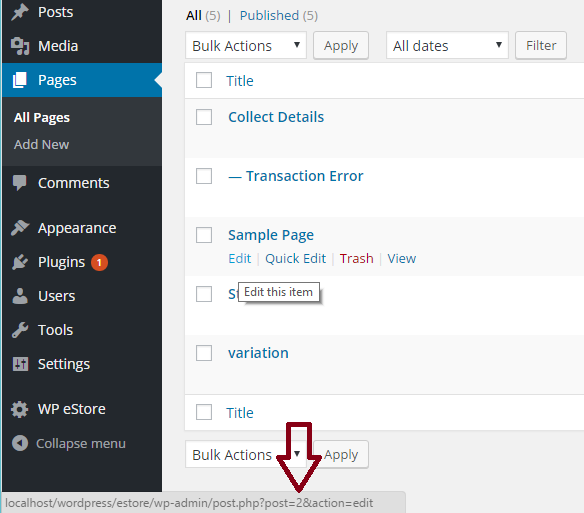
2) Hover your mouse over the Edit link.

3) The post/page ID should appear on the bottom left corner of your screen (it will be a numeric value).

Get the Opening Hours Addon

The price of this addon is $29

Please contact us to purchase this addon.

WP eStore Table Rate Tax by Item Types AddOn

The eStore Table Rate Tax by Item Types addon allows you to charge tax in the shopping cart based on the user’s country and type of items.

Installing the eStore Table Rate Tax by Item Types Addon

You can install this addon the same way you install any WordPress plugin:

  • Go to the “Add New” plugins screen in your WordPress admin area
  • Click the “upload” tab
  • Browse for the addon file (estore-table-rate-tax-by-item-types.zip)
  • Click “Install Now” and then activate the plugin

Using this Addon

When this addon is active, You can easily configure rates that will be used to apply tax in the shopping cart based on the customer’s country.

To access the addon settings click on the “Table Rate Tax” sub-menu under the WP eStore plugin menu.

screenshot showing how to access the estore table rate tax addon by item types menu

To add a new tax zone you need to select a country, type of product and specify a tax rate for it (For example: 20).

Click the “Save” button which will add the zone.

If you do not wish to configure a rate for every country you can specify a flat rate (For example: 15). By default it is set to 0.

screenshot showing the settings of table rate tax by item types addon

screenshot showing the default options of table rate tax by item types addon

screenshot showing the countries configured in the table rate tax by item types addon


How Does It Work

Lets say, a customer is browsing your website from Denmark. When that user adds a digital product to the shopping cart a 25% tax/VAT will be automatically applied.

screenshot showing the eStore table rate tax addon by item types country dropdown in the shopping cart

The location of the user is determined based on the IP address. But they can also manually select their country (the addon will calculate the tax accordingly).

If the user is from a zone that you haven’t configured (Example: USA) a 15% tax will be automatically applied.

Tax will be applied the same way for physical products.

AddOn Price

The eStore Table Rate Tax by Item Types Addon is FREE for all customers who purchased WP eStore plugin from us.

Download the Addon (v1.0.1)

You can download this addon from the addon download area of our customer only support forum.

General Note

Please note that some of these free eStore addons are developed by our users in the community. So they do not have any advanced customization option. The description above explains exactly what this addon does.

Jrox Jam Affiliate Software Integration Addon

You can integrate the eStore plugin with Jrox Jam Affiliate software using this addon plugin. It allows you to track and generate commission for the customers that are referred by your affiliates.

Installing the Jam Affiliate Integration Addon

You can install this addon the same way you install any WordPress plugin:

  • Go to the “Add New” plugins screen in your WordPress admin area
  • Click the “upload” tab
  • Browse for the addon file (estore-jrox-jam-affiliate-integration.zip)
  • Click “Install Now” and then activate the plugin

Addon Usage

Step 1) Click on the “Jrox Jam Affiliate” menu link from the main eStore plugin’s admin menu.

Step 2) Specify the URL of the “sale.php” file of your Jrox JAM affiliate install.

jrox-jam-affiliate-integration-settings

Get the Jam Affiliate Integration Addon

The price of this addon is $29.95

Please contact us to purchase this addon.

WP eStore PayPal Installment Payment Addon

Ever wanted to offer your customers the option to pay via installment payment for your products or services? The eStore PayPal Installment Payment addon allows you to accept payments in installments for the products or services you sell from your website. Offering an installment payment option can be very helpful if you are selling high priced items.

You can offer installment plans that collect the first installment on checkout, with up to 3 additional installments. Or, you can set up installment plans that defer the first installment, with up to 4 installments.

Installing the eStore PayPal Installment Addon

You can install this addon the same way you install any WordPress plugin:

  • Go to the “Add New” plugins screen in your WordPress admin area
  • Click the “upload” tab
  • Browse for the addon file (estore-paypal-installment.zip)
  • Click “Install Now” and then activate the plugin

Product Configuration

In order to configure PayPal Installment specific options for a product click “Add/Edit Products” from the admin dashboard.

screenshot showing how to add a new product in the wp estore plugin

Click on the “PayPal Installment Specific Settings” section and configure the details of your installment plan.

screenshot showing how to configure PayPal Installment specific settings in the WP eStore plugin

Click Save product.

Please note that All payments must be collected within one year of checkout (This is a requirement of PayPal Installment checkout from PayPal). So you need to configure your plan accordingly.

Shortcode Usage

You can now add the following shortcode to a WordPress page (your landing page) to create an installment payment button for a product or service:

[eStore_paypal_installment id="1"]

Here, id is your unique eStore product ID.

Using Installment Payment Button With Fancy Product Display

If you want to use it with a fancy product display template then you just need to make sure that the product in question has the installment details configured. Then you can use the fancy display template shortcode as usual.

Get the PayPal Installment Addon

The price of this addon is $39.00

WP eStore and Infusionsoft Integration Addon

You can integrate the eStore plugin with Infusionsoft so that the customers can be automatically signed up to your Infusionsoft list.

Installing the Infusionsoft Integration Addon

You can install this addon the same way you install any WordPress plugin:

  • Go to the “Add New” plugins screen in your WordPress admin area
  • Click the “upload” tab
  • Browse for the addon file (estore-infusionsoft-addon.zip)
  • Click “Install Now” and then activate the plugin

Addon Usage

Step 1) Click on the “Infusionsoft” menu link from the main eStore plugin’s admin menu.

Step 2) Enable the integration then fill in the API key and your APP Name. Then hit the “update” button to save.

infusionsoft-integration-settings

API Key – You can get the API key from your Infusionsoft account.

APP Name – The appname is the subdomain value of your account URL. For example, if your Infusionsoft account URL is the following:

https://az127.infusionsoft.com/Admin/home.jsp

Then your app name is az127

Step 3) Edit the eStore product in question and specify your Infusionsoft “Tag ID” in the List Name field of the product.

specifying-infusionsoft-tag-id

Now, when a customer purchase this product, the addon will automatically add this user to the specified Infusionsoft tag.

Getting Infusionsoft Tag ID

You can find all your Infusionsoft tags (they used to be called “groups”) from the tags interface of your Infusionsoft account.

getting-Infusionsoft-tag-id

Get the eStore Infusionsoft Addon

The price of this addon is $29.95

WP eStore Country Blocking AddOn

The eStore Country Blocking addon prevents users of certain countries from being able to checkout.

You can also select to only block selling of digital products (instead of all products) to the selected countries.

Installing the eStore Country Blocking Addon

You can install this addon the same way you install any WordPress plugin:

  • Go to the “Add New” plugins screen in your WordPress admin area
  • Click the “upload” tab
  • Browse for the addon file (estore-country-blocking.zip)
  • Click “Install Now” and then activate the plugin

Using this Addon

To access the addon settings click on the “Country Blocking” sub-menu under the WP eStore plugin menu.

screenshot showing how to access the estore country blocking addon menu

Select one or more country which you wish to block by using the checkboxes.

screenshot showing how to select countries to block


How Does It Work

Lets say, a customer is browsing your website from Austria and you have blocked that country in the settings. When that user adds a product to the shopping cart an error message will be displayed instead of the checkout button.

screenshot showing the eStore country blocking addon demo

Get the Country Blocking Addon

Download the Country Blocking addon.

WP eStore Table Rate Tax AddOn

The eStore Table Rate Tax addon allows you to charge tax in the shopping cart based on the user’s country.

Installing the eStore Table Rate Tax Addon

You can install this addon the same way you install any WordPress plugin:

  • Go to the “Add New” plugins screen in your WordPress admin area
  • Click the “upload” tab
  • Browse for the addon file (estore-table-rate-tax.zip)
  • Click “Install Now” and then activate the plugin

Using this Addon

When this addon is active, You can easily configure rates that will be used to apply tax in the shopping cart based on the customer’s country.

To access the addon settings click on the “Table Rate Tax” sub-menu under the WP eStore plugin menu.

screenshot showing how to access the estore table rate tax addon menu

To add a new tax zone you need to select a country and specify a tax rate for it (For example: 20).

Click the “Save” button which will add the zone.

If you do not wish to configure a rate for every country you can specify a flat rate in the “Tax Rate For Other Zones” field (For example: 15). By default it is set to 0.

screenshot showing how to configure a table rate tax

How Does It Work

Lets say, a customer is browsing your website from Denmark. When that user adds a product to the shopping cart a 25% tax/VAT will be automatically applied.

screenshot showing the eStore table rate tax addon country dropdown

The location of the user is determined based on the IP address. But they can also manually select their country (the addon will calculate the tax accordingly).

If the user is from a zone that you haven’t configured (Example: USA) a 15% tax will be automatically applied.

AddOn Price

The eStore Table Rate Tax Addon is FREE for all customers who purchased WP eStore plugin from us.

Download the Addon (v1.0.1)

You can download this addon from the addon download area of our customer only support forum.

General Note

Please note that some of these free eStore addons are developed by our users in the community. So they do not have any advanced customization option. The description above explains exactly what this addon does.

Adwords Conversion Tracking AddOn for Your Store

If you run Google Adwords campaigns and you want to know which of your keywords best leads to clicks and conversions, such as sales, conversion tracking can help you. The conversion tracking tool in AdWords can show you what happens after customers click your ad (for example, whether they purchased your product or not).

The eStore conversion tracking addon plugin adds conversion tracking functionality to your store.

Installing the Conversion Tracking Addon

You can install this addon the same way you install any WordPress plugin:

  • Go to the “Add New” plugins screen in your WordPress admin area
  • Click the “upload” tab
  • Browse for the addon file (estore-adwords-conversion-tracking.zip)
  • Click “Install Now” and then activate the plugin

Using This Addon

After you active this addon, You need to configure some settings related to this addon.

Click on the “Adwords Conversion” sub-menu under the eStore plugin’s admin menu.

You need the following two pieces of information from your Google Adwords account:

  1. Conversion Label
  2. Conversion ID

Follow this tutorial to get your conversion tracking code.

Your conversion tracking code should look like the following (the two pieces of information you need from this code is highlighted):

getting-adwords-conversion-id-and-label-values

Once you have the “Conversion Label and “Conversion ID” values, enter them in the settings of this addon:

adwords-conversion-tracking-settings

Save the settings and your store will start to do the conversion tracking.

Download the Addon (v1.0)

You can download this addon from the addon download area of our support forum.

Please note that some of these free eStore addons are developed by our users in the community. So they do not have any advanced customization option. The description above explains exactly what this addon does.

WP eStore Addon – Self Re-Download Digital Products

This eStore addon allows your customers to re-download the digital products they purchased via a page on your site.

This can be used if you want your customers to be able to download the latest version of a digital product by visiting a page on your site and filling out a form.

self-re-download-digital-products-form-screenshot

Installing the Self Re-Download Products Addon

You can install this addon the same way you install any WordPress plugin:

  • Go to the “Add New” plugins screen in your WordPress admin area
  • Click the “upload” tab
  • Browse for the addon file (estore-redownload-purchased-items.zip)
  • Click “Install Now” and then activate the plugin

Using this Addon

When this addon is active, You can configure some settings related to this addon. To configure this addon, click on the “Re-Download Form” sub-menu under the WP eStore plugin admin menu.

self-re-download-digital-products-addon-menu

Step 1) Create a new WordPress page where you want to offer this product re-download option.

Step 2) Add the following shortcode to this newly created page:

[eStore_product_download_form]

Step 3) Select this page from the settings interface of this addon.

You can optionally enable captcha on this digital product re-download form.

Now, your customers can go this page and enter some details (to verify their purchase) and re-download the digital items they purchased from you in the past.

AddOn Price

The Self Re-Download Digital Items Addon is FREE

Download the Addon (v1.1)

You can download this addon from the addon download area of our customer only support forum.

Please note that some of these free eStore addons are developed by our users in the community. So they do not have any advanced customization option. The description above explains exactly what this addon does.

WP eStore Stylish Squeeze Form Addon

The eStore Stylish Squeeze Form Addon allows you to create a nice looking squeeze form using a shortcode.

A squeeze form will help you build an email list by giving a digital download away for free.

Using the Stylish Squeeze Form Addon

When this addon is active, you you can use a shortcode like the following to create a stylish squeeze form anywhere on your WordPress site:

[wp_eStore_ssf id=2]

2 is the eStore product ID in the above shortcode.

Here is a screenshot of how a stylish squeeze form looks like:

stylish squeeze form

Here is an example of a shortcode where you can customize the “Download” button text via the shortcode:

[wp_eStore_ssf id=1 button_text="Download Now"]

Stylish Squeeze Form Template 2

The 2nd template shows the thumbnail image of the product. The following screenshot shows how it looks:

stylish squeeze form template 2

Here is an example of a shortcode that uses template 2:

[wp_eStore_ssf id=1 template=2]

Stylish Squeeze Form Template 3

Here is an example of how the 3rd template looks like:

stylish-squeeze-form-template3-example

Use the following shortcode to use template 3:

[wp_eStore_ssf id=1 template=3]

Stylish Squeeze Form Template 4

Here is an exmaple of how the 4th template looks like

stylish-squeeze-form-template-4-example

Use the following shortcode to use template 4:

[wp_eStore_ssf id=1 template=4]

AddOn Price

The eStore Subscription Coupons Addon is FREE for all customers who purchased WP eStore plugin from us.

Download the Addon (v1.4)

You can download this addon from the addon download area of our customer only support forum.

Installing the Stylish Squeeze Form Addon

You can install this addon the same way you install any WordPress plugin:

  • Go to the Add New plugins screen in your WordPress admin area
  • Click the upload tab
  • Browse for the addon file (estore-stylish-squeeze-form.zip)
  • Click Install Now and then activate the plugin

General Note

Please note that some of these free eStore addons are developed by our users in the community. So they do not have any advanced customization option. The description above explains exactly what this addon does.

Next Page »

Your Shopping Cart

Shopping Cart Empty
Shopping Cart is Empty
Visit The Shop

Search

Featured Documents

Stylish Product Display Options for WP eStore WP eStore Quick Setup and Usage Video Tutorial WP eStore Shortcodes and Functions Reference WordPress eStore Plugin Features WordPress eStore Plugin Demo What Our Customers Have to Say About Our Products WordPress eStore WishList (Feature Suggestions) WordPress eStore Frequently Asked Questions (FAQ) How to Show Add to Cart buttons

Featured Plugins

WP Express Checkout Plugin
wordpress_estore_icon
wordpress membership plugin icon
wordpress_affiliate_plugin_icon

Copyright © 2025 | eCommerce Plugins