Note: We are discontinuing the Clickbank integration due to a lack of usage. Please use any of our PayPal or Stripe integration for membership payments.
ClickBank Integration Instructions For Membership Payment
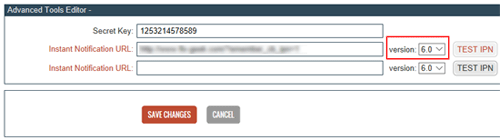
Step 1) Enable the “Instant Notification Service” in your ClickBank account by going to the following section:
My Account -> My Sites -> Advanced Tools
Step 2) Take note of the “Secret Key” that you specify when requesting the “Instant Notification Service” in step 1.
Specify this secret key in eMember’s “ClickBank Secret Key” settings field (You can find it under the “Gateway Settings” tab of eMember settings menu).

Step 3) When your request for IPN gets approved by Clickbank, take the URL value shown in eMember’s ClickBank Instant Notification URL Value field and use it in Your ClickBank account settings (You will specify it in the Instant Notification URL field of your Clickbank account).

Use the URL value shown in there and select IPN v6.0.
It is important to choose the correct IPN version number (see the screenshot below):
Step 4) Finally, when you create a product and place the payment button on a WordPress post or page, do the following:
Add the “membership_level_id” variable in your ClickBank button code. The value of the “membership_level_id” variable should be set to whatever the membership level ID this product corresponds to (example: if this is a payment for membership level 1 then use 1 as the value).
The following is an example of how it should look (given that membership level ID of the product is 1):
<input name="membership_level_id" type="hidden" value="1" />
Example Clickbank Button Code
<form action="http://item.vendor.pay.clickbank.net" method="post">
<input name="membership_level_id" type="hidden" value="1" />
<input src="https://www.example.com/uploads/pay-button.gif" type="image" />
</form>
When someone makes a payment using this button, the plugin will create a membership account with the appropriate membership level (Level ID 1 in the above example) and send the customer a “Prompt to complete the registration” email.
Creating a Thank You Page
You should create a generic thank you page for your membership site. Explain what the user can expect next in this “Thank You” page.
Instruct your users to check their email and click on the link to complete the paid membership registration.
The following is an example of the type of message you should put on your thank you page:
You will receive an email shortly which will contain the details of this transaction.

You will also receive an email containing a special link. Click on that link in the email to complete your paid membership registration.