WordPress Membership

Easy to use WordPress Membership plugin

  • Documentation
  • WP eMember Plugin
  • Projects
  • Home

Manually Activating Expired Members Account

The plugin normally runs in an automated fashion and updates the member profiles when accounts are renewed. It also has a daily check which expires any account that has run its course. However, sometimes you may want to manually activate a member’s account that has expired. The following documentation explains how to do it correctly.

The expiry of a member’s account is controlled by the membership level assigned to that member. When you want to manually activate an expired account, you need to pay attention to the following two items from the member’s profile:

  1. The membership level assigned to the member.
  2. The “Subscription Starts” date set in the member’s profile.

Check the “Subscription Duration” value of the membership level in question and then do the following according to the access duration.

1) No Expiry Access Duration

If the membership level of the member has “No Expiry or Until Cancelled” duration, then you can just change the account status to “Active” and save the profile.

2) Expire After an Interval

If the membership level of the member has “Expire After an Interval” duration, then update the “Subscription Starts” date value in the member’s profile to the current date so the plugin doesn’t think that the membership has run its course and revert it back to expired.

So edit the member’s profile then change the account status to “Active” and update the “Subscription Starts” date to current date then save the profile.

3) Expire After a Fixed Date

If the membership level of the member has a “Expire After a Fixed Date” duration, then check to make sure the current date is not past that expiry date already.

  • Past the expiry date – then changing the account status to “active” won’t help since the membership level is still expired. You may want to switch the member to a new membership level in this case.
  • Expiry date is still in the future – then you can just change the account status to “Active” and save the profile.

Filed Under: Additional Resources Tagged With: member, WP eMember

WP eMember Miscellaneous CSS Tweaks

You can add the CSS tweaks to the following interface of your site (or any other option your theme may have to insert CSS tweaks):

Appearance -> Customize -> Additional CSS

Login Form Related

Hiding the Join Us Link in the Login Form Widget

Add the following CSS tweak to hide the Join Us link in the membership login form widget:

#wp_emember_loginForm .register_link{
display: none;
}

Hiding the Forgot Password Link in the Login Form Widget

Add the following CSS tweak to hide the Forgot Password link in the membership login form widget:

#wp_emember_loginForm #forgot_pass{
display: none;
}

Hiding the Remember Me Checkbox in the Login Form Widget

Add the following CSS tweak to hide the Remember Me checkbox in the membership login form widget:

#wp_emember_loginForm .eMember_remember_me{
display: none;
}

Center Align the Member Login Form

Add the following CSS tweak to center align the member login form on the login page:

.wp_emember_loginForm {
    margin-right: auto;
    margin-left: auto;
}

Registration Form Related

Larger Font Size (Registration Form)

Add the following CSS tweak to make the font-size larger in the membership registration form:

#wp_emember_regoForm {
  font-size: 22px;
}

Larger Font Size for Only the Text Input Fields (Registration Form)

Add the following CSS tweak to target only the text input fields of the registration form and make the font-size larger:

#wp_emember_regoForm input[type="text"] {
  font-size: 22px;
}

Hide the Membership Level Field on the Registration Form

Add the following CSS tweak to target the membership level field of the registration form and hide it:

#wp_emember_regoForm #wp_emember_member_level {
  display: none;
}

Filed Under: Additional Resources Tagged With: membership tweaks, WP eMember

Membership Payments Using the Stripe Payments Plugin

Using the WP eMember Plugin together with the free Stripe Payments Plugin, membership payments can be handled via Stripe payment gateway.

Stripe’s competitive pricing and on-site checkout has landed them as the second best payment processor for online businesses.

Using the Stripe Payments Plugin, a customer can purchase a membership via a ‘Buy Now’ button and checkout with their credit card. Their member profile will be automatically created by eMember and as a result they will be able to enjoy your protected/hidden content.

eMembercrossstripe

Installation and Activation of Plugins

To accept membership payments via Stripe, you will need the eMember Plugin as well as the Stripe Payments Plugin installed and activated.

  1. Download the Stripe Payments Plugin.
  2. Click on the Add New menu under the plugins interface.
  3. Click on the Upload Plugin button and select the plugin zip file for the Stripe Payments Plugin.
  4. Now hit the Install Now button and then activate the plugin.

Creating a Membership Product that can be Purchased via Stripe

First of all you will need configure the basic Stripe Payments settings and eMember settings.

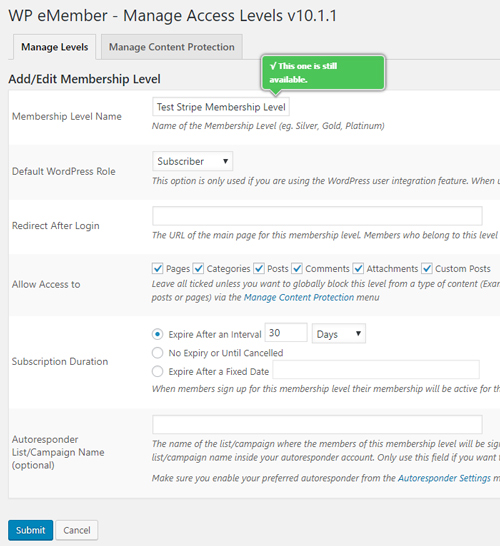
Step 1) Lets create a membership level first (if you don’t have one already). Click on the Membership Level menu under WP eMember. Click the Add New button and create a new membership level.

emember-level-creation

Step 2) Click on the Add New Product menu under Stripe Payments.

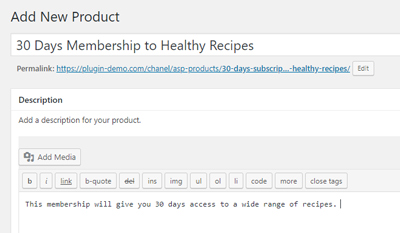
Step 3) Create a product that replicates the membership that you intend on offering. For example, the product title may read ’30 Days Membership to Healthy Recipes’. Choose a ‘Buy Now’ price for the membership that someone must pay to gain access to your hidden content.

Configure all the details needed to create a new product.

configure-stripe-product

Step 4) Link the Stripe Payments product to the membership level that you created. Use the WP eMember Membership Level drop down menu to choose the correct membership level. This is a section within the Add New Product page.

choose-the-membership-level-this-product-connects-to

Step 5) Publish out the product.

Example: Membership Product Created with Stripe Payments

The following product was created with the Stripe Payments plugin and is linked to an eMember, membership level. A customers who purchases the following product gains access to a range of recipes for 30 days. Gaining access to this membership costs a one off fee of $9.95.

publish-stripe-product-out

Member Sign Up Process with Stripe Checkout

After you publish the Stripe membership product, your customers will be able to click the ‘Buy Now’ button.

After a successful payment, the standard eMember registration flow applies.

By default, a basic membership account is automatically created and the new member will receive an email that contains a link. The member should then click on this link that allows them to complete further registration details such as a username and password. After their registration form is complete, they will be able to log in to your site and view hidden content intended for their level.

Step 1) Customer Purchases the Product

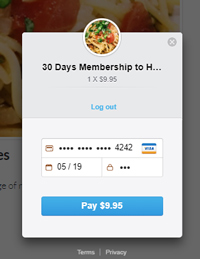
The customer purchases a membership by entering their credit card details in the Stripe popup window.

payment-for-stripe-product-membership

Step 2) eMember Creates a Basic Account Automatically

After a successful credit card payment, eMember creates a basic account.

emember-account-created

Step 3) The Member Receives an Email to Complete the Registration Form

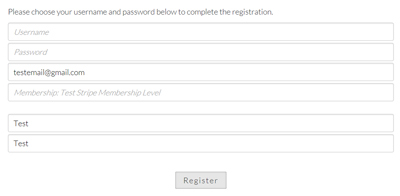
An email is automatically sent to the member that contains a link to the registration form.

complete-registration-details

Step 4) A Member’s Account Details are Upgraded and They Gain Access to Hidden Content

After the registration form is complete, the account details are upgraded and the member can enjoy hidden content.

emember-account-details-upgraded

Filed Under: Additional Resources Tagged With: Membership Level, membership payment, WordPress membership

How to View Members Whose Accounts have Expired or Will Expire Shortly Using eMember

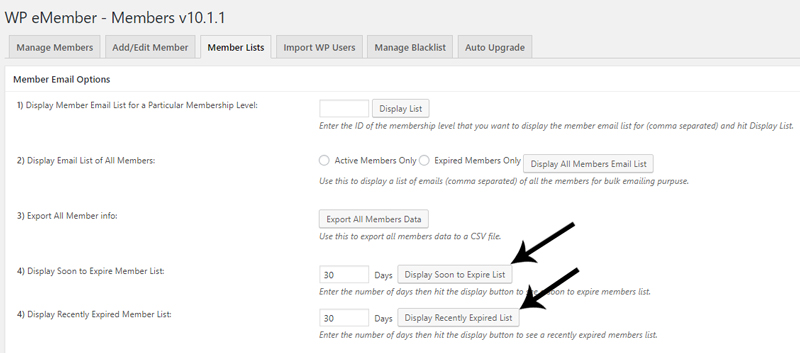
Using eMember you can view all your members whose account will shortly expire and those members whose account has recently expired. This feature gives you the ability to gather all members in question who you can then notify to renew their membership. Often notifying your members will prompt them to renew their membership if they are enjoying their current subscription.

viewing-member-list-emember

Locating the ‘Display Member’ Feature

  1. Click on WP eMember and then on the Members menu.
  2. Click on the Member Lists tab.
  3. You will see two different features within this tab. One will display a list of members who are Soon to Expire and the other will display a list of members who have Recently Expired.

Viewing Soon to Expire Members

In the Display Soon to Expire Member List field, enter the number of days prior to member expiry. For example, if you wish to see all members who have 30 days left of their membership you would enter ‘30′ in this field. Once you have entered a numeral click the Display Soon to Expire List button.

Viewing Recently Expired Members

In the Display Recently Expired Member List field, enter the number of days since a members account has expired. For example, if you wish to see all members whose account expired less than 30 days ago, you would enter ‘30′ in this field. Once you have entered a numeral click the Display Recently Expired List button.

Filed Under: Additional Resources Tagged With: member, Membership Level, Settings, WP eMember

How to Offer Your Customers a Free Trial Period

A trial period allows your customers to view protected content on your site for free. The time frame of the trial period is entirely up to you, some opting to create a trial period that lasts a few days, while others wish to offer their customers a trial that lasts a few weeks. A free trial period allows your customers to test run the membership you offer without having to pay.

This documentation will outline the two ways to offer a free trial period to your customers:

  • Option 1: Providing your customers with a free period prior to charging them for a membership (using a subscription button)
  • Option 2: Offering a trial period for free with no further cost (customers will have to choose to sign up as a paid member)

Why Offer a Trial Period?

Offering a trial period to your customers allows them to get a taste of what having a paid membership would be like. If your customers like the content you are providing in their trial period, it will entice them to sign up for a paid membership.

Option 1: Creating a Free Period Prior to a Subscription Membership

This option allows you to offer a free trial period attached to a subscription membership. For example, I would like to offer my customers 2 weeks free before recurring payments are deducted from their PayPal account.

  1. Create a ‘Membership Level’ for the subscription you will offer (more details on creating a membership level here). You may wish to title this membership level ‘Gold Subscriber’ or ‘Silver Subscriber’.
  2. Now that you have created your membership level, click on the ‘Payments’ menu under the ‘WP eMember’ plugin.
  3. Select the ‘Create New Button’ tab. Choose the ‘PayPal Subscription’ option.
  4. Give the button a title and select the membership level you created from the drop down menu.
  5. Enter in your PayPal email address and choose the billing cycle and count you would like to associate with this subscription. This billing cycle will begin after the free trial period has ended.
  6. Under the ‘Trial Billing Details’ section is where you will enter in the details that relate to the ‘free trial period’. For a free trial period, enter ‘0’ in the ‘Trial Billing Amount’ field.
  7. In the ‘Trial Billing Period’ field, enter in the length of the trial period you will offer (for example, 10 days). Your customers will not be charged for this period.
  8. ‘Save Payment Data’.

trial-billing-period-wp-emember

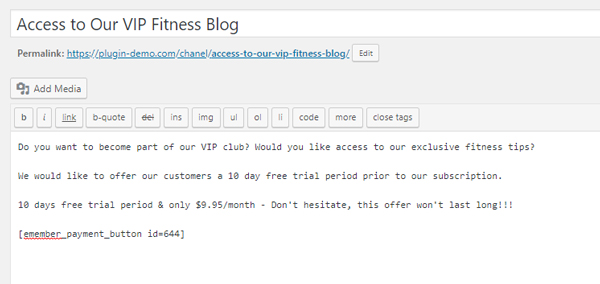
You can now use the button shortcode to embed this payment button on a post or page. You will need to explain the terms of this subscription on the page above or below the subscription button (see example below).

entering-in-subscription-button-emember

Customers who proceed to checkout with PayPal will see ‘terms’ similar to the example below:

diamond-member-subscriber

Option 2: Offering One Standalone Free Trial

Offering a standalone free membership means you will give your customers free access to your website for a set amount of time. This option does not include charging your customers after the free membership ends. Free trial customers will need to return to your site and then purchase a paid membership.

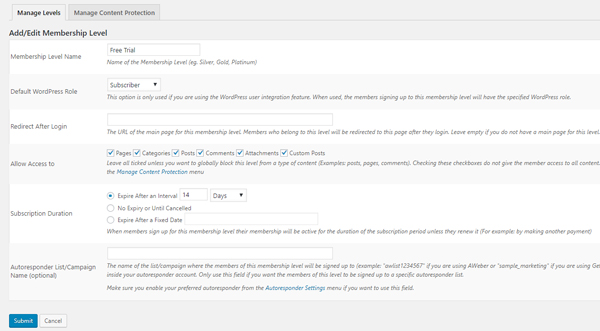
  1. Create a membership level. You may wish to title this membership level: Free Trial Membership.
  2. In the ‘Subscription Duration’ section of the ‘Membership Level’ decide on the length of the free trial you will offer your customers. For this example, I will set my membership level expiry to 14 days. This means after 14 days my customers will no longer have access to my website.
  3. Take note of the level ID of the free trial level.
  4. Click on the ‘Settings‘ menu of ‘WP eMember’.
  5. Check the ‘Allow Free Membership‘ field.
  6. In the ‘Free Membership Level ID‘ field, enter in the ID of your free trial period.
  7. You can now use the standard registration page (that is generated on installation of this plugin) to offer the free trial period to your customers. They will be able to register for free and their account will expire after the time you have set in the ‘Subscription Duration’ field.

free-trial-period-emember

Filed Under: Additional Resources Tagged With: FAQ, Free Trial, Membership Level, WordPress membership, WP eMember

Beaver Builder Plugin and WP eMember Plugin

WP eMemeber should work fine with the Beaver Builder Plugin.

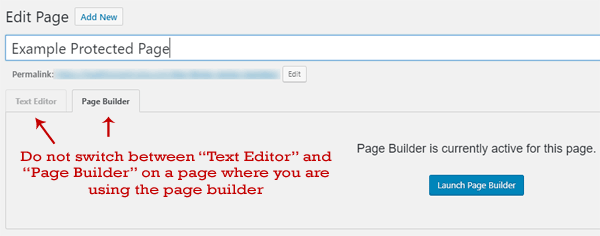
You need to make sure that you don’t switch between the “Text Editor” and “Page Builder” on a page where you are using the page builder. Switching to text editor can mess up your formatting of the page.

Stay in the “Page Builder” then scroll down to the bottom and apply protection to the page (if you need to).

beaver-page-builder-plugin-and-wp-emember

Using eMember Shortcode in Beaver Builder

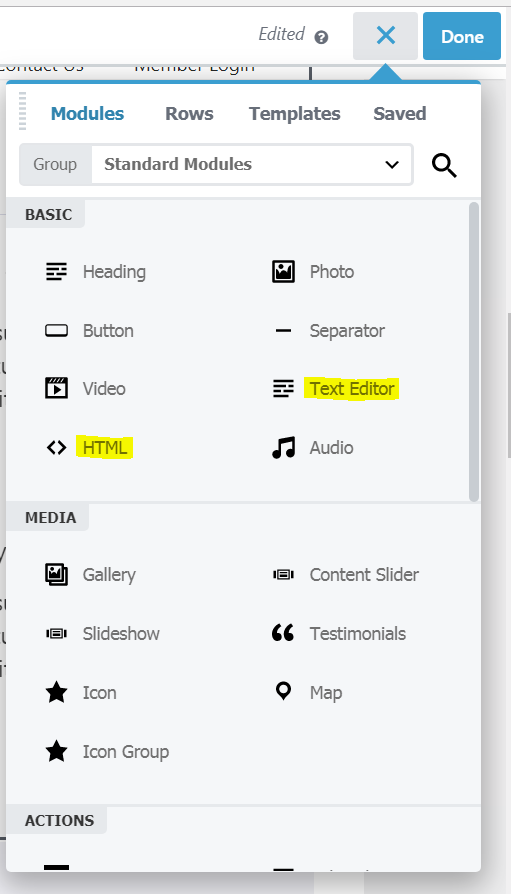
The emember plugin’s shortcode works fine in Beaver Builder. Use the native “HTML” module or “Text Editor” of Beaver Builder and insert shorcode in there.

WP-eMember-Shortcode-in-Beaver-Builder


Filed Under: Additional Resources Tagged With: form builder, Membership Level, membership protection

Managing Member Blacklisting Using WP eMember Plugin

You may have a site where you find a pattern of certain IP or email addresses that are the basis of problematic or spam memberships.

Within the settings menu of the WP eMember plugin, a site admin is able to blacklist specific user addresses. Blacklisting a user from creating a membership can be based on their IP address, email address or email address pattern (eg blacklisting all users who attempt to sign up with an @yahoo.com email). This allows admin to blacklist multiple accounts attempting to sign up with certain email patterns IP addresses or one user specific to a certain email address.

This functionality of the WP eMember plugin allows admin to prevent spam or problematic users from signing up to their site.

How to Blacklist Users Based on IP and Email Address

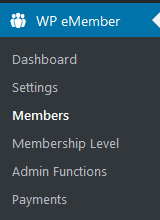
Step 1) Once logged into the admin dashboard of your site, go to Members under the WP eMember menu.

wp-emember-members-admin-menu

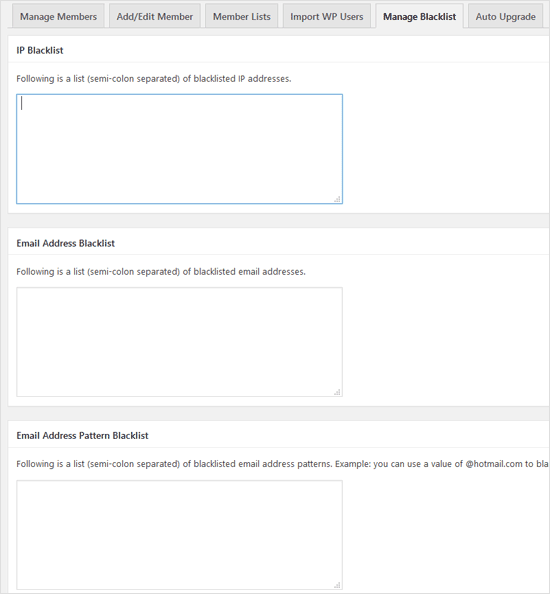
Step 2) Click on the Manage Blacklist tab.

Step 3) Under Manage Blacklist, you will see three fields depending on the sort of users you need to blacklist:

  • IP Blacklist
  • Email Address Blacklist
  • Email Address Pattern Blacklist.

Step 4) Decide on the type of address or pattern you wish to blacklist. For example if you wish to blacklist one user from becoming a member you may decide to blacklist them using their email address. You would enter their email into the email address blacklist field. If you have more than one IP or email in any one field you will need to separate them using a semi-colon.

Example Values

The following example values will give you an idea of how to enter the data in the fields.

IP Blacklist

223.58.1.10;4.23.145.90;129.6.8.4

Email Address Blacklist

[email protected];[email protected];[email protected]

Email Address Pattern Blacklist

@spamydomain.com;@yahoo.com

Step 5) Once you have entered in your blacklisted IP, email or pattern email addresses click on the Update Blacklist button at the bottom of the page to save it.

Now, when a member tries to register or login that matches with the entries you specified in the blacklisting interface, they will be blocked.

Filed Under: Additional Resources Tagged With: Access, member, registration form

ConvertKit Integration with WP eMember plugin

You can integrate the WP eMember plugin with ConvertKit so that the members can be automatically signed up to a sequence. You can also add members to certain tags (based on their membership level).

Installing the ConvertKit Addon

You can install this addon the same way you install any WordPress plugin:

  • Go to the Add New plugins screen in your WordPress admin area
  • Click the Upload button
  • Browse for the addon file (emember-convertkit-addon.zip)
  • Click Install Now and then activate the plugin

[Read more…]

Filed Under: Additional Resources Tagged With: Autoresponder, emember addon, newsletter, WP eMember

Amazon S3 Secure Downloads for Members (Using eMember and eStore)

The following video explains how you can do Amazon S3 downloads for members using WP eStore and WP eMember plugins.

Video Tutorial

Summary Steps

Below is a quick summary of the steps involved to set it up:

Step 1) First, configure eStore’s amazon s3 integration with a product.

Step 2) Use the following shortcode on a page for the eStore product in question so a user can click on the download link to download the item via secure amazon s3 download.

[wp_eStore_download_now_button id=1]

1 is the Product ID of the product in this example.

Put as many download now buttons as you want (for different products) on a page.

Step 3) Now, use eMember’s protection settings to protect this post/page in question. So only members who have access to that page can view the “download now” button and use it to download the items from your amazon s3 account.


Filed Under: Additional Resources Tagged With: member only download, membership protection, WordPress membership, WP eMember

Giving Other WordPress User Roles Access to Your WP eMember Admin Dashboard

Your WP eMember plugin’s admin dashboard is only accessible to WP Admin users by default. There is an option in the plugin that you can use to give other WP User roles (example: editor, author etc.) access to the eMember plugin’s admin dashboard.

Enabling Dashboard Access for Other WordPress User Roles

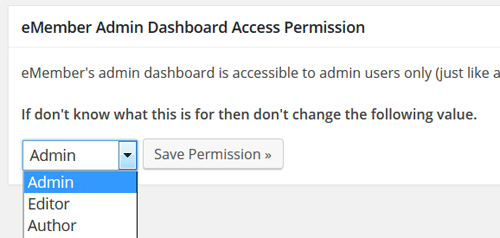
Step 1) Go to the “Admin Functions” menu of the plugin.

Step 2) Scroll down to the “eMember Admin Dashboard Acess Permission” section.

Step 3) Select the desired role and save the permission.

emember-admin-dashboard-access-permission-setup

WP users with and above that selected user role will now have access to the dashboard.

Filed Under: Additional Resources Tagged With: Access, Permission, WP eMember

  • 1
  • 2
  • 3
  • 4
  • Next Page »

Get the WP eMember Plugin

Get WP eMember

Categories

  • Additional Resources
  • Content Protection
  • Design & Usage
  • eMember Addon
  • Installation
  • Integration
  • License
  • Testing
  • Uncategorized
  • Video Tutorial

Recent Comments

  • Chris Brown on API – Querying A Member Profile Using HTTP GET or POST
  • admin on API – Updating A Member Account Using HTTP GET or POST
  • Chris Brown on API – Updating A Member Account Using HTTP GET or POST
  • admin on API – Updating A Member Account Using HTTP GET or POST
  • Andrea on API – Updating A Member Account Using HTTP GET or POST

Featured WordPress Plugins

wordpress_estore_icon
wordpress membership plugin icon
WP Express Checkout Plugin
WordPress Lightbox Ultimate Plugin
WordPress Photo Seller Plugin
wordpress_affiliate_plugin_icon

Copyright © 2023 | WP Membership Plugin