WordPress Membership

Easy to use WordPress Membership plugin

  • Documentation
  • WP eMember Plugin
  • Projects
  • Home

eMember Two-Factor Authentication Addon

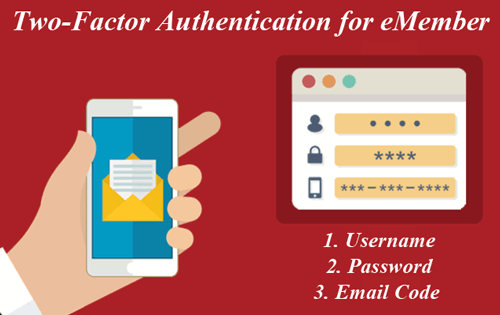
The WP eMember Two-Factor Authentication Addon gives admin the ability to further secure their membership site. To prevent hackers from accessing a members sensitive information, the Two-Factor Authentication Addon requires an additional security login measure.

When the addon has been enabled on an WP eMember site, each member will require their correct username, password and email code to login. While this additional email code step may take a minute longer within the login process, it ultimately protects your member’s information.

two-factor-authentication-for-eMember-plugin

What is Two-Factor Authentication?

Two-Factor Authentication Adds an Additional Security Measure to Your Membership Site. 

Two-Factor Authentication, also referred to as two-step verification or abbreviated as ‘2FA’ is a security measure put in place to prevent hackers accessing a users personal information. This security measure requires users to enter two different authentication factors that only they should have access to.

Why Should I Implement a Two-Factor Authentication System on my Membership Site?

A membership site often contains sensitive member information. This information may be in the form of a members medical records, address, phone number, pictures or other private documents. In the wrong hands this information can be detrimental for the member. As admin of a membership site, the first priority should be the security of your members.

Adding a two-factor authentication system ensures:

  • The process to hack a members account is difficult
  • If a hacker works out a member’s password they still cannot gain access to the site
  • Members have peace of mind that their information is secure

How Does the Two-Factor Authentication Differ from the Single-Factor Authentication?

In terms of the WP eMember Plugin, a general member account always requires single-factor authentication. This is in the form of a secure password. Single-factor authentication means you only have to provide one form of evidence to confirm you are the legitimate member.

If you use the Two-Factor Authentication Addon and the eMember Plugin together, your users will need to provide their password and a secondary security measure in the form of a unique email code.

While the eMember Two-Factor Authentication Addon works by requiring the correct username, password and email code for member access, two-factor authentication methods used in other scenarios can include:

  • Finger print authentication
  • Facial/voice recognition
  • Unique Mobile phone codes

When is Two-Factor Authentication Implemented?

No matter what site you are running, where a login is required we always suggest two-factor authentication. The following sites should predominately sport two-factor authentications:

  • Banking websites
  • Social media sites
  • Membership sites
  • Government sites

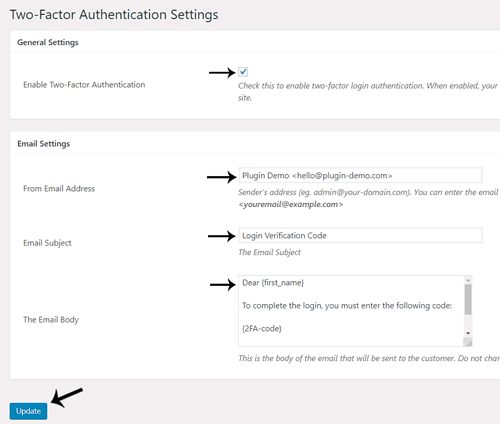
Configuring Two-Factor Authentication for eMember

  1. Ensure you have installed and activated the eMember Two-Factor Authentication Addon.
  2. A new menu titled Two-Factor Authentication will be displayed below WP eMember.
  3. Within the Two-Factor Authentication menu, mark the checkbox to enable this feature on your site.
  4. Ensure the From Email Address is correct. The from email should include your site’s domain name eg ‘[email protected]‘.
  5. Customize the Email Subject if you choose.
  6. Customize the Email Body if needed. Do not change the text within the braces/brackets {}. This is the code that your member will need to retrieve from their email to log into your site. These codes are randomly generated meaning codes always differ.
  7. Click the Update button.
  8. Create a new ‘test’ member. Attempt to login as that member. Ensure that the email code is sent successfully to the ‘test’ member.

configuring-two-step-authentication-addon-for-emember

How can my Members Login with the Two-Factor Authentication

The section below will outline how your members can login to your site when the Two-Factor Authentication Addon is enabled. The process is simple and ensures security of each members profile and information.

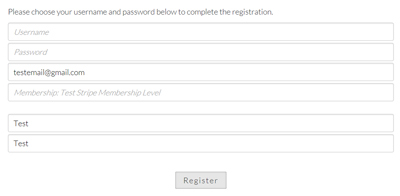
Step 1) A new member registers on your site and enters a valid email address.

Step 2) The member will need to enter their correct Username and Password on the login page followed by clicking the Login button. two-factor-authentication-process

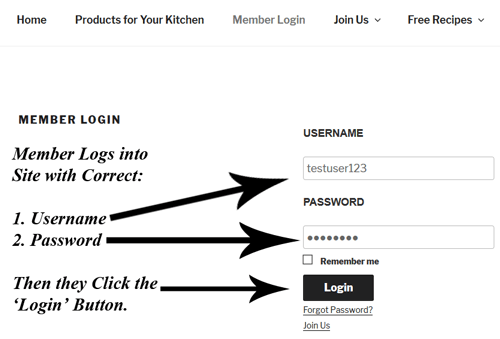
Step 3) If the correct Username and Password were supplied, the member will be prompted to enter the unique code sent to their email address. member-prompted-for-two-step-authentication

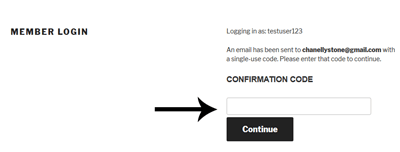
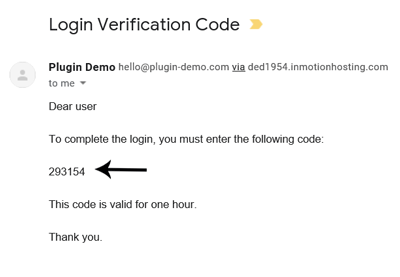
Step 4) An automated email is sent to the members email address that contains their first name and their login code. This is a random ‘6’ digit code.

code-for-two-step-authentication

Step 5) The member will need to copy the code from the plugin email and paste it into the required login field. code-entered-for-two-step-verification-eMember

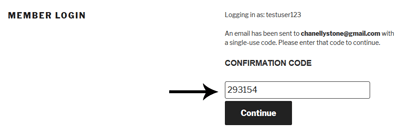
Step 5) If the correct code is entered the member will gain access to the site.

successful-emember-login

Get the 2FA Addon

The price of this addon is $29

Please contact us to purchase this addon.

Filed Under: eMember Addon Tagged With: emember addon, Membership Security, Website Security, WordPress membership, WP eMember

How to Bulk Update Member’s Start Date and Membership Level with WP eMember

A feature of the eMember Plugin allows admin to bulk update their member’s start date and membership level. This tool is useful if you have many members that need to have their accounts updated or changed.

The Bulk Update Admin Functions are useful if you intend to run an upgrade promotion on your website or need to cease a number of member accounts.

When you use these functions keep in mind the changes will apply to all the members that belong to the chosen membership level.

bulk-member-update-feature

Locating the Bulk Update Tools

The bulk update tools can be found by:

  1. Clicking the Admin Functions menu under WP eMember.
  2. Selecting the Bulk Operation tab.
  3. Choosing which Bulk Operation function you would like to use (instructions of each tool can be found below).

locating-bulk-operation-tools-emember

Types of Bulk Operation Tools for the eMember Plugin

Bulk Update Subscription Start Date of Members

The subscription start date of a member is set to the day the user registers.

If for any reason you need to alter the date your user’s membership commenced, you can use this section to do so.

You can manually set a new subscription start date of all members who belong to a particular level with the click of a couple of buttons.

  1. Select the level that the members belong to.
  2. Choose the date that their membership should now commence. You may choose an earlier date if you wish to cease the members access, while choosing a later date will allow them further access to the site.
  3. Click the Bulk Change Subscription Start Date button.
  4. All members that belong to the level you chose from the drop-down menu will now have a new member start date. This new member start date will be visible in the member’s profile.

bulk-member-start-date-eMember-plugin

Bulk Update Membership Level of Members

You can manually change the membership level of any member by editing their record from the members menu. This is great if you only have a couple of members you wish to update.

If you find that you need to update all members within a specific level you can use the Bulk Update Member Level Tool.

For instance, you could be offering a deal where all members are upgraded free of charge. This bulk update option would allow you to make those changes in a couple of seconds.

  1. Select the current membership level of the members that you wish to update. Note that all members within this level will be updated.
  2. Select which level these members will be updated to. This may be an upgrade or downgrade depending on the circumstances.
  3. Click the Bulk Change Membership Level button.
  4. All the members from the chosen level will now be updated to the new level.

bulk-update-membership-level-eMember-plugin

Bulk Update Auto Upgrade Starts Date of Members

The auto upgrade starts date of a member is set to the day the user registers (or the day they pay for a new membership level). You can manually set a specific date of all members who belong to a particular level using the following option.

  1. Select the level of the members that you wish to change the auto upgrade start date of.
  2. Enter the new auto upgrade start date for the members.
  3. Click the Bulk Change Auto Upgrade Start Date button.
  4. The members that belong to the chosen level will now have a new auto upgrade start date.

bulk-upgrade-auto-update-members-eMember-plugin

A Successful Bulk Update

Once you complete a bulk member update, if the process has been successful you will receive a message at the top of the screen similar to the one below.

admin-function-completed-eMember

In the case of this example, all members of the Gold level had their subscription start date updated to the 20th of September 2018. This is now reflected in the profile of each of the Gold members (displayed in the screenshot below).

member-profile-bulk-update-eMember

Filed Under: Design & Usage Tagged With: Admin Functions, member, Settings, Usage Guide, WordPress membership, WP eMember

Membership Payments Using the Stripe Payments Plugin

Using the WP eMember Plugin together with the free Stripe Payments Plugin, membership payments can be handled via Stripe payment gateway.

Stripe’s competitive pricing and on-site checkout has landed them as the second best payment processor for online businesses.

Using the Stripe Payments Plugin, a customer can purchase a membership via a ‘Buy Now’ button and checkout with their credit card. Their member profile will be automatically created by eMember and as a result they will be able to enjoy your protected/hidden content.

eMembercrossstripe

Installation and Activation of Plugins

To accept membership payments via Stripe, you will need the eMember Plugin as well as the Stripe Payments Plugin installed and activated.

  1. Download the Stripe Payments Plugin.
  2. Click on the Add New menu under the plugins interface.
  3. Click on the Upload Plugin button and select the plugin zip file for the Stripe Payments Plugin.
  4. Now hit the Install Now button and then activate the plugin.

Creating a Membership Product that can be Purchased via Stripe

First of all you will need configure the basic Stripe Payments settings and eMember settings.

Step 1) Lets create a membership level first (if you don’t have one already). Click on the Membership Level menu under WP eMember. Click the Add New button and create a new membership level.

emember-level-creation

Step 2) Click on the Add New Product menu under Stripe Payments.

Step 3) Create a product that replicates the membership that you intend on offering. For example, the product title may read ’30 Days Membership to Healthy Recipes’. Choose a ‘Buy Now’ price for the membership that someone must pay to gain access to your hidden content.

Configure all the details needed to create a new product.

configure-stripe-product

Step 4) Link the Stripe Payments product to the membership level that you created. Use the WP eMember Membership Level drop down menu to choose the correct membership level. This is a section within the Add New Product page.

choose-the-membership-level-this-product-connects-to

Step 5) Publish out the product.

Example: Membership Product Created with Stripe Payments

The following product was created with the Stripe Payments plugin and is linked to an eMember, membership level. A customers who purchases the following product gains access to a range of recipes for 30 days. Gaining access to this membership costs a one off fee of $9.95.

publish-stripe-product-out

Member Sign Up Process with Stripe Checkout

After you publish the Stripe membership product, your customers will be able to click the ‘Buy Now’ button.

After a successful payment, the standard eMember registration flow applies.

By default, a basic membership account is automatically created and the new member will receive an email that contains a link. The member should then click on this link that allows them to complete further registration details such as a username and password. After their registration form is complete, they will be able to log in to your site and view hidden content intended for their level.

Step 1) Customer Purchases the Product

The customer purchases a membership by entering their credit card details in the Stripe popup window.

payment-for-stripe-product-membership

Step 2) eMember Creates a Basic Account Automatically

After a successful credit card payment, eMember creates a basic account.

emember-account-created

Step 3) The Member Receives an Email to Complete the Registration Form

An email is automatically sent to the member that contains a link to the registration form.

complete-registration-details

Step 4) A Member’s Account Details are Upgraded and They Gain Access to Hidden Content

After the registration form is complete, the account details are upgraded and the member can enjoy hidden content.

emember-account-details-upgraded

Filed Under: Additional Resources Tagged With: Membership Level, membership payment, WordPress membership

How to Offer Your Customers a Free Trial Period

A trial period allows your customers to view protected content on your site for free. The time frame of the trial period is entirely up to you, some opting to create a trial period that lasts a few days, while others wish to offer their customers a trial that lasts a few weeks. A free trial period allows your customers to test run the membership you offer without having to pay.

This documentation will outline the two ways to offer a free trial period to your customers:

  • Option 1: Providing your customers with a free period prior to charging them for a membership (using a subscription button)
  • Option 2: Offering a trial period for free with no further cost (customers will have to choose to sign up as a paid member)

Why Offer a Trial Period?

Offering a trial period to your customers allows them to get a taste of what having a paid membership would be like. If your customers like the content you are providing in their trial period, it will entice them to sign up for a paid membership.

Option 1: Creating a Free Period Prior to a Subscription Membership

This option allows you to offer a free trial period attached to a subscription membership. For example, I would like to offer my customers 2 weeks free before recurring payments are deducted from their PayPal account.

  1. Create a ‘Membership Level’ for the subscription you will offer (more details on creating a membership level here). You may wish to title this membership level ‘Gold Subscriber’ or ‘Silver Subscriber’.
  2. Now that you have created your membership level, click on the ‘Payments’ menu under the ‘WP eMember’ plugin.
  3. Select the ‘Create New Button’ tab. Choose the ‘PayPal Subscription’ option.
  4. Give the button a title and select the membership level you created from the drop down menu.
  5. Enter in your PayPal email address and choose the billing cycle and count you would like to associate with this subscription. This billing cycle will begin after the free trial period has ended.
  6. Under the ‘Trial Billing Details’ section is where you will enter in the details that relate to the ‘free trial period’. For a free trial period, enter ‘0’ in the ‘Trial Billing Amount’ field.
  7. In the ‘Trial Billing Period’ field, enter in the length of the trial period you will offer (for example, 10 days). Your customers will not be charged for this period.
  8. ‘Save Payment Data’.

trial-billing-period-wp-emember

You can now use the button shortcode to embed this payment button on a post or page. You will need to explain the terms of this subscription on the page above or below the subscription button (see example below).

entering-in-subscription-button-emember

Customers who proceed to checkout with PayPal will see ‘terms’ similar to the example below:

diamond-member-subscriber

Option 2: Offering One Standalone Free Trial

Offering a standalone free membership means you will give your customers free access to your website for a set amount of time. This option does not include charging your customers after the free membership ends. Free trial customers will need to return to your site and then purchase a paid membership.

  1. Create a membership level. You may wish to title this membership level: Free Trial Membership.
  2. In the ‘Subscription Duration’ section of the ‘Membership Level’ decide on the length of the free trial you will offer your customers. For this example, I will set my membership level expiry to 14 days. This means after 14 days my customers will no longer have access to my website.
  3. Take note of the level ID of the free trial level.
  4. Click on the ‘Settings‘ menu of ‘WP eMember’.
  5. Check the ‘Allow Free Membership‘ field.
  6. In the ‘Free Membership Level ID‘ field, enter in the ID of your free trial period.
  7. You can now use the standard registration page (that is generated on installation of this plugin) to offer the free trial period to your customers. They will be able to register for free and their account will expire after the time you have set in the ‘Subscription Duration’ field.

free-trial-period-emember

Filed Under: Additional Resources Tagged With: FAQ, Free Trial, Membership Level, WordPress membership, WP eMember

ActiveCampaign Integration with WP eMember Plugin

You can integrate the WP eMember plugin with ActiveCampaign so that the members can be automatically signed up to your list (with any tags that you want to apply).

Installing the ActiveCampaign Addon

You can install this addon the same way you install any WordPress plugin:

  • Go to the Add New plugins screen in your WordPress admin area
  • Click the Upload button
  • Browse for the addon file (emember-activecampaign-addon.zip)
  • Click Install Now and then activate the plugin

Addon Usage

Step 1) Click on the ActiveCampaign menu link from the main eMember plugin’s admin menu.

Step 2) Enable the integration then fill in the API key and API URL details. You can get the API details from your ActiveCampaign account.

Step 3) Hit the update button to save.

Step 4) Edit the membership level in question and specify your ActiveCampaign List ID in there (this is the list where the members of this level will be added to).

Get the ActiveCampaign Addon

The price of this addon is $39

Filed Under: eMember Addon, Integration Tagged With: 3rd party integration, Autoresponder, emember addon, WordPress membership

Amazon S3 Secure Downloads for Members (Using eMember and eStore)

The following video explains how you can do Amazon S3 downloads for members using WP eStore and WP eMember plugins.

Video Tutorial

Summary Steps

Below is a quick summary of the steps involved to set it up:

Step 1) First, configure eStore’s amazon s3 integration with a product.

Step 2) Use the following shortcode on a page for the eStore product in question so a user can click on the download link to download the item via secure amazon s3 download.

[wp_eStore_download_now_button id=1]

1 is the Product ID of the product in this example.

Put as many download now buttons as you want (for different products) on a page.

Step 3) Now, use eMember’s protection settings to protect this post/page in question. So only members who have access to that page can view the “download now” button and use it to download the items from your amazon s3 account.


Filed Under: Additional Resources Tagged With: member only download, membership protection, WordPress membership, WP eMember

Manually Approve Members on Your Site

You may have a business that requires you to review the membership application. WP eMember plugin has a feature that allows you to manually approve each member account (so you can review their application before giving access).

How to Enable Manual Approval

Step 1) Go to the settings menu of the eMember plugin.

Step 2) Check the Manually Approve Member Registration field.

enable-manual-membership-approval-option

Step 3) Save the changes by clicking the update button.

Your members will be set to a “Pending” account status after they register for an account. So they can’t log into the site until you edit their profile (from the admin side), review the details, and set the account status to “Active”.

Email Notification

The “registration complete” email is the one that gets sent to the members automatically when they successfully submit the registration form. So that email is a good place to explain to them what to expect next.

You should change the “registration complete” email notification message so it explains to the users that their account will be active after you review the application.

You can customize this email message from the following interface:

WP eMember Settings -> Email Settings -> Registration Complete Email

A message like the following should do the job:

Your application is being reviewed. You will be able to access the protected content after an admin approves the account.

Send Email When Account is Approved

You can send a notification email to the user when you approve the account.

When you review the user details and set the account status to “Active“, you can additionally check the “Send a Notification to the User” checkbox and enter an email message. This email will be sent to the user when you save the profile.

sending-account-approval-email

Filed Under: Design & Usage Tagged With: member, Membership Level, WordPress membership

WP eMember Extra Login Shortcodes Addon

The extra login shortcodes addon has a collection of pre-designed login widget creation shortcodes. You can use this addon to create nice looking member login form on your site.

The following screenshot shows the design of the login forms that you can create with this addon:

extra-membership-login-shortcodes-screenshot

extra-membership-login-shortcodes-screenshot-2

Installing the Extra Login Forms AddOn

  • Upload the “emember-extra-login-shortcodes” file via the WordPress’s plugin uploader interface (Plugins -> Add New -> Upload)
  • Activate the plugin through the “Plugins” menu in WordPress.

Extra Login Form Addon Usage

Use one of the following shortcodes on your member login page or sidebar widget to place the login form.

[wp_eMember_fancy_login style="1"]

[wp_eMember_fancy_login style="2"]

[wp_eMember_fancy_login style="3"]

[wp_eMember_fancy_login style="4"]

[wp_eMember_fancy_login style="5"]

[wp_eMember_fancy_login style="6"]

[wp_eMember_fancy_login style="7"]

[wp_eMember_fancy_login style="8"]

Showing Extra Details in the Login Widget

Use the “display_account_details” parameter in the shortcode to show extra user profile details that will get shown to the logged in member.

Below is an example shortcode:

[wp_eMember_fancy_login style="1" display_account_details="1"]

Download The Extra Login Shortcodes Addon

Click here to download this adddon and try it on your site.

Filed Under: eMember Addon Tagged With: Compact Login, emember addon, member login redirection, WordPress membership

WP eMember WPML Addon

The WPML addon loads the correct language file based on what your visitor selects in the WPML language selection widget.

Installing the WPML AddOn

  • Upload the “emember-wpml.zip” file via the WordPress’s plugin uploader interface (Plugins -> Add New -> Upload)
  • Activate the plugin through the “Plugins” menu in WordPress.

Using The WPML Addon

You just have to keep the WP eMember WPML addon active and it will automatically load the correct emember language file for the selected WPML language.

Download the Addon

You can download this adddon from the addon download area.

Filed Under: eMember Addon Tagged With: emember addon, emember extension, WordPress membership, WP eMember

eMember Stats/Analytics Addon

This addon shows you various eMember stats of your membership site.

  • See pageviews of your members
  • Count of pageviews
  • Login counts by day
  • New member registration by month
  • Members by country

Installing the Stats AddOn

  • Upload the “emember-stats.zip” file via the WordPress’s plugin uploader interface (Plugins -> Add New -> Upload)
  • Activate the plugin through the “Plugins” menu in WordPress.

Using The Addon

Click on the “Analytics” menu from the WP eMember plugin’s admin dashboard menu.

Database Tables

This addon will create additional database tables in your WordPress site’s database to store pageviews and other data. If you have a lot of members then the database table sizes can be large.

Download the Addon

Click here to download this adddon and try it on your site.

Filed Under: eMember Addon Tagged With: emember addon, member, WordPress membership

  • 1
  • 2
  • Next Page »

Get the WP eMember Plugin

Get WP eMember

Categories

  • Additional Resources
  • Content Protection
  • Design & Usage
  • eMember Addon
  • Installation
  • Integration
  • License
  • Testing
  • Uncategorized
  • Video Tutorial

Recent Comments

  • Chris Brown on API – Querying A Member Profile Using HTTP GET or POST
  • admin on API – Updating A Member Account Using HTTP GET or POST
  • Chris Brown on API – Updating A Member Account Using HTTP GET or POST
  • admin on API – Updating A Member Account Using HTTP GET or POST
  • Andrea on API – Updating A Member Account Using HTTP GET or POST

Featured WordPress Plugins

wordpress_estore_icon
wordpress membership plugin icon
WP Express Checkout Plugin
WordPress Lightbox Ultimate Plugin
WordPress Photo Seller Plugin
wordpress_affiliate_plugin_icon

Copyright © 2023 | WP Membership Plugin