WordPress Membership

Easy to use WordPress Membership plugin

  • Documentation
  • WP eMember Plugin
  • Projects
  • Home

Import WordPress Users as Members

You can import your existing WordPress users as members by going to the “Import WP Users” interface. So no need to create new member entry for users that already exist in your system.

WordPress doesn’t let you create multiple user accounts using ONE email address. So if you already have an user account with an email address in your system, you can’t create another one using that same address.

Go to the following admin area of the membership plugin to import an existing user account as a member:

WP eMember -> Members -> Import WP Users

import-wordpress-users-as-members

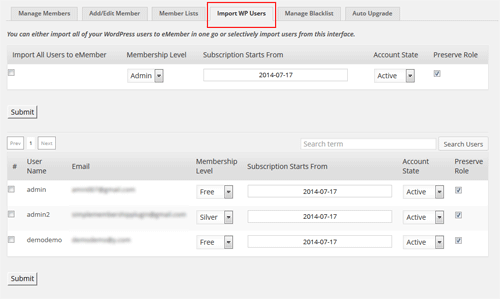
This interface lets you import all users or some users selectively. You will also be able to specify what membership level these users will have when they are imported.

Filed Under: Additional Resources Tagged With: import, Membership Level, WordPress membership

WordPress Membership Site for Selling a Course that Starts in a Future Date

In this tutorial I will go over how to create a membership site to sell courses where all the members will start a course on the same date in the future.

The Goal

Lets say you want to setup a membership site to sell online courses. The courses will last ten weeks, with all participants in the course starting at the same time and going through the course as a group.

So a person may purchase a course today that won’t start until a month from today. Courses must be paid for in full before a person can participate [Read more…]

Filed Under: Additional Resources Tagged With: online course, video membership site, WordPress membership

Membership Site with Facebook Connect Plugin

Looks like the Facebook Connect plugin no longer exists. So this integration is not possible anymore.

In this tutorial I will explain how to use the Facebook Connect Plugin in conjunction with WP eMember to add facebook registration and login to your membership site.

eMember Does Not Create WordPress User Accounts by Default

When someone logs into a WordPress site using Facebook Connect they must have an existing WordPress user account. By default, when a new user is created in eMember, the user is not also created in WordPress. The account profiles for eMember are kept separate.

It makes no sense (in most cases) for someone to login to WordPress on a membership site without getting access to the content they are meant to have access to.

Therefore mirrored accounts need to be created, and mirrored logins need to happen to keep things simple for the users.

Optionally Import WordPress User Accounts Into eMember

If you have WordPress user accounts that need to be brought into eMember, you can do that very quickly. You have the option to import all accounts or just a selection of them.

Here are the steps:

  1. Go to WP eMember >> Members >> Import WP Users
  2. Choose which accounts you want to copy over, the membership level to use, etc.
  3. Click the Submit button.

Use Automation For Future Account Creation And Logins

Now that you have matching accounts between eMember and WordPress for all of the accounts that you want to, you can now set it up so that this happens automatically from here on out. At the same time we can turn on the auto background login features.

If you intend to turn on the ability to allow users to register to WordPress with Facebook Connect, we will need to make sure that a corresponding eMember account is created as well.

To enable that feature:

  1. Go to WP eMember >> Admin Functions.
  2. Look for the section labeled Automatically Create eMember Account When a WordPress User Account is Created.
  3. Enable it and click the Save Settings button.

Now, let’s set it up so that when an eMember account is created, a WordPress account is created in the background at the same time. While we are at it, we’ll turn on the auto login features at the same time.

Follow the steps below:

  1. Go to WP eMember >> Settings.
  2. Scroll down and look for the section labeled WordPress User Integration Settings.
  3. Turn on the top 3 options labeled “Automatically Create WordPress User,” “Automatically log into WordPress,” and “Automatically log into eMember.”
  4. Scroll to the bottom and click the Update Options button.

When everything is complete, test logins and registration using all scenarios to be certain all works as expected.

Filed Under: Additional Resources Tagged With: social media, WordPress membership, WP eMember

How to Limit Access to Video Content on a WordPress Site

In this article and the embedded video I will demonstrate how to prevent access to video content from non-paying members or members without sufficient privileges, on your WordPress site.

There are a few different ways you can limit access to your protected videos and make it only available to your members. In this tutorial I will cover an in-depth method of making videos available to your members only or a customer can buy an individual video and view that video.

You should also check out this other simple option to protect videos.

What Plugins I will Use in This Tutorial

I am going to use the following two WordPress plugins for this tutorial

  • WP eMember
  • WP eStore

These instructions will allow you to provide access to video content in two different ways, for those that are members at the appropriate membership level, and for those who purchased “pay per view” or PPV access. PPV access grants access to one or more videos depending on what was purchased, rather than the “whole lot” which is available to paying members.

Video Tutorial

Setting up the Video Display Page

In the video example you will see that I setup a page that gives visitors a view of all the video courses that are available. Regardless of whether the individual is logged in or not, or what privelegs they have, they will see a thumbnail of the video.

If the visitor is a logged in member with appropriate access, he or she will be able to click the video thumbnail, or the accompanying “Watch Now” link to gain access to the video watch page.

For those that are not logged in, or those that are logged in but aren’t at the appropriate membership level, they will see “add to cart” buttons rather than “watch now” links.

Pay Per View access is not taken into account on this page.

Below is the code, including the shortcodes that could be added to the video display page. Modify the code to adopt it for your needs.

At the top of the page in the sample showed in the video I have a welcome message that changes based on whether the visitor has access to the content or not.

[emember_protected for=2 custom_msg='No access']
If you see this text then you have access
[/emember_protected]

In the above code it checks whether the visitor is logged in and has a membership level of 2. You can determine the appropriate membership level ID to use by going to WP eMember >> Membership Level.

The custom message will accept HTML so you can ask the visitor to “login” or “join” if desired, and link them to the appropriate place. Just be sure to use single quotes to wrap around your custom message and double quotes in your HTML (or vice versa). Also, do not use square brackets in your custom message. I have also found that using more than one break tag in a row generates undesirable results.

Check the partial protection documentation to learn more on the usage of this shortcode.

The other message, the message that shows when the visitor has full access to the content, can explain how to gain access to the content. In my example, I explained to click the “watch now” link to watch the video.

Here is the code used to show either the “add to cart” button or “watch” link below the video thumbnail/description.

[emember_protected for=2 do_not_show_restricted_msg=1]

<a href="#">Watch Now</a>

[/emember_protected]

[emember_protected scope=not_logged_in_users_only]

[wp_eStore_add_to_cart id=1]

[/emember_protected]

[emember_protected not_for=2 do_not_show_restricted_msg=1]

[wp_eStore_add_to_cart id=1]

[/emember_protected]

Here we are again checking for membership level “2” and if found, it links to the video watch page for that particular video. Note: The URL for the video watch page is no secret, the plugins will work to keep the video protected even though the page is publicly accessible.

The next two bits of code may seem redundant but they are checking for two different scenarios even though the results are the same.

One block is displaying content if the visitor is “public” (i.e. not logged in) and the other is displaying content if the visitor is in fact logged in but doesn’t have sufficient privileges. Either way, we are providing an “add to cart” button which will give them access to that individual video.

Somewhere on the page we should also indicate that they can save money (assuming that is the case) if they pay for a full membership rather that buying access to videos on an individual basis. I have seen this scenario where commonly one month of access to all content is slightly less than the cost of two or three individual videos.

Setting Up the Video Watch Page

The video watch page is a public URL but has a section with protected content (the HTML that displays the video). This video HTML can be to YouTube, but in order to keep it really secure it might be best to use a solution such as Amazon.

At any rate, the video watch page checks a few different scenarios before deciding what to display to the visitor.

First off, members with proper access gain access to the video content. Secondly, non-members with pay-per-view access are allowed to view the video content as well. Everyone else sees a thumbnail and a buy button.

Below is the code to grant users who are logged in and have sufficient access (i.e. members), the ability to stream the video. In some cases (when using Amazon AWS for example) you can also provide a download link for the video from within the HTML that is displayed to visitors with sufficient privileges.

[emember_protected for=2 do_not_show_restricted_msg=1]

HTML to display and optionally download the video content

[/emember_protected]

Just like before, we are looking for membership level of 2. If the current visitor’s membership level is not 2, we do nothing. This is why “do_not_show_restricted_msg” is set to 1. This tells the shortocde not to display the default “insufficient access” message for non-privileged users.

After that (below) we have code for logged in users that aren’t at the proper membership level. If you remember, when taking into account pay per view access, this doesn’t necessarily mean that they can’t view the content. For that reason we are using the “wp_eStore_APR” shortcode to check for the cookie that shows that they paid (per view).

We are also considering non logged in users with this code. Non logged in users may very well have access to the video content as well on a pay per view basis. If not, we give them their options (login, pay for a membership, or pay for individual access).

[emember_protected not_for=2 do_not_show_restricted_msg=1]

The code in here is displayed and executed when members ARE logged in but don't have membership level access to ALL content

[wp_eStore_APR expiry=0 status=unexpired]

HTML to display and optionally download the video content.
This is displayed for those that have PPV access.

[/wp_eStore_APR]

[wp_eStore_APR expiry=0 status=expired]

This is displayed for those that DO NOT have PPV access.
It is appropriate here to include a "buy now" or "add to cart" button, or a link to get membership access.

[/wp_eStore_APR]

[/emember_protected]

[emember_protected scope=not_logged_in_users_only]

The code in here is displayed and executed when members ARE NOT logged in

[wp_eStore_APR expiry=0 status=unexpired]

HTML to display and optionally download the video content.
This is displayed for those that have PPV access.

[/wp_eStore_APR]

[wp_eStore_APR expiry=0 status=expired]

This is displayed for those that DO NOT have PPV access.
It is appropriate here to include a "buy now" or "add to cart" button, or a link to get membership access.

[/wp_eStore_APR]

[/emember_protected]

Setting up the “Product” for the Video

Now, the above code is really just the first step to getting pay per view to work.

Using eStore we now must setup a product for each video. There are a couple required fields here:

a) product name of course
b) product price naturally

…and in the Digital Content Details section:

a) Digital Product URL: this is the link to the page for the video (created above) – be sure to replace “http” with “aprtp” (or “https” with “aprtps”) in the full URL
b) Uncheck “Downloadable”

Now, when someone purchases individual access (or pay per view access) to a video, they will be given a “download” link in an email. Of course, they will not be downloading the video watch page, but visiting/viewing it instead.

Upon visiting the page, the cookie will be checked, and the individual will be able to watch the video (i.e. view the hidden PPV content, whatever it may be).

Filed Under: Additional Resources Tagged With: video membership site, video protection, WordPress membership

How to Use Google First Click Free Feature with Your Membership Site

Implementing Google’s First Click Free (FCF) for your content allows you to include your restricted content in Google’s main search index. WP eMember has an option that allows you to enable the Google first click free feature on your membership site.

What is Google First Click Free Feature?

  • Read the details of First Click Free feature from Google’s site
  • More details from the Google Webmaster Central Blog

What You Need to be Aware of?

  • When you use this feature a visitor (non-member) can see your protected content if they follow a link from Google’s Search result. So yes, you are somewhat compromising the security of your protected content.
  • All users who click a Google search result to arrive at your site should be allowed to see the full text of the content they’re trying to access.
  • The page displayed to all users who visit from Google must be identical to the content that is shown to Googlebot.
  • We implemented this feature following exactly what Google recommended and we intend to keep it this way (it is good idea to follow Google’s policies if you don’t want to get your site banned).
If you are uncomfortable with any of the above then DO NOT use this feature.

How Do You Enable it in eMember?

  1. Go to the settings menu of eMember and check the “Enable Google First Click Free Feature” field to enable this feature.
  2. Wait for Google to index your protected content.
Now, when a user follows a Google search result and lands on your protected article, WP eMember will display the full content of the protected article to this user. If the user clicks on any other link on your site then the normal protection rules are applied as usual.

Filed Under: Design & Usage Tagged With: Google First Click Free, WordPress membership, WP eMember

How to create a Video Membership Site with Complete Protection to Your Videos

With General Protection feature of WP eMember you can easily secure your videos from anonymous visitors. Here is how you do it:

  1. Create a post/page in WordPress.
  2. Embed the video on the post/page that you want to offer to the members of a particular membership level. (If you don’t know how to configure the basic membership settings using WP eMember please watch the video tutorial here).
  1. Go to WP eMember->Membership Level->Manage Content Protection section under WP Dashboard. In this section you can set which pages/posts you don’t want the anonymous visitors to see. In this case you can set protection to the post/page you just created and grant access to this post/page for a certain membership level (Detailed explanation can be found here).
  1. Now whenever any member from that particular membership level (the one you granted access to) logs in, the member will be able to view the content of the page (in this case: the video you embedded on that page). Any other anonymous visitors will be asked to log in when they stumble upon that post/page.

This will be good enough for most users but if you want to add another layer of protection for your super secret videos then continue reading.

Ultimate Video Lockdown

The key is to use Amazon S3’s private/protected file option.

To add complete protection to your videos we recommend you use the following two service/product with eMember:

  • Amazon S3 Account
  • WP Lightbox Ultimate Plugin

Amazon S3 has an option where you can make a video file private (If you are selling video content on your site then you should be using Amazon S3). Amazon S3’s private/protected video can only be retrieved by an application using a secure API so there is no way for anyone to go directly to the URL of the file and download it.

The WP Lightbox Ultimate plugin has an option that can use the secure amazon s3 API and allows you to embed private/protected Amazon S3 videos on a WordPress post or page.

The following steps will ensure the complete protection of your videos:

Step 1: Upload your videos to Amazon S3 and make the files private/protected so no one can retrieve the file without the secure API (only you know the API access keys).

Step 2: Embed the private video on your WordPress post or page using the WP Lightbox Ultimate Plugin. You can directly embed the private/protected video on the page (no lightbox) or embed it using the lightbox option (the video will play in a lightbox).

Step 3: Protect the WordPress post or Page using eMember so only members with the correct permission can see the content of the page.

The following video explains how this protected/private Amazon S3 video works with the Lightbox Ultimate plugin:

WP eMember

Another Method of Creating a Video Membership Site

Check the limiting access to video content tutorial to learn another method of offering videos to your members.

Filed Under: Design & Usage Tagged With: online course, video membership site, video protection, WordPress membership

WP eMember Miscellaneous Tweaks

If you are a developer and want to customize the code or if you want to add conditions around your content then the following code examples should be helpful.

Find out if a member is logged in or not

You can use the following function call to determine if a member is logged in or not. The following function call will return true if a member is logged in (otherwise it will return false)

wp_emember_is_member_logged_in()

You can utilize the above function in the following way to ad code in your theme’s template file to add conditional block (for example: show a special message to your logged in users):

<?php if(wp_emember_is_member_logged_in()) { ?>
//Place your special message for members here
<?php } ?>

The following example can be useful if you want to show ad to non-members of the site:

<?php if(!wp_emember_is_member_logged_in()) { ?>
//Place your ad code here
<?php } ?>

The following example can be useful if you want to show a message to a member who belongs to membership level 1:

<?php if(wp_emember_is_member_logged_in('1')) { ?>
//Place your special message for members from membership level with ID 1
<?php } ?>

The following PHP code example shows how you can programmatically retrieve the member ID of a member and add condition:

<?php
$emember_auth = Emember_Auth::getInstance();
$user_id = $emember_auth->getUserInfo('member_id');
if (!empty($user_id))
{
    //pleace code that only members can see
}
?>

Hiding Post Title From Non Members

We will use the “wp_emember_is_member_logged_in” function (explained above) to modify the “Twenty Eleven” theme and make the post title only visible to users who are logged in.
This is an example for when a post is displayed on a single page – ie, I edited the content-single.php file:

The original line of code was as follows:

<h1 class="entry-title"><?php the_title(); ?>

To hide the post heading/title , I modified it as follows:

<h1 class="entry-title"><?php if(wp_emember_is_member_logged_in()) the_title(); ?>

The above is a simple example which will suppress the post heading if someone is not logged in.

Get member id and his/her membership level

<?php
$emember_auth = Emember_Auth::getInstance();
$user_id = $emember_auth->getUserInfo('member_id');
if (!empty($user_id))
{
    //User is logged in so add your conditional code here
    $membership_level = $emember_auth->getUserInfo('membership_level');
    if($membership_level == 1)
    {
        //Add stuff for this level
    }
}
?>

Get the homepage URL from the logged in member’s membership level

<?php
$emember_auth = Emember_Auth::getInstance();
$user_id = $emember_auth->getUserInfo('member_id');
if (!empty($user_id))
{
    //User is logged in so add your conditional code here
    $membership_level_resultset = $emember_auth->userInfo->primary_membership_level;
    $home_page_url = $membership_level_resultset->loginredirect_page;
    //Do something with this URL
}
?>

Show Logged in Member’s Username or other details

<?php
$emember_auth = Emember_Auth::getInstance();
$username = $emember_auth->getUserInfo('user_name');
echo "Username of the logged in member: ".$username;
?>

Check if the Logged in Member is Allowed to See a Post

<?php
$emember_auth = Emember_Auth::getInstance();
$post_id = "10"
if($emember_auth->is_protected_post($post_id))
{
    //This member is allowed to see this post
}

Retrieve Member’s Data

  • How to retrieve logged-in member’s data using a shortcode or PHP code
  • How to retrieve a particular member’s data using shortcode or PHP

Retrieve a Member Record Using the Username

The following PHP code will retrieve a member’s record for the given username:

<?php 
$username = "johndoe";//Replace with the actual username
$member = emember_get_member_by_username ($username);
echo "Member's First Name: " . $member->first_name; //Output the first name
echo "Member's Last Name: " . $member->last_name; //Output the last name
?>

Retrieve Total Members Count

The following PHP code will display the total members count:

<?php echo emember_get_total_members(array()); ?>

Member Registration Completion Hook

If you need to execute some custom code after a member completes the registration, use the following action hook:

  • Registration completion action hook

Show Different Navigation Menu to your Members and Non-members

  • Tweak your navigation menu to show dynamic menu items to members and non-members

Show Logged in Member’s Details Using Shortcode

You can use a shrotcode to show any details of the logged in member on a WordPress post or page. Refer to the eMember shortcode documentation for more details.

Placing a Registration Form For a Particular Membership Level to Give Backdoor Entrance

  • How to create a Registration Form for a Particular Membership Level

Free Members Must Confirm Their Email Address

  • How to make the free members to confirm their email address

Get the Login Page’s URL from the System

$emember_config = Emember_Config::getInstance();
$login_page_url = $emember_config->getValue('login_page_url');

Get the Registration Page’s URL from the System

$emember_config = Emember_Config::getInstance();
$login_page_url = $emember_config->getValue('eMember_registration_page');

Get the Edit Profile Page’s URL from the System

$emember_config = Emember_Config::getInstance();
$login_page_url = $emember_config->getValue('eMember_profile_edit_page');

Filed Under: Additional Resources Tagged With: member, Membership Level, membership tweaks, shortcodes, WordPress membership

How to Configure a Member’s Only Download Page

This post explains how you can give your members access to the Product Downloads when using the WP eMember plugin.

Table of Contents

  • 1) Simple File Download Option
  • 2) Using eMember’s Folder Protection Feature
  • 3) Using the Simple Download Monitor Plugin
  • 4) More Secure Download Option When Used with the WP eStore plugin
  • 5) Using Amazon S3 Download with WP eStore Plugin

1) Simple File Download Option

A “Members’s Only” download page is simply another page that contains a whole bunch of download links that the members can use to download the products. So all you have to do is create a page (example: “Member’s only download”) and put links to all the downloadable files on this page and then protect this page from the “Manage Content Protection” menu of the WP eMember plugin. Since the page is protected, only the members with correct membership level can access this page and download the file.

If you want to give access to a different set of downloadable files to your members based on their membership level (example: silver, gold, platinum) then you can create few different “Member’s only download” pages (one for each membership level) listing different downloadable files and protecting the pages accordingly.

View the Member’s Only Download Page on the demo site to see how this is done. Log in using the following details:

Username: free123
Password: testpass

2) Using eMember’s Folder Protection Feature

Note: The download folder protection feature requires the .htaccess functionality to work correctly on your web server. If you are unsure, please check with your hosting provider to confirm if your server supports .htaccess files.

You can also use eMember’s folder protection feature to secure your downloads. This makes it to where a member will always have to enter a username and password when he/she is about to download any file from this protected folder.

Go to the following WP eMember interface to configure download folder protection.

WP eMember -> Admin Functions -> Download Folder Protection

First you will need to enable the download folder protection feature. After that you can start uploading the files to this protected folder using the built-in file uploader.

emember-download-folder-protection-feature-settings

3) Using the Simple Download Monitor Plugin

You can use our free simple download monitor plugin to manage and configure your downloads. Then embed the download now buttons on a post/page that only the members can see. That plugin can also track the downloads from your members.

For added security, the plugin includes an enhanced file protection feature that can be integrated with our WP eMember plugin.

4) More Secure Download Option When Used with the WP eStore plugin

If you are using the WP eStore plugin then you can take this one step further. Instead of giving out the links to your products (eg. PDF file, Zip file, MP3 file) directly on the “Member’s Only Downlaod” page you can put a “Download” button that lets the user download a particular product. Whats the advantage? The member can download the product without knowing the actual location of the downloadable file (so the static URL of the file is always hidden).

How to create a “Download” button using the eStore?

Configure the products in WP eStore then use the following shortcode for each downloadable product on the page:

[wp_eStore_download_now_button id=1]

1 is the Product ID of the product in this example.

You can customize the download button text using the “button_text” parameter in the shortcode. Example shortcode usage below:

[wp_eStore_download_now_button id=1 button_text="Custom Download Text"]

5) Using Amazon S3 Download with WP eStore Plugin

You can also use amazon s3 integration with eStore’s secure download now button. Read the Amazon S3 secure downloads for members page for details.

Storing the files on amazon S3 and then using API to access those files offers a very good solution for protecting static files.

Filed Under: Design & Usage Tagged With: member only download, membership protection, WordPress membership

  • « Previous Page
  • 1
  • 2

Get the WP eMember Plugin

Get WP eMember

Categories

  • Additional Resources
  • Content Protection
  • Design & Usage
  • eMember Addon
  • Installation
  • Integration
  • License
  • Testing
  • Uncategorized
  • Video Tutorial

Recent Comments

  • Chris Brown on API – Querying A Member Profile Using HTTP GET or POST
  • admin on API – Updating A Member Account Using HTTP GET or POST
  • Chris Brown on API – Updating A Member Account Using HTTP GET or POST
  • admin on API – Updating A Member Account Using HTTP GET or POST
  • Andrea on API – Updating A Member Account Using HTTP GET or POST

Featured WordPress Plugins

WP Express Checkout Plugin
wordpress_estore_icon
wordpress membership plugin icon
wordpress_affiliate_plugin_icon

Copyright © 2025 | WP Membership Plugin