WordPress Membership

Easy to use WordPress Membership plugin

  • Documentation
  • WP eMember Plugin
  • Projects
  • Home

Membership Payments Using the Stripe Payments Plugin

Using the WP eMember Plugin together with the free Stripe Payments Plugin, membership payments can be handled via Stripe payment gateway.

Stripe’s competitive pricing and on-site checkout has landed them as the second best payment processor for online businesses.

Using the Stripe Payments Plugin, a customer can purchase a membership via a ‘Buy Now’ button and checkout with their credit card. Their member profile will be automatically created by eMember and as a result they will be able to enjoy your protected/hidden content.

eMembercrossstripe

Installation and Activation of Plugins

To accept membership payments via Stripe, you will need the eMember Plugin as well as the Stripe Payments Plugin installed and activated.

  1. Download the Stripe Payments Plugin.
  2. Click on the Add New menu under the plugins interface.
  3. Click on the Upload Plugin button and select the plugin zip file for the Stripe Payments Plugin.
  4. Now hit the Install Now button and then activate the plugin.

Creating a Membership Product that can be Purchased via Stripe

First of all you will need configure the basic Stripe Payments settings and eMember settings.

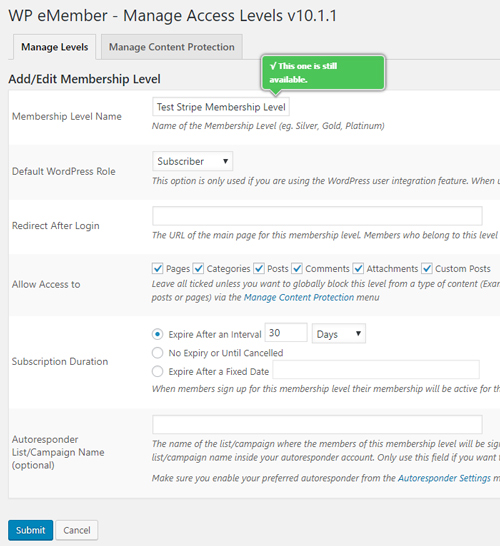
Step 1) Lets create a membership level first (if you don’t have one already). Click on the Membership Level menu under WP eMember. Click the Add New button and create a new membership level.
emember-level-creation

Step 2) Click on the Add New Product menu under Stripe Payments.

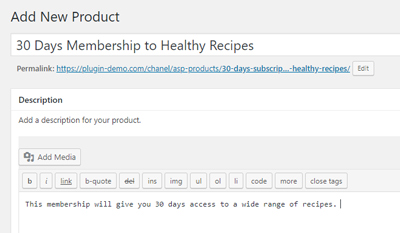
Step 3) Create a product that replicates the membership that you intend on offering. For example, the product title may read ’30 Days Membership to Healthy Recipes’. Choose a ‘Buy Now’ price for the membership that someone must pay to gain access to your hidden content.

Configure all the details needed to create a new product.
configure-stripe-product

Step 4) Link the Stripe Payments product to the membership level that you created. Use the WP eMember Membership Level drop down menu to choose the correct membership level. This is a section within the Add New Product page.

choose-the-membership-level-this-product-connects-to

Step 5) Publish out the product.

Example: Membership Product Created with Stripe Payments

The following product was created with the Stripe Payments plugin and is linked to an eMember, membership level. A customers who purchases the following product gains access to a range of recipes for 30 days. Gaining access to this membership costs a one off fee of $9.95.

publish-stripe-product-out

Member Sign Up Process with Stripe Checkout

After you publish the Stripe membership product, your customers will be able to click the ‘Buy Now’ button.

After a successful payment, the standard eMember registration flow applies.

By default, a basic membership account is automatically created and the new member will receive an email that contains a link. The member should then click on this link that allows them to complete further registration details such as a username and password. After their registration form is complete, they will be able to log in to your site and view hidden content intended for their level.

Step 1) Customer Purchases the Product

The customer purchases a membership by entering their credit card details in the Stripe popup window.
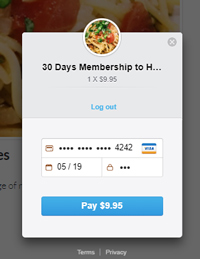
payment-for-stripe-product-membership

Step 2) eMember Creates a Basic Account Automatically

After a successful credit card payment, eMember creates a basic account.

emember-account-created

Step 3) The Member Receives an Email to Complete the Registration Form

An email is automatically sent to the member that contains a link to the registration form.
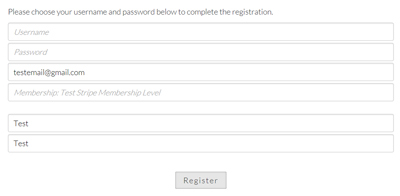
complete-registration-details

Step 4) A Member’s Account Details are Upgraded and They Gain Access to Hidden Content

After the registration form is complete, the account details are upgraded and the member can enjoy hidden content.

emember-account-details-upgraded

Filed Under: Additional Resources Tagged With: Membership Level, membership payment, WordPress membership

How to View Members Whose Accounts have Expired or Will Expire Shortly Using eMember

Using eMember you can view all your members whose account will shortly expire and those members whose account has recently expired. This feature gives you the ability to gather all members in question who you can then notify to renew their membership. Often notifying your members will prompt them to renew their membership if they are enjoying their current subscription.

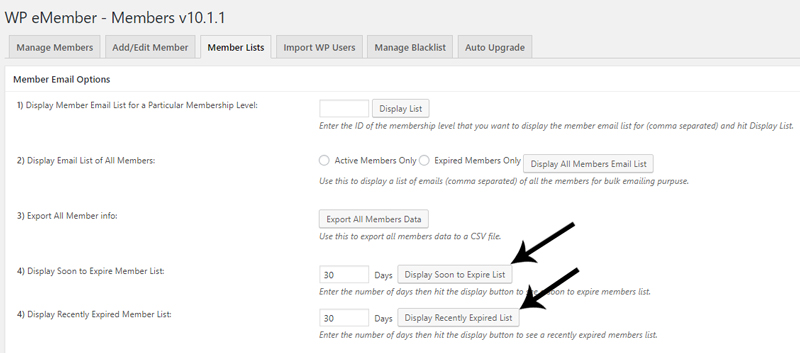
viewing-member-list-emember

Locating the ‘Display Member’ Feature

  1. Click on WP eMember and then on the Members menu.
  2. Click on the Member Lists tab.
  3. You will see two different features within this tab. One will display a list of members who are Soon to Expire and the other will display a list of members who have Recently Expired.

Viewing Soon to Expire Members

In the Display Soon to Expire Member List field, enter the number of days prior to member expiry. For example, if you wish to see all members who have 30 days left of their membership you would enter ‘30′ in this field. Once you have entered a numeral click the Display Soon to Expire List button.

Viewing Recently Expired Members

In the Display Recently Expired Member List field, enter the number of days since a members account has expired. For example, if you wish to see all members whose account expired less than 30 days ago, you would enter ‘30′ in this field. Once you have entered a numeral click the Display Recently Expired List button.

Filed Under: Additional Resources Tagged With: member, Membership Level, Settings, WP eMember

How to Offer Your Customers a Free Trial Period

A trial period allows your customers to view protected content on your site for free. The time frame of the trial period is entirely up to you, some opting to create a trial period that lasts a few days, while others wish to offer their customers a trial that lasts a few weeks. A free trial period allows your customers to test run the membership you offer without having to pay.

This documentation will outline the two ways to offer a free trial period to your customers:

  • Option 1: Providing your customers with a free period prior to charging them for a membership (using a subscription button)
  • Option 2: Offering a trial period for free with no further cost (customers will have to choose to sign up as a paid member)

Why Offer a Trial Period?

Offering a trial period to your customers allows them to get a taste of what having a paid membership would be like. If your customers like the content you are providing in their trial period, it will entice them to sign up for a paid membership.

Option 1: Creating a Free Period Prior to a Subscription Membership

This option allows you to offer a free trial period attached to a subscription membership. For example, I would like to offer my customers 2 weeks free before recurring payments are deducted from their PayPal account.

  1. Create a ‘Membership Level’ for the subscription you will offer (more details on creating a membership level here). You may wish to title this membership level ‘Gold Subscriber’ or ‘Silver Subscriber’.
  2. Now that you have created your membership level, click on the ‘Payments’ menu under the ‘WP eMember’ plugin.
  3. Select the ‘Create New Button’ tab. Choose the ‘PayPal Subscription’ option.
  4. Give the button a title and select the membership level you created from the drop down menu.
  5. Enter in your PayPal email address and choose the billing cycle and count you would like to associate with this subscription. This billing cycle will begin after the free trial period has ended.
  6. Under the ‘Trial Billing Details’ section is where you will enter in the details that relate to the ‘free trial period’. For a free trial period, enter ‘0’ in the ‘Trial Billing Amount’ field.
  7. In the ‘Trial Billing Period’ field, enter in the length of the trial period you will offer (for example, 10 days). Your customers will not be charged for this period.
  8. ‘Save Payment Data’.

trial-billing-period-wp-emember

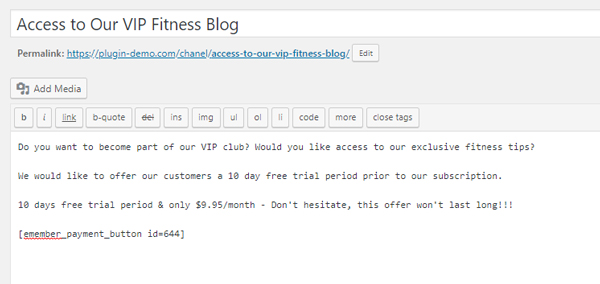
You can now use the button shortcode to embed this payment button on a post or page. You will need to explain the terms of this subscription on the page above or below the subscription button (see example below).

entering-in-subscription-button-emember

Customers who proceed to checkout with PayPal will see ‘terms’ similar to the example below:

diamond-member-subscriber

Option 2: Offering One Standalone Free Trial

Offering a standalone free membership means you will give your customers free access to your website for a set amount of time. This option does not include charging your customers after the free membership ends. Free trial customers will need to return to your site and then purchase a paid membership.

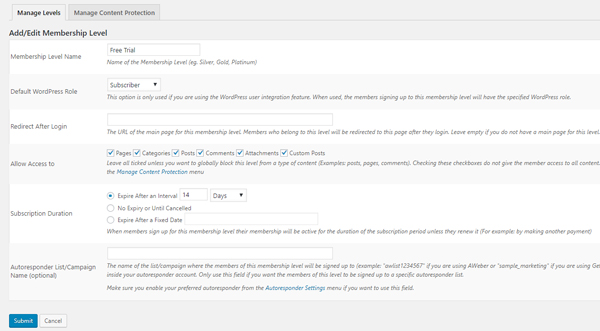
  1. Create a membership level. You may wish to title this membership level: Free Trial Membership.
  2. In the ‘Subscription Duration’ section of the ‘Membership Level’ decide on the length of the free trial you will offer your customers. For this example, I will set my membership level expiry to 14 days. This means after 14 days my customers will no longer have access to my website.
  3. Take note of the level ID of the free trial level.
  4. Click on the ‘Settings‘ menu of ‘WP eMember’.
  5. Check the ‘Allow Free Membership‘ field.
  6. In the ‘Free Membership Level ID‘ field, enter in the ID of your free trial period.
  7. You can now use the standard registration page (that is generated on installation of this plugin) to offer the free trial period to your customers. They will be able to register for free and their account will expire after the time you have set in the ‘Subscription Duration’ field.

free-trial-period-emember

Filed Under: Additional Resources Tagged With: FAQ, Free Trial, Membership Level, WordPress membership, WP eMember

Beaver Builder Plugin and WP eMember Plugin

WP eMemeber should work fine with the Beaver Builder Plugin.

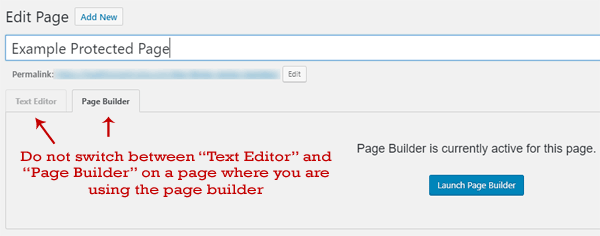
You need to make sure that you don’t switch between the “Text Editor” and “Page Builder” on a page where you are using the page builder. Switching to text editor can mess up your formatting of the page.

Stay in the “Page Builder” then scroll down to the bottom and apply protection to the page (if you need to).

beaver-page-builder-plugin-and-wp-emember

Using eMember Shortcode in Beaver Builder

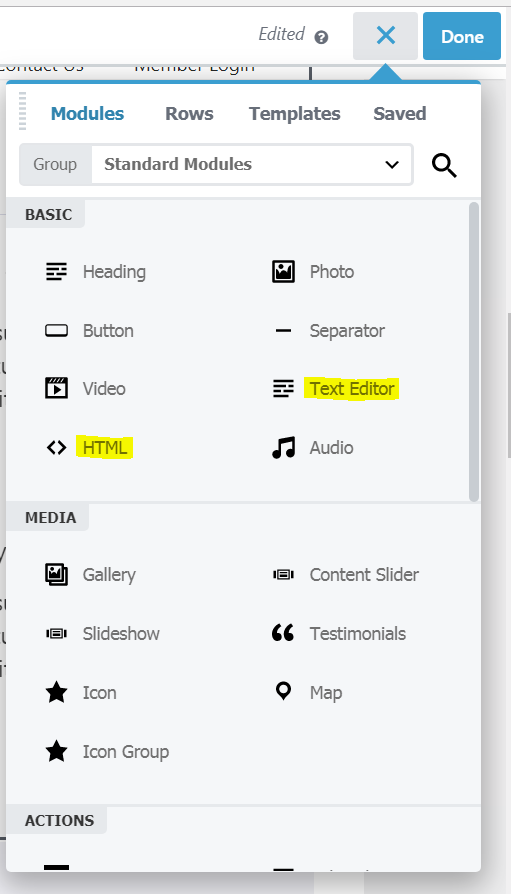
The emember plugin’s shortcode works fine in Beaver Builder. Use the native “HTML” module or “Text Editor” of Beaver Builder and insert shorcode in there.

WP-eMember-Shortcode-in-Beaver-Builder


Filed Under: Additional Resources Tagged With: form builder, Membership Level, membership protection

Allow Members to Upgrade or Add New Level to Their Profile for Free

Normally, you would charge people to upgrade their membership level to a new one. The standard upgrade documentation explains how that process is handled.

However, for a particular project, you may want to allow your members to upgrade their membership level for free. They just log into the site as a member then click a button to upgrade (or add) the level to their profile. This documentation explains how you can create a button that will allow your members to do that.

Creating a Button for Free Membership Level Upgrade

Step 1) Create a new WordPress page (where you will put the free upgrade buttons).

Step 2) Use the following shortcode in this newly created page. So you are creating a button that will upgrade the user’s membership level to the one specified in the “level” parameter of the shortcode.

[wp_eMember_upgrade_membership_level_to level="3"]

3 is the membership level ID in the above example. So change it to the correct level ID value for your site.

You can put as many buttons as you want (using the above shortcode) on this page for your various different levels that you want to offer free upgrade.

Step 3) Protect this page so only logged-in members of the site can view and interact with the upgrade buttons. You can use partial protection too (if that makes sense for your particular situation).

Step 4) Tell your users (who already has an account on your site) to go to this page and click on the button to upgrade.

When logged-in members click on the button that this shortcode generates, it upgrades their membership level to the one specified in the shortcode. If you are using the multiple membership level per user feature, then it will ADD the specified level to their profile (meaning they will now be able to access content of this newly added level).

Custom Button Text for the Update Level Button

You can specify a custom button text for the button by using the “button_text” parameter in the shortcode.

Example shortcode usage below:

[wp_eMember_upgrade_membership_level_to level="3" button_text="Click here to update"]

Redirect the Members to a Page After They Use the Button

You can use the “redirect_to” parameter in the shortcode to redirect the members to a page after they use the level update button.

Example shortcode usage below:

[wp_eMember_upgrade_membership_level_to level="3" redirect_to="http://www.exmaple.com/page-after-update-button-usage"]

Filed Under: Additional Resources Tagged With: Account Upgrade, Membership Level, shortcodes, WP eMember

Manually Approve Members on Your Site

You may have a business that requires you to review the membership application. WP eMember plugin has a feature that allows you to manually approve each member account (so you can review their application before giving access).

How to Enable Manual Approval

Step 1) Go to the settings menu of the eMember plugin.

Step 2) Check the Manually Approve Member Registration field.

enable-manual-membership-approval-option

Step 3) Save the changes by clicking the update button.

Your members will be set to a “Pending” account status after they register for an account. So they can’t log into the site until you edit their profile (from the admin side), review the details, and set the account status to “Active”.

Email Notification

The “registration complete” email is the one that gets sent to the members automatically when they successfully submit the registration form. So that email is a good place to explain to them what to expect next.

You should change the “registration complete” email notification message so it explains to the users that their account will be active after you review the application.

You can customize this email message from the following interface:

WP eMember Settings -> Email Settings -> Registration Complete Email

A message like the following should do the job:

Your application is being reviewed. You will be able to access the protected content after an admin approves the account.

Send Email When Account is Approved

You can send a notification email to the user when you approve the account.

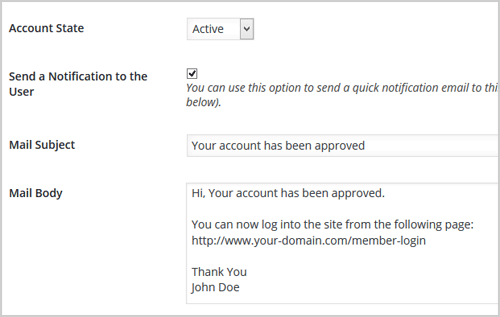
When you review the user details and set the account status to “Active“, you can additionally check the “Send a Notification to the User” checkbox and enter an email message. This email will be sent to the user when you save the profile.

sending-account-approval-email

Filed Under: Design & Usage Tagged With: member, Membership Level, WordPress membership

Allow Member Registration Using an Invitation Code or Password

Lets say you have a membership level called “Invitation Only”. You only want users with a special password or code to be able to signup to this membership level.

Do the following to achieve this type of setup

Step 1) Create Your Special Registration Page

Create a new WordPress page and follow this instruction to add a registration form on this page (for the membership level you want).

Step 2) Set Your Special Code or Password

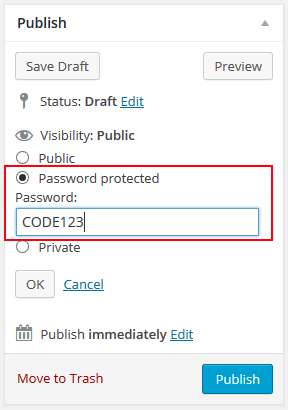
Edit the visibility of the page and select the “Password protected” option. Set your special code (invitation code) as the password of this page.

set-password-protection-on-page

Step 3) Send Users to This Page

Now, you can communicate to your users and tell them to go to this page and use the code/password to unlock the page and register.

Only users with the correct code will be able to see the registration form and register.

Filed Under: Additional Resources Tagged With: member, Membership Level, membership tweaks, registration form

Printable Membership Card Addon

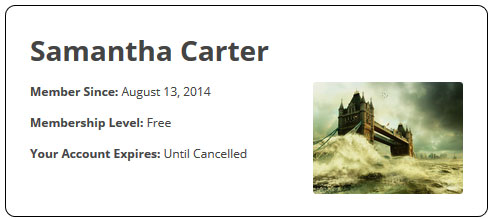
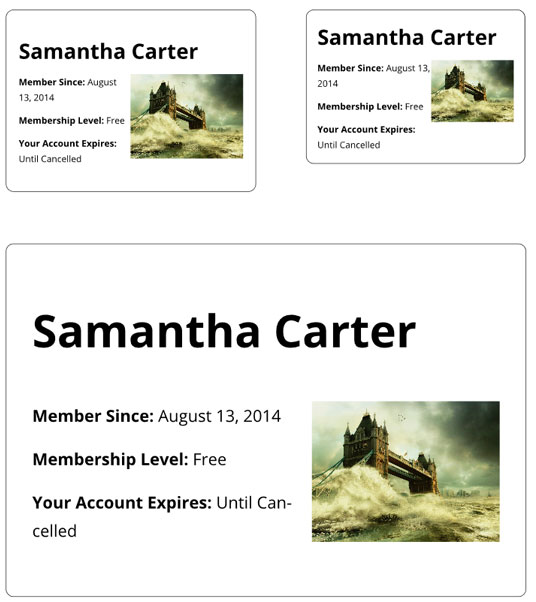
This addon plugin allows you to show a printable membership card for your members. Your members will be able to visit a page on your site and print their membership card.

printable-membership-card-sample

Installing the Printable Membership Card Add-On

  • Upload the “emember-membership-card-addon” file via the WordPress’s plugin uploader interface (Plugins -> Add New -> Upload)
  • Activate the plugin through the “Plugins” menu in WordPress.

Printable Membership Card Add-On Usage

Create a new WordPress post or page. Then enter the following shortcode in this page (your members can go to this page to see a printable membership card):

[eMember_membership_card]

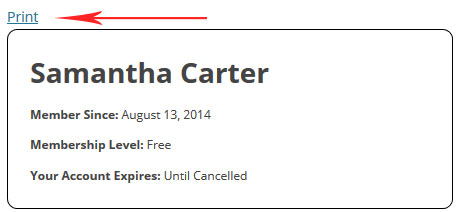
This shortcode will produce the following output. That print link will popup the option to print this card.

printable-membership-card-basic-shortcode-output

Adding a Featured Image in the Membership Card

You can add an image in the card (example: your company logo) by using the “image_url” parameter in the shortcode. Here is an example shortcode usage using the featured image:

[eMember_membership_card image_url="http://www.example.com/wp-content/uploads/my-logo.jpg"]

Using Member’s Profile Photo in the Membership Card

You can show the member’s profile photo (if you are using profile picture option in the membership plugin) by adding the “show_profile_photo” parameter in the shortcode.

Example shortcode usage below:

[eMember_membership_card show_profile_photo="1"]

Printed Membership Card Example

When your members go to the page you just created and print the membership card, it will look like the following example:

membership-card-example-with-member-profile-photo

printed-membership-card-example

Get the Printable Membership Card Add-On

The price of this addon is $29.95

Filed Under: eMember Addon Tagged With: emember addon, emember extension, Membership Level, WP eMember

How to Create Multiple Free Membership Levels on Your Site

In this post I will cover how to have more than one free membership level on your site. WP eMember uses one registration form for all of your membership levels. This way you don’t have to create multiple pages with different registration forms and confuse your customers. Full details of how eMember does this is explained here.

Steps for Creating Multiple Free Membership Levels on Your Site:

Step 1: Create a New Level

You can create as many membership levels as you want to. When you give your users access to a membership level for free, it makes that level a “FREE” one.

Create a new membership access level from eMember’s “Membership Level” interface. Lets say the ID of this level is 2.

Step 2: Create a Registration Page

Create a new WordPress page and use the following shortcode on it. This will place a registration form for this newly created membership level:

[wp_eMember_registration_form_for level=2]

2 is the membership ID in this example. You will need to change this value to the actual membership level ID for your system.

Step 3: Send Users to This Page

Now, you can send users to this page and they will be able to signup for this free membership level.

You can repeat steps 1, 2 and 3 to create as many free levels as you want.

Filed Under: Additional Resources Tagged With: Membership Level, registration form, shortcodes

Import WordPress Users as Members

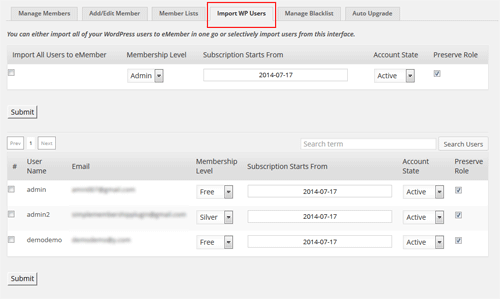
You can import your existing WordPress users as members by going to the “Import WP Users” interface. So no need to create new member entry for users that already exist in your system.

WordPress doesn’t let you create multiple user accounts using ONE email address. So if you already have an user account with an email address in your system, you can’t create another one using that same address.

Go to the following admin area of the membership plugin to import an existing user account as a member:

WP eMember -> Members -> Import WP Users

import-wordpress-users-as-members

This interface lets you import all users or some users selectively. You will also be able to specify what membership level these users will have when they are imported.

Filed Under: Additional Resources Tagged With: import, Membership Level, WordPress membership

  • 1
  • 2
  • Next Page »

Get the WP eMember Plugin

Get WP eMember

Categories

  • Additional Resources
  • Content Protection
  • Design & Usage
  • eMember Addon
  • Installation
  • Integration
  • License
  • Testing
  • Uncategorized
  • Video Tutorial

Recent Comments

  • Chris Brown on API – Querying A Member Profile Using HTTP GET or POST
  • admin on API – Updating A Member Account Using HTTP GET or POST
  • Chris Brown on API – Updating A Member Account Using HTTP GET or POST
  • admin on API – Updating A Member Account Using HTTP GET or POST
  • Andrea on API – Updating A Member Account Using HTTP GET or POST

Featured WordPress Plugins

WP Express Checkout Plugin
wordpress_estore_icon
wordpress membership plugin icon
wordpress_affiliate_plugin_icon

Copyright © 2025 | WP Membership Plugin