WordPress Membership

Easy to use WordPress Membership plugin

  • Documentation
  • WP eMember Plugin
  • Projects
  • Home

How to Bulk Update Member’s Start Date and Membership Level with WP eMember

A feature of the eMember Plugin allows admin to bulk update their member’s start date and membership level. This tool is useful if you have many members that need to have their accounts updated or changed.

The Bulk Update Admin Functions are useful if you intend to run an upgrade promotion on your website or need to cease a number of member accounts.

When you use these functions keep in mind the changes will apply to all the members that belong to the chosen membership level.

bulk-member-update-feature

Locating the Bulk Update Tools

The bulk update tools can be found by:

  1. Clicking the Admin Functions menu under WP eMember.
  2. Selecting the Bulk Operation tab.
  3. Choosing which Bulk Operation function you would like to use (instructions of each tool can be found below).
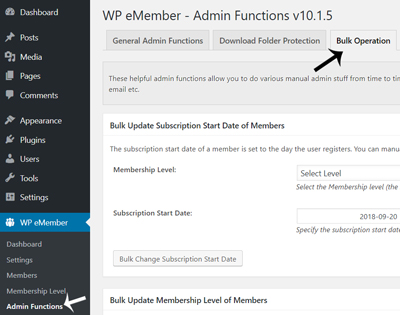
locating-bulk-operation-tools-emember

Types of Bulk Operation Tools for the eMember Plugin

Bulk Update Subscription Start Date of Members

The subscription start date of a member is set to the day the user registers.

If for any reason you need to alter the date your user’s membership commenced, you can use this section to do so.

You can manually set a new subscription start date of all members who belong to a particular level with the click of a couple of buttons.

  1. Select the level that the members belong to.
  2. Choose the date that their membership should now commence. You may choose an earlier date if you wish to cease the members access, while choosing a later date will allow them further access to the site.
  3. Click the Bulk Change Subscription Start Date button.
  4. All members that belong to the level you chose from the drop-down menu will now have a new member start date. This new member start date will be visible in the member’s profile.

bulk-member-start-date-eMember-plugin

Bulk Update Membership Level of Members

You can manually change the membership level of any member by editing their record from the members menu. This is great if you only have a couple of members you wish to update.

If you find that you need to update all members within a specific level you can use the Bulk Update Member Level Tool.

For instance, you could be offering a deal where all members are upgraded free of charge. This bulk update option would allow you to make those changes in a couple of seconds.

  1. Select the current membership level of the members that you wish to update. Note that all members within this level will be updated.
  2. Select which level these members will be updated to. This may be an upgrade or downgrade depending on the circumstances.
  3. Click the Bulk Change Membership Level button.
  4. All the members from the chosen level will now be updated to the new level.

bulk-update-membership-level-eMember-plugin

Bulk Update Auto Upgrade Starts Date of Members

The auto upgrade starts date of a member is set to the day the user registers (or the day they pay for a new membership level). You can manually set a specific date of all members who belong to a particular level using the following option.

  1. Select the level of the members that you wish to change the auto upgrade start date of.
  2. Enter the new auto upgrade start date for the members.
  3. Click the Bulk Change Auto Upgrade Start Date button.
  4. The members that belong to the chosen level will now have a new auto upgrade start date.

bulk-upgrade-auto-update-members-eMember-plugin

A Successful Bulk Update

Once you complete a bulk member update, if the process has been successful you will receive a message at the top of the screen similar to the one below.

admin-function-completed-eMember

In the case of this example, all members of the Gold level had their subscription start date updated to the 20th of September 2018. This is now reflected in the profile of each of the Gold members (displayed in the screenshot below).
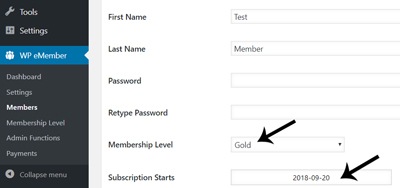
member-profile-bulk-update-eMember

Filed Under: Design & Usage Tagged With: Admin Functions, member, Settings, Usage Guide, WordPress membership, WP eMember

How to View Members Whose Accounts have Expired or Will Expire Shortly Using eMember

Using eMember you can view all your members whose account will shortly expire and those members whose account has recently expired. This feature gives you the ability to gather all members in question who you can then notify to renew their membership. Often notifying your members will prompt them to renew their membership if they are enjoying their current subscription.

viewing-member-list-emember

Locating the ‘Display Member’ Feature

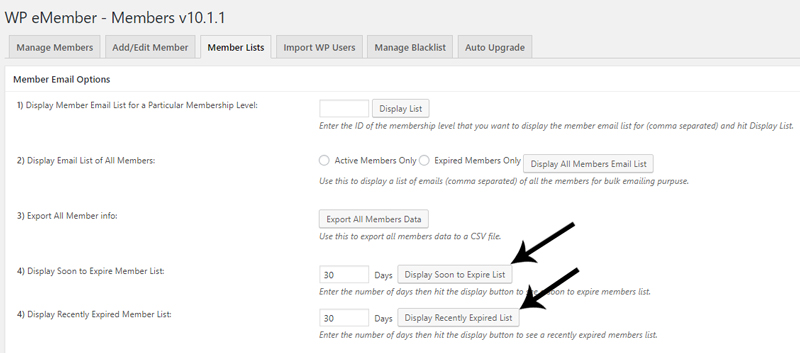
  1. Click on WP eMember and then on the Members menu.
  2. Click on the Member Lists tab.
  3. You will see two different features within this tab. One will display a list of members who are Soon to Expire and the other will display a list of members who have Recently Expired.

Viewing Soon to Expire Members

In the Display Soon to Expire Member List field, enter the number of days prior to member expiry. For example, if you wish to see all members who have 30 days left of their membership you would enter ‘30′ in this field. Once you have entered a numeral click the Display Soon to Expire List button.

Viewing Recently Expired Members

In the Display Recently Expired Member List field, enter the number of days since a members account has expired. For example, if you wish to see all members whose account expired less than 30 days ago, you would enter ‘30′ in this field. Once you have entered a numeral click the Display Recently Expired List button.

Filed Under: Additional Resources Tagged With: member, Membership Level, Settings, WP eMember

How to Setup the WP eMember Settings Page

The first thing you need to do after you activate the WP eMember plugin is head over to the settings menu page to configure some settings. Most of the settings fields are self explanatory and have help text next to it.

It is a good idea to read the Typical Membership Registration process documentation before you start setting up WP eMember plugin.

The settings/options menu for the WordPress eMember Plugin can be found on the left hand side of your wordpress dashboard similar to the following screenshot (on WordPress version 4.0 or above) [Read more…]

Filed Under: Design & Usage Tagged With: Settings, Usage Guide, WP eMember

Get the WP eMember Plugin

Get WP eMember

Categories

  • Additional Resources
  • Content Protection
  • Design & Usage
  • eMember Addon
  • Installation
  • Integration
  • License
  • Testing
  • Uncategorized
  • Video Tutorial

Recent Comments

  • Chris Brown on API – Querying A Member Profile Using HTTP GET or POST
  • admin on API – Updating A Member Account Using HTTP GET or POST
  • Chris Brown on API – Updating A Member Account Using HTTP GET or POST
  • admin on API – Updating A Member Account Using HTTP GET or POST
  • Andrea on API – Updating A Member Account Using HTTP GET or POST

Featured WordPress Plugins

wordpress_estore_icon
wordpress membership plugin icon
WP Express Checkout Plugin
WordPress Lightbox Ultimate Plugin
WordPress Photo Seller Plugin
wordpress_affiliate_plugin_icon

Copyright © 2023 | WP Membership Plugin