WordPress Membership

Easy to use WordPress Membership plugin

  • Documentation
  • WP eMember Plugin
  • Projects
  • Home

JVZoo Integration with WP eMember

WP eMember plugin can be integrated with JVZoo to process the membership payment. When customers purchase your JVZoo product, membership accounts will be created for them.

What You Can Expect from the JVZoo Integration

  • The customers go to your landing page where you have the JVZoo payment button.
  • Customers click on the JVZoo buy button and complete the payment.
  • Payment is completed and they get sent to your thank you page.
  • JVZoo sends a payment notification (JVZIPN) to WP eMember plugin after the transaction.
  • WP eMember creates a member account by processing the notification and emails the special link to complete the registration.
  • Users complete the registration form. Now, they can view everything that the membership level offers.

JVZoo Integration Instructions

Step 1) Set Your JVZoo Secret Key

First, you need to set a secret key for the JVZoo IPN feature in your JVZoo account.

  • Login to your JVZoo account and visit the MyAccount page.
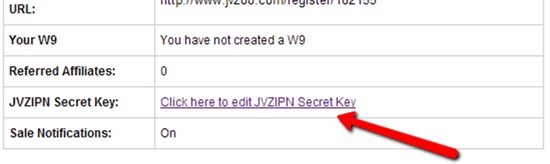
  • Search for Click here to edit JVZIPN Secret Key link as shown on the image below.
  • Click on that link, Enter your Secret Key and click Save.

jvzoo-secret-key-setup-1

Step 2) Enter the Secret Key in WP eMember Settings

Copy the secrete key from step 1 and enter it in the following interface of WP eMember

WP eMember Settings -> Gateway Settings -> JVZoo Integration Settings -> JVZoo Secret Key

Save the settings.

Take note of the JVZoo Instant Notification URL Value as we will need it in the next step.

Step 3) Enter the IPN URL in Your JVZoo Product

Click the Sellers tab in your JVZoo account. Click your product in the sub nav.

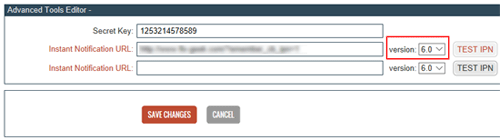
Enter an Instant Notification URL in the JVZIPN URL field.

The URL should look something like the following

https://www.yoursite.com/?emember_jvzoo_ipn=1&membership_level_id=XX

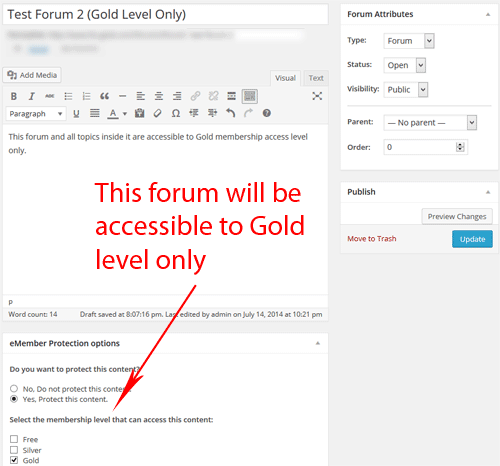
Replace “XX” with the membership level that corresponds to this product. A member account with this membership level will be created when a customer purchases this product.

Click ‘Save Changes’.

Now you should be all set and JVZoo transactions for the product in question will be processed and sent to your Instant Notification URL and WP eMember will create the membership account for them.

Filed Under: Integration Tagged With: 3rd party integration, Integration, jvzoo, membership payment

Creating a Braintree Buy Now Button for Membership Payment

You can create a Braintree payment button inside WP eMember plugin to accept payment for your premium memberships.

Braintree gateway allows you to create payment buttons that is processed on your site (so the visitor never leaves your site during the checkout).

Creating Braintree Buy Now Button for Membership Payment

Step 1) Select Braintree Buy Now Button

Go to Payments -> Create New Button interface from the admin side of the eMember plugin. Then select the Braintree Buy Now option (see image below):

braintree-payment-button-for-membership-step-1

Step 2) Configure the Payment Details

Enter the payment details and select your membership level for the button.

Step 3) Configure the Braintree API Key and Account Details

Enter your Braintree API Key details in the payment button also.

You can get the Braintree API key details from your Braintree account.

You can locate these values by following these steps:

  1. Log into your Braintree account
  2. Navigate to Account > My user
  3. Under API Keys, Tokenization Keys, Encryption Keys, click View Authorizations
    • If no API keys appear, click Generate New API Key
  4. Click View under the Private Key column to see your public and private keys, merchant ID, and environment

If you do not see the Authorizations section at all and your account was recently approved, please try again later – it can take a few business days for Braintree to set up your merchant account.

Merchant Account ID

This field controls your currenty for the transaction. You can leave the Merchant Account ID field empty if you want to use the default one.

Step 4) Save the Payment Button

Save the payment button after you have entered all the necessary details. This will create the payment button.

Step 5) Put the Payment Button on a Page

You can now put this newly created button on your membership join us page so the visitors can pay you using this button.

The Payment Buttons tab shows you the shortcode you need to use to put your Braintree payment button on a page. The shortcode should look something like the following:

[emember_payment_button id=2101]

The shortcode will create a Buy Now button (for the membership level you specified).

When your visitors click on the button, they will see a payment form like the following screenshot. They will be able to enter the credit card details to complete the payment.

braintree-payment-button-for-membership-card-payment-form

Customizing the Button Text

You can customize the button text by specifying the value in the shortcode using the “button_text” parameter. Below is an example shortcode that uses “Pay Now” as the payment button text:

[emember_payment_button id=2101 button_text="Pay for Membership"]

What Happens After the Payment?

If a payment is made by a new member then the user will receive an email that contains a unique link to complete the registration. Read the registration process overview documentation to learn more.

If the payment is made by an existing member then the membership level (associated with this payment button) is applied to the existing member’s profile.

Note: The member must be logged into the site as a member for this plugin to recognize the user and treat him as an existing member.

SSL Certificate Requirement

Braintree payment gateway requires you to have SSL certification on your payment/checkout page (the page where you put your payment button). So the URL of that page should have HTTPS (example: https://www.example.com/membership-payment-page).

If you are not already using an SSL certificate on your site then you should contact your hosting provider and request them to install it for you.

Filed Under: Integration Tagged With: Integration, membership payment

ActiveCampaign Integration with WP eMember Plugin

You can integrate the WP eMember plugin with ActiveCampaign so that the members can be automatically signed up to your list (with any tags that you want to apply).

Installing the ActiveCampaign Addon

You can install this addon the same way you install any WordPress plugin:

  • Go to the Add New plugins screen in your WordPress admin area
  • Click the Upload button
  • Browse for the addon file (emember-activecampaign-addon.zip)
  • Click Install Now and then activate the plugin

Addon Usage

Step 1) Click on the ActiveCampaign menu link from the main eMember plugin’s admin menu.

Step 2) Enable the integration then fill in the API key and API URL details. You can get the API details from your ActiveCampaign account.

Step 3) Hit the update button to save.

Step 4) Edit the membership level in question and specify your ActiveCampaign List ID in there (this is the list where the members of this level will be added to).

Get the ActiveCampaign Addon

The price of this addon is $39

Filed Under: eMember Addon, Integration Tagged With: 3rd party integration, Autoresponder, emember addon, WordPress membership

WP eMember and BBPress Forum Plugin Integration

WP eMember (membership plugin) can be used with BBPress forum plugin to protect the content of your forum topics.

Required Setup for BBPress Forum Protection Feature

Simply enable WP eMember’s WP User integration feature then choose one of the following protection options for your forum.

There are 3 different forum protection options:

  1. You can protect a BBPress forum (the forum and all the topics inside that forum will be protected)
  2. You can protect individual topics
  3. You can make the full BBPress forum area members only

1. Protect a BBPress Forum

This is the most widely used option when it comes to making your forum(s) member only.

This option allows you to protect the forum and all the topics inside that forum for members of particular membership level.

When you create a BBPress forum you can specify the eMember protection settings for this forum. WP eMember will only let members of the correct membership level (that you specify) to see the content of the topics that belong to the protected forum.

Users who do not have permission to view a forum topic will be greeted with a message like the following:

To use this option, edit the “forum” in question from your admin dashboard. Then scroll down to the “eMember protection options” box at the bottom and choose your protection settings.

bbpress-entire-forum-protection

2. Protect Individual Forum Topics

If you want to keep your forum topics open and only protect a handful of topics selectively then this option will be useful for you.

Keep your forum unprotected then edit an individual forum topic and set the eMember protection settings for that topic. eMember will only let the members of the correct membership level to see the content of the protected forum topic.

Users who do not have permission to view a forum topic will be greeted with a message like the following:

To use this option, edit the forum topic from your admin dashboard and choose the protection settings from the “eMember protection options” box.

3. Lock-down the Full Forum Area to Members Only

If you want to lockdown your forum area and make it to where only logged in members can view it, then this option will be useful for you.

This option is achieved by using eMember’s lockdown feature and specifying the URL of the forum area. The following documentation on the lockdown feature explains how to use the lockdown feature:

  • How to use the eMember’s lockdown feature

Filed Under: Integration Tagged With: bbpress forum plugin integration, membership and bbpress forum, wordpress membership with bbpress

WP eMember and ClickBank Integration

Note: We are discontinuing the Clickbank integration due to a lack of usage. Please use any of our PayPal or Stripe integration for membership payments.

ClickBank Integration Instructions For Membership Payment

Step 1) Enable the “Instant Notification Service” in your ClickBank account by going to the following section:

My Account -> My Sites -> Advanced Tools

Step 2)  Take note of the “Secret Key” that you specify when requesting the “Instant Notification Service” in step 1.

Specify this secret key in eMember’s “ClickBank Secret Key” settings field (You can find it under the “Gateway Settings” tab of eMember settings menu).

Step 3) When your request for IPN gets approved by Clickbank, take the URL value shown in eMember’s ClickBank Instant Notification URL Value field and use it in Your ClickBank account settings (You will specify it in the Instant Notification URL field of your Clickbank account).

clickbank-ipn-notification-url-value

Use the URL value shown in there and select IPN v6.0.

It is important to choose the correct IPN version number (see the screenshot below):

clickbank-ipn-settings-ipn-version-6

Step 4) Finally, when you create a product and place the payment button on a WordPress post or page, do the following:

Add the “membership_level_id” variable in your ClickBank button code. The value of the “membership_level_id” variable should be set to whatever the membership level ID this product corresponds to (example: if this is a payment for membership level 1 then use 1 as the value).

The following is an example of how it should look (given that membership level ID of the product is 1):

<input name="membership_level_id" type="hidden" value="1" />

Example Clickbank Button Code

<form action="http://item.vendor.pay.clickbank.net" method="post"> 
<input name="membership_level_id" type="hidden" value="1" /> 
<input src="https://www.example.com/uploads/pay-button.gif" type="image" /> 
</form>

When someone makes a payment using this button, the plugin will create a membership account with the appropriate membership level (Level ID 1 in the above example) and send the customer a “Prompt to complete the registration” email.

Creating a Thank You Page

You should create a generic thank you page for your membership site. Explain what the user can expect next in this “Thank You” page.

Instruct your users to check their email and click on the link to complete the paid membership registration.

The following is an example of the type of message you should put on your thank you page:

You will receive an email shortly which will contain the details of this transaction.

You will also receive an email containing a special link. Click on that link in the email to complete your paid membership registration.

Filed Under: Integration Tagged With: Clickbank integration, membership payment

API – Creating A Member Account Using HTTP GET or POST

This documentation is only for developers. If you are not a developer with good PHP coding skills then you have no need to read this.

WP eMember plugin has an API that allows you to create a member account using a standard HTTP GET or POST request.

Enabling the API

If you want to use this API then you need to enable it from the settings menu of the plugin first. The following is a screenshot of this section in the settings menu:


It is very important that you do not reveal the Secret Word/API key to anyone else.

Using the API

Once you enable it, you can start to send HTTP request to the following URL to create member account remotely or from another software:

http://www.example.com/wp-content/plugins/wp-eMember/api/create.php

You need a minimum of 5 pieces of information to create a member account using a HTTP request. These are:

  • Secret Word/API Key (you specified it in the settings menu of the plugin)
  • First Name
  • Last Name
  • Email Address
  • Membership Level ID

Optionally, you can pass in the following data with the request (if you do not pass these, a randomly generated value will be used for these)

  • username
  • password

1. Creating Member Account Using  HTTP GET request

In order to create a member account via HTTP GET use the following format:

http://www.example.com/wp-content/plugins/wp-eMember/api/create.php?secret_key=XX&first_name=XX&last_name=XX&email=XX&membership_level_id=XX

Replace the ‘example.com’ and ‘XX’ with the appropriate values.

PHP Code Example:The following is an example of how to construct this link using PHP:

$secret_key = "6bd39ewe43a7bb";
$first_name= "Jon";
$last_name= "Doe";
$email= "[email protected]";
$membership_level_id= "1";
$prepared_data = "?secret_key=".$secret_key."&first_name=".$first_name."&last_name=". $last_name."&email=".$email."&membership_level_id=".$membership_level_id;
$get_url = "http://www.example.com/wp-content/plugins/wp-eMember/api/create.php".$prepared_data;
// Execute this GET Request
file_get_contents($get_url);

2. Creating Member Account Using  HTTP POST request

To create a member account via HTTP POST use the following format:

<form method="post" action="http://www.example.com/wp-content/plugins/wp-eMmeber/api/create.php">
<input type="hidden" name="secret_key" value="XX">
<input type="hidden" name="first_name" value="XX">
<input type="hidden" name="last_name" value="XX">
<input type="hidden" name="email" value="XX">
<input type="hidden" name="membership_level_id" value="XX">
<input type=submit value="Submit Post">
</form>

Replace the ‘example.com’ and ‘XX’ with the appropriate value.

Passing Additional Field Values

You can optionally pass additional field values using the following parameters in your request:

  • phone
  • address_street
  • address_city
  • address_state
  • address_zipcode
  • country
  • gender
  • company_name

Filed Under: Additional Resources, Integration Tagged With: 3rd party integration, API, Integration

Using eMember with Another Plugin That Uses the WordPress User Roles

If you need to use eMember with another WordPress plugin that uses the WordPress user’s role (example: a forum plugin) then you need to check the fields in the  “WordPress User Integration Settings” section of the eMember’s settings menu.

WordPress User Integration Settings

WP eMember does not create WordPress user entry by default.

We prefer not to modify or add data to a core WordPress database table. So eMember uses it’s own database table to store membership account details. Most of our customers who create a membership site using WordPress prefer this clean approach where your core WordPress user database table doesn’t get cluttered.

However, some projects will require the creation of WordPress user so that you can use WordPress’s role and capabilities with another plugin. Checking the “Automatically Create WordPress User” checkbox will make it so whenever someone signs up via eMember it will automatically create a corresponding WordPress user in the background with the role you specify in the membership level of eMember.

The WP eMember plugin will work as a gatekeeper. After a user registers for a membership account using eMember, the plugin will create a WordPress user with the specified Role in the background. It will also keep the user’s details in sync. When a member logs into eMember, he/she will automatically get logged into the WordPress user system in the background and other plugin(s) can then do stuff based on that WordPress user’s role.

Mass Import All WP User Accounts into eMember

If you already have a lot of WP User accounts that you want to import into eMember then you can do that from the following interface of eMember:

WP eMember -> Members -> Import WP Users

Auto Create an eMember Account When a WP User is Created by Another Plugin

If you have another WordPress plugin that creates WP User account and you want to automatically create an eMember user account for them then you can do that too.

Go to the following interface of eMember and enable the feature (see the following screenshot):

WP eMember -> Admin Functions

Creating WP User Accounts for Your Existing ‘eMembers’

If you have an established site where there are a number of existing members within your WP eMember plugin, this section will demonstrate how you can create corresponding WP user accounts. This features works well for those admin that wish to now use another plugin that relies on the WP user functionality.

  1. Click on the WP eMember Admin Functions menu.
  2. Scroll down until you find the section titled ‘Create WordPress User Account for the members that do not have one‘.
  3. If you wish to create WP User accounts for existing eMembers, click the appropriate button.
  4. WP User accounts will now be created for all your eMembers (that did not already have a WP User account).

Considerations when using this Feature:

  • User accounts will be created for every eMember user that does not have a corresponding WordPress account already
  • The WordPress user accounts will be created with the same details from eMember but the password will be set to “changeme” (The users who are getting a new WP user record will have to change the password to their liking from the edit profile page).

creating-wp-user-accounts-for-existing-emembers

Filed Under: Integration

WP eMember and GetResponse Integration

The WP eMember membership plugin can be easily integrated with GetResponse (Autoresponder, Email marketing and Email list manager) to signup your members to your email list when they register for a membership account on your site using eMember.

To integrate GetResponse with eMember simply go to the “Autoresponder Settings” tab from the Settings menu of eMember and set it up.

  1. Check the “Use GetResponse AutoResponder” field
  2. Specify your campaign ID in the “GetResponse Campaign ID” field. It maybe labeled as Campaign Token ID in your GetResponse account. This ID value is usually 5 characters long.
  3. Specify your GetResponse API Key that you can get from your GetResponse account (make sure to activate it)
  4. Save the settings by hitting the “Update Options” button at the bottom of the page.

You can also signup members of different membership level to different GetResponse Campaigns by using the Campaign ID there.

Filed Under: Integration

How to Integrate WP eMember with AWeber

The WP eMember membership plugin can be easily integrated with AWeber (Email marketing and Autoresponder service) so that your members get signed up to your AWeber list when they register for an account.

AWeber recently added the capability to add subscribers to a list via their API. We have updated the eMember plugin to use this new API for AWeber integration.

AWeber Integration Steps

Step 1) Make a Connection to the AWeber API

First, you need to connect with the AWeber API. In order to connect eMember with the AWeber API, go to the eMember Settings -> Autoresponder Settings menu and authorize the “Tips and Tricks HQ” app.

Click on the “Make Connection” button to start the process (see the following screenshots).

After you hit the “Make Connection” button you should see a message saying “AWeber Authorization Success” given you provided the correct authorization code. Save the settings.

Step 2) Enable the Integration

Make sure you have checked the “Enable AWeber Signup” option in the settings to enable the AWeber integration.

Step 3) Specify the AWeber List Name/ID

Next, you need to specify the AWeber list name/ID so the plugin knows which list it should signup the members.

Below is an example of how an AWeber list name/ID looks like (you get the list ID value from your AWeber account):

awlist1234567

You can specify a Global list name in the “AWeber List Name” settings field so all members get added to that list. Remember to save the settings after you make changes.

Alternatively, you can signup your members to different AWeber lists based on their membership level also. For membership level specific signup, specify the list name in the “Autoresponder List/Campaign Name” section of the membership level in question.

Filed Under: Additional Resources, Integration Tagged With: 3rd party integration, AWeber, eMember Weber Integration, WP eMember

WP eMember and WP eStore Integration for Membership Payment

The eStore and eMember plugins are pre-integrated so using a WP eStore button to accept payment for membership is very easy.

The only thing you need to do is specify the “Membership Level ID” in the eStore product’s “Reference Text” field when you create/configure a product in eStore.

This basically tells eStore which membership level a product corresponds to. You can create as many eStore products and payment buttons as you want for your different membership levels.

Here is a summary of the steps involved

Step 1) Create an eStore product. Our WP eStore documentation will show you how to do this if you don’t know it already (there are video tutorials for it too)

Step 2) Find a field called “Reference Text” when your are creating/configuring the eStore product. You can find this field under the “Additional Product Details” section of the product (see the screenshot below).

Specify the membership level ID in this reference text field.

Check the video tutorial from the “Video Tutorial” section below which will explain how this works in details.

Video Tutorial

Click on the following image to open the video tutorial:

WP eMember Premium Membership

Buy Now Type Button or Subscription Type Button?

Read the following documentation if you are not sure if you should use an ONE OFF payment button or a SUBSCRIPTION (recurring payment) button for your membership payment:

  • Difference between “Buy Now” and “Subscription” type buttons for membership payment

Example Scenario

Here is an example scenario,

You have a membership level called “Gold Pass”. The id of this membership level is 3 (The ID for each membership level is listed on the Manage Levels screen).

Say for example, you want to charge $25 for this membership level. Go to the “Add/Edit Products” menu of the WP eStore plugin so you can configure a payment button to accept payment from potential customers.

When you fill in the details of this eStore product, just specify 3 (Membership Level ID of Gold Pass) in the “Reference Text” field which is under the “Additional Product Details” section. Now, use an eStore shortcode to place “Add to Cart” or “Buy Now” button (for the product you just configured) on your Membership Payment/Join Us page.

When a member pays for the membership using this button the eStore plugin will know (from the Level ID you entered in the reference text) that this payment was for a “Gold Pass” and it will automatically create the appropriate member account and send an email to the customer.

The email sent to the customers will contain a unique link. When they click/follow that link, they will be brought to the registration page where they will be able to choose their Username and password to complete the registration and access the “members only” content.

If you have multiple membership levels then create an “Add to Cart” or “Buy Now” button for each membership level and place them on your Membership Payment/Join Us page following the above instructions.

Integration Troubleshooting

Check the following link if your integration is not working as expected:

  • WP eStore and eMember integration troubleshooting

Filed Under: Design & Usage, Integration Tagged With: Integration, WP eMember

Get the WP eMember Plugin

Get WP eMember

Categories

  • Additional Resources
  • Content Protection
  • Design & Usage
  • eMember Addon
  • Installation
  • Integration
  • License
  • Testing
  • Uncategorized
  • Video Tutorial

Recent Comments

  • Chris Brown on API – Querying A Member Profile Using HTTP GET or POST
  • admin on API – Updating A Member Account Using HTTP GET or POST
  • Chris Brown on API – Updating A Member Account Using HTTP GET or POST
  • admin on API – Updating A Member Account Using HTTP GET or POST
  • Andrea on API – Updating A Member Account Using HTTP GET or POST

Featured WordPress Plugins

wordpress_estore_icon
wordpress membership plugin icon
WP Express Checkout Plugin
WordPress Lightbox Ultimate Plugin
WordPress Photo Seller Plugin
wordpress_affiliate_plugin_icon

Copyright © 2023 | WP Membership Plugin