WordPress Membership

Easy to use WordPress Membership plugin

  • Documentation
  • WP eMember Plugin
  • Projects
  • Home

Membership Payments Using the Stripe Payments Plugin

Using the WP eMember Plugin together with the free Stripe Payments Plugin, membership payments can be handled via Stripe payment gateway.

Stripe’s competitive pricing and on-site checkout has landed them as the second best payment processor for online businesses.

Using the Stripe Payments Plugin, a customer can purchase a membership via a ‘Buy Now’ button and checkout with their credit card. Their member profile will be automatically created by eMember and as a result they will be able to enjoy your protected/hidden content.

eMembercrossstripe

Installation and Activation of Plugins

To accept membership payments via Stripe, you will need the eMember Plugin as well as the Stripe Payments Plugin installed and activated.

  1. Download the Stripe Payments Plugin.
  2. Click on the Add New menu under the plugins interface.
  3. Click on the Upload Plugin button and select the plugin zip file for the Stripe Payments Plugin.
  4. Now hit the Install Now button and then activate the plugin.

Creating a Membership Product that can be Purchased via Stripe

First of all you will need configure the basic Stripe Payments settings and eMember settings.

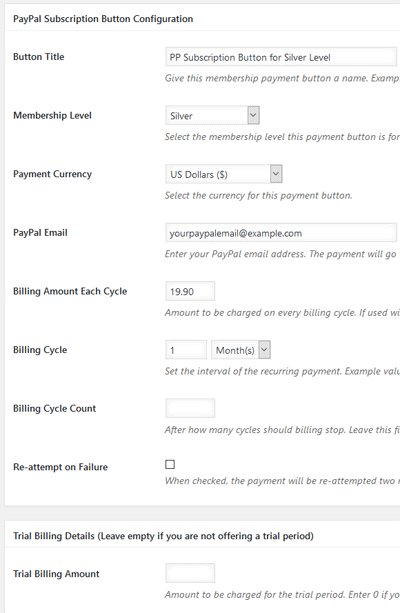
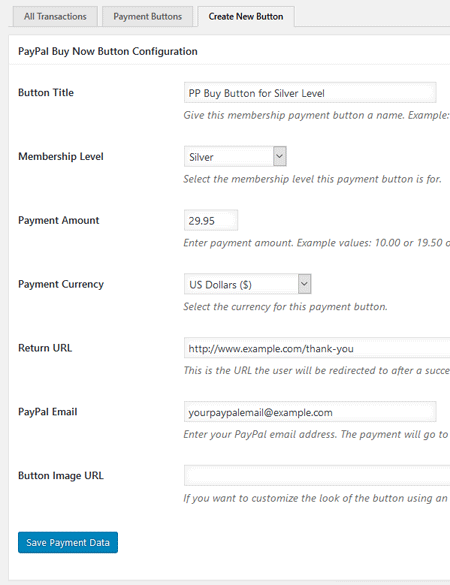
Step 1) Lets create a membership level first (if you don’t have one already). Click on the Membership Level menu under WP eMember. Click the Add New button and create a new membership level.

emember-level-creation

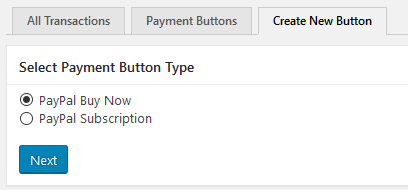
Step 2) Click on the Add New Product menu under Stripe Payments.

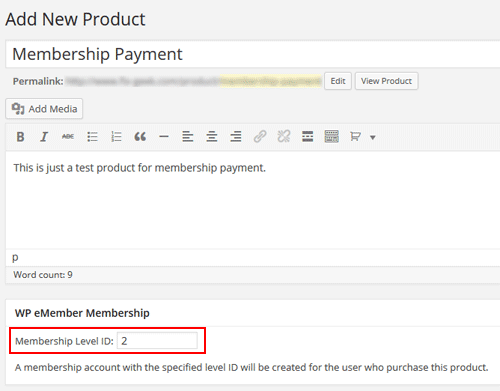
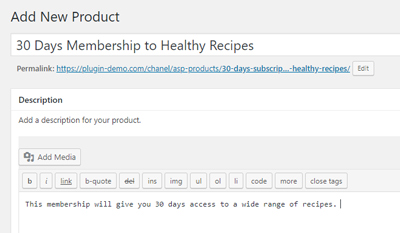
Step 3) Create a product that replicates the membership that you intend on offering. For example, the product title may read ’30 Days Membership to Healthy Recipes’. Choose a ‘Buy Now’ price for the membership that someone must pay to gain access to your hidden content.

Configure all the details needed to create a new product.

configure-stripe-product

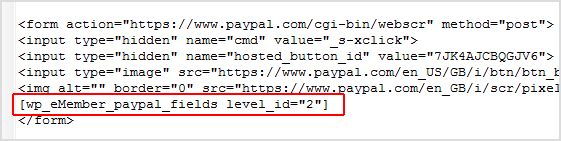
Step 4) Link the Stripe Payments product to the membership level that you created. Use the WP eMember Membership Level drop down menu to choose the correct membership level. This is a section within the Add New Product page.

choose-the-membership-level-this-product-connects-to

Step 5) Publish out the product.

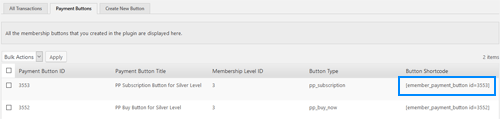
Example: Membership Product Created with Stripe Payments

The following product was created with the Stripe Payments plugin and is linked to an eMember, membership level. A customers who purchases the following product gains access to a range of recipes for 30 days. Gaining access to this membership costs a one off fee of $9.95.

publish-stripe-product-out

Member Sign Up Process with Stripe Checkout

After you publish the Stripe membership product, your customers will be able to click the ‘Buy Now’ button.

After a successful payment, the standard eMember registration flow applies.

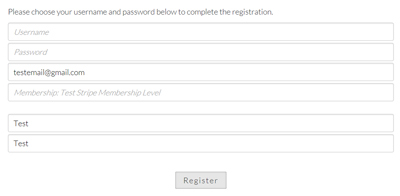
By default, a basic membership account is automatically created and the new member will receive an email that contains a link. The member should then click on this link that allows them to complete further registration details such as a username and password. After their registration form is complete, they will be able to log in to your site and view hidden content intended for their level.

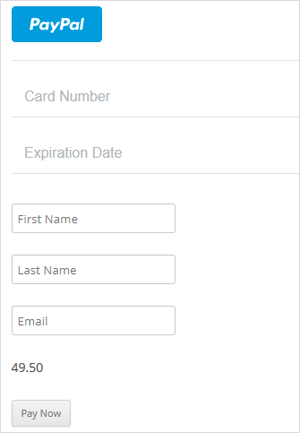
Step 1) Customer Purchases the Product

The customer purchases a membership by entering their credit card details in the Stripe popup window.

payment-for-stripe-product-membership

Step 2) eMember Creates a Basic Account Automatically

After a successful credit card payment, eMember creates a basic account.

emember-account-created

Step 3) The Member Receives an Email to Complete the Registration Form

An email is automatically sent to the member that contains a link to the registration form.

complete-registration-details

Step 4) A Member’s Account Details are Upgraded and They Gain Access to Hidden Content

After the registration form is complete, the account details are upgraded and the member can enjoy hidden content.

emember-account-details-upgraded

Filed Under: Additional Resources Tagged With: Membership Level, membership payment, WordPress membership

JVZoo Integration with WP eMember

WP eMember plugin can be integrated with JVZoo to process the membership payment. When customers purchase your JVZoo product, membership accounts will be created for them.

What You Can Expect from the JVZoo Integration

  • The customers go to your landing page where you have the JVZoo payment button.
  • Customers click on the JVZoo buy button and complete the payment.
  • Payment is completed and they get sent to your thank you page.
  • JVZoo sends a payment notification (JVZIPN) to WP eMember plugin after the transaction.
  • WP eMember creates a member account by processing the notification and emails the special link to complete the registration.
  • Users complete the registration form. Now, they can view everything that the membership level offers.

JVZoo Integration Instructions

Step 1) Set Your JVZoo Secret Key

First, you need to set a secret key for the JVZoo IPN feature in your JVZoo account.

  • Login to your JVZoo account and visit the MyAccount page.
  • Search for Click here to edit JVZIPN Secret Key link as shown on the image below.
  • Click on that link, Enter your Secret Key and click Save.

jvzoo-secret-key-setup-1

Step 2) Enter the Secret Key in WP eMember Settings

Copy the secrete key from step 1 and enter it in the following interface of WP eMember

WP eMember Settings -> Gateway Settings -> JVZoo Integration Settings -> JVZoo Secret Key

Save the settings.

Take note of the JVZoo Instant Notification URL Value as we will need it in the next step.

Step 3) Enter the IPN URL in Your JVZoo Product

Click the Sellers tab in your JVZoo account. Click your product in the sub nav.

Enter an Instant Notification URL in the JVZIPN URL field.

The URL should look something like the following

https://www.yoursite.com/?emember_jvzoo_ipn=1&membership_level_id=XX

Replace “XX” with the membership level that corresponds to this product. A member account with this membership level will be created when a customer purchases this product.

Click ‘Save Changes’.

Now you should be all set and JVZoo transactions for the product in question will be processed and sent to your Instant Notification URL and WP eMember will create the membership account for them.

Filed Under: Integration Tagged With: 3rd party integration, Integration, jvzoo, membership payment

Creating a Braintree Buy Now Button for Membership Payment

You can create a Braintree payment button inside WP eMember plugin to accept payment for your premium memberships.

Braintree gateway allows you to create payment buttons that is processed on your site (so the visitor never leaves your site during the checkout).

Creating Braintree Buy Now Button for Membership Payment

Step 1) Select Braintree Buy Now Button

Go to Payments -> Create New Button interface from the admin side of the eMember plugin. Then select the Braintree Buy Now option (see image below):

braintree-payment-button-for-membership-step-1

Step 2) Configure the Payment Details

Enter the payment details and select your membership level for the button.

Step 3) Configure the Braintree API Key and Account Details

Enter your Braintree API Key details in the payment button also.

You can get the Braintree API key details from your Braintree account.

You can locate these values by following these steps:

  1. Log into your Braintree account
  2. Navigate to Account > My user
  3. Under API Keys, Tokenization Keys, Encryption Keys, click View Authorizations
    • If no API keys appear, click Generate New API Key
  4. Click View under the Private Key column to see your public and private keys, merchant ID, and environment

If you do not see the Authorizations section at all and your account was recently approved, please try again later – it can take a few business days for Braintree to set up your merchant account.

Merchant Account ID

This field controls your currenty for the transaction. You can leave the Merchant Account ID field empty if you want to use the default one.

Step 4) Save the Payment Button

Save the payment button after you have entered all the necessary details. This will create the payment button.

Step 5) Put the Payment Button on a Page

You can now put this newly created button on your membership join us page so the visitors can pay you using this button.

The Payment Buttons tab shows you the shortcode you need to use to put your Braintree payment button on a page. The shortcode should look something like the following:

[emember_payment_button id=2101]

The shortcode will create a Buy Now button (for the membership level you specified).

When your visitors click on the button, they will see a payment form like the following screenshot. They will be able to enter the credit card details to complete the payment.

braintree-payment-button-for-membership-card-payment-form

Customizing the Button Text

You can customize the button text by specifying the value in the shortcode using the “button_text” parameter. Below is an example shortcode that uses “Pay Now” as the payment button text:

[emember_payment_button id=2101 button_text="Pay for Membership"]

What Happens After the Payment?

If a payment is made by a new member then the user will receive an email that contains a unique link to complete the registration. Read the registration process overview documentation to learn more.

If the payment is made by an existing member then the membership level (associated with this payment button) is applied to the existing member’s profile.

Note: The member must be logged into the site as a member for this plugin to recognize the user and treat him as an existing member.

SSL Certificate Requirement

Braintree payment gateway requires you to have SSL certification on your payment/checkout page (the page where you put your payment button). So the URL of that page should have HTTPS (example: https://www.example.com/membership-payment-page).

If you are not already using an SSL certificate on your site then you should contact your hosting provider and request them to install it for you.

Filed Under: Integration Tagged With: Integration, membership payment

Creating a PayPal Subscription Button for Membership Payment

A lot of people use the WP eStore plugin to create payment buttons for membership as it has a few advantages. However, you can also create a PayPal Subscription payment button inside eMember to accept payment for your premium memberships.

Buy Now Type Button or Subscription Type Button?

You can use PayPal buy now or subscription type buttons for your membership payment (based on how you want to setup the payment structure). Read the following post so you understand the difference between these two types of payment buttons.

  • Difference between “Buy Now” and “Subscription” type buttons for membership payment

Creating PayPal Subscription Button for Membership Payment

Step 1) Select PayPal Subscription Button

Go to Payments -> Create New Button interface from the admin side of the eMember plugin. Then select the PayPal Subscription option (see image below):

creating-paypal-subscription-button-for-membership-step-1

Step 2) Configure the Payment Details

Enter the payment details and select your membership level for the button. See example below:

creating-paypal-subscription-button-for-membership-step-2

Step 3) Put the Subscripiton Button on Your Membership Payment Page

You can now put this newly created payment button on your membership join us page so the visitors can pay you using this button.

The Payment Buttons tab shows you the shortcode you need to use to put your payment button on a page.

creating-paypal-buy-now-button-for-membership-step-3

The shortcode will create a PayPal Subscription button (for the membership level you specified in the button).

Your PayPal Profile Settings

Make sure that the Instant Payment Notification (IPN) feature is enabled in your PayPal profile (this is enabled by default). You can enable it by going to the profile menu in your PayPal account.

If the IPN is disabled in your PayPal Profile then PayPal won’t send any payment notification to eMember after payment. This will cause the registration process to not work as usual and your users who pay you won’t get any email form eMember.

You can use your site’s homepage URL when enabling the IPN feature in your PayPal account.

Creating a Thank You Page

You should create a generic thank you page for your membership site. Use this page as your return page in the PayPal button (so the user goes to this page after the payment).

Explain what the user can expect next in this “Thank You” page. Instruct your users to check their email and click on the link to complete the paid membership registration.

The following is an example of the type of message you should put on your thank you page:

You will receive an email shortly which will contain the details of this transaction.

You will also receive an email containing a unique link. Click on that link in the email to complete your paid membership registration.

Customizing the Payment Button

The look and feel of the button will depend on your theme’s style/CSS.

You can use a custom image for your button to customize it. Upload your button image to the media library then specify the URL of the image in the “Button Image URL” field (by editing the button).

You can also customize the button text by specifying the value in the shortcode using the “button_text” parameter. Below is an example shortcode that uses “Subscribe Now” as the payment button text:

[emember_payment_button id="3553" button_text="Subscribe Now"]

What Happens After the Payment?

If the payment is made by a new member then the user will receive an email that contains a unique link to complete the registration. Read the registration process documentation to learn more.

If the payment is made by an existing member then the membership level (associated with this payment button) is applied to the existing member’s profile.

The member must be logged into the site as a member for this plugin to recognize the user and treat him as an existing member.

Will the Affiliate Commission be Tracked?

If you are using our WP Affiliate Platform plugin and the user was referred by an affiliate then the referrer will receive an affiliate commission after the payment.

Filed Under: Design & Usage Tagged With: membership payment, paypal, plain paypal button

Creating a PayPal Buy Now Button for Membership Payment

A lot of people use the WP eStore plugin to create payment buttons for membership as it has a few advantages. However, you can also create a PayPal payment button inside eMember to accept payment for your premium memberships.

Buy Now Type Button or Subscription Type Button?

You can use PayPal buy now or subscription type buttons for your membership payment (based on how you want to setup the payment structure). Read the following post so you understand the difference between these two types of payment buttons.

  • Difference between “Buy Now” and “Subscription” type buttons for membership payment

Creating PayPal Buy Now Button for Membership Payment

Step 1) Select PayPal Buy Now Button

Go to Payments -> Create New Button interface from the admin side of the eMember plugin. Then select the PayPal Buy Now option (see image below):

creating-paypal-buy-now-button-for-membership-step-1

Step 2) Configure the Payment Details

Enter the payment details and select your membership level for the button. See example below:

creating-paypal-buy-now-button-for-membership-step-2

Step 3) Put the Payment Button on Your Membership Payment Page

You can now put this newly created payment button on your membership join us page so the visitors can pay you using this button.

The Payment Buttons tab shows you the shortcode you need to use to put your payment button on a page.

creating-paypal-buy-now-button-for-membership-step-3

The shortcode will create a PayPal buy now button (for the membership level you specified in the button).

Your PayPal Profile Settings

Make sure that the Instant Payment Notification (IPN) feature is enabled in your PayPal profile (this is enabled by default). You can enable it by going to the profile menu in your PayPal account.

If the IPN is disabled in your PayPal Profile then PayPal won’t send any payment notification to eMember after payment. This will cause the registration process to not work as usual and your users who pay you won’t get any email form eMember.

You can use your site’s homepage URL when enabling the IPN feature in your PayPal account.

PayPal IPN URL

WP eMember doesn’t require you to use any special URL for the IPN feature. The plugin just needs that the IPN feature be enabled in your PayPal account. So you can use your homepage URL to enable this feature.

Creating a Thank You Page

You should create a generic thank you page for your membership site. Use this page as your return page in the PayPal button (so the user goes to this page after the payment).

Explain what the user can expect next in this “Thank You” page. Instruct your users to check their email and click on the link to complete the paid membership registration.

The following is an example of the type of message you should put on your thank you page:

You will receive an email shortly which will contain the details of this transaction.

You will also receive an email containing a unique link. Click on that link in the email to complete your paid membership registration.

Customizing the Payment Button

The look and feel of the button will depend on your theme’s style/CSS.

You can use a custom image for your button to customize it. Upload your button image to the media library then specify the URL of the image in the “Button Image URL” field (by editing the button).

You can also customize the button text by specifying the value in the shortcode using the “button_text” parameter. Below is an example shortcode that uses “Pay Now” as the payment button text:

[emember_payment_button id="3552" button_text="Pay Now"]

What Happens After the Payment?

If the payment is made by a new member then the user will receive an email that contains a unique link to complete the registration. Read the registration process documentation to learn more.

If the payment is made by an existing member then the membership level (associated with this payment button) is applied to the existing member’s profile.

The member must be logged into the site as a member for this plugin to recognize the user and treat him as an existing member.

Will the Affiliate Commission be Tracked?

If you are using our WP Affiliate Platform plugin and the user was referred by an affiliate then the referrer will receive an affiliate commission after the payment.

Filed Under: Design & Usage Tagged With: Account Upgrade, membership payment, paypal, plain paypal button

WooCommerce and WP eMember Integration

You can integration WP eMember with WooCommerce so you can accept membership payment via WooCommerce.

Accept Membership Payment Via WooCommerce

Step 1) Download the integration addon plugin from here.

Step 2) Install the addon just like any other WordPress plugin.

Step 3) When creating a new WooCommerce product (or editing one), you can specify a membership level for that product.

woocommerce-and-membership-payment

Now, when a customer purchase this product, a membership account (for the specified access level) will be created for the user.

Note: Your WooCommerce checkout for all products in the shop stay as is. The eMember plugin will ONLY  monitor the product checkout for products where you have specified a membership level ID. When you specify a membership level ID value in a WooCommerce product, you are telling our plugin that this product is for a membership payment.

Membership Registration Setup with WooCommerce

There are a couple of different ways you can setup the membership registration scenario.

1) WooCommerce and eMember Registration Scenario 1

In this setup, you just use WooCommerce to do the checkout. The user/member account creation process is completely handled by eMember.

You will turn off all the WooCommerce account creation options from the “Accounts” settings of WooCommerce.


woocommerce-account-settings-interface-for-scenario-1

Here is a typical flow of how this process works:

  1. A visitor buys a membership product from your WooCommerce store.
  2. Once the payment is confirmed, WooCommerce will notify the eMember plugin.
  3. At this point the plugin knows what membership level this user paid for, the plugin will create the appropriate membership account for this visitor.
  4. The member will receive an email that contains a “unique” link to complete the registration.
  5. When the member clicks on that link in the email it will let him choose a “username” and “password” and complete the registration.
  6. At this point the member can log into the site via eMember and enjoy the premium members only content.

Your membership products are virtual products. So make sure the “Virtual” and “Download” options are enabled in your WooCommerce product in question. This way the order will immediately go to “complete” status after successful payment.

2) WooCommerce and eMember Registration Scenario 2

This setup is good for users who want to use the account creation option of WooCommerce.

Go to the Admin Functions menu of eMember and enable the auto create eMember account feature. Create a free membership level (just so you can use it as a default level).

Also, you can optionally enable this feature to keep the user records in sync.

Here is a typical flow of how this process works

  1. A visitor buys a membership product from your WooCommerce store.
  2. Once the payment is confirmed, WooCommerce will create a WP User account for this user (just like it does for any product checkout).
  3. Then WooCommerce will notify the eMember plugin.
  4. eMember will create a corresponding eMember user record then upgrade that account to the appropriate membership level (the one this user paid for).
  5. At this point the member can log into the site via eMember and enjoy the members only content.

WooCommerce Payment/Order Status

Our plugin will only process orders/payments that are set to “processing” or “completed” status in WooCommerce. This is to make sure the money has been received before the member account gets created (or updated).

If your WooCommerce setup is correct, then the order status will be set correctly after an online payment is received. So it should work in an automated fashion.

However, if you are accepting manual payment then you need to review your order and set the order status correctly after you receive money from the customer. You can also use an WooCommerce extension to set the order status to complete automatically (after you receive an order).

Keeping the WooCommerce and eMember Logins in Sync

This is optional but you should enable this setting so when members log into the site via eMember’s login, they automatically get logged into their WooCommerce account (and vice versa).

Filed Under: Additional Resources, eMember Addon Tagged With: 3rd party integration, commerce, emember addon, emember extension, member, membership payment

WP eMember and ClickBank Integration

Note: We are discontinuing the Clickbank integration due to a lack of usage. Please use any of our PayPal or Stripe integration for membership payments.

ClickBank Integration Instructions For Membership Payment

Step 1) Enable the “Instant Notification Service” in your ClickBank account by going to the following section:

My Account -> My Sites -> Advanced Tools

Step 2)  Take note of the “Secret Key” that you specify when requesting the “Instant Notification Service” in step 1.

Specify this secret key in eMember’s “ClickBank Secret Key” settings field (You can find it under the “Gateway Settings” tab of eMember settings menu).

Step 3) When your request for IPN gets approved by Clickbank, take the URL value shown in eMember’s ClickBank Instant Notification URL Value field and use it in Your ClickBank account settings (You will specify it in the Instant Notification URL field of your Clickbank account).

clickbank-ipn-notification-url-value

Use the URL value shown in there and select IPN v6.0.

It is important to choose the correct IPN version number (see the screenshot below):

clickbank-ipn-settings-ipn-version-6

Step 4) Finally, when you create a product and place the payment button on a WordPress post or page, do the following:

Add the “membership_level_id” variable in your ClickBank button code. The value of the “membership_level_id” variable should be set to whatever the membership level ID this product corresponds to (example: if this is a payment for membership level 1 then use 1 as the value).

The following is an example of how it should look (given that membership level ID of the product is 1):

<input name="membership_level_id" type="hidden" value="1" />

Example Clickbank Button Code

<form action="http://item.vendor.pay.clickbank.net" method="post"> 
<input name="membership_level_id" type="hidden" value="1" /> 
<input src="https://www.example.com/uploads/pay-button.gif" type="image" /> 
</form>

When someone makes a payment using this button, the plugin will create a membership account with the appropriate membership level (Level ID 1 in the above example) and send the customer a “Prompt to complete the registration” email.

Creating a Thank You Page

You should create a generic thank you page for your membership site. Explain what the user can expect next in this “Thank You” page.

Instruct your users to check their email and click on the link to complete the paid membership registration.

The following is an example of the type of message you should put on your thank you page:

You will receive an email shortly which will contain the details of this transaction.

You will also receive an email containing a special link. Click on that link in the email to complete your paid membership registration.

Filed Under: Integration Tagged With: Clickbank integration, membership payment

How to Use a Simple PayPal Payment Button to Accept Membership Payment

A lot of people use the WP eStore plugin to create payment buttons for membership as it has a range of benefits but you can use a PayPal payment button (“Buy Now” or “Subscribe”) that you create in your PayPal account to accept payment for your premium members too.

Buy Now Type Button or Subscription Type Button?

  • Difference between “Buy Now” and “Subscription” type buttons for membership payment

Video Tutorial Showing PayPal Button Integration

Setup Preparation

To create a membership payment button using PayPal, you will need two pieces of information:

  • The URL of the IPN handling script
  • The ID of the membership level that you are creating this payment button for

The above two pieces of information will go in the “advanced variables” field of your PayPal button. WP eMember has a settings menu that will allow you to generate the advanced variables code easily so you can copy and paste it into your PayPal button.

Step 1) Go to the following area of your WP Admin dashboard:

eMember Settings -> Gateway Settings -> Direct PayPal Integration settings

Step 2) You can find the ID of a membership level (example: 4) in the “Membership Level” menu of the WP eMember plugin.

Enter the Membership level ID in the appropriate box then hit the “Generate Code” button to generate the advanced variables code that you need to use in your PayPal button.

The advanced variables code it generates for your site should look something like the following (you will need to copy this code so you can use it in your PayPal button):

notify_url=http://www.your-domain.com/?emember_paypal_ipn=1
custom=subsc_ref=4

Specifying the “Advanced Variables” Code in the PayPal button

When you create your button on PayPal from the “Merchant Services” menu, you will be able to specify some advanced variables in “Step 3”.

Specify advanced variables

Specify advanced variables

  • Check the add advanced variables checkbox
  • Copy and Paste the text from the notepad saved earlier into the textarea.

Now, you can copy the button code that PayPal gives you and paste it in your “Membership Payment” page. When someone makes a payment using this button it will automatically create a membership for the membership level that is specified in the button.

Your PayPal Profile Settings

Make sure that the Instant Payment Notification (IPN) is enabled in your PayPal profile (this is enabled by default). You can enable it by going to the profile menu in your PayPal account.

If the IPN is disabled in your PayPal Profile then PayPal won’t send any payment notification to eMember after payment. This will cause the registration process to not work as usual and your users who pay you won’t get any email form eMember.

Creating a Thank You Page

You should create a generic thank you page for your membership site. Use this page as your return page in the PayPal button (so the user goes to this page after the payment).

Explain what the user can expect next in this “Thank You” page. Instruct your users to check their email and click on the link to complete the paid membership registration.

The following is an example of the type of message you should put on your thank you page:

You will receive an email shortly which will contain the details of this transaction.

You will also receive an email containing a special link. Click on that link in the email to complete your paid membership registration.

Advanced Integration with a PayPal Button (An Alternative Integration Option)

This section is only for users who are looking for an advanced integration option.

If you want to create a PayPal button that both your new users or existing members can use to pay or renew membership then use the following option. This is also useful when you want your existing members to be able pay using a different PayPal account or email address. It can also track the affiliate commission if you are using our affiliate platform plugin.

Step 1) Edit your PayPal button and remove any value from your PayPal button’s advanced variables section. If you are creating a new PayPal button then you can skip this step.

Step 2) Edit the WordPress page where you will add the PayPal button code for membership payment.

Step 3) Add the following shortcode inside your PayPal button’s HTML code.

[wp_eMember_paypal_fields level_id="2"]

In this example, 2 is the membership level ID for this button so you will need to change it for your site.

Your final PayPal button code on the page should look something like the following example:

paypal-button-integration-advanced-example

It works just like a normal membership payment button for new users. However, when your logged-in members use this PayPal button to Pay, it will upgrade their existing membership profile to the newly paid level or renew the existing level. It will also work with affiliate tracking (if you are using our affiliate tracking plugin).

Video Tutorial (Using a PayPal Buy Now Button)

Video Tutorial (Using a PayPal Subscription Button)

Note: Once the button code is generated in your PayPal account, make sure that it is not “protected” (Click the Remove code protection option if it is encrypted). You also need to make sure that the website tab is selected (not Email) so PayPal shows you the full button code.

Filed Under: Design & Usage Tagged With: membership payment, paypal, plain paypal button

Get the WP eMember Plugin

Get WP eMember

Categories

  • Additional Resources
  • Content Protection
  • Design & Usage
  • eMember Addon
  • Installation
  • Integration
  • License
  • Testing
  • Uncategorized
  • Video Tutorial

Recent Comments

  • Chris Brown on API – Querying A Member Profile Using HTTP GET or POST
  • admin on API – Updating A Member Account Using HTTP GET or POST
  • Chris Brown on API – Updating A Member Account Using HTTP GET or POST
  • admin on API – Updating A Member Account Using HTTP GET or POST
  • Andrea on API – Updating A Member Account Using HTTP GET or POST

Featured WordPress Plugins

wordpress_estore_icon
wordpress membership plugin icon
WP Express Checkout Plugin
WordPress Lightbox Ultimate Plugin
WordPress Photo Seller Plugin
wordpress_affiliate_plugin_icon

Copyright © 2023 | WP Membership Plugin