WordPress Membership

Easy to use WordPress Membership plugin

  • Documentation
  • WP eMember Plugin
  • Projects
  • Home

Creating a PayPal Buy Now Button for Membership Payment

A lot of people use the WP eStore plugin to create payment buttons for membership as it has a few advantages. However, you can also create a PayPal payment button inside eMember to accept payment for your premium memberships.

Buy Now Type Button or Subscription Type Button?

You can use PayPal buy now or subscription type buttons for your membership payment (based on how you want to setup the payment structure). Read the following post so you understand the difference between these two types of payment buttons.

  • Difference between “Buy Now” and “Subscription” type buttons for membership payment

Creating PayPal Buy Now Button for Membership Payment

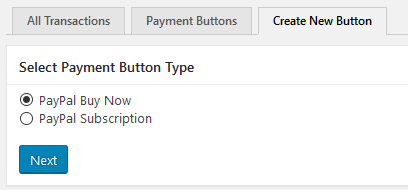
Step 1) Select PayPal Buy Now Button

Go to Payments -> Create New Button interface from the admin side of the eMember plugin. Then select the PayPal Buy Now option (see image below):

creating-paypal-buy-now-button-for-membership-step-1

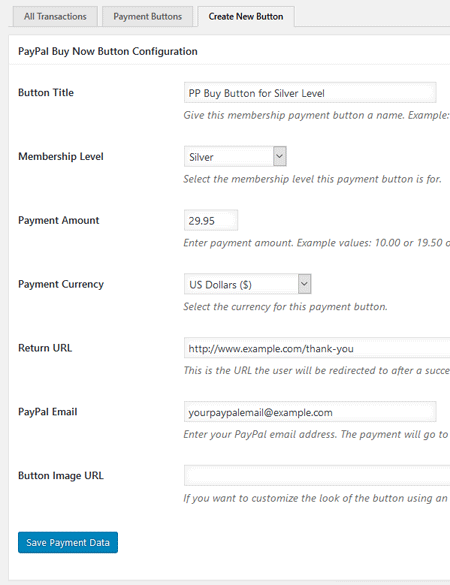
Step 2) Configure the Payment Details

Enter the payment details and select your membership level for the button. See example below:

creating-paypal-buy-now-button-for-membership-step-2

Step 3) Put the Payment Button on Your Membership Payment Page

You can now put this newly created payment button on your membership join us page so the visitors can pay you using this button.

The Payment Buttons tab shows you the shortcode you need to use to put your payment button on a page.

creating-paypal-buy-now-button-for-membership-step-3

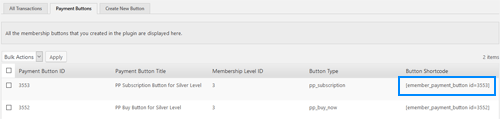
The shortcode will create a PayPal buy now button (for the membership level you specified in the button).

Your PayPal Profile Settings

Make sure that the Instant Payment Notification (IPN) feature is enabled in your PayPal profile (this is enabled by default). You can enable it by going to the profile menu in your PayPal account.

If the IPN is disabled in your PayPal Profile then PayPal won’t send any payment notification to eMember after payment. This will cause the registration process to not work as usual and your users who pay you won’t get any email form eMember.

You can use your site’s homepage URL when enabling the IPN feature in your PayPal account.

PayPal IPN URL

WP eMember doesn’t require you to use any special URL for the IPN feature. The plugin just needs that the IPN feature be enabled in your PayPal account. So you can use your homepage URL to enable this feature.

Creating a Thank You Page

You should create a generic thank you page for your membership site. Use this page as your return page in the PayPal button (so the user goes to this page after the payment).

Explain what the user can expect next in this “Thank You” page. Instruct your users to check their email and click on the link to complete the paid membership registration.

The following is an example of the type of message you should put on your thank you page:

You will receive an email shortly which will contain the details of this transaction.

You will also receive an email containing a unique link. Click on that link in the email to complete your paid membership registration.

Customizing the Payment Button

The look and feel of the button will depend on your theme’s style/CSS.

You can use a custom image for your button to customize it. Upload your button image to the media library then specify the URL of the image in the “Button Image URL” field (by editing the button).

You can also customize the button text by specifying the value in the shortcode using the “button_text” parameter. Below is an example shortcode that uses “Pay Now” as the payment button text:

[emember_payment_button id="3552" button_text="Pay Now"]

What Happens After the Payment?

If the payment is made by a new member then the user will receive an email that contains a unique link to complete the registration. Read the registration process documentation to learn more.

If the payment is made by an existing member then the membership level (associated with this payment button) is applied to the existing member’s profile.

The member must be logged into the site as a member for this plugin to recognize the user and treat him as an existing member.

Will the Affiliate Commission be Tracked?

If you are using our WP Affiliate Platform plugin and the user was referred by an affiliate then the referrer will receive an affiliate commission after the payment.

Filed Under: Design & Usage Tagged With: Account Upgrade, membership payment, paypal, plain paypal button

Allow Members to Upgrade or Add New Level to Their Profile for Free

Normally, you would charge people to upgrade their membership level to a new one. The standard upgrade documentation explains how that process is handled.

However, for a particular project, you may want to allow your members to upgrade their membership level for free. They just log into the site as a member then click a button to upgrade (or add) the level to their profile. This documentation explains how you can create a button that will allow your members to do that.

Creating a Button for Free Membership Level Upgrade

Step 1) Create a new WordPress page (where you will put the free upgrade buttons).

Step 2) Use the following shortcode in this newly created page. So you are creating a button that will upgrade the user’s membership level to the one specified in the “level” parameter of the shortcode.

[wp_eMember_upgrade_membership_level_to level="3"]

3 is the membership level ID in the above example. So change it to the correct level ID value for your site.

You can put as many buttons as you want (using the above shortcode) on this page for your various different levels that you want to offer free upgrade.

Step 3) Protect this page so only logged-in members of the site can view and interact with the upgrade buttons. You can use partial protection too (if that makes sense for your particular situation).

Step 4) Tell your users (who already has an account on your site) to go to this page and click on the button to upgrade.

When logged-in members click on the button that this shortcode generates, it upgrades their membership level to the one specified in the shortcode. If you are using the multiple membership level per user feature, then it will ADD the specified level to their profile (meaning they will now be able to access content of this newly added level).

Custom Button Text for the Update Level Button

You can specify a custom button text for the button by using the “button_text” parameter in the shortcode.

Example shortcode usage below:

[wp_eMember_upgrade_membership_level_to level="3" button_text="Click here to update"]

Redirect the Members to a Page After They Use the Button

You can use the “redirect_to” parameter in the shortcode to redirect the members to a page after they use the level update button.

Example shortcode usage below:

[wp_eMember_upgrade_membership_level_to level="3" redirect_to="http://www.exmaple.com/page-after-update-button-usage"]

Filed Under: Additional Resources Tagged With: Account Upgrade, Membership Level, shortcodes, WP eMember

How to Manually Add Members to Your Site

In a standard setup, your visitors will signup for a membership account after they read your membership offers. You will use one of these registration scenarios for them to register for an account.

However, you can also manually add members to your site via the admin dashboard if you need to.

Do the following to manually add member records to your WordPress site:

  • Click on the Members link from the WP eMember plugin’s admin menu.
  • Click on the Add/Edit Member link from the top navigation menu.
  • Fill in the details of the member and hit the save button.
add-edit-members-interface

You can assign a generic password and tell the user to change it later from the profile edit page.

Filed Under: Design & Usage Tagged With: Account Upgrade, member

How to Create Payment Buttons for Membership Upgrade or Renewal

If you have a membership site with multiple premium memberships then you probably want to offer your members an option to upgrade their account. Upgrading an account is very easy.

Creating Upgrade/Renewal Payment Buttons

1) Option A – PayPal Button for Membership Renewal/Upgrade

Step #1) Create a payment button the same way you created it for your membership joining page.

Step #2) Enter the URL of this newly created upgrade/renewal page in the “Membership renewal Page” settings field of the plugin and save the settings.

When a member wishes to upgrade his/her account, all this member has to do is click on the payment button and make the payment. After the payment, the plugin will use the payment email address to identify the correct member account and upgrade or renew the account automatically.

2) Option B – Using an eStore Button for Membership Renewal/Upgrade

Step #1) Create an eStore payment button the same way you created it for your membership joining page.

Step #2) Enter the URL of this newly created upgrade/renewal page in the “Membership renewal Page” settings field of the plugin and save the settings.

When a member wishes to upgrade his/her account, all this member has to do is click on this button and make the payment. After the payment, the plugin will use the payment email address to identify the correct member account and upgrade or renew the account automatically.

WP eStore’s payment buttons are a little more advanced than a standard PayPal button in the sense that it can carry more data. So when using an eStore button it is also possible to upgrade the member account that is logged into the site at the time of making the payment (In this case it doesn’t matter which email address the payment is coming from).

When logged-in members make a payment, the plugin will apply the payment to their exiting account profile.

What if the Member Account is Expired?

What about the members whose account is expired? They can’t log into the site anymore. We have thought about that too. Simply go to the eMember settings menu and check the “Allow Expired Account login” field from the “Account upgrade and renewal settings” section.

Don’t worry, just because they can log into the system doesn’t mean they can view the restricted content. Expired member accounts will not be able to view any protected content. They will see a message that tells them to renew the membership. You are allowing them to log into the system so the plugin can recognize their account profile.

The following screenshot shows where you can configure the renewal page within the plugin’s settings.

Adding More Flavor to Your Upgrade/Renewal Buttons

If you want to add a little bit of flavor to your membership upgrade path then create special payment buttons that are just like the payment button for the normal premium membership but with a discounted price. Then place it on a page that only premium members have access to. You can create a special page with all these discounted prices.

Now, your members can make payment using these buttons to upgrade their accounts at a discounted price. Since this page (that contains the buttons) can only be viewed by a premium member, an anonymous visitor won’t be able to signup at this special discounted price.

Filed Under: Design & Usage Tagged With: Account Upgrade, WP eMember

Get the WP eMember Plugin

Get WP eMember

Categories

  • Additional Resources
  • Content Protection
  • Design & Usage
  • eMember Addon
  • Installation
  • Integration
  • License
  • Testing
  • Uncategorized
  • Video Tutorial

Recent Comments

  • Chris Brown on API – Querying A Member Profile Using HTTP GET or POST
  • admin on API – Updating A Member Account Using HTTP GET or POST
  • Chris Brown on API – Updating A Member Account Using HTTP GET or POST
  • admin on API – Updating A Member Account Using HTTP GET or POST
  • Andrea on API – Updating A Member Account Using HTTP GET or POST

Featured WordPress Plugins

wordpress_estore_icon
wordpress membership plugin icon
WP Express Checkout Plugin
WordPress Lightbox Ultimate Plugin
WordPress Photo Seller Plugin
wordpress_affiliate_plugin_icon

Copyright © 2023 | WP Membership Plugin