WordPress Membership

Easy to use WordPress Membership plugin

  • Documentation
  • WP eMember Plugin
  • Projects
  • Home

Manually Activating Expired Members Account

The plugin normally runs in an automated fashion and updates the member profiles when accounts are renewed. It also has a daily check which expires any account that has run its course. However, sometimes you may want to manually activate a member’s account that has expired. The following documentation explains how to do it correctly.

The expiry of a member’s account is controlled by the membership level assigned to that member. When you want to manually activate an expired account, you need to pay attention to the following two items from the member’s profile:

  1. The membership level assigned to the member.
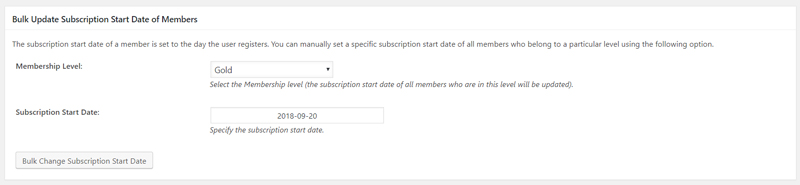
  2. The “Subscription Starts” date set in the member’s profile.

Check the “Subscription Duration” value of the membership level in question and then do the following according to the access duration.

1) No Expiry Access Duration

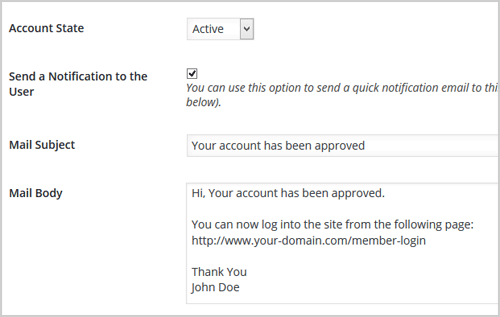
If the membership level of the member has “No Expiry or Until Cancelled” duration, then you can just change the account status to “Active” and save the profile.

2) Expire After an Interval

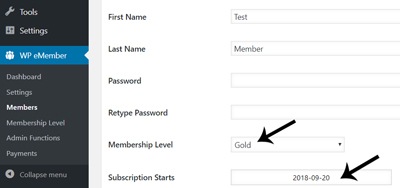
If the membership level of the member has “Expire After an Interval” duration, then update the “Subscription Starts” date value in the member’s profile to the current date so the plugin doesn’t think that the membership has run its course and revert it back to expired.

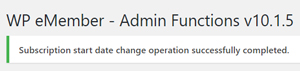
So edit the member’s profile then change the account status to “Active” and update the “Subscription Starts” date to current date then save the profile.

3) Expire After a Fixed Date

If the membership level of the member has a “Expire After a Fixed Date” duration, then check to make sure the current date is not past that expiry date already.

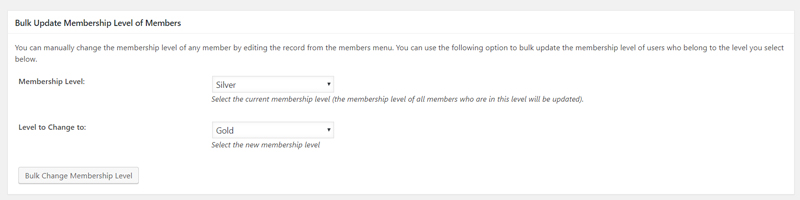
  • Past the expiry date – then changing the account status to “active” won’t help since the membership level is still expired. You may want to switch the member to a new membership level in this case.
  • Expiry date is still in the future – then you can just change the account status to “Active” and save the profile.

Filed Under: Additional Resources Tagged With: member, WP eMember

How to Bulk Update Member’s Start Date and Membership Level with WP eMember

A feature of the eMember Plugin allows admin to bulk update their member’s start date and membership level. This tool is useful if you have many members that need to have their accounts updated or changed.

The Bulk Update Admin Functions are useful if you intend to run an upgrade promotion on your website or need to cease a number of member accounts.

When you use these functions keep in mind the changes will apply to all the members that belong to the chosen membership level.

bulk-member-update-feature

Locating the Bulk Update Tools

The bulk update tools can be found by:

  1. Clicking the Admin Functions menu under WP eMember.
  2. Selecting the Bulk Operation tab.
  3. Choosing which Bulk Operation function you would like to use (instructions of each tool can be found below).

locating-bulk-operation-tools-emember

Types of Bulk Operation Tools for the eMember Plugin

Bulk Update Subscription Start Date of Members

The subscription start date of a member is set to the day the user registers.

If for any reason you need to alter the date your user’s membership commenced, you can use this section to do so.

You can manually set a new subscription start date of all members who belong to a particular level with the click of a couple of buttons.

  1. Select the level that the members belong to.
  2. Choose the date that their membership should now commence. You may choose an earlier date if you wish to cease the members access, while choosing a later date will allow them further access to the site.
  3. Click the Bulk Change Subscription Start Date button.
  4. All members that belong to the level you chose from the drop-down menu will now have a new member start date. This new member start date will be visible in the member’s profile.

bulk-member-start-date-eMember-plugin

Bulk Update Membership Level of Members

You can manually change the membership level of any member by editing their record from the members menu. This is great if you only have a couple of members you wish to update.

If you find that you need to update all members within a specific level you can use the Bulk Update Member Level Tool.

For instance, you could be offering a deal where all members are upgraded free of charge. This bulk update option would allow you to make those changes in a couple of seconds.

  1. Select the current membership level of the members that you wish to update. Note that all members within this level will be updated.
  2. Select which level these members will be updated to. This may be an upgrade or downgrade depending on the circumstances.
  3. Click the Bulk Change Membership Level button.
  4. All the members from the chosen level will now be updated to the new level.

bulk-update-membership-level-eMember-plugin

Bulk Update Auto Upgrade Starts Date of Members

The auto upgrade starts date of a member is set to the day the user registers (or the day they pay for a new membership level). You can manually set a specific date of all members who belong to a particular level using the following option.

  1. Select the level of the members that you wish to change the auto upgrade start date of.
  2. Enter the new auto upgrade start date for the members.
  3. Click the Bulk Change Auto Upgrade Start Date button.
  4. The members that belong to the chosen level will now have a new auto upgrade start date.

bulk-upgrade-auto-update-members-eMember-plugin

A Successful Bulk Update

Once you complete a bulk member update, if the process has been successful you will receive a message at the top of the screen similar to the one below.

admin-function-completed-eMember

In the case of this example, all members of the Gold level had their subscription start date updated to the 20th of September 2018. This is now reflected in the profile of each of the Gold members (displayed in the screenshot below).

member-profile-bulk-update-eMember

Filed Under: Design & Usage Tagged With: Admin Functions, member, Settings, Usage Guide, WordPress membership, WP eMember

How to View Members Whose Accounts have Expired or Will Expire Shortly Using eMember

Using eMember you can view all your members whose account will shortly expire and those members whose account has recently expired. This feature gives you the ability to gather all members in question who you can then notify to renew their membership. Often notifying your members will prompt them to renew their membership if they are enjoying their current subscription.

viewing-member-list-emember

Locating the ‘Display Member’ Feature

  1. Click on WP eMember and then on the Members menu.
  2. Click on the Member Lists tab.
  3. You will see two different features within this tab. One will display a list of members who are Soon to Expire and the other will display a list of members who have Recently Expired.

Viewing Soon to Expire Members

In the Display Soon to Expire Member List field, enter the number of days prior to member expiry. For example, if you wish to see all members who have 30 days left of their membership you would enter ‘30′ in this field. Once you have entered a numeral click the Display Soon to Expire List button.

Viewing Recently Expired Members

In the Display Recently Expired Member List field, enter the number of days since a members account has expired. For example, if you wish to see all members whose account expired less than 30 days ago, you would enter ‘30′ in this field. Once you have entered a numeral click the Display Recently Expired List button.

Filed Under: Additional Resources Tagged With: member, Membership Level, Settings, WP eMember

Managing Member Blacklisting Using WP eMember Plugin

You may have a site where you find a pattern of certain IP or email addresses that are the basis of problematic or spam memberships.

Within the settings menu of the WP eMember plugin, a site admin is able to blacklist specific user addresses. Blacklisting a user from creating a membership can be based on their IP address, email address or email address pattern (eg blacklisting all users who attempt to sign up with an @yahoo.com email). This allows admin to blacklist multiple accounts attempting to sign up with certain email patterns IP addresses or one user specific to a certain email address.

This functionality of the WP eMember plugin allows admin to prevent spam or problematic users from signing up to their site.

How to Blacklist Users Based on IP and Email Address

Step 1) Once logged into the admin dashboard of your site, go to Members under the WP eMember menu.

wp-emember-members-admin-menu

Step 2) Click on the Manage Blacklist tab.

Step 3) Under Manage Blacklist, you will see three fields depending on the sort of users you need to blacklist:

  • IP Blacklist
  • Email Address Blacklist
  • Email Address Pattern Blacklist.

Step 4) Decide on the type of address or pattern you wish to blacklist. For example if you wish to blacklist one user from becoming a member you may decide to blacklist them using their email address. You would enter their email into the email address blacklist field. If you have more than one IP or email in any one field you will need to separate them using a semi-colon.

Example Values

The following example values will give you an idea of how to enter the data in the fields.

IP Blacklist

223.58.1.10;4.23.145.90;129.6.8.4

Email Address Blacklist

[email protected];[email protected];[email protected]

Email Address Pattern Blacklist

@spamydomain.com;@yahoo.com

Step 5) Once you have entered in your blacklisted IP, email or pattern email addresses click on the Update Blacklist button at the bottom of the page to save it.

Now, when a member tries to register or login that matches with the entries you specified in the blacklisting interface, they will be blocked.

Filed Under: Additional Resources Tagged With: Access, member, registration form

Manually Approve Members on Your Site

You may have a business that requires you to review the membership application. WP eMember plugin has a feature that allows you to manually approve each member account (so you can review their application before giving access).

How to Enable Manual Approval

Step 1) Go to the settings menu of the eMember plugin.

Step 2) Check the Manually Approve Member Registration field.

enable-manual-membership-approval-option

Step 3) Save the changes by clicking the update button.

Your members will be set to a “Pending” account status after they register for an account. So they can’t log into the site until you edit their profile (from the admin side), review the details, and set the account status to “Active”.

Email Notification

The “registration complete” email is the one that gets sent to the members automatically when they successfully submit the registration form. So that email is a good place to explain to them what to expect next.

You should change the “registration complete” email notification message so it explains to the users that their account will be active after you review the application.

You can customize this email message from the following interface:

WP eMember Settings -> Email Settings -> Registration Complete Email

A message like the following should do the job:

Your application is being reviewed. You will be able to access the protected content after an admin approves the account.

Send Email When Account is Approved

You can send a notification email to the user when you approve the account.

When you review the user details and set the account status to “Active“, you can additionally check the “Send a Notification to the User” checkbox and enter an email message. This email will be sent to the user when you save the profile.

sending-account-approval-email

Filed Under: Design & Usage Tagged With: member, Membership Level, WordPress membership

Allow Member Registration Using an Invitation Code or Password

Lets say you have a membership level called “Invitation Only”. You only want users with a special password or code to be able to signup to this membership level.

Do the following to achieve this type of setup

Step 1) Create Your Special Registration Page

Create a new WordPress page and follow this instruction to add a registration form on this page (for the membership level you want).

Step 2) Set Your Special Code or Password

Edit the visibility of the page and select the “Password protected” option. Set your special code (invitation code) as the password of this page.

set-password-protection-on-page

Step 3) Send Users to This Page

Now, you can communicate to your users and tell them to go to this page and use the code/password to unlock the page and register.

Only users with the correct code will be able to see the registration form and register.

Filed Under: Additional Resources Tagged With: member, Membership Level, membership tweaks, registration form

How to Manually Add Members to Your Site

In a standard setup, your visitors will signup for a membership account after they read your membership offers. You will use one of these registration scenarios for them to register for an account.

However, you can also manually add members to your site via the admin dashboard if you need to.

Do the following to manually add member records to your WordPress site:

  • Click on the Members link from the WP eMember plugin’s admin menu.
  • Click on the Add/Edit Member link from the top navigation menu.
  • Fill in the details of the member and hit the save button.
add-edit-members-interface

You can assign a generic password and tell the user to change it later from the profile edit page.

Filed Under: Design & Usage Tagged With: Account Upgrade, member

eMember Stats/Analytics Addon

This addon shows you various eMember stats of your membership site.

  • See pageviews of your members
  • Count of pageviews
  • Login counts by day
  • New member registration by month
  • Members by country

Installing the Stats AddOn

  • Upload the “emember-stats.zip” file via the WordPress’s plugin uploader interface (Plugins -> Add New -> Upload)
  • Activate the plugin through the “Plugins” menu in WordPress.

Using The Addon

Click on the “Analytics” menu from the WP eMember plugin’s admin dashboard menu.

Database Tables

This addon will create additional database tables in your WordPress site’s database to store pageviews and other data. If you have a lot of members then the database table sizes can be large.

Download the Addon

Click here to download this adddon and try it on your site.

Filed Under: eMember Addon Tagged With: emember addon, member, WordPress membership

WooCommerce and WP eMember Integration

You can integration WP eMember with WooCommerce so you can accept membership payment via WooCommerce.

Accept Membership Payment Via WooCommerce

Step 1) Download the integration addon plugin from here.

Step 2) Install the addon just like any other WordPress plugin.

Step 3) When creating a new WooCommerce product (or editing one), you can specify a membership level for that product.

woocommerce-and-membership-payment

Now, when a customer purchase this product, a membership account (for the specified access level) will be created for the user.

Note: Your WooCommerce checkout for all products in the shop stay as is. The eMember plugin will ONLY  monitor the product checkout for products where you have specified a membership level ID. When you specify a membership level ID value in a WooCommerce product, you are telling our plugin that this product is for a membership payment.

Membership Registration Setup with WooCommerce

There are a couple of different ways you can setup the membership registration scenario.

1) WooCommerce and eMember Registration Scenario 1

In this setup, you just use WooCommerce to do the checkout. The user/member account creation process is completely handled by eMember.

You will turn off all the WooCommerce account creation options from the “Accounts” settings of WooCommerce.


woocommerce-account-settings-interface-for-scenario-1

Here is a typical flow of how this process works:

  1. A visitor buys a membership product from your WooCommerce store.
  2. Once the payment is confirmed, WooCommerce will notify the eMember plugin.
  3. At this point the plugin knows what membership level this user paid for, the plugin will create the appropriate membership account for this visitor.
  4. The member will receive an email that contains a “unique” link to complete the registration.
  5. When the member clicks on that link in the email it will let him choose a “username” and “password” and complete the registration.
  6. At this point the member can log into the site via eMember and enjoy the premium members only content.

Your membership products are virtual products. So make sure the “Virtual” and “Download” options are enabled in your WooCommerce product in question. This way the order will immediately go to “complete” status after successful payment.

2) WooCommerce and eMember Registration Scenario 2

This setup is good for users who want to use the account creation option of WooCommerce.

Go to the Admin Functions menu of eMember and enable the auto create eMember account feature. Create a free membership level (just so you can use it as a default level).

Also, you can optionally enable this feature to keep the user records in sync.

Here is a typical flow of how this process works

  1. A visitor buys a membership product from your WooCommerce store.
  2. Once the payment is confirmed, WooCommerce will create a WP User account for this user (just like it does for any product checkout).
  3. Then WooCommerce will notify the eMember plugin.
  4. eMember will create a corresponding eMember user record then upgrade that account to the appropriate membership level (the one this user paid for).
  5. At this point the member can log into the site via eMember and enjoy the members only content.

WooCommerce Payment/Order Status

Our plugin will only process orders/payments that are set to “processing” or “completed” status in WooCommerce. This is to make sure the money has been received before the member account gets created (or updated).

If your WooCommerce setup is correct, then the order status will be set correctly after an online payment is received. So it should work in an automated fashion.

However, if you are accepting manual payment then you need to review your order and set the order status correctly after you receive money from the customer. You can also use an WooCommerce extension to set the order status to complete automatically (after you receive an order).

Keeping the WooCommerce and eMember Logins in Sync

This is optional but you should enable this setting so when members log into the site via eMember’s login, they automatically get logged into their WooCommerce account (and vice versa).

Filed Under: Additional Resources, eMember Addon Tagged With: 3rd party integration, commerce, emember addon, emember extension, member, membership payment

How to Create an Edit Profile Page for Your Members

If you want to allow your members to edit their membership profile, then simply create a profile edit page using the following instructions:

Creating an Edit Profile Page

Step 1) Create a new WordPress Page. Lets say the title of this page is “Edit Profile”.

Step 2) Enter the following shortcode on this Edit Profile page that you just created:

[wp_eMember_edit_profile]

Step 3) Save and Publish this page. Take note of the URL of this page (copy the URL).

Step 4) Go to the following eMember interface

WP eMember -> Settings -> Pages/Forms Settings -> Member Profile Edit Page

Step 5) Enter the page URL (that you copied earlier) in the “Member Profile Edit Page” field.

Step 6) Save the settings by clicking the “Update” button at the bottom.

Now, your members can go this page and edit their membership details (name, password, email address etc.)


Filed Under: Design & Usage Tagged With: member, member profile display, Profile Listing

  • 1
  • 2
  • Next Page »

Get the WP eMember Plugin

Get WP eMember

Categories

  • Additional Resources
  • Content Protection
  • Design & Usage
  • eMember Addon
  • Installation
  • Integration
  • License
  • Testing
  • Uncategorized
  • Video Tutorial

Recent Comments

  • Chris Brown on API – Querying A Member Profile Using HTTP GET or POST
  • admin on API – Updating A Member Account Using HTTP GET or POST
  • Chris Brown on API – Updating A Member Account Using HTTP GET or POST
  • admin on API – Updating A Member Account Using HTTP GET or POST
  • Andrea on API – Updating A Member Account Using HTTP GET or POST

Featured WordPress Plugins

WP Express Checkout Plugin
wordpress_estore_icon
wordpress membership plugin icon
wordpress_affiliate_plugin_icon

Copyright © 2025 | WP Membership Plugin