WordPress Membership

Easy to use WordPress Membership plugin

  • Documentation
  • WP eMember Plugin
  • Projects
  • Home

Managing Member Blacklisting Using WP eMember Plugin

You may have a site where you find a pattern of certain IP or email addresses that are the basis of problematic or spam memberships.

Within the settings menu of the WP eMember plugin, a site admin is able to blacklist specific user addresses. Blacklisting a user from creating a membership can be based on their IP address, email address or email address pattern (eg blacklisting all users who attempt to sign up with an @yahoo.com email). This allows admin to blacklist multiple accounts attempting to sign up with certain email patterns IP addresses or one user specific to a certain email address.

This functionality of the WP eMember plugin allows admin to prevent spam or problematic users from signing up to their site.

How to Blacklist Users Based on IP and Email Address

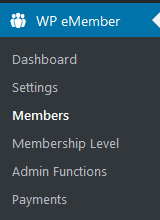
Step 1) Once logged into the admin dashboard of your site, go to Members under the WP eMember menu.

wp-emember-members-admin-menu

Step 2) Click on the Manage Blacklist tab.

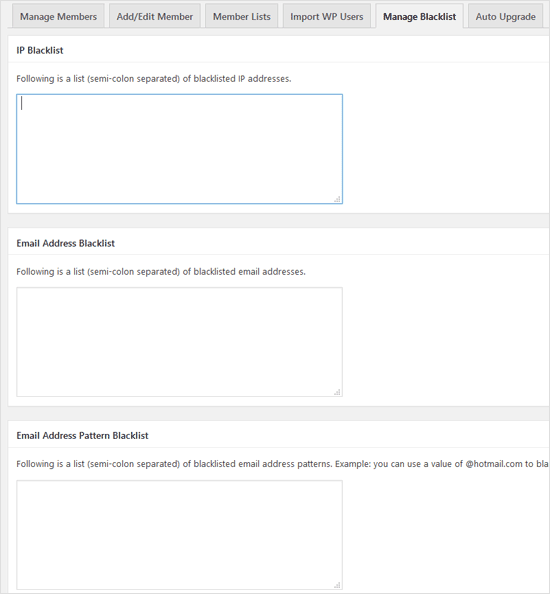
Step 3) Under Manage Blacklist, you will see three fields depending on the sort of users you need to blacklist:

  • IP Blacklist
  • Email Address Blacklist
  • Email Address Pattern Blacklist.

Step 4) Decide on the type of address or pattern you wish to blacklist. For example if you wish to blacklist one user from becoming a member you may decide to blacklist them using their email address. You would enter their email into the email address blacklist field. If you have more than one IP or email in any one field you will need to separate them using a semi-colon.

Example Values

The following example values will give you an idea of how to enter the data in the fields.

IP Blacklist

223.58.1.10;4.23.145.90;129.6.8.4

Email Address Blacklist

[email protected];[email protected];[email protected]

Email Address Pattern Blacklist

@spamydomain.com;@yahoo.com

Step 5) Once you have entered in your blacklisted IP, email or pattern email addresses click on the Update Blacklist button at the bottom of the page to save it.

Now, when a member tries to register or login that matches with the entries you specified in the blacklisting interface, they will be blocked.

Filed Under: Additional Resources Tagged With: Access, member, registration form

How to Use Google reCAPTCHA on Member Registration Form

If you offer free membership registration on your site then it can be affected by spam signups (bots completing the registration form).

You can enable Google reCAPTCHA on your member’s registration form if your site gets a lot of spam signups. Google reCAPTCHA will cut down all the spam signup attempts on your membership registration page.

Enabling Google reCAPTCHA

Go to the Google reCAPCHA settings tab from the main eMember settings menu. Then fill in the API keys to enable this option.

Filed Under: Design & Usage Tagged With: captcha addon, registration form, WP eMember, wp emember captcha

Allow Member Registration Using an Invitation Code or Password

Lets say you have a membership level called “Invitation Only”. You only want users with a special password or code to be able to signup to this membership level.

Do the following to achieve this type of setup

Step 1) Create Your Special Registration Page

Create a new WordPress page and follow this instruction to add a registration form on this page (for the membership level you want).

Step 2) Set Your Special Code or Password

Edit the visibility of the page and select the “Password protected” option. Set your special code (invitation code) as the password of this page.

set-password-protection-on-page

Step 3) Send Users to This Page

Now, you can communicate to your users and tell them to go to this page and use the code/password to unlock the page and register.

Only users with the correct code will be able to see the registration form and register.

Filed Under: Additional Resources Tagged With: member, Membership Level, membership tweaks, registration form

How to Create Multiple Free Membership Levels on Your Site

In this post I will cover how to have more than one free membership level on your site. WP eMember uses one registration form for all of your membership levels. This way you don’t have to create multiple pages with different registration forms and confuse your customers. Full details of how eMember does this is explained here.

Steps for Creating Multiple Free Membership Levels on Your Site:

Step 1: Create a New Level

You can create as many membership levels as you want to. When you give your users access to a membership level for free, it makes that level a “FREE” one.

Create a new membership access level from eMember’s “Membership Level” interface. Lets say the ID of this level is 2.

Step 2: Create a Registration Page

Create a new WordPress page and use the following shortcode on it. This will place a registration form for this newly created membership level:

[wp_eMember_registration_form_for level=2]

2 is the membership ID in this example. You will need to change this value to the actual membership level ID for your system.

Step 3: Send Users to This Page

Now, you can send users to this page and they will be able to signup for this free membership level.

You can repeat steps 1, 2 and 3 to create as many free levels as you want.

Filed Under: Additional Resources Tagged With: Membership Level, registration form, shortcodes

How to Re-Create the Mandatory eMember Pages

When you first install the WP eMember plugin, it will create all the mandatory pages for you so you never need to use the following tutorial.

However, if you need to re-create those pages (for whatever reason) then just watch the following video and it will show you what to do:

Pages Created on Installation

When you install the WP eMember plugin for the very first time, the following pages are automatically created:

  • Login Page – The page where visitors are able to login to your site.
  • Registration Page – Where customers will sign up to your website. A form where they will enter in their details.
  • Join Us Page – A page that has the different memberships that you offer.
  • Edit Profile Page – Where your members can go to edit their profile.
  • Password Reset Page – Where your members can go and reset their account password.

Recreating the Mandatory eMember Pages

If you happen to accidentally delete any of the required pages (the four pages listed above), you can complete the steps below to recreate the page(s).

Login Page

Creating the Page:

  1. Create a new WordPress page and title it ‘Member Login’.
  2. In the page editor enter in the following shortcode and then publish the page:

[wp_eMember_login]

Correcting the URL:

  1. Copy the URL of the new ‘Member Login’ page.
  2. Click on the ‘WP eMember’, ‘Settings’ menu.
  3. Click on the ‘Pages/Forms Settings’ tab.
  4. Delete the previous ‘Login Page’ URL and paste in the new URL.
  5. Ensure you ‘Update Options’.

Registration Page

Creating the Page:

  1. Create a new WordPress page and title it ‘Registration’.
  2. In the page editor enter in the following shortcode and then publish the page:

[wp_eMember_registration]

Correcting the URL:

  1. Copy the URL of the new ‘Registration’ page.
  2. Click on the ‘WP eMember’, ‘Settings’ menu.
  3. Click on the ‘Pages/Forms Settings’ tab.
  4. Delete the previous ‘Registration Page’ URL and paste in the new URL.
  5. Ensure you ‘Update Options’.

Join Us Page

Creating the Page:

  1. Create a new WordPress page and title it ‘Join Us’.
  2. This page can be customized how you would like. Use the ‘Join Us’ page to inform your customers of the different memberships that you offer. Once you have added content to the page, ensure that you ‘Publish’

Correcting the URL:

  1. Copy the URL of the new ‘Join Us’ page.
  2. Click on the ‘WP eMember’, ‘Settings’ menu.
  3. Click on the ‘Pages/Forms Settings’ tab.
  4. Delete the previous ‘Membership Payment/Join Page’ URL and paste in the new URL.
  5. Ensure you ‘Update Options’.

Edit Profile Page

Creating the Page:

  1. Create a new WordPress page and title it ‘Edit Profile’.
  2. In the page editor enter in the following shortcode and then publish the page:

[wp_eMember_edit_profile]

Correcting the URL:

  1. Copy the URL of the new ‘Edit Profile’ page.
  2. Click on the ‘WP eMember’, ‘Settings’ menu.
  3. Click on the ‘Pages/Forms Settings’ tab.
  4. Delete the previous ‘Member Profile Edit Page’ URL and paste in the new URL.
  5. Ensure you ‘Update Options’.

Password Reset Page

Creating the Page:

  1. Create a new WordPress page and title it ‘Password Reset’.
  2. In the page editor enter in the following shortcode and then publish the page:

[wp_eMember_password_reset]

Correcting the URL:

  1. Copy the URL of the new ‘Password Reset’ page.
  2. Click on the ‘WP eMember’, ‘Settings’ menu.
  3. Click on the ‘Pages/Forms Settings’ tab.
  4. Delete the previous ‘Password Reset Page’ URL and paste in the new URL value.
  5. Ensure you ‘Update Options’.


Filed Under: Additional Resources Tagged With: registration form, WP eMember

Member Registration Completion Hook

This documentation is only for developers. If you are not a developer with good PHP coding skills then you have no need to read this.

The registration completion hook (eMember_registration_complete) gets triggered after a member completes the registration. It will pass the details of the user who just registered to the handling function.

Here is a sample code to show you how it works. You can use this code in your custom plugin to see how it passes the data.

function handle_custom_registration_complete_event($member_data,$custom_fields)
{
  //The following line will print all the member details that got passed to this function via the $member_data array.
  //You can use this data however you like it.
  print_r($member_data);
  echo "<br />Custom fields data shown below<br />";
  print_r($custom_fields);
}
add_action('eMember_registration_complete','handle_custom_registration_complete_event',10,2);

Filed Under: Additional Resources Tagged With: API, member, registration form

eMember addon – Disable Button After Form Submission

This addon plugin will disable the registration and login form button immediately after the user clicks the button. If you have a slightly slow loading site then this should prevent users from clicking again and again when the form data is being submitted.

Installing the AddOn

  • Upload the “emember-disable-button-after-submission.zip” file via the WordPress’s plugin uploader interface (Plugins -> Add New -> Upload)
  • Activate the plugin through the “Plugins” menu in WordPress.

Using The Addon

You don’t have to do anything other than keeping it active.

AddOn Price

The eMember Email Broadcast addon is FREE for all customers who purchased WP eMember plugin from us.

Download the Addon

You can download this addon from the addon download area of our customer only support forum

  • Addon download area

Please note that some of these free addons are developed by our users in the community. So these addons do not have any advanced customization option. The description above explains exactly what this addon does.

Filed Under: eMember Addon Tagged With: disable button, emember addon, emember extension, registration form

Create a Registration Form for a Particular Membership Level

WP eMember uses ONE registration form for all kinds of membership registration. This way you don’t have to create multiple pages with different registration forms and confuse your customers. Full details of how eMember does this is explained here.

Occasionally, you may need to create a registration form for a particular membership level for a special reason. For example,  give backdoor entrance to your paid membership site to some special people (this way they won’t have to pay)

Create a Registration Form for a Specific Level

Create a new WordPress page. Then use the following shortcode on this page. It will place a registration form for a particular membership level:

[wp_eMember_registration_form_for level=1]

1 is the membership level ID in this example. Change it to the actual membership level ID value for your system.

Now, when a user registers using this form, he will be signing up for that particular membership level that you specified in the shortcode.

You can also hide this special registration page from the standard WordPress navigation menu.

Filed Under: Additional Resources Tagged With: backdoor registration form, Membership Level, registration form

Get the WP eMember Plugin

Get WP eMember

Categories

  • Additional Resources
  • Content Protection
  • Design & Usage
  • eMember Addon
  • Installation
  • Integration
  • License
  • Testing
  • Uncategorized
  • Video Tutorial

Recent Comments

  • Chris Brown on API – Querying A Member Profile Using HTTP GET or POST
  • admin on API – Updating A Member Account Using HTTP GET or POST
  • Chris Brown on API – Updating A Member Account Using HTTP GET or POST
  • admin on API – Updating A Member Account Using HTTP GET or POST
  • Andrea on API – Updating A Member Account Using HTTP GET or POST

Featured WordPress Plugins

wordpress_estore_icon
wordpress membership plugin icon
WP Express Checkout Plugin
WordPress Lightbox Ultimate Plugin
WordPress Photo Seller Plugin
wordpress_affiliate_plugin_icon

Copyright © 2023 | WP Membership Plugin