WordPress Membership

Easy to use WordPress Membership plugin

  • Documentation
  • WP eMember Plugin
  • Projects
  • Home

Show Secure RSS Feed Link to Members of Certain Membership Levels

If you enable the “Display Secure RSS Feed” feature in WP eMember plugin then it will show the secure RSS feed link in the login widget (to all members).

This addon has a shortcode that allows you to show the secure RSS feed if the member belongs to the specified membership level.

The following is an example of how to use the shortcode. It will show the RSS feed links to members that belong to membership level 2 or 3 or 4.

[wp_eMember_secure_rss_feed levels="2,3,4"]

You can specify as many membership levels as you want in the abavoe shortcode.

Keep the “Display Secure RSS Feed” option in the main eMember plugin unchecked (if you don’t wan to show the standard RSS feed link to all members).
Filed Under: Additional Resources Tagged With: emember addon

Allow Members to Upgrade or Add New Level to Their Profile for Free

Normally, you would charge people to upgrade their membership level to a new one. The standard upgrade documentation explains how that process is handled.

However, for a particular project, you may want to allow your members to upgrade their membership level for free. They just log into the site as a member then click a button to upgrade (or add) the level to their profile. This documentation explains how you can create a button that will allow your members to do that.

Creating a Button for Free Membership Level Upgrade

Step 1) Create a new WordPress page (where you will put the free upgrade buttons).

Step 2) Use the following shortcode in this newly created page. So you are creating a button that will upgrade the user’s membership level to the one specified in the “level” parameter of the shortcode.

[wp_eMember_upgrade_membership_level_to level="3"]

3 is the membership level ID in the above example. So change it to the correct level ID value for your site.

You can put as many buttons as you want (using the above shortcode) on this page for your various different levels that you want to offer free upgrade.

Step 3) Protect this page so only logged-in members of the site can view and interact with the upgrade buttons. You can use partial protection too (if that makes sense for your particular situation).

Step 4) Tell your users (who already has an account on your site) to go to this page and click on the button to upgrade.

When logged-in members click on the button that this shortcode generates, it upgrades their membership level to the one specified in the shortcode. If you are using the multiple membership level per user feature, then it will ADD the specified level to their profile (meaning they will now be able to access content of this newly added level).

Custom Button Text for the Update Level Button

You can specify a custom button text for the button by using the “button_text” parameter in the shortcode.

Example shortcode usage below:

[wp_eMember_upgrade_membership_level_to level="3" button_text="Click here to update"]

Redirect the Members to a Page After They Use the Button

You can use the “redirect_to” parameter in the shortcode to redirect the members to a page after they use the level update button.

Example shortcode usage below:

[wp_eMember_upgrade_membership_level_to level="3" redirect_to="http://www.exmaple.com/page-after-update-button-usage"]

Filed Under: Additional Resources Tagged With: Account Upgrade, Membership Level, shortcodes, WP eMember

API – Deactivate A Member Profile Using HTTP GET or POST

This documentation is only for developers. If you are not a developer with good PHP coding skills then you have no need to read this.

If you want to deactivate a member’s account profile using a HTTP GET or POST request then use this documentation. [Read more…]

Filed Under: Additional Resources Tagged With: 3rd party integration, API, emember extension, Integration, WP eMember

API – Querying A Member Profile Using HTTP GET or POST

This documentation is only for developers. If you are not a developer with good PHP coding skills then you have no need to read this.

If you want to query a member account profile using a HTTP GET or POST request then use this documentation. [Read more…]

Filed Under: Additional Resources Tagged With: 3rd party integration, API, emember extension, Integration, WP eMember

Allow Member Registration Using an Invitation Code or Password

Lets say you have a membership level called “Invitation Only”. You only want users with a special password or code to be able to signup to this membership level.

Do the following to achieve this type of setup

Step 1) Create Your Special Registration Page

Create a new WordPress page and follow this instruction to add a registration form on this page (for the membership level you want).

Step 2) Set Your Special Code or Password

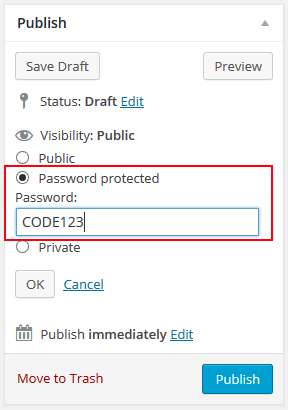
Edit the visibility of the page and select the “Password protected” option. Set your special code (invitation code) as the password of this page.

set-password-protection-on-page

Step 3) Send Users to This Page

Now, you can communicate to your users and tell them to go to this page and use the code/password to unlock the page and register.

Only users with the correct code will be able to see the registration form and register.

Filed Under: Additional Resources Tagged With: member, Membership Level, membership tweaks, registration form

How to Create Multiple Free Membership Levels on Your Site

In this post I will cover how to have more than one free membership level on your site. WP eMember uses one registration form for all of your membership levels. This way you don’t have to create multiple pages with different registration forms and confuse your customers. Full details of how eMember does this is explained here.

Steps for Creating Multiple Free Membership Levels on Your Site:

Step 1: Create a New Level

You can create as many membership levels as you want to. When you give your users access to a membership level for free, it makes that level a “FREE” one.

Create a new membership access level from eMember’s “Membership Level” interface. Lets say the ID of this level is 2.

Step 2: Create a Registration Page

Create a new WordPress page and use the following shortcode on it. This will place a registration form for this newly created membership level:

[wp_eMember_registration_form_for level=2]

2 is the membership ID in this example. You will need to change this value to the actual membership level ID for your system.

Step 3: Send Users to This Page

Now, you can send users to this page and they will be able to signup for this free membership level.

You can repeat steps 1, 2 and 3 to create as many free levels as you want.

Filed Under: Additional Resources Tagged With: Membership Level, registration form, shortcodes

Import WordPress Users as Members

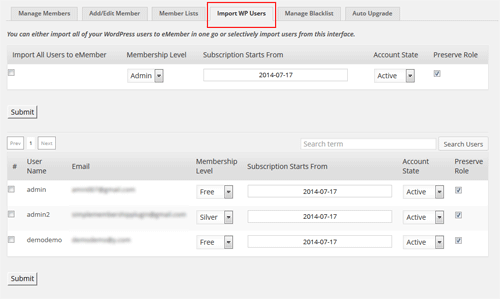
You can import your existing WordPress users as members by going to the “Import WP Users” interface. So no need to create new member entry for users that already exist in your system.

WordPress doesn’t let you create multiple user accounts using ONE email address. So if you already have an user account with an email address in your system, you can’t create another one using that same address.

Go to the following admin area of the membership plugin to import an existing user account as a member:

WP eMember -> Members -> Import WP Users

import-wordpress-users-as-members

This interface lets you import all users or some users selectively. You will also be able to specify what membership level these users will have when they are imported.

Filed Under: Additional Resources Tagged With: import, Membership Level, WordPress membership

WooCommerce and WP eMember Integration

You can integration WP eMember with WooCommerce so you can accept membership payment via WooCommerce.

Accept Membership Payment Via WooCommerce

Step 1) Download the integration addon plugin from here.

Step 2) Install the addon just like any other WordPress plugin.

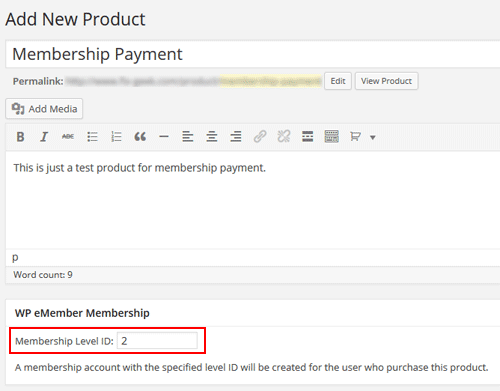
Step 3) When creating a new WooCommerce product (or editing one), you can specify a membership level for that product.

woocommerce-and-membership-payment

Now, when a customer purchase this product, a membership account (for the specified access level) will be created for the user.

Note: Your WooCommerce checkout for all products in the shop stay as is. The eMember plugin will ONLY  monitor the product checkout for products where you have specified a membership level ID. When you specify a membership level ID value in a WooCommerce product, you are telling our plugin that this product is for a membership payment.

Membership Registration Setup with WooCommerce

There are a couple of different ways you can setup the membership registration scenario.

1) WooCommerce and eMember Registration Scenario 1

In this setup, you just use WooCommerce to do the checkout. The user/member account creation process is completely handled by eMember.

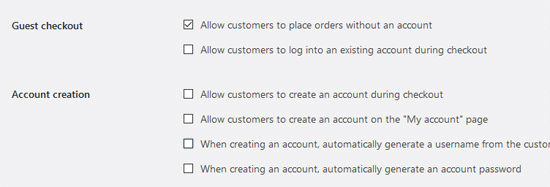
You will turn off all the WooCommerce account creation options from the “Accounts” settings of WooCommerce.


woocommerce-account-settings-interface-for-scenario-1

Here is a typical flow of how this process works:

  1. A visitor buys a membership product from your WooCommerce store.
  2. Once the payment is confirmed, WooCommerce will notify the eMember plugin.
  3. At this point the plugin knows what membership level this user paid for, the plugin will create the appropriate membership account for this visitor.
  4. The member will receive an email that contains a “unique” link to complete the registration.
  5. When the member clicks on that link in the email it will let him choose a “username” and “password” and complete the registration.
  6. At this point the member can log into the site via eMember and enjoy the premium members only content.

Your membership products are virtual products. So make sure the “Virtual” and “Download” options are enabled in your WooCommerce product in question. This way the order will immediately go to “complete” status after successful payment.

2) WooCommerce and eMember Registration Scenario 2

This setup is good for users who want to use the account creation option of WooCommerce.

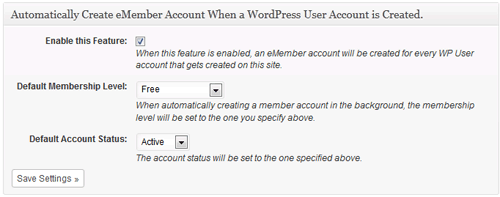
Go to the Admin Functions menu of eMember and enable the auto create eMember account feature. Create a free membership level (just so you can use it as a default level).

Also, you can optionally enable this feature to keep the user records in sync.

Here is a typical flow of how this process works

  1. A visitor buys a membership product from your WooCommerce store.
  2. Once the payment is confirmed, WooCommerce will create a WP User account for this user (just like it does for any product checkout).
  3. Then WooCommerce will notify the eMember plugin.
  4. eMember will create a corresponding eMember user record then upgrade that account to the appropriate membership level (the one this user paid for).
  5. At this point the member can log into the site via eMember and enjoy the members only content.

WooCommerce Payment/Order Status

Our plugin will only process orders/payments that are set to “processing” or “completed” status in WooCommerce. This is to make sure the money has been received before the member account gets created (or updated).

If your WooCommerce setup is correct, then the order status will be set correctly after an online payment is received. So it should work in an automated fashion.

However, if you are accepting manual payment then you need to review your order and set the order status correctly after you receive money from the customer. You can also use an WooCommerce extension to set the order status to complete automatically (after you receive an order).

Keeping the WooCommerce and eMember Logins in Sync

This is optional but you should enable this setting so when members log into the site via eMember’s login, they automatically get logged into their WooCommerce account (and vice versa).

Filed Under: Additional Resources, eMember Addon Tagged With: 3rd party integration, commerce, emember addon, emember extension, member, membership payment

API – Updating A Member Account Using HTTP GET or POST

This documentation is only for developers. If you are not a developer with good PHP coding skills then you have no need to read this.

If you want to update a member account using a HTTP GET or POST request then use this documentation.

Enabling the API

WP eMember plugin has an API that allows you to update a member account using a standard HTTP GET or POST request. If you want to use this API then you need to enable it from the settings menu of the plugin first. The following is a screenshot of this section in the settings menu:


It is very important that you do not reveal the Secret Word/API key to anyone else.

Using the API

Once you enable it, you can start to send HTTP request to the following URL to update member accounts remotely or from another software/application:

http://www.example.com/wp-content/plugins/wp-eMember/api/update.php

You need a minimum of 2 pieces of information to send an update request. These are:

  • Secret Word/API Key (you specified it in the settings menu of the plugin)
  • Member ID (the user whose details you want to update)

Optionally, you can pass the following fields with the request to update the values of those fields for the member’s account in question.

  • title
  • first_name
  • last_name
  • email
  • password
  • phone
  • address_street
  • address_city
  • address_state
  • address_zipcode
  • country
  • gender
  • company_name
  • membership_level_id
  • account_state
  • subscription_starts

1. Updating Member Account Using  HTTP GET request

In order to update a member account via HTTP GET request, use the following format:

http://www.example.com/wp-content/plugins/wp-eMember/api/update.php?secret_key=XX&member_id=XX&first_name=XX&last_name=XX

Replace the “example.com” and “XX” with the appropriate values.

PHP Code Example:The following is an example of how to construct this URL using PHP:

$secret_key = "6bd39ewe43a7bb";
$member_id= "1";
$first_name= "Jon";
$last_name= "Doe";

$prepared_data = "?secret_key=".$secret_key."&member_id=".$member_id."&first_name=".$first_name."&last_name=". $last_name;
$get_url = "http://www.example.com/wp-content/plugins/wp-eMember/api/update.php".$prepared_data;
// Execute this GET Request
file_get_contents($get_url);

2. Updating Member Account Using  HTTP POST request

To update a member account via HTTP POST use the following format:

<form method="post" action="http://www.example.com/wp-content/plugins/wp-eMmeber/api/update.php">
<input type="hidden" name="secret_key" value="XX">
<input type="hidden" name="member_id" value="XX">
<input type="hidden" name="first_name" value="XX">
<input type="hidden" name="last_name" value="XX">
<input type=submit value="Submit Post">
</form>

Replace the “example.com” and “XX” with the appropriate value.

Filed Under: Additional Resources Tagged With: 3rd party integration, API, emember extension, WP eMember

Building an Alumni Website on WordPress Platform

In this tutorial I will show you how you can build an alumni website for school/college using the WordPress platform.

[Read more…]

Filed Under: Additional Resources Tagged With: member profile display, Profile Listing, user profile listing

  • « Previous Page
  • 1
  • 2
  • 3
  • 4
  • Next Page »

Get the WP eMember Plugin

Get WP eMember

Categories

  • Additional Resources
  • Content Protection
  • Design & Usage
  • eMember Addon
  • Installation
  • Integration
  • License
  • Testing
  • Uncategorized
  • Video Tutorial

Recent Comments

  • Chris Brown on API – Querying A Member Profile Using HTTP GET or POST
  • admin on API – Updating A Member Account Using HTTP GET or POST
  • Chris Brown on API – Updating A Member Account Using HTTP GET or POST
  • admin on API – Updating A Member Account Using HTTP GET or POST
  • Andrea on API – Updating A Member Account Using HTTP GET or POST

Featured WordPress Plugins

WP Express Checkout Plugin
wordpress_estore_icon
wordpress membership plugin icon
wordpress_affiliate_plugin_icon

Copyright © 2025 | WP Membership Plugin