Tips and Tricks WP eCommerce

eCommerce Solution for WordPress Blog

  • Home
  • eCommerce Plugins
  • WP eStore Documentation
  • WP Shopping Cart Doc

WP eStore and Infusionsoft Integration Addon

You can integrate the eStore plugin with Infusionsoft so that the customers can be automatically signed up to your Infusionsoft list.

Installing the Infusionsoft Integration Addon

You can install this addon the same way you install any WordPress plugin:

  • Go to the “Add New” plugins screen in your WordPress admin area
  • Click the “upload” tab
  • Browse for the addon file (estore-infusionsoft-addon.zip)
  • Click “Install Now” and then activate the plugin

Addon Usage

Step 1) Click on the “Infusionsoft” menu link from the main eStore plugin’s admin menu.

Step 2) Enable the integration then fill in the API key and your APP Name. Then hit the “update” button to save.

infusionsoft-integration-settings

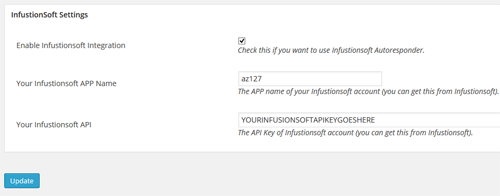
API Key – You can get the API key from your Infusionsoft account.

APP Name – The appname is the subdomain value of your account URL. For example, if your Infusionsoft account URL is the following:

https://az127.infusionsoft.com/Admin/home.jsp

Then your app name is az127

Step 3) Edit the eStore product in question and specify your Infusionsoft “Tag ID” in the List Name field of the product.

specifying-infusionsoft-tag-id

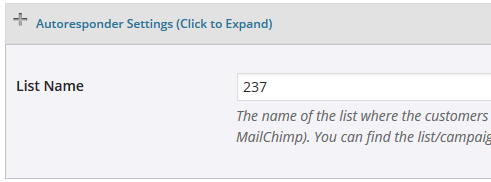
Now, when a customer purchase this product, the addon will automatically add this user to the specified Infusionsoft tag.

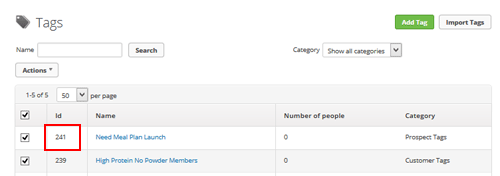
Getting Infusionsoft Tag ID

You can find all your Infusionsoft tags (they used to be called “groups”) from the tags interface of your Infusionsoft account.

getting-Infusionsoft-tag-id

Get the eStore Infusionsoft Addon

The price of this addon is $29.95

Filed Under: Autoresponder, eStore AddOn, Integration Tagged With: Autoresponder, eStore Addon, extension, Integration

WP eStore and NextGen Gallery Integration to Create Digital Photo Store (Method 1)

WordPress eStore and WordPress Paypal Shopping Cart Plugins can be integrated with the NextGen Gallery Plugin to create a Digital photo store similar to the screenshot shown below (please see the integration steps below to find out the full details):

WP eStore and NextGen Gallery Integration

WP eStore and NextGen Gallery Integration

The images were resized to 800×600 resolution using the NextGen Gallery resize utility. An watermark was also applied to the image using the NextGen Gallery ‘Effect’ option to prevent stealing. Once the purchase is complete the encrypted download link for the original image stored in a separate location (1920×1200 resolution and no watermark) is emailed to the buyer.

Just to clarify… You don’t necessarily have to sell digital photos to use the gallery. You could be selling anything and still use the Gallery as a means of displaying the products where each thumbnail is the icon of the product you are selling.

How to Integrate NextGen Gallery and WordPress eStore Plugins

There are two ways to integrate NextGen Gallery with the WP eStore plugin:

Method 1: Create/Configure every product separately
Method 2: Configure one product then use that as a template

This page explains the first integration method. Please see the following link for the 2nd integration method:

  • NextGen Gallery Alternative Integration Method (Method 2)

What Plugins do You Need for This Integration?

You will need the following 3 plugins for this:

  • WordPress eStore plugin
  • NextGen Gallary Plugin
  • eStore NextGen Gallery Addon Plugin

This guide assumes that you have used NextGen Gallery Plugin and know how to use it. If you don’t know how to use NextGen Gallery then I suggest you read the ‘Readme.txt’ file that comes with the NexGen Gallery plugin or try the NextGen Gallery forum.

The Integration Steps

Step1. Install the eStore NextGen Gallery Addon

How to download and install the Free eStore NextGen Gallery Addon is explained here.

Step 2. Displaying the Gallery

Use the following shortcode to display the NextGen Gallery in a post or page:

[nggallery id=1 template=wp-eStore]

Given the nextgen gallery id is 1. You will need to change “1” to whatever your NextGen Gallery ID is.

Using the ‘template=wp-eStore’ option will show captions underneath each thumbnail image where you can display the ‘Add to Cart’ button and a little bit of other details/description of the image.

Note: The “S” in “wp-eStore” is capitalized.

Step 3. Adding the ‘Add to Cart’ Buttons below the Image Thumbnails

1) First make an eStore product for the NextGen Gallery image in question (if you haven’t done so already). You will need to make a product for each of your gallery images.

2) Go to ‘Manage Gallery‘ from the NextGen Gallery settings menu and choose the Gallery that you want to turn into a shop.

3) Now in the ‘Alt & Title Text / Description‘ field of every image, enter the Image details (name, price etc) and the shortcode for the Add to Cart button of that image.

[wp_eStore_add_to_cart id=4]

It should look similar to the following example:

In the above example the eStore Product id of the Photo is 4 (the product ID can be found in the “Manage Products” menu of eStore). I have configured this product in WP eStore already. "<br />" is an HTML code to insert a line break so the name, price and the buy button doesn’t appear all on the same line.

4) Do the same for all the images in the gallery.

5) Save the Changes to the Gallery and Now your Gallery will look similar to the demo shown at the start of this Page.

Frequently Asked Questions:

Question 1: Can I use an eStore fancy display inside a NextGen gallery display?

No, the NextGen gallery itself is a way of displaying your products. So you cannot insert a pre-configured eStore’s fancy display inside a NextGen gallery display (they are two different display methods).

The WordPress eStore Plugin can be found in the WordPress eStore Plugin Page. All WP eStore related documentation can be found on the WP eStore Documentation Site.

Filed Under: Integration Tagged With: Integration, NextGen Gallery, WordPress eStore

Amazon Web Services Simple Storage Service (AWS S3) Integration

We now have a free addon for Amazon S3 integration. This addon makes the S3 integration simpler. The following integration will still work but it is recommended that you use the addon going forward.

The WP eStore plugin can be integrated with Amazon S3. This feature lets you securely store and deliver digital products/downloads using Amazon’s Simple Storage Service (S3).

Amazon S3 integration is really helpful when you want to sell large files without using/wasting bandwidth of your server.

The Amazon S3 integration involves the following two steps:

  1. Specify the Amazon S3 API details in the eStore plugin’s settings
  2. Specify the URI of your digital asset in the digital product URL field of the product in question

Amazon S3 Integration Video Tutorial

Checkout the amazon S3 integration video tutorial from our additional video tutorials section.

Amazon S3 Integration Details

Step 1 – Specify Amazon S3 API Details

The amazon S3 integration options can be found under the “AddOn Settings” tab in eStore Settings menu. Go to the following interface and specify your S3 API details:

WP eStore Settings -> AddOn Settings -> Amazon Web Services (AWS)

If you don’t already have your Amazon S3 API keys then read this document to learn how to get Amazon S3 API keys (you can find similar information on Amazon site also).

Once you have configured the amazon S3 access key and secret access key in the S3 settings section under the AddOn Settings tab of eStore, you are ready to start using your Amazon s3 account with WP eStore.

Step 2- Specify the S3 Asset Location

You need to tell WP eStore to redirect encrypted download links to the AWS S3 server using the AS3TP URI in the Digital Product URL field of the product. Basically, enter your Product URL using the following method in the “Digital Product URL” field:

as3tp://bucket.s3.amazonaws.com/folder/object

Here, “bucket” is the name of the S3 bucket containing the digital product, and “folder/object” is the S3 key which points to the digital product.

You may also use “as3tps://” in place of “as3tp://” if you want the S3 download to be SSL encrypted. You also have the option of inserting “[email protected]” before the bucket name, if the S3 object is marked as “public” on the S3 server.

The following screen capture shows how to properly create this URI value

Amazon S3 Integration

Here are some typical examples of valid AS3TP URI that you can use in eStore:

  • as3tp://bucket.s3.amazonaws.com/object
  • as3tp://bucket.s3.amazonaws.com/folder/object
  • as3tps://bucket.s3.amazonaws.com/folder/folder/object
  • as3tps://[email protected]/object

Remember to use one of the above URI methods to enter your product URL in the “Digital Product URL” field (Don’t just use the normal amazon S3 URL of the product in that field).

Use of Amazon S3 is completely optional, but provides several advantages for those who use it. The biggest advantage is that your eStore server is relieved of the burden of having to act as an intermediary when processing anonymized downloads. This will enhance the download experience for users, because they are directly downloading files from the higher bandwidth S3 server. And because the redirection is done using an expiring AWS presigned URL request, your digital products are protected; even if the user saves the redirection URL. And, successful downloads are no longer dependent upon the reliability of your hosting provider’s server.

What File Permission To Use in Amazon S3

When you upload a file to your amazon S3 account, you should make it private (not public). If you make a file private, then no one can download that file other than going via the encrypted link eStore creates after a purchase.

The following screenshot shows how you can make a file in your amazon S3 account private.

Amazon S3 File Permission

Amazon S3 File Permission

IMPORTANT NOTES:

  • Strict S3 bucket naming restrictions are enforced.
  • Only virtual hosted style bucket names are supported. Path style bucket name access is not supported.
  • CNAME DNS aliases are supported.
  • Region specific end points are not supported.
  • Use of “[email protected]” tells eStore not to presign URL for public objects. Forgetting to add “[email protected]” to the URI, generates a presigned URL, but no redirection errors will occur.
  • Remote hosting (on S3) of PDF Stamper files is not supported (if you are using the PDF Stamper plugin).

Filed Under: Integration Tagged With: Amazon S3 Integration, AWS S3

WP eStore and GetResponse Integration

The WP eStore shopping cart plugin can be easily integrated with GetResponse (Autoresponder, Email marketing and Email list manager).

To integrate GetResponse with eStore simply go to the “Autoresponder Settings” tab from the Settings menu of eStore and set it up.

You will need to specify your GetResponse API key. When you copy the API key from your GetResponse account remember to look for a button to the right of the API key that says “ON/OFF”. It is OFF by default. The API key is not activated until this is turned ON so make sure to turn in on.

You can get the Campaign ID from your GetResponse account. Example Campaign ID: Thual

Filed Under: Integration Tagged With: Autoresponder, Integration

WP eStore and MemberWing Plugin Integration

WP eStore can be integrated with the MemberWing Plugin.

MemberWing Plugin Integration Steps

Step 1: You will need one piece of information from the MemberWing plugin. So browse to the “Integration with other systems” menu from the “MemberWing-X” section of your WordPress Dashboard:

Admin dashboard => MemberWing-X => Integration with other systems

Step 2: Copy the URL from “MemberWing Universal Paypal Postback URL” field. It will look something like the following:

http://www.your-domain.com/wp-content/plugins/memberwing-x/mwx-notify-paypal.php?mwx_api_key=dfb0e9e3b9359541&skip_postback=1

Step 3: Browse to the “3rd Party Integration” tab from the WP eStore’s settings menu and paste the above URL in the “MemberWing Integration Settings” section:

MemberWing Plugin Integration

All done, now when someone makes a purchase using a payment button configured using eStore, it will automatically create a membership account for that customer.

Filed Under: Integration Tagged With: Integration, Membership plugin, WP eStore

NextGen Gallery Alternate Integration Method (Method 2)

There are two ways to integration WP eStore with the NextGen Gallery plugin. Each of these two methods have pros and cons. Depending on what you want, one might work out better than the other.

So make sure to check the details of both these integration methods so you can decide which one works best for you.

The method 1 of NextGen Gallery integration is explained on the following page:

  • WP eStore and NextGen Gallery Integration Instructions
Method 1 is slightly better for the security of the digital photo/image since you can configure to deliver a separate copy of the image than the one on display. The following link has more details on this :
  • Why configure every product separately

The only issue with method 1 is that you manually have to configure every product separately which is not ideal for some users. So for people who are not really that concerned about the security of the digital image (example, if you are selling prints of wedding photos) the method 2 (alternate way of integrating NextGen Gallery) works out better as you don’t have to manually configure every product.

What to Expect From Integration Method 2 (the objective)

The aim of this integration is that you will configure one product with the price, variation, shipping etc options that you prefer and then use that product’s information as a template to create a “Buy Now” button for every image in your gallery. The name of the product will be dynamically changed to the “alt text” of the image on a per image basis and upon purchase the “image url” for that image from the NextGen gallery will be given as a download.

Important Note: One thing people miss when using this method is that the image that you are using in the NextGen gallery will be delivered to your customer after purchase (not the one you configure in the “Digital Product URL” field of eStore).

If you want to deliver the image from the “Digital Product URL” field then you need to use method 1 of NextGen gallery integration.

The Integration Steps

Step1. Install the eStore NextGen Gallery Addon

How to download and install the Free eStore NextGen Gallery Addon is explained here.

Step 2. Configuring a product to be Used as  Template

Add a product from the “Add/Edit Products” menu of the eStore plugin. Specify the price, variation, shipping etc options that you prefer for your images appropriately (the product name doesn’t matter as it will be dynamically changed to the alt text of the image).

Step 3. Specify the Template Product ID in the Settings Menu

Browse to the “3rd Party Integration” tab of eStore’s settings menu and specify the product ID configured in step 2 as the template product.

NextGen Gallery Settings Screenshot

Step 4. Displaying the Gallery with Buy Buttons

Use the following shortcode/tag to display the Gallery in a post or page.

[nggallery id=1 template=wp-eStore-auto]

The gallery id is 1 in this example. You will need to change “1” to whatever your NextGen Gallery ID is.

Using the “template=wp-eStore-auto” option will show/display a “Buy Now” button below every image in this gallery that the visitors can use to make a purchase.

Important Notes and F.A.Q:

Question 1: Can I Use “Add to Cart” Buttons Instead of “Buy Now” Buttons When Using This Integration?

Yes, There is another template in eStore so you can use “add to cart” type buttons. The template is stored in the “view” directory of the eStore plugin and is called “gallery-wp-eStore-auto-addtocart.php”. Copy this template file to the “view” directory of the NextGen gallery plugin. Now, you can follow the 2nd and 3rd step of the above instruction and use the following shortcode to use this template:

[nggallery id=1 template=wp-eStore-auto-addtocart]

1 is the ID of the nextgen gallery.

Question 2: Can I use an eStore fancy display inside a NextGen gallery display?

No, the NextGen gallery itself is a way of displaying your products. So you cannot insert a pre-configured eStore’s fancy display inside a NextGen gallery display (they are two different display methods).

Filed Under: Integration, WordPress eStore Tagged With: Integration, NextGen Gallery, WordPress eStore

WordPress eStore and WishList Members plugin Integration

Integrating WishList with the WP eStore plugin is very easy. First you should read the integration scenario post from the following URL to get a visualization of what to expect from this integration though:

  • WP eStore and WishList integration scenerio

You also need to make sure that you have the latest version of WishList Members pluign. Move to the next section when you are ready to do the integration.

What Info will You Need?

You will need 3 pieces of information from WishList members plugin to configure a “Buy Now”, “Subscribe” or “Add to Cart” button that integrates with the WP eStore plugin. The info you need  are:

  1. The Post URL
  2. The Secret Word
  3. Membership Level SKU Number

All these information can be found on the “Integration” tab of the WishList members plugin (Select Generic System integration)

wishlist-members-generic-integration-menu

WP eStore Settings for WishList Members Integration

Step 1) Go to the “3rd Party Integration” tab from the settings menu of WP eStore plugin.

esotre-and-wishlist-members-integration-settings

Step 2) Check the “Enable Wishlist Members Integration” checkbox from the “WishList Integration Settings” section.

Step 3) Fill in the “POST URL” and the “Secret Word” in the corresponding fields and save the settings by clicking the “Update” button.

Step 4) When configuring an eStore product, use the Membership Level SKU (this is number that corresponds to a particular membership level of your WishList members plugin) in the “Reference Text” field under the Additional product details section of the product.

Now, when someone pays using that eStore product, the plugin will know which membership level to create for that user. Once the user makes a payment, the plugin will talk to the WishList members plugin to create a membership account and send an email which will have a link to complete the registration.

Handling the Thank You Page URL

The user needs to click on the unique link sent to them via email in order to complete the registration after payment. So you can send the users to a generic “Thank You” page (after payment) where you instruct them to check the email for the special registration link and click on it.

What to Do When You Have Multiple Membership Levels?

Create a new eStore product for each of your membership levels and use the corresponding SKU value of the level in the reference text field of the eStore product.

Filed Under: Integration Tagged With: Integration, membership integration, Wish List, WordPress eStore

Your Shopping Cart

Shopping Cart Empty
Shopping Cart is Empty
Visit The Shop

Search

Featured Documents

Stylish Product Display Options for WP eStore WP eStore Quick Setup and Usage Video Tutorial WP eStore Shortcodes and Functions Reference WordPress eStore Plugin Features WordPress eStore Plugin Demo What Our Customers Have to Say About Our Products WordPress eStore WishList (Feature Suggestions) WordPress eStore Frequently Asked Questions (FAQ) How to Show Add to Cart buttons

Featured Plugins

wordpress_estore_icon
wordpress membership plugin icon
WP Express Checkout Plugin
Lightbox Ultimate Plugin
wordpress_affiliate_plugin_icon

Copyright © 2023 | eCommerce Plugins