Tips and Tricks WP eCommerce

eCommerce Solution for WordPress Blog

  • Home
  • eCommerce Plugins
  • WP eStore Documentation
  • WP Shopping Cart Doc

Using Product Specific Instructions in WP eStore

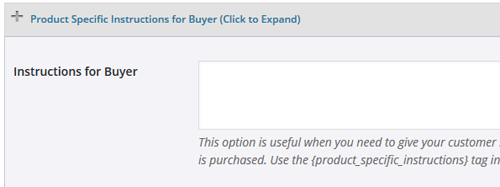
You can use the “Product Specific Instructions” feature of WP eStore to send special instructions (specific to a product) to your customers.

Your customers will only get this info when they purchase this product in question.

This is great for the following:

  • Send some special usage instructions specific to that product.
  • Explain some steps that they need to do before they can use the item.
  • Send them access to a URL that is password protected (you can share the URL and the password using this option).
  • Share the password to open the file (if there is one).
  • … and so on …

Step 1) Edit the product in question and enter the info in the “Product Specific Instructions” field

product-specific-instructions-configuration

Step 2) Edit the buyer email body (from the Email Settings menu of WP eStore).

Enter the following email shortcode in there (where you want the product specific instructions to show):

{product_specific_instructions}

WP eStore and Constant Contact Integration Addon

This addon has been deprecated. It is no longer being sold.

The users are added to the Constant Contact list when any of the following event happens:

  1. A customer purchases a product that has a list name specified for it.
  2. A visitor submits a squeeze form for a product that has a list name specified for it.

Installing the Constant Contact Addon

You can install this addon the same way you install any WordPress plugin:

  • Go to the Add New plugins screen in your WordPress admin area
  • Click the Upload button
  • Browse for the addon file (estore-constant-contact-addon.zip)
  • Click Install Now and then activate the plugin

Addon Usage

Step 1) Click on the “Constant Contact” menu link from the main eStore plugin’s admin menu.

Step 2) Enable the integration then fill in the API key and other API details. Then hit the “update” button to save.

You can get the API details from your Constant Contact account.

Step 3) Edit the eStore product in question and specify your Constant Contact “List Name” in the List Name field of the product.

Now, when a customer purchase this product, the addon will automatically add this user to the specified list.

WP eStore Addon – USAePay Payment Gateway

This addon allows you to do shopping cart checkout using USAePay payment gateway.

AddOn Price

The eStore USAePay addon is FREE for all customers who purchased WP eStore plugin from us.

Download the Addon

You can download this addon from the gateway addon download area of our support forum.

Installation

You can install this addon the same way you install any WordPress plugin:

  • Go to the “Add New” plugins screen in your WordPress admin area
  • Click the “upload” tab
  • Browse for the addon file (eStore-usaepay-gateway.zip)
  • Click “Install Now” and then activate the plugin

Using USAePay Payment Gateway Addon

Once you install addon you will need to configure some USAePay specific settings. You can find the settings page under the eStore USAePay menu of WP eStore plugin. The following screenshot shows how you can access the settings page of this addon:

screenshot showing how to access the USAePay addon in the estore settings

In order to complete the settings simply follow the steps outlined below:

Step 1: Enable “USAePay” from the settings section of the addon.

Step 2: Enter your USAePay merchant account Source Key. You can retrieve it from your USAePay account (Settings->Source Keys).

screenshot showing the settings menu for USAePay addon

Step 3: Enter your preferred checkout text for USAePay gateway (example: USAePay). This text will be used in the eStore shopping cart gateway selection drop down menu if you are using multiple payment gateway options. Click the “Update” button.

Step 4: Login to your USAePay merchant account and Go to “Settings->Source Keys”.

Step 5: Edit your source key and enter a return URL in the Approved URL field of Payment Form Settings (preferably “Thank You” page). Make sure that “Transaction Result” is set to “Display Result and POST to URL”.

screenshot showing the payment form settings of USAePay gateway

Save the settings and your site will be ready to accept payments using USAePay gateway.

Example Code for Custom Autoresponder Integration with WP eStore

This documentation is only for developers. If you are not a developer then you have no need to read this.

First read this post to understand some basics.

The following is an example code that shows you how use the item specific signup hook (this hook is called for each item that the customer purchases):

add_action('eStore_item_specific_autoresponder_signup', 'my_estore_custom_signup');
function my_estore_custom_signup($signup_data)
{
    eStore_payment_debug('Received request for item specific autoresponder signup action.', true);
    $firstname = $signup_data['firstname'];
    $lastname = $signup_data['lastname'];
    $email = $signup_data['email'];
    $list_name = $signup_data['list_name'];
    //TODO - write your autoresponder signup code here.
}

The value you specify in the “List Name” field (under the autoresponder settings section of the product) will be passed in the above function using the “list_name” parameter.


Integrate WP eStore with Software License Manager Plugin

WP eStore plugin can be integrated with the Software License Manager plugin easily.

eStore will automatically generate license codes when a customer purchase the software product.

Integration Steps

Step 1) Edit the eStore product in question (the one that is your software product) and go to the “AddOn Settings” section.

Step 2) Check the “Create License” option

estore-license-manager-integration-screenshot-1

Step 3) Go to the “Email Settings” menu of eStore.

Step 4) Add the following email tag in the buyer email body field:

{slm_data}

The plugin will replace this tag with the generated license code and send it to the customer.

Specifying a Custom Max Domain Limit

The license key that gets created will use the default value you set in the “Maximum Allowed Domains” field of the License Manage plugin settings. If you want to use a different/custom max domain number for a particular product then edit the eStore product in question and specify the value in the “Software License Manager Plugin” section of the product:

software-license-manager-custom-max-domain-limit-settings

You can also edit a particular license from the license manager plugin and update the “Maximum Allowed Domains” field’s value for that license key.

WP eStore Amount Based Shipping AddOn

The eStore Amount Based Shipping addon allows you to automatically apply a shipping amount to the cart based on a price range.

You can pre-configure how much shipping amount to apply for what price range.

Installing the eStore Amount Based Shipping Addon

You can install this addon the same way you install any WordPress plugin:

  • Go to the “Add New” plugins screen in your WordPress admin area
  • Click the “upload” tab
  • Browse for the addon file (eStore-amount-based-shipping.zip)
  • Click “Install Now” and then activate the plugin

Using this Addon

When this addon is active, You can easily configure some conditions that will be used to automatically apply the shipping amount to the shopping cart.

To configure a new shipping condition click on the “Amount based shipping” sub-menu under the WP eStore plugin menu.

screenshot showing the amount based shipping menu in the estore plugin

To add a new condition you need to enter the following information:

  • From (Amount): The minimum price amount required to apply this shipping amount. For example: 5.00
  • To (Amount): The maximum price amount required in the shopping cart to apply this shipping amount. For example: 7.00
  • Shipping Amount: The shipping amount that will be applied to the cart when the above condition is fulfilled. For example: 1.50

Click the “Save” button which will add the new shipping condition.

You can add as many conditions as you want.

screenshot showing the amount based shipping settings in the estore plugin

How Does the Amount Based Shipping Condition Work

Lets say, you configured one shipping condition and a user just came to your site to do a shopping cart checkout. If the total price amount (of physical products) in the shopping cart is between $5.00 and $7.00, a $1.50 shipping will be automatically applied to the cart.

In order for a product to be eligible for amount based shipping,

a) Digital Product URL field needs to be empty

b) Downloadable option needs to be disabled

screenshot showing the digital content details section of estore plugin

Otherwise the addon will consider it as a digital item and no shipping will apply.

AddOn Price

The eStore Amount Based Shipping Addon is FREE for all customers who purchased WP eStore plugin from us.

Download the Addon (v1.0.1)

You can download this addon from the addon download area of our customer only support forum.

General Note

Please note that some of these free eStore addons are developed by our users in the community. So they do not have any advanced customization option. The description above explains exactly what this addon does.

WP eStore Sendy Integration Addon

This addon plugin allow you to integrate WP eStore plugin with the Sendy Email Marketing solution. You can use it to add customers to your Sendy email list when someone purchase your product(s).

Installing the Sendy Integration Addon

You can install this addon the same way you install any WordPress plugin:

  • Go to the “Add New” plugins screen in your WordPress admin area
  • Click the “upload” tab
  • Browse for the plugin file (eStore-sendy-integration-addon.zip)
  • Click “Install Now” and then activate the plugin

Using the Sendy Integration AddOn

After you install this addon using the above instruction do the following:

Step 1) Go to the Sendy integration settings interface from your main eStore menu.

screenshot of sendy integration menu in the estore plugin

Step 2) Enter you Sendy Installation URL.

screenshot showing the sendy api details section in the estore plugin

Step 3) Edit the eStore product (the one that you want to link to Sendy list) and specify the list ID in the List Name field.

screenshot of sendy autoresponder section in the estore product interface

Save the product and you are done!

Now every time  there is a new transaction or squeeze page form submission for this product, the customer will be automatically added to your Sendy list.

How to Get The Sendy Integration Addon/Extension

The price of this addon is $29.95

Please contact us to purchase this addon.

WP eStore Table Rate Tax by Item Types AddOn

The eStore Table Rate Tax by Item Types addon allows you to charge tax in the shopping cart based on the user’s country and type of items.

Installing the eStore Table Rate Tax by Item Types Addon

You can install this addon the same way you install any WordPress plugin:

  • Go to the “Add New” plugins screen in your WordPress admin area
  • Click the “upload” tab
  • Browse for the addon file (estore-table-rate-tax-by-item-types.zip)
  • Click “Install Now” and then activate the plugin

Using this Addon

When this addon is active, You can easily configure rates that will be used to apply tax in the shopping cart based on the customer’s country.

To access the addon settings click on the “Table Rate Tax” sub-menu under the WP eStore plugin menu.

screenshot showing how to access the estore table rate tax addon by item types menu

To add a new tax zone you need to select a country, type of product and specify a tax rate for it (For example: 20).

Click the “Save” button which will add the zone.

If you do not wish to configure a rate for every country you can specify a flat rate (For example: 15). By default it is set to 0.

screenshot showing the settings of table rate tax by item types addon

screenshot showing the default options of table rate tax by item types addon

screenshot showing the countries configured in the table rate tax by item types addon


How Does It Work

Lets say, a customer is browsing your website from Denmark. When that user adds a digital product to the shopping cart a 25% tax/VAT will be automatically applied.

screenshot showing the eStore table rate tax addon by item types country dropdown in the shopping cart

The location of the user is determined based on the IP address. But they can also manually select their country (the addon will calculate the tax accordingly).

If the user is from a zone that you haven’t configured (Example: USA) a 15% tax will be automatically applied.

Tax will be applied the same way for physical products.

AddOn Price

The eStore Table Rate Tax by Item Types Addon is FREE for all customers who purchased WP eStore plugin from us.

Download the Addon (v1.0.1)

You can download this addon from the addon download area of our customer only support forum.

General Note

Please note that some of these free eStore addons are developed by our users in the community. So they do not have any advanced customization option. The description above explains exactly what this addon does.

WP eStore Addon – NMI Payment Gateway

This addon allows you to do shopping cart checkout using NMI payment gateway.

AddOn Price

The eStore NMI addon is FREE for all customers who purchased WP eStore plugin from us.

Installation

You can install this addon the same way you install any WordPress plugin:

  • Go to the “Add New” plugins screen in your WordPress admin area
  • Click the “upload” tab
  • Browse for the addon file (eStore-nmi-gateway.zip)
  • Click “Install Now” and then activate the plugin

Using NMI Gateway Addon

Once you have this addon activated your Authorize.net checkout data will be submitted to NMI gateway.

Download the Addon

You can download this addon from the gateway addon download area of our support forum.

Automatically Shorten Encrypted Download Links in WP eStore Plugin

WP eStore plugin allows you to shorten the encrypted download links using Bitly URL shortener service. In order to integrate Bitly with eStore please follow these steps:

Step 1 (Login to Bitly)

Login to your Bitly account (Please sign up for an account if you don’t have one).

Step 2 (Generate token)

Generate a generic access token here by confirming your account password at the bottom of the page.

Step 3 (Enable Bitly in eStore)

  • Go to eStore general settings (WP eStore->Settings->Digital Product Delivery Settings)
  • Enable Shorten Encrypted Download Links
  • Enter your Bitly access token and save the settings.

shorten-encrypted-download-links-settings

« Previous Page
Next Page »

Your Shopping Cart

Shopping Cart Empty
Shopping Cart is Empty
Visit The Shop

Search

Featured Documents

Stylish Product Display Options for WP eStore WP eStore Quick Setup and Usage Video Tutorial WP eStore Shortcodes and Functions Reference WordPress eStore Plugin Features WordPress eStore Plugin Demo What Our Customers Have to Say About Our Products WordPress eStore WishList (Feature Suggestions) WordPress eStore Frequently Asked Questions (FAQ) How to Show Add to Cart buttons

Featured Plugins

WP Express Checkout Plugin
wordpress_estore_icon
wordpress membership plugin icon
wordpress_affiliate_plugin_icon

Copyright © 2025 | eCommerce Plugins