Tips and Tricks WP eCommerce

eCommerce Solution for WordPress Blog

  • Home
  • eCommerce Plugins
  • WP eStore Documentation
  • WP Shopping Cart Doc

PayPal’s Pay in 4 (Buy Now Pay Later) with Simple Shopping Cart Plugin

When you use any of the PayPal checkout options offered in the Simple Shopping Cart Plugin, your customers can checkout using PayPal’s Pay in 4 option. The Pay in 4 is PayPal’s Buy Now, Pay Later Interest-Free Installments Option. As the seller, you will receive the full amount for the product at the time of the purchase, the customer will pay it off to PayPal over time.

Set-Up Requirements for PayPal’s Pay in 4 Feature

PayPal stipulates a number of requirements for companies that wish to accept Pay-in-4 payments for goods and services they sell from their websites. Below are the set-up requirements for PayPal’s Pay in 4 option:

  1. Use any of the PayPal checkout options (PayPal Standard, PayPal Commerce Platform etc).
  2. The product you are selling needs to be between $30.00 and $1500.00 for the ‘Pay in 4’ option to appear on the checkout window.
  3. The customer must reside in an eligible country/state. United States is supported. The countries that PayPal offers the Pay in 4 feature is expanding, and in the future additional customers from around the world will be able to use this option to pay for goods and services. So check with PayPal if your country is supported at this moment.
  4. The customer will need to have a PayPal account.

You can read more about PayPal Pay in 4 eligibility on their website here.

If you have set up the Pay in 4 option in your PayPal account but the customer is not seeing the option during checkout, then this customer may not meet all the criteria to be able to use this payment option.

How Will the Customers Use the Pay in 4?

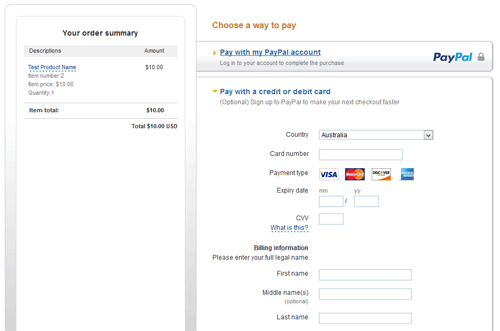
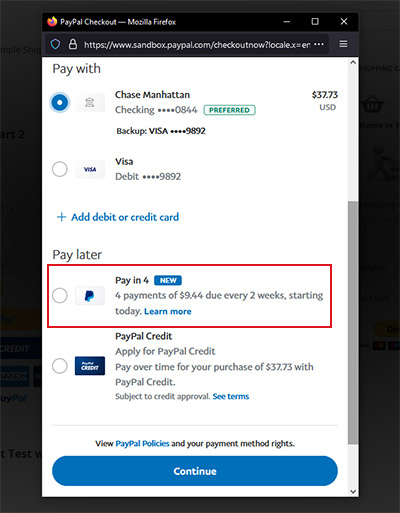
Once you have the Simple Shopping Cart Plugin activated and you have a product where the price is between $30.00 and $1500.00, those customers who reside in eligible countries should see the option to use ‘Pay in 4’. The option is shown within the checkout popup window. The customer can simply click to ‘Pay in 4’ payments, rather than having to pay the total amount upfront.
WP eStore – How Does the Manual Checkout Option Work?

This documentation will address the usage and setup of the ‘Manual/Off-line Checkout Settings‘ feature of the WP eStore plugin.

What is the Manual Checkout Option?

The manual checkout option (when enabled) allows your customers to proceed to checkout with an item without needing to pay. This feature is useful if you have a business that has physical products where most of the transactions occur offline. Other business owners are able to use this feature to sell items to a non-for-profit organization where they give the items in return for a payment later on. The ‘Manual Checkout Option’ is also widely used for companies that wish to offer an in-store pickup and payment option. This feature is fully customizable allowing you to:

  • Choose if the product database is updated automatically after a manual checkout
  • Add a shipping charge
  • Customize emails sent from the plugin to both the seller and the buyer
  • Direct your customers to a specific page after the checkout is complete
  • Decide on functions that relate to the WP Affiliate and WP eMember plugins
manual-checkout-option

How Do my Customer’s Checkout with the Manual Option?

1) Your customer goes to your store and checks out via the manual checkout option.

2) The customer gets an email that contains all the items he/she ordered.

3) The customer also gets some “instructions” in the email. You specify the instructions in the “Directions for the Customer” field under the manual checkout settings section. This instruction could read:
“Come to our store [address of your store] with the money to pickup your item.”

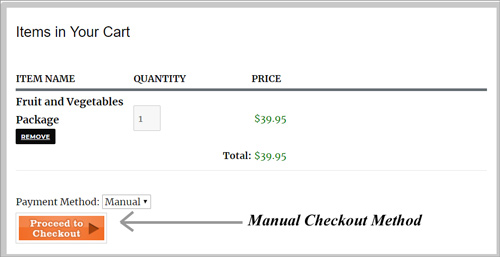
Example: Ability to Manually Checkout

manual-checkout-box

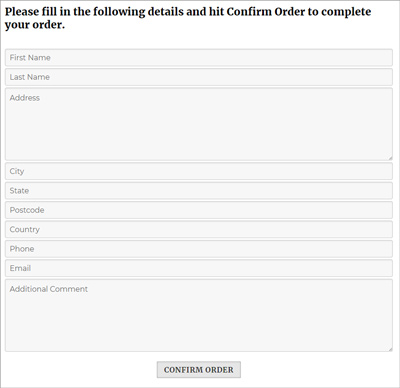
Example: Manual Checkout Form

form-for-manual-checkout-option

Locating the Manual Checkout Option

The manual checkout option is located in the ‘Settings’ menu of the WP eStore plugin.

  1. Click on the ‘Settings’ menu of the WP eStore plugin.
  2. Click on the ‘Payment Gateway Settings’ tab.
  3. You will now see a section titled ‘Manual/Off-line Checkout Settings’. This documentation will focus on this feature of the plugin.

Configuring the Manual Checkout Option

Configuring the manual checkout option is simple and easy.

Step 1) Under the ‘Payment Gateway Settings‘ tab, you will need to check the ‘Use Multiple Payment Gateways‘ box to be able to offer both a standard checkout (for example, PayPal) and a manual checkout to your customers.

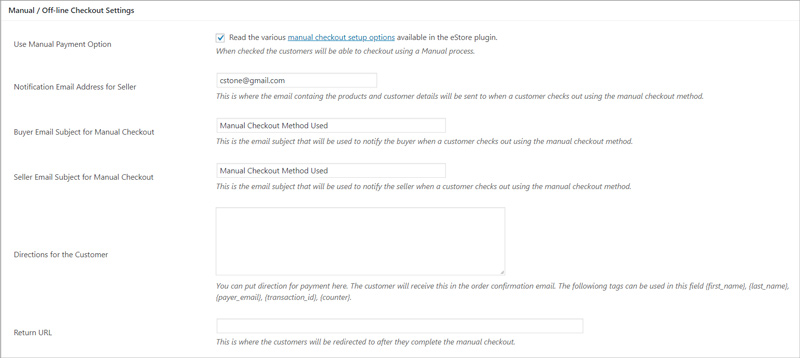
Step 2) Use the above steps to locate the ‘Manual Checkout Options’ area. Check the box next to ‘Use Manual Payment Option‘ to enable this feature.

Step 3) Enter in the email address of the seller (merchant) and choose a subject for the emails that will be sent from the plugin.

Step 4) If you would like to add directions for your customers, you can type these in the ‘Directions for Customers‘ box. Email tags can be used in this field.

Step 5) Paste in a return URL where you would like to send your customers after they have enter in their details for manual checkout.

manual-checkout-options

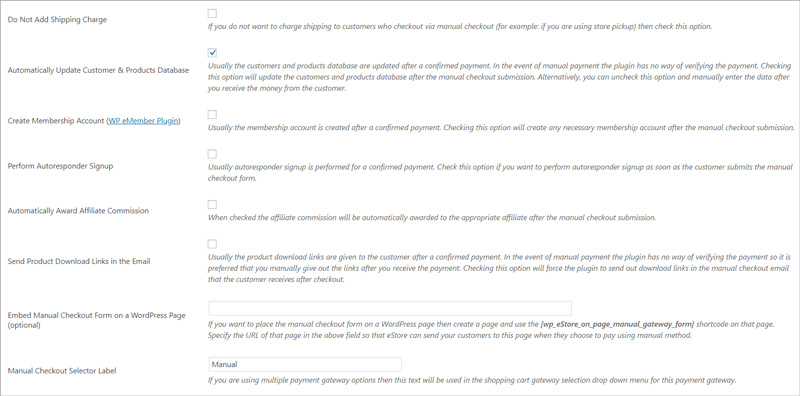
Step 6) Tick the boxes for the following if they apply to your product: ‘Do Not Add Shipping Charge‘, ‘Automatically Update Customer & Product Database‘, ‘Create Membership Account‘, ‘Perform Autoresponder Signup‘, ‘Automatically Award Affiliate Commission‘ and ‘Send Product Download Links in the Email‘.

Step 7) You can edit the title of the ‘Manual Checkout Option’ viewed by your customers from the word ‘Manual’ to the wording of your choice in the ‘Manual Checkout Selector Label‘ field.

Step 8) Ensure you ‘Update‘ the changes you have made.

manual-checkout-full-options

There are several ways to set up the manual/offline payment option for your site. It’s also a good idea to read this post, which outlines the available options.

Promoting Manual Checkout for the Products

To give your customers the option to use the ‘Manual Checkout Option’ you will need to use an ‘Add to Cart’ button. This can be a ‘fancy’ add to cart button or a simple add to cart button. Using a ‘Buy Now’ button will not offer your customers the choice of ‘Manual Checkout’. Your customer will see the option to checkout manually when they view the ‘Shopping Cart’. The ‘Manual’ option appears beneath their item total in a drop down menu. To complete a manual order, your customer will be required to fill in an order form.

When a customer checkouts using the ‘Manual’ option, their ‘Payment Status’ will appear as ‘Unpaid‘. This can be manually edited by admin once the customer pays cash in person or transfer money into the business account.

WP eStore Addon – USAePay Payment Gateway

This addon allows you to do shopping cart checkout using USAePay payment gateway.

AddOn Price

The eStore USAePay addon is FREE for all customers who purchased WP eStore plugin from us.

Download the Addon

You can download this addon from the gateway addon download area of our support forum.

Installation

You can install this addon the same way you install any WordPress plugin:

  • Go to the “Add New” plugins screen in your WordPress admin area
  • Click the “upload” tab
  • Browse for the addon file (eStore-usaepay-gateway.zip)
  • Click “Install Now” and then activate the plugin

Using USAePay Payment Gateway Addon

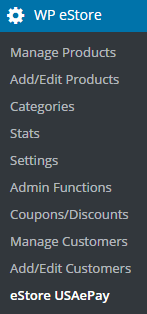
Once you install addon you will need to configure some USAePay specific settings. You can find the settings page under the eStore USAePay menu of WP eStore plugin. The following screenshot shows how you can access the settings page of this addon:

screenshot showing how to access the USAePay addon in the estore settings

In order to complete the settings simply follow the steps outlined below:

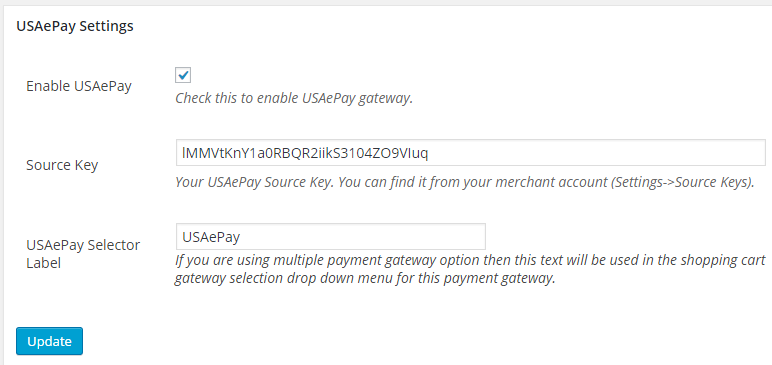
Step 1: Enable “USAePay” from the settings section of the addon.

Step 2: Enter your USAePay merchant account Source Key. You can retrieve it from your USAePay account (Settings->Source Keys).

screenshot showing the settings menu for USAePay addon

Step 3: Enter your preferred checkout text for USAePay gateway (example: USAePay). This text will be used in the eStore shopping cart gateway selection drop down menu if you are using multiple payment gateway options. Click the “Update” button.

Step 4: Login to your USAePay merchant account and Go to “Settings->Source Keys”.

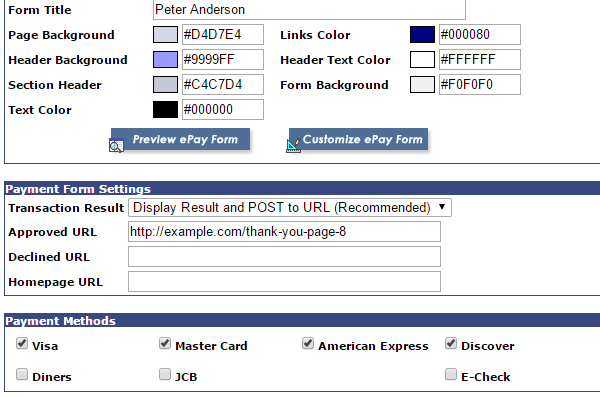
Step 5: Edit your source key and enter a return URL in the Approved URL field of Payment Form Settings (preferably “Thank You” page). Make sure that “Transaction Result” is set to “Display Result and POST to URL”.

screenshot showing the payment form settings of USAePay gateway

Save the settings and your site will be ready to accept payments using USAePay gateway.

WP Payment Gateway Bundle – 2Checkout Subscription Setup

If you want to set up your website with 2Checkout to accept recurring payments please follow these steps:

Step 1) Read our 2Checkout Setup Guide and configure everything according to the instructions.

Step 2) In the INS (Instant Notification Settings) section of your 2Checkout account, please specify the notification URL for “Recurring Installment Success” and “Recurring Stopped”.

2checkout-ins-recurring-installment-started-setting

2checkout-ins-recurring-installment-stopped-setting

The URL you enter in there should look like the following:

http://www.example.com/?estore_2co_ipn=process

Replace “http://www.example.com” with your own site URL.

You need to have this URL configured for the following types of notifications:

  • Order Created
  • Recurring Installment Success
  • Recurring Stopped

Step 3) Save the settings.

Step 4) Insert the following shortcode into a post/page to create a subscription button:

[wp_pg_eStore_subscription_button id="1" gateway="2co_subsc"]

Make sure to replace the value of id with your eStore product id.

Now your website is ready to accept recurring payments (subscription) using 2Checkout gateway.

Important Notes

2Checkout does not support recurring payments in days. You can use weeks instead. In order to do so please specify the equivalent number of days in your eStore product. For example:

  • Recurring Billing Cycle: 7 Day (1 week)
  • Recurring Billing Cycle: 14 Day (2 weeks)
  • Recurring Billing Cycle: 28 Day (4 weeks)


WP eStore Addon – NMI Payment Gateway

This addon allows you to do shopping cart checkout using NMI payment gateway.

AddOn Price

The eStore NMI addon is FREE for all customers who purchased WP eStore plugin from us.

Installation

You can install this addon the same way you install any WordPress plugin:

  • Go to the “Add New” plugins screen in your WordPress admin area
  • Click the “upload” tab
  • Browse for the addon file (eStore-nmi-gateway.zip)
  • Click “Install Now” and then activate the plugin

Using NMI Gateway Addon

Once you have this addon activated your Authorize.net checkout data will be submitted to NMI gateway.

Download the Addon

You can download this addon from the gateway addon download area of our support forum.

Make Credit Card the Default Checkout Option for PayPal Standard

When your customers checkout using the standard PayPal checkout option in eStore, PayPal figures out (using a cookie) if the user has PayPal account or not. Then it presents the checkout option (Paypal account or Credit card) accordingly. The customers can always switch between the checkout options from this page and make the payment.

If you want to force the credit card checkout option to be the default option, then use this addon plugin on your site. When the customers land on the PayPal checkout page, the credit card payment option will be open by default.

Note: You need to have a PayPal business or premiere account to accept credit card from your customers.

credit-card-default-paypal-checkout-option

Installing the Addon

You can install this addon the same way you install any WordPress plugin:

  • Go to the “Add New” plugins screen in your WordPress admin area
  • Click the “upload” tab
  • Browse for the addon file (estore-card-default-paypal-checkout-option.zip)
  • Click “Install Now” and then activate the plugin

Using the Addon

You just have to keep this addon active.

Download the Addon

You can download this addon from the addon download area of our customer only support forum.

WP eStore Addon – Payline Data Payment Gateway

This addon allows you to do shopping cart checkout using Payline Data payment gateway.

AddOn Price

The eStore Payline Data addon is FREE for all customers who purchased WP eStore plugin from us.

Installation

You can install this addon the same way you install any WordPress plugin:

  • Go to the “Add New” plugins screen in your WordPress admin area
  • Click the “upload” tab
  • Browse for the addon file (eStore-paylinedata-gateway.zip)
  • Click “Install Now” and then activate the plugin

Using Payline Data Gateway Addon

Once you have this addon activated your Authorize.net checkout data will be submitted to Payline Data gateway.

Download the Addon

You can download this addon from the gateway addon download area of our support forum.

WP eStore Addon – ComproPago Payment Gateway

This addon allows you to do shopping cart checkout using ComproPago payment gateway.

AddOn Price

The eStore ComproPago addon is FREE for all customers who purchased WP eStore plugin from us.

Download the Addon

You can download this addon from the gateway addon download area of our support forum.

Installation

You can install this addon the same way you install any WordPress plugin:

  • Go to the “Add New” plugins screen in your WordPress admin area
  • Click the “upload” tab
  • Browse for the addon file (eStore-compropago-gateway.zip)
  • Click “Install Now” and then activate the plugin

Using ComproPago Payment Gateway Addon

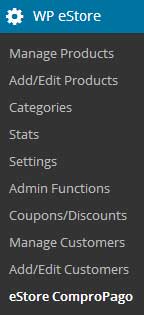
Once you install addon you will need to configure some ComproPago specific settings. You can find the settings page under the eStore ComproPago menu of WP eStore plugin. The following screenshot shows how you can access the settings page of this addon:

screenshot showing how to access the ComproPago addon in the estore settings

In order to complete the settings simply follow the steps outlined below:

Step 1: Enable “ComproPago” from the settings section of the addon.

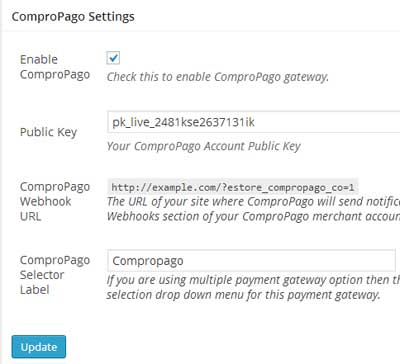
Step 2: Enter your ComproPago merchant account Public Key. You can retrieve it by logging into your ComproPago account and clicking “Configuration”.

screenshot showing the settings menu for ComproPago addon

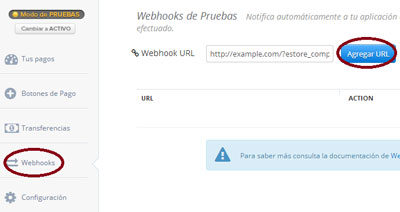
Step 3: Copy the webhook URL for your site and specify it in your ComproPago Merchant account. ComproPago will send notification to this URL when a transaction is processed.

screenshot showing how to configure a webhook in your ComproPago merchant account

Step 4: Enter your preferred checkout text for ComproPago gateway (example: ComproPago). This text will be used in the eStore shopping cart gateway selection drop down menu if you are using multiple payment gateway options.

Now hit the Update button and your site will be ready to accept payments using ComproPago gateway.

WP eStore Addon – Braintree Payment Gateway

This addon allows you to do shopping cart checkout using Braintree payment gateway.

AddOn Price

The eStore Braintree addon is FREE for all customers who purchased WP eStore plugin from us.

Download the Addon

You can download this addon from the gateway addon download area of our support forum.

Installation

You can install this addon the same way you install any WordPress plugin:

  • Go to the “Add New” plugins screen in your WordPress admin area
  • Click the “upload” tab
  • Browse for the addon file (eStore-braintree-gateway.zip)
  • Click “Install Now” and then activate the plugin

Using Braintree Payment Gateway Addon

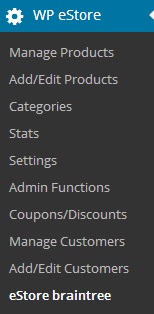
Once you install addon you will need to configure some Braintree specific settings. You can find the settings page under the eStore braintree menu of WP eStore plugin. The following screenshot shows how you can access the settings page of this addon:

screenshot showing how to access the braintree addon in the estore settings

In order to complete the settings simply follow the steps outlined below:

Step 1: Enable “Braintree” from the settings section of the addon.

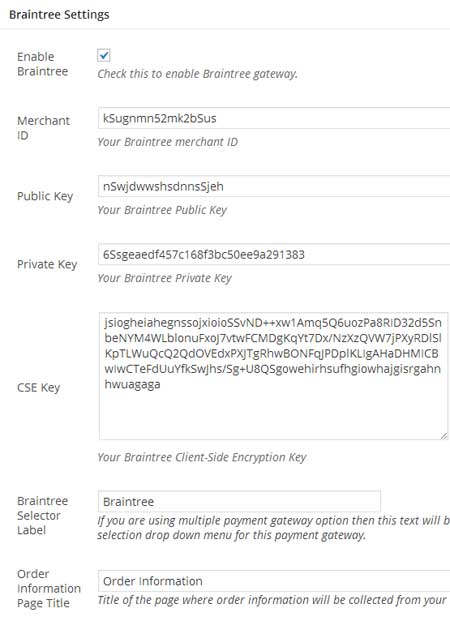
Step 2: Enter your Braintree merchant account credentials (Merchant ID, Public Key, Private Key, CSE Key). You can retrieve them by logging into your Braintree account and clicking “Account->My User->API Keys”.

screenshot showing the settings menu for braintree addon

Step 3: Enter your preferred checkout text for Braintree gateway (example: Braintree). This text will be used in the eStore shopping cart gateway selection drop down menu if you are using multiple payment gateway options.

Step 4: Enter a title for the order information page. This page will be used to collect order information from your users.

Now hit the Update button and your site will be ready to accept payments using braintree gateway.

Download the Addon

You can download this addon from the gateway addon download area of our support forum.

WP eStore Addon – Bitcoin via Bitpay Payment Gateway

This addon allows you to do shopping cart checkout using bitpay payment gateway.

AddOn Price

The eStore Bitcoin via Bitpay addon is FREE for all customers who purchased WP eStore plugin from us.

Download the Addon

You can download this addon from the gateway addon download area of our support forum.

Installation

You can install this addon the same way you install any WordPress plugin:

  • Go to the “Add New” plugins screen in your WordPress admin area
  • Click the “upload” tab
  • Browse for the addon file (eStore-bitpay-gateway-addon.zip)
  • Click “Install Now” and then activate the plugin

Using Bitpay Payment Gateway Addon

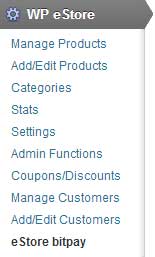
Once you install addon you will need to configure some Bitpay specific settings. You can find the settings page under the eStore bitpay menu of WP eStore plugin. The following screenshot shows how you can access the settings page of this addon:

screenshot showing how to access the bitpay addon in the estore settings

In order to complete the settings simply follow the steps outlined below:

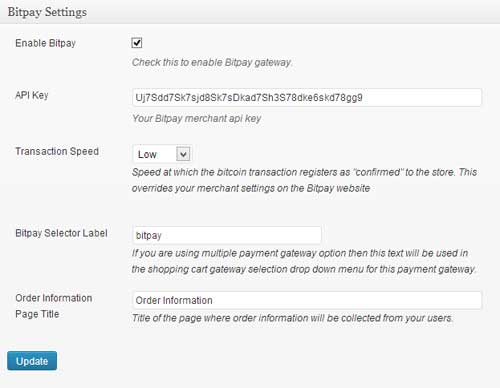
Step 1: Enable “bitpay” from the settings section of the addon.

Step 2: Enter the API key for your bitpay merchant account.

screenshot showing the settings menu for bitpay addon

Step 3: Select the speed at which your bitcoin transaction will register as confirmed.

  • Low: An invoice is considered to be “confirmed” after 6 block confirmations (~1 hour)
  • Medium: An invoice is considered to be “confirmed” after 1 block confirmation (~10 minutes)
  • High: An invoice is considered to be “confirmed” immediately upon receipt of payment

Step 4: Enter your preferred checkout text for bitpay (example: bitpay). This text will be used in the eStore shopping cart gateway selection drop down menu if you are using multiple payment gateway options.

Step 5: Enter a title for the order information page. This page will be used to collect order information from your users.

Now hit the Update button and your site will be ready to accept payments using bitpay gateway.

Next Page »

Your Shopping Cart

Shopping Cart Empty
Shopping Cart is Empty
Visit The Shop

Search

Featured Documents

Stylish Product Display Options for WP eStore WP eStore Quick Setup and Usage Video Tutorial WP eStore Shortcodes and Functions Reference WordPress eStore Plugin Features WordPress eStore Plugin Demo What Our Customers Have to Say About Our Products WordPress eStore WishList (Feature Suggestions) WordPress eStore Frequently Asked Questions (FAQ) How to Show Add to Cart buttons

Featured Plugins

WP Express Checkout Plugin
wordpress_estore_icon
wordpress membership plugin icon
wordpress_affiliate_plugin_icon

Copyright © 2025 | eCommerce Plugins