Tips and Tricks WP eCommerce

eCommerce Solution for WordPress Blog

  • Home
  • eCommerce Plugins
  • WP eStore Documentation
  • WP Shopping Cart Doc

WP eStore Addon – Google Wallet For Digital Goods Payment Gateway

This addon allows you to do a one-item checkout using Google Wallet For Digital Goods payment gateway.

Download the Addon

You can download this addon from the gateway addon download area of our support forum.

Installation

You can install this addon the same way you install any WordPress plugin:

  • Go to the “Add New” plugins screen in your WordPress admin area
  • Click the “upload” tab
  • Browse for the addon file (eStore-google-wallet-digital-goods.zip)
  • Click “Install Now” and then activate the plugin

Using Google Wallet For Digital Goods Payment Gateway Addon

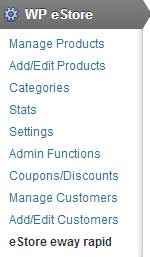
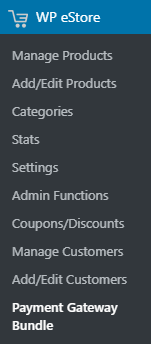
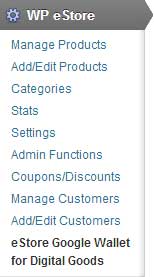
Once you install addon you will need to configure some Google Wallet For Digital Goods specific settings. You can find the settings page under the eStore Google Wallet for Digital Goods menu of WP eStore plugin. The following screenshot shows how you can access the settings page of this addon:

screenshot showing how to access the google wallet for digital goods addon in the estore settings

In order to complete the settings simply follow the steps outlined below:

Step 1: Enable “Google Wallet for Digital Goods” from the settings section of the addon.

Step 2: Fill in the API details. There are two pieces of API information that you need to enter in the settings:

  • Your Google Wallet for Digital Goods Seller Identifier
  • Your Google Wallet for Digital Goods Seller Secret
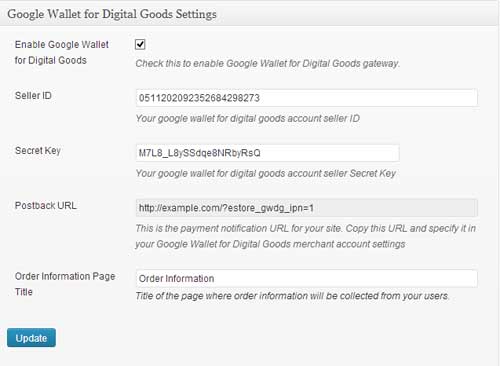
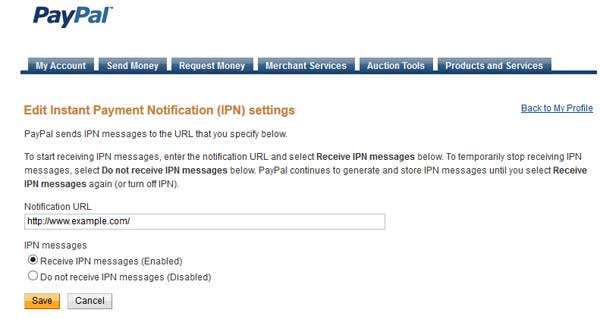
screenshot showing the settings menu for google wallet for digital goods addon

Step 3: Copy the Postback URL for your site. Now go to the settings menu of your Google Wallet for digital goods merchant account and specify it in the Postback URL field.

screenshot showing how to retrieve google wallet for digital goods api credentials

This is where you will also find your Seller ID and Secret Key. Once you are done click the Save button.

Step 4: Enter a title for the order information page. This page will be used to collect order information from your users.

Now hit the Update button and your site will be ready to accept payments using Google Wallet for Digital Goods.

One-item checkout button shortcode

Embed the following shortcode on a WordPress post/page so your users can purchase with Google Wallet for digital goods gateway:

[wp_eStore_buy_now_for_specific_gateway id="1" gateway="google_wallet_dg"]

Replace 1 with your eStore product ID.

WP Payment Gateway Bundle – PayPal Payments Pro Subscription Setup

If you want to set up your website with PayPal Payments Pro to accept recurring payments please follow these steps:

Step 1: Read our PayPal Payments Pro Setup Guide and configure everything according to the instructions.

Step 2: Login to your PayPal account and follow these instructions to set up your ipn (Instant Payment Notification) listener:

  • Click Profile on the My Account tab
  • Click Instant Payment Notification Preferences in the Selling Preferences column
  • Click Choose IPN Settings to specify your listener’s URL and activate the listener

The following screen appears:

paypal ipn settings screenshot

  • Specify the URL of your website in the Notification URL field
  • Click Receive IPN messages (Enabled) to enable your listener
  • Click Save

Step 3: Embed the following shortcode on a post/page to create a subscription button:

[wp_pg_eStore_subscription_button id="1" gateway="pppro_subsc"]

Make sure to replace the value of id with your eStore product id.

Now your website is ready to accept recurring payments (subscription) using PayPal Payments Pro gateway.

WP eStore Addon – eWAY Rapid 3.0 Payment Gateway

This addon allows you to do a shopping cart checkout using eWAY 3.0 Rapid payment gateway.

Download the Addon

You can download this addon from the gateway addon download area of our support forum.

Installation

You can install this addon the same way you install any WordPress plugin:

  • Go to the “Add New” plugins screen in your WordPress admin area
  • Click the “upload” tab
  • Browse for the addon file (eStore-eway-rapid.zip)
  • Click “Install Now” and then activate the plugin

Using eWAY Rapid 3.0 Payment Gateway Addon

Once you install addon you will need to configure some eWAY Rapid 3.0 specific settings. You can find the eWAY Rapid 3.0 specific settings under the eStore eway rapid menu of WP eStore plugin. The following screenshot shows how you can access the settings page of this addon:

screenshot showing how to access eway rapid addon settings from the eStore menu

In order to complete the eWAY Rapid 3.0 settings simply follow the steps outlined below:

Step 1: Check the “Enable eway rapid gateway” checkbox from the “Eway Gateway Settings” section of the addon.

Step 2: Fill in the API details. There are two pieces of API information that you need to enter in the settings:

  • Your eWAY Rapid 3.0 user API Key
  • Your eWAY Rapid 3.0 user password

screenshot showing eway rapid 3.0 addon settings

Step 3: Enter your preferred checkout text for eway rapid. This text will be used in the eStore shopping cart gateway selection drop down menu if you are using multiple payment gateway options.

Step 4: Enter a title for the order information page. This page will be used to collect order information from your users.

Now hit the Update button and your site will be ready to accept payments using eWAY Rapid 3.0.

How to create an API Key for eWAY Rapid 3.0

If you are not sure how you can create a new api key (also called Username) and password for your eWAY Rapid account you can follow the steps outlined below:

1) Log in to your partner portal account using the link below for your country

  • https://www.eway.com.au/PartnerPortal
  • https://www.eway.co.uk/PartnerPortal
  • https://www.eway.co.nz/PartnerPortal

2) Go to My Account > User Security > Create User and complete the form.

3) Click on Actions next to the new user and View API Key. This is your new API key and password for accessing Rapid API.

WP Payment Gateway Bundle – PayPal Payments Advanced Setup

The following video will give you a basic introduction of PayPal Payments Advanced and the requirements for the integration.

After you install the WP Payment Gateway Bundle plugin you will need to configure some PayPal Payments Advanced specific settings in the plugin and in your PayPal Manager Merchant account. This will allow you to accept payments using one of the hosted checkout templates.

You can find the PayPal Payments Advanced Checkout specific settings under the “Gateway Settings” tab when you go to the payment gateway bundle plugin’s settings menu. The following screenshot shows how you can access the settings page of this plugin:

Payment Gateway Bundle Plugin Settings

Payment Gateway Bundle Plugin Settings

In order to complete the PayPal Payments Advanced settings simply follow the steps outlined below:

Step 1: Check the “Use PayPal Payments Advanced Gateway” checkbox from the “PayPal Payments Advanced Settings” section of the plugin.

Step 2: Fill in the API details. There are four pieces of API information that you need to enter in the settings so the plugin can process the payment using PayPal Payments Advanced:

  • Partner
  • Vendor
  • User
  • Password

screenshot showing paypal payments advanced settings


These are basically the api credentials that you use to login to your PayPal Manager account.

screenshow showing how to login to paypal manager

If you don’t have an account yet you can create one by following the “I would like to create a new account” link.

Step 3: Once you have logged into your paypal manager account switch to the Service Settings tab.

screenshot showing paypal manager account

This is where you will be able to customise the settings and the layout for your hosted checkout page. First, click on the Set up option.

Step 4: The Set up tab contains most of your settings. The default options are fine. So I’m just going to walk you through some of the major options.

screenshot showing paypal manager setup error page

If you are going to run some testing before you go live make sure to set the Transaction Process Mode to “Test”. Otherwise it should be set to “Live”.

Enter a URL where the user will be redirected to upon cancellation or if an error occurs. You can just copy the value of Transaction Error Page (under Settings->Payment Gateway Bundle->General Settings) and paste it here for now.

Step 5: Move on to the Billing & Shipping info sections. You can just check the fields that you would like a user to fill out (or check everything so you can get all the information).

screenshot showing billing and shipping info of paypal manager

Step 6: Now is the important part which is the Payment Confirmation Section. This is where you need to specify how your website will receive the payment notification.

screenshot showing paypal manger payment confirmation section

Make sure that you have set the options to the following:

  • Show Confirmation page:  On my website
  • Enter Return URL: the return url specified in the eStore settings (WP eStore->Settings->General Settings->General Image and Page URL Settings->Return URL)
  • Return URL Method: Post

Step 7: In the Security Options section select Enable Secure Token: Yes.

screenshot showing paypal manager security token settings

Click on the Save Changes button to update your settings.

That’s pretty much it. There is still one thing that you need to do. Go back to the top of the page and select the Customize option.

screenshot showing paypal manager layout options

Select Layout A. Currently the gateway bundle addon is integrated with Layout A (since it gives a merchant the flexibility of customizing the checkout form with billing & shipping information). We plan to integrate the other two layout options in future.

Click on the Save and Publish button at the bottom of the page to update your settings.

Now your website is ready to accept payments using PayPal Payments Advanced.

Getting Started with WP Payment Gateway Bundle Addon

If you have just installed the Payment Gateway Bundle Addon for the first time, this guide will help you set up your site so it’s ready to accept payment via one of your preferred payment gateways.

The Payment Gateway Bundle is an Addon for the WP eStore plugin. So before you move on to the Payment Gateway Bundle setup you need to make sure that you are familiar with WP eStore plugin configuration. Here is what you need to do:

Step 1

Watch the eStore’s basic setup video tutorials and complete the required setup of the plugin so you can start selling (Ignore this step if you have done this already).

Step 2

Once you have configured WP eStore plugin, created a product, placed an “Add to Cart” button on your site, you can go to the next step.

Step 3

Install the WP Payment Gateway Bundle Addon (if you haven’t installed it already).

  • Go to the Add New plugins screen in your WordPress admin area
  • Click the upload tab
  • Browse for the plugin file (wp-payment-gateway.zip)
  • Click Install Now and then activate the plugin

Step 4

Go to Settings > Payment Gateway Bundle interface from your WordPress admin dashboard.

Step 5

Configure and save the general settings of the Payment Gateway Bundle extension. The general settings page has two sections:

a) General Settings

This section allows you to set your language, currency code, currency symbol etc.

Also, there are some pages that automatically gets created for you when you first install the addon (simply check the settings and verify that a URL value exists in the field in question):

  • Return URL: The Page where your users will be redirected to after a successful transaction. You can also use this page to deliver digital downloads to your customers after the transaction.
  • Transaction Error Page: The page where your users will be redirected to if there is an issue with the transaction.
  • Form Processing Page URL: The page where your users fill up the details before they make the payment.

Please make sure that none of the fields are empty. If a page didn’t get created for some reason, you should read the help text for the field and create the page manually.

b) Testing and Debugging Settings

This section allows you to run a transaction in test mode (if you need).

There is also a debug option. You can enable this to track every step of a user’s transaction (This can help you quickly identify a transaction failure and why it happened). You should keep this option enabled if you are having an issue with getting the plugin to work correctly.

Hit the Update button to save the changes.

Step 6

Switch to the Gateway Settings tab at the top of the page.

This is where you can fill up the API details specific to the payment gateway you want to use.

We have documentation that explains how to setup each payment gateway supported by the Payment Gateway Bundle addon. Please make sure to check the gateway specific documentation (marked blue in the screenshot below) before you enter any information.

Click the Update button to save the settings.

Step 7

Read this documentation to learn how to setup the WP eStore plugin to use ONE payment gateway or show a selection of multiple gateways (the ones that you have enabled).

If you show multiple gateways, your customers will be able to choose the checkout option they want to use.

WP Payment Gateway Bundle – Configuring One or Multiple Payment Gateways

When you first install the WP eStore plugin, you will see that only the PayPal payment gateway is enabled by default. Most users only use the PayPal standard gateway so that option is automatically enabled for you in the settings when you install the plugin.

However, you have the freedom to uncheck/disable PayPal checkout from the settings and enable any other payment gateway that you prefer to use at any time.

There are two types of setups you can go after with the gateway checkout option for your store:

  1. You can process all of your checkouts using ONE payment gateway
  2. You can give your users an option to choose which gateway they want to use for a checkout

1. Using One Gateway For All Chekcout

This setup is the widely used setup. All of your customers will checkout via the payment gateway that you specified (the customers don’t have a choice). For example, when you specify PayPal gateway, all of your customers will be able to checkout via PayPal.

Lets say you have added the Payment Gateway Bundle addon and you want to process checkout via Google Checkout. You would do the following to achieve this:

  • Go to WP eStore Settings -> Payment Gateway Settings and make sure all the payment gateways offered in eStore are unchecked/disabled.
  • Go to payment gateway bundle addon settings -> Gateway Settings menu and check the “Use Google Checkout Payment Gateway” checkbox to enable Google checkout.

Now, when your customers add items to the shopping cart and click the checkout button, they will be able to pay you for the items via Google Checkout.

2. Using Multiple Gateways At the Same Time

You can use this setup to give your customers the choice of choosing the payment method for a checkout from a range of selections. For example, you can enable both PayPal and Google Checkout gateways and the customers will be able to choose which one they want to use and make then payment.

Lets say, you want to use both PayPal and Google Checkout at the same time. You would do the following to achieve this setup:

  • Go to WP eStore Settings -> Payment Gateway Settings and make sure to enable/check the “Use Multiple Payment Gateways” option.

  • Go to the “PayPal” settings section and make sure the “Use PayPal Payment Gateway” field is checked
  • Make sure to enter your correct PayPal merchant account details in there too
  • Go to payment gateway bundle addon settings -> Gateway Settings menu and check the “Use Google Checkout Payment Gateway” checkbox
  • Make sure to enter your correct Google Checkout merchant account details in there too

Now, when your customers add items to the shopping cart, they will be able to select between PayPal or Google Checkout to make the payment for the items.

You can enable as many gateways as you wish (you will of-course need to have a merchant account with the gateway you select).

The following screenshot gives you an idea of how your customers can select a payment method when they are about to do a checkout.

Multiple payment gateways

WP Payment Gateway Bundle – ClickBank Setup

What to Expect From a ClickBank Integration

ClickBank integration is good for adding a Buy button like the one shown below to allow a checkout of your product from the landing/pitch page. When the button is clicked the visitor is sent to ClickBank for payment. After the payment the customer will receive an email which will contain encrypted download link for the item he/she just paid for.

ClickBank is not ideal for running a store where you expect your customers to add multiple items to the shopping cart and then checkout.

ClickBank Limitations

ClickBank has the following checkout limitations:

  • ClickBank only lets you checkout a product that you have configured in your ClickBank account. So you will need to configure the product in Your ClickBank account.
  • ClickBank only lets you do one item checkout at a time. So you cannot add 5 items to the shopping cart and checkout via ClickBank.

ClickBank Setup Steps

After you install the WP Payment Gateway Bundle plugin you will need to configure some ClickBank specific settings in the plugin and in your ClickBank merchant/vendor account. You can find the ClickBank specific settings under the “Gateway Settings” tab when you go to the payment gateway bundle plugin’s settings menu. The following screenshot shows how you can access the settings page of this plugin:

Payment Gateway Bundle Plugin Settings

Payment Gateway Bundle Plugin Settings

In order to complete the ClickBank settings simply follow the steps outlined below

ClickBank Setup Settings

Step 1: Check the “Use ClickBank Payment” option from the ClickBank Settings section.

Step 2: Enter your ClickBank Account Username, also known as your ClickBank ID, nickname, account ID, or affiliate/vendor ID.

Step 3: Enter your ClickBank account secret key. You can configure your secret key from the "Account Settings -> My Site -> Advanced Tools" section of your ClickBank account.

Step 4: Hit the “Update” button at the bottom to save the settings.

Step 5: Log into your ClickBank account and Edit your “Advanced Tools” section. Enter the URL shown in the “ClickBank Instant Notification URL value” field of the plugin’s ClickBank settings section. The URL will look similar to the example shown below

http://www.your-domain.com/?wp_pg_clickbank_notify=1

ClickBank Account’s Advanced Tools Settings

Step 6: Now that all the setup is complete you can use the following sortcode to place a “Buy” button for your eStore and ClickBank product:

[wp_pg_eStore_clickbank_buy_now cb_item_number="1" product_id="4"]

cb_item_number = Your Clickbank product item number
product_id = Your WP eStore product ID for this item

Customizing the Look of the Clickbank Buy Now Button

WP eStore plugin allows you to customize all of your buy now buttons by using a custom button image of your choice. If you want to customize the look of your Clickbank buy now button then read this post.

WP Payment Gateway Bundle – eWAY Gateway Setup

After you install the WP Payment Gateway Bundle plugin you will need to configure some eWAY specific settings in the plugin and in your eWAY merchant profile account. You can find the eWAY specific settings under the “Gateway Settings” tab when you go to the payment gateway bundle plugin’s settings menu. The following screenshot shows how you can access the settings page of this plugin:

Payment Gateway Bundle Plugin Settings

Payment Gateway Bundle Plugin Settings

In order to complete the eWAY profile settings simply follow the steps outlined below so after a payment, eWAY can send payment notification to the plugin for post payment processing.

eWAY Settings Menu

Step 1: Check the “Use eWAY Payment Gateway” option from the eWAY Settings section.

Step 2: Enter your eWAY Customer ID

Step 3: Enter your eWAY username

Step 4: Enter a Company Name (optional)

Step 5: Select the country you are using eWAY from.

Step 6: Enter a selector Label for eWAY (This text will be displayed in the select box if a customer chooses eWAY for checkout)

Step 7: Hit the “Update” button at the bottom to save the settings and now you are ready to use eWAY with the WP Payment Gateway Bundle Plugin.

WP Payment Gateway Bundle – PayPal Payments Pro Payment Gateway Setup

The following video shows a basic demonstration of how the PayPal Payments Pro Gateway Works

PayPal Payment Pro Demo

Read this page to get a good idea of how the checkout flow works when you use the gateway bundle addon.

After you install the WP Payment Gateway Bundle addon plugin you will need to configure some PayPal Payments Pro specific settings in the plugin and in your PayPal merchant profile account. This will let you process credit card on your own site without sending the customer to PayPal’s site.

You will however need to have SSL certificate installed on your site (it is a requirement from the payment gateway).

Video Instructions

PayPal makes frequent changes to their interface so the following video may not match exactly as you see things in your PayPal account. However, it should give you a good idea of how it works and how to set it up.

Written Instructions

You can find the PayPal Payments Pro Checkout specific settings under the “Gateway Settings” tab when you go to the payment gateway bundle plugin’s settings menu. The following screenshot shows how you can access the settings page of this plugin:

In order to complete the PayPal Payments Pro settings simply follow the steps outlined below:

Step 1) Check the “Use PayPal Payments Pro Gateway” checkbox from the “PayPal Payments Pro Settings” section of the plugin.

Step 2) Fill in the API details. There are three pieces of API information that you need to get from your PayPal merchant account and specify it in the plugin so the plugin can process the payment using PayPal payments pro:

  • API Username
  • API Password
  • API Signature
PayPal Payments Pro Setup

PayPal Payments Pro Setup

If you do not know how to get your PayPal payments Pro API details then the following should help (you can also contact PayPal to get your PayPal Payments Pro account API details):

Getting Your PayPal Pro API Credentials

PayPal frequently makes changes to their interface. So the following steps may not match 100% according to the interface you see in your PayPal account right now. However, the general guideline will still be helpful for you to retrieve your PayPal Pro API details.

  • Log into your PayPal account.
  • Hover over the gear icon and select Account Settings.
  • Go to the Account Access section and select Update next to API Access.
  • Find the NVP/SOAP API Integration (Classic) and select Manage API credentials.
  • Select Show next to API Username, API Password, and Signature.
  • If you have never activated this API, then you may need to request permission for the API first. Select the “Request an API signature” option and submit.
  • Once you can see the API Details, copy and paste the details into the settings fields of the Payment Gateway Bundle addon.

Creating Buy Now Type Buttons For PayPal Pro

If you want to use “Buy Now” type buttons instead of the standard “Add to Cart” buttons then check the following documentation to learn how to create buy now buttons for any payment gateways offered in WP eStore plugin:

  • How to use payment gateway specific buy now button

2Checkout Payment Gateway Setup

2Chekcout payment gateway doesn’t seem to have the INS (instant payment notification) turned on by default. So you need to specify in your 2Checkout account that you want to send payment notification to the WP eStore plugin after a checkout. This will allow the plugin to do the post payment operation after a sale takes place via the 2Checkout gateway.

2Checkout INS (Instant Notification System) Setup

Step 1) Log into your 2Checkout vendor/merchant account.

Step 2) Click on the “Webhooks” menu link (see the following screenshot)

2checkout-ins-webhooks-menu-example

Step 3) Enable the “Order Crated” notification option (see the following screenshot)

2checkout-vendor-order-creation-ins

Step 4) Enter the following value in the “URL” field:

http://www.example.com/?estore_2co_ipn=process

Replace “http://www.example.com” with your own site URL.

Step 5) Save this settings change by clicking the “Save Settings” link at the bottom of the page.

Setting up the 2Checkout Secret Word

You can setup your secret word from your 2Checkout merchant account:

  • Log in to your 2Checkout account.
  • Click the ACCOUNT tab.
  • Click on SITE MANAGEMENT sub tab.
  • Scroll down to find the Secret Word field and change it.
  • Save the changes

What to expect after this setup

Once you have completed the above setup your customers will see a page similar to the following screenshot after they enter their credit card details when making a payment.

2Checkout Post Payment Confirmation Page

When they click on the “Click Here To Finalize Your Order” button the payment will be finalized and 2Checkout will send the payment notification to the plugin so WP eStore can continue with the post payment processing (for example, send the product download link(s) via email to the customer).

Limitations

2Checkout doesn’t have a PayPal PDT like feature where the transaction details are available on the “Thank You” page when a customer lands on that page after the payment. This means eStore cannot display the product download links on the “Thank You” page (eStore only gives the download links after it verifies the payment details).

« Previous Page
Next Page »

Your Shopping Cart

Shopping Cart Empty
Shopping Cart is Empty
Visit The Shop

Search

Featured Documents

Stylish Product Display Options for WP eStore WP eStore Quick Setup and Usage Video Tutorial WP eStore Shortcodes and Functions Reference WordPress eStore Plugin Features WordPress eStore Plugin Demo What Our Customers Have to Say About Our Products WordPress eStore WishList (Feature Suggestions) WordPress eStore Frequently Asked Questions (FAQ) How to Show Add to Cart buttons

Featured Plugins

WP Express Checkout Plugin
wordpress_estore_icon
wordpress membership plugin icon
wordpress_affiliate_plugin_icon

Copyright © 2025 | eCommerce Plugins