Tips and Tricks WP eCommerce

eCommerce Solution for WordPress Blog

  • Home
  • eCommerce Plugins
  • WP eStore Documentation
  • WP Shopping Cart Doc

WP eStore PayPal Installment Payment Addon

Ever wanted to offer your customers the option to pay via installment payment for your products or services? The eStore PayPal Installment Payment addon allows you to accept payments in installments for the products or services you sell from your website. Offering an installment payment option can be very helpful if you are selling high priced items.

You can offer installment plans that collect the first installment on checkout, with up to 3 additional installments. Or, you can set up installment plans that defer the first installment, with up to 4 installments.

Installing the eStore PayPal Installment Addon

You can install this addon the same way you install any WordPress plugin:

  • Go to the “Add New” plugins screen in your WordPress admin area
  • Click the “upload” tab
  • Browse for the addon file (estore-paypal-installment.zip)
  • Click “Install Now” and then activate the plugin

Product Configuration

In order to configure PayPal Installment specific options for a product click “Add/Edit Products” from the admin dashboard.

screenshot showing how to add a new product in the wp estore plugin

Click on the “PayPal Installment Specific Settings” section and configure the details of your installment plan.
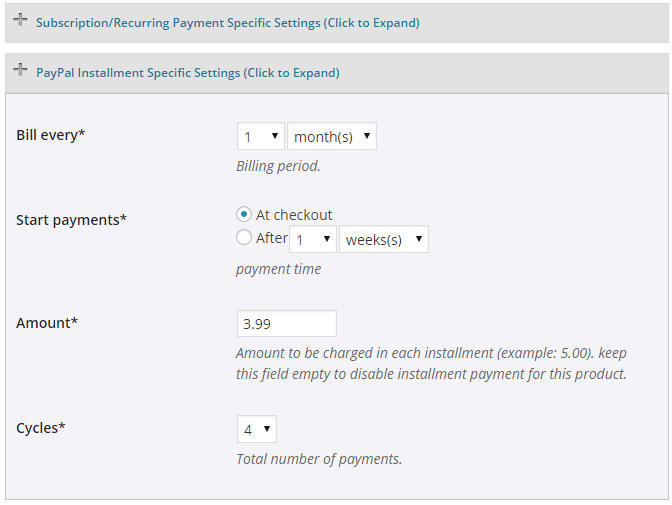
screenshot showing how to configure PayPal Installment specific settings in the WP eStore plugin

Click Save product.

Please note that All payments must be collected within one year of checkout (This is a requirement of PayPal Installment checkout from PayPal). So you need to configure your plan accordingly.

Shortcode Usage

You can now add the following shortcode to a WordPress page (your landing page) to create an installment payment button for a product or service:

[eStore_paypal_installment id="1"]

Here, id is your unique eStore product ID.

Using Installment Payment Button With Fancy Product Display

If you want to use it with a fancy product display template then you just need to make sure that the product in question has the installment details configured. Then you can use the fancy display template shortcode as usual.

Get the PayPal Installment Addon

The price of this addon is $39.00

Make Credit Card the Default Checkout Option for PayPal Standard

When your customers checkout using the standard PayPal checkout option in eStore, PayPal figures out (using a cookie) if the user has PayPal account or not. Then it presents the checkout option (Paypal account or Credit card) accordingly. The customers can always switch between the checkout options from this page and make the payment.

If you want to force the credit card checkout option to be the default option, then use this addon plugin on your site. When the customers land on the PayPal checkout page, the credit card payment option will be open by default.

Note: You need to have a PayPal business or premiere account to accept credit card from your customers.

credit-card-default-paypal-checkout-option

Installing the Addon

You can install this addon the same way you install any WordPress plugin:

  • Go to the “Add New” plugins screen in your WordPress admin area
  • Click the “upload” tab
  • Browse for the addon file (estore-card-default-paypal-checkout-option.zip)
  • Click “Install Now” and then activate the plugin

Using the Addon

You just have to keep this addon active.

Download the Addon

You can download this addon from the addon download area of our customer only support forum.

WP Payment Gateway Bundle – PayPal Payments Pro Subscription Setup

If you want to set up your website with PayPal Payments Pro to accept recurring payments please follow these steps:

Step 1: Read our PayPal Payments Pro Setup Guide and configure everything according to the instructions.

Step 2: Login to your PayPal account and follow these instructions to set up your ipn (Instant Payment Notification) listener:

  • Click Profile on the My Account tab
  • Click Instant Payment Notification Preferences in the Selling Preferences column
  • Click Choose IPN Settings to specify your listener’s URL and activate the listener

The following screen appears:

paypal ipn settings screenshot

  • Specify the URL of your website in the Notification URL field
  • Click Receive IPN messages (Enabled) to enable your listener
  • Click Save

Step 3: Embed the following shortcode on a post/page to create a subscription button:

[wp_pg_eStore_subscription_button id="1" gateway="pppro_subsc"]

Make sure to replace the value of id with your eStore product id.

Now your website is ready to accept recurring payments (subscription) using PayPal Payments Pro gateway.

How to Add/Create a Subscription Button for Recurring Payment

Configuring a Subscription button for recurring payment and adding it to a post or page is very easy using the WP eStore plugin.

Please note that this documentation is for creating a PayPal subscription button only

Subscription payments for other payment gateways are handled via the payment gateway bundle addon. Refer to the documentation of that addon if you are creating a subscription button for a different gateway.

Creating A PayPal Subscription Button

Follow the steps below to create a subscription product/button in eStore plugin:

Step 1: Click on the “Add/Edit Products” menu in your WP eStore admin area to create a new product.

Step 2: Fill in the product details as you see fit. You can enter a descriptive price in the “Price” field of a subscription product. Example values:

  • 29 USD Per Month
  • 47 USD for 3 Installments
  • 7 Days Trial Then 19 USD Per Month

Step 3: Go to the “Subscription/Recurring Payment Specific Settings” section of this product and enter the subscription details correctly. Save the product when you are done.

Configuring a Subscription Payment

Step 4: Type the following shortcode to display a subscription button for this product on a WordPress post or page.

[wp_eStore_subscribe_button id="15"]

Replace the PRODUCT-ID with the actual id of the product (example: 15)

Example Subscription Button

The following Subscription button charges the customer $29.95 USD for the first 7 days Then $49.95 USD for each month, for 6 installments.

You can also display the subscription button using one of the fancy displays like the following:

Test Membership Subscription
Subscription button that charges the customer $29.95 USD for the first 7 days Then $49.95 USD for each month, for 6 installments
Price: $29.95

Feel free to hit the subscription button to see how it works.

Frequently Asked Questions

  • Can I customize the button image? – Yes, simply specify your custom button image URL in the “Button Image URL” field when configuring the product.
  • Can I display a subscription button using one of the fancy displays? – Yes, please check the shortcodes documentation to find a suitable shortcode.
  • Can the subscription be added to the shopping cart? – No, please see the “Notes” section at the bottom of this page for detailed explanation.

Example Values for a Subscription Button

Here are some examples showing you what values to use to create a subscription button

Example 1: To create a subscription button  that charges $27.00 USD for each month until canceled use the following values:

Trial Billing Amount -> (leave empty)
Trial Billing Period -> (leave empty)
Recurring Billing Amount -> 27.00
Recurring Billing Cycle -> 1 Month
Recurring Billing Count -> (leave empty)

Example 2: To create a subscription button  that charges $29.95 USD for the first 7 days Then $49.95 USD for each month, for 6 installments use the following values:

Trial Billing Amount -> 29.95
Trial Billing Period -> 7 days
Recurring Billing Amount -> 49.95
Recurring Billing Cycle -> 1 Month
Recurring Billing Count -> 6

How to Test A Subscription Payment

  • Please read this post before you test a subscription payment button.

Note:

Please note that the subscription payment cannot be added to the shopping cart. Why? because PayPal handles subscription payments through a different API than the normal one (Subscription payments are usually complex). How do you process two of the following payments together when you checkout using the shopping cart?

  • Charge the customer $29.95 USD for the first 7 days Then $49.95 USD for each month
  • Charge the customer $49.95 USD for the first 14 days Then $19.95 USD for each month, for 6 installments.

Also, PayPal will not process multiple subscriptions through the cart checkout API so if a customer added 5 subscriptions to the cart and then tried to checkout it will get stuck.

Your Shopping Cart

Shopping Cart Empty
Shopping Cart is Empty
Visit The Shop

Search

Featured Documents

Stylish Product Display Options for WP eStore WP eStore Quick Setup and Usage Video Tutorial WP eStore Shortcodes and Functions Reference WordPress eStore Plugin Features WordPress eStore Plugin Demo What Our Customers Have to Say About Our Products WordPress eStore WishList (Feature Suggestions) WordPress eStore Frequently Asked Questions (FAQ) How to Show Add to Cart buttons

Featured Plugins

WP Express Checkout Plugin
wordpress_estore_icon
wordpress membership plugin icon
wordpress_affiliate_plugin_icon

Copyright © 2025 | eCommerce Plugins