Tips and Tricks WP eCommerce

eCommerce Solution for WordPress Blog

  • Home
  • eCommerce Plugins
  • WP eStore Documentation
  • WP Shopping Cart Doc

WP eStore – Shopping Cart Templates (Full Cart Display Options)

WP eStore plugin comes with a few pre-configured shopping cart display templates. You can use any of these templates (by using a shortcode) to show the shopping cart on your site.

All the cart shortcodes are listed in our shortcodes documentation page.

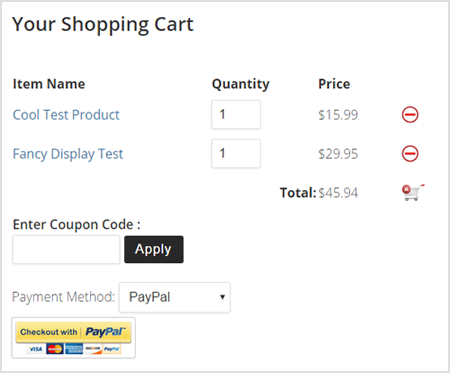
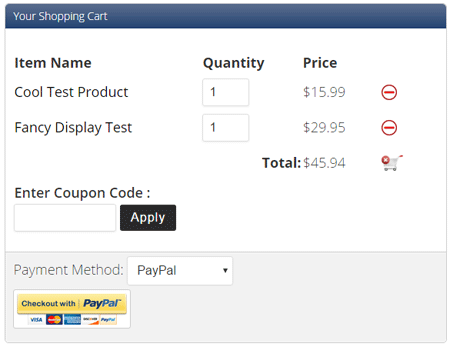
Shopping Cart Template – Default Option

The following is an example of how the default cart template looks like:

estore-shopping-cart-template-1

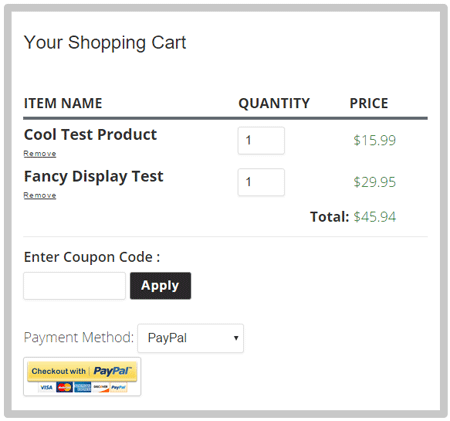
Shopping Cart Template – Fancy 1

The following is an example of how the fancy 1 cart template looks like:

estore-shopping-cart-template-2

Shopping Cart Template – Fancy 2

The following is an example of how the fancy 2 cart template looks like:

estore-shopping-cart-template-3

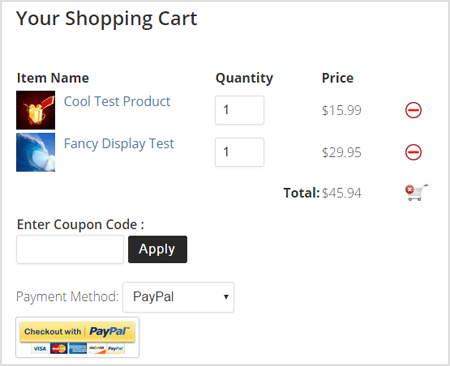
Shopping Cart Template – With Product Thumbnail

The following is an example of how this one looks like:

estore-shopping-cart-template-4

Compact Shopping Cart Templates

In addition to the above full cart templates, the WP eStore plugin comes with a few compact cart shortcodes also.

View the compact cart display options page to learn more about it.

Creating a Specific Cart Checkout Page

This page explains how you can create a specific cart checkout page for your site if you want to.

Filed Under: Additional Resources, WordPress eStore Tagged With: cart shortcode, compact cart, WP eStore, WP Shopping Cart

Using Product Specific Instructions in WP eStore

You can use the “Product Specific Instructions” feature of WP eStore to send special instructions (specific to a product) to your customers.

Your customers will only get this info when they purchase this product in question.

This is great for the following:

  • Send some special usage instructions specific to that product.
  • Explain some steps that they need to do before they can use the item.
  • Send them access to a URL that is password protected (you can share the URL and the password using this option).
  • Share the password to open the file (if there is one).
  • … and so on …

Step 1) Edit the product in question and enter the info in the “Product Specific Instructions” field

product-specific-instructions-configuration

Step 2) Edit the buyer email body (from the Email Settings menu of WP eStore).

Enter the following email shortcode in there (where you want the product specific instructions to show):

{product_specific_instructions}

Filed Under: Additional Resources Tagged With: Usage, WordPress eStore, WP eStore

Example Code for Custom Autoresponder Integration with WP eStore

This documentation is only for developers. If you are not a developer then you have no need to read this.

First read this post to understand some basics.

The following is an example code that shows you how use the item specific signup hook (this hook is called for each item that the customer purchases):

add_action('eStore_item_specific_autoresponder_signup', 'my_estore_custom_signup');
function my_estore_custom_signup($signup_data)
{
    eStore_payment_debug('Received request for item specific autoresponder signup action.', true);
    $firstname = $signup_data['firstname'];
    $lastname = $signup_data['lastname'];
    $email = $signup_data['email'];
    $list_name = $signup_data['list_name'];
    //TODO - write your autoresponder signup code here.
}

The value you specify in the “List Name” field (under the autoresponder settings section of the product) will be passed in the above function using the “list_name” parameter.


Filed Under: Additional Resources Tagged With: Autoresponder, code example, Tweaks

Automatically Shorten Encrypted Download Links in WP eStore Plugin

WP eStore plugin allows you to shorten the encrypted download links using Bitly URL shortener service. In order to integrate Bitly with eStore please follow these steps:

Step 1 (Login to Bitly)

Login to your Bitly account (Please sign up for an account if you don’t have one).

Step 2 (Generate token)

Generate a generic access token here by confirming your account password at the bottom of the page.

Step 3 (Enable Bitly in eStore)

  • Go to eStore general settings (WP eStore->Settings->Digital Product Delivery Settings)
  • Enable Shorten Encrypted Download Links
  • Enter your Bitly access token and save the settings.

shorten-encrypted-download-links-settings

Filed Under: Additional Resources, WordPress eStore Tagged With: downloadable file, Integration

How to Display a List of Latest Products

The latest products shortcode allows you to display any number of latest products (based on the date added to your store).

How to Display Your Latest Products.

You can use the eStore and the Extra Shortcodes add-on to display a list of your latest products. To do this all you need to do is follow the steps outlined below.

Step 1: You will need to have the eStore and the Extra Shortcodes add-on installed on your site.

Step 2: Create a page where you want to display the list of latest products. You can also use an existing page or widget.

Step 3: Place the below shortcode where you want a list of your latest products to be displayed.

[wp_eStore_latest_products number=5 style=1]

Parameters you can modify in this shortcode.

• Number of products (number) This is how many products you want to be displayed using the shortcode. Example: If you set this number to 5 the shortcode will display the 5 most popular products.

• Style (style) This allows you to use different fancy displays to show your products. You can see a full list of the fancy display templates here.

Related Documents

  • Display a List of Random Products
  • Display a List of Popular Products

Filed Under: Additional Resources, WordPress eStore Tagged With: digital downloads, product box, products

How to Display a List of Random Products

The random products shortcode allows you to display any number of random products from your available products .

How to Display Your Latest Products.

You can use the eStore and the Extra Shortcodes add-on to display a list of your random products. To do this all you need to do is follow the steps outlined below.

Step 1: You will need to have the eStore and the Extra Shortcodes add-on installed on your site.

Step 2: Create a page where you want to display the list of random products. You can also use an existing page or widget.

Step 3: Place one of the below shortcodes where you want a list of random products to be displayed.

Shortcodes

1. [wp_eStore_random_products number=1 style=1 type=1]

Parameters you can modify in this shortcode.

• Number of products (number) This is how many products you want to be displayed using the shortcode. Example: If you set this number to 5 the shortcode will display the 5 most popular products.

• Style (style) This allows you to use different fancy displays to show your products. You can see a full list of the fancy display templates here.

• Button type (type) This allows you to specify what type of button you want to use. Example: Buy Now, Add to Cart, Subscription or Download Now.

2. [wp_eStore_random_products number=1 style=1 type=1 cat_id=1]

Parameters you can modify in this shortcode.

• Number of products (number) This is how many products you want to be displayed using the shortcode. Example: If you set this number to 5 the shortcode will display the 5 most popular products.

• Style (style) This allows you to use different fancy displays to show your products. You can see a full list of the fancy displays here.

• Button type (type) This allows you to specify what type of button you want to use. Example: Buy Now, Add to Cart, Subscription or Download Now.

• Category ID (cat_id) This allows you to specify a category that you want the random products to be displayed from. When you use this shortcode it will only take the random products from the specified category.

Related Documents

  • Display a List of Latest Products
  • Display a List of Popular Products

Filed Under: Additional Resources, WordPress eStore Tagged With: digital downloads, products, random products, WP eStore

How to Display a List of Popular Products

The popular products shortcode allows you to do the following:

Display any number of popular products (based on the number of quantity sold) from your available products.

How to Display Your Popular Products.

You can use the eStore and the Extra Shortcodes add-on to display popular products easily. You just need to follow the steps outlined below.

Step 1: You will need to have the eStore and the Extra Shortcodes add-on installed on your site.

Step 2: Create a page where you want to display the list of popular products. You can also use an existing page or widget.

Step 3: Place the below shortcode where you want your popular products to be displayed.

[wp_eStore_popular_products number=1 style=1 type=1]

Parameters you can modify in this shortcode.

• Number of products (number) This is how many products you want to be displayed using the shortcode. Example: If you set this number to 5 the shortcode will display the 5 most popular products.

• Style (style) This allows you to use different fancy displays to show your products. You can see a full list of the fancy display templates here.

• Button type (type) This allows you to specify what type of button you want to use. Example: Buy Now, Add to Cart, Subscription or Download Now.

Related Documents

  • Display a List of Random Products
  • Display a List of Latest Products

Filed Under: Additional Resources, WordPress eStore Tagged With: list products by category, Product Categories, WP eStore, WP Shopping Cart

Automatically Apply Discounted Product Prices for Members

You can automatically give a discount to your emember users on your eStore products.

How Auto Member Discounts Work

Normal visitors (non-members) of the site will see the standard full product price. Logged in members of the site will see a discounted price (according to the discount rate you set in the settings).

discounted-product-prices-for-site-members

Configuring the Automatic Discounts for Members

Step 1) Download and install the eStore dynamic discounts/coupons addon

Step 2) Go to the “Dynamic Coupons” menu in from the eStore admin dashboard area

Step 3) Go to the “WP eMember Integration” section and check the “Enable Auto Discounts For Members” option.

Step 4) Specify a discount rate in the “Member Discount Amount” field. For example: use a value like 25 if the members should automatically receive a 25% discount.

Step 5) Save the settings

Step 6) This step is optional. You can edit your membership level and apply a different discount rate if you want to offer different discount to different levels. For example: you may want to apply 15% discount to silver level members and 30% discount to gold level members.

When members go to your store page, they will automatically see the discounted product price (according to their membership access level). Normal visitors (non-members) will continue to see the standard product price.

This works for any fancy product display templates offered in WP eStore. So this will work even if you are using it on a sales/landing page (instead of a store page).

Filed Under: Additional Resources Tagged With: discount, discount coupons, eStore, membership integration, non members purchase

Copy Customer Details to Create a New Customer Record

If you needed to create multiple customer record entries with a slight variation then use the “copy customer record” feature of the eStore plugin.

Go to the “Add/Edit Customers” interface and look at the “Copy Customer Details from an Existing Customer” section. See screenshot below:

copy-customer-details-interface

You can copy the existing customer record then change the value of some fields (for example: the products they purchased) then save it as a new record.


Filed Under: Additional Resources Tagged With: customers, e-commerce

How to Use Pay What You Want Price for Your Product

In this tutorial I will explain how you can charge a “Pay What You Want Price” to sell your products.

There is an option in the eStore that allows you to make products where customers can choose what they want to pay you for a product.

How to Setup the “Pay What You Want” Feature

Step 1: Create a product as you would normally do.

Step 2: Specify the minimum amount you want your customers to pay in the “Price” field for this product. Example: $5.00

Step 3: In the product settings under “Additional Product Details” section, check the following option:

pay what you want price

Now, when you put the “Add to Cart” button on the page for this product, it will have an option to enter a custom price field next to the button. This will allow the customer to specify how much they want to pay for this product. Example Below:

pay-what-you-want-price-example

Using Pay What You Want Price with a Display Template

If you want to use a fancy display template with this feature, it will look like the following:

Customer Specifies a Price Demo
This is a test description. This description is here to show how the description of this product looks like.
Price: $2.00
Your Price: $ 

Filed Under: Additional Resources Tagged With: Customer Enter a Price, WP eStore, WP Shopping Cart

  • 1
  • 2
  • 3
  • …
  • 5
  • Next Page »

Your Shopping Cart

Shopping Cart Empty
Shopping Cart is Empty
Visit The Shop

Search

Featured Documents

Stylish Product Display Options for WP eStore WP eStore Quick Setup and Usage Video Tutorial WP eStore Shortcodes and Functions Reference WordPress eStore Plugin Features WordPress eStore Plugin Demo What Our Customers Have to Say About Our Products WordPress eStore WishList (Feature Suggestions) WordPress eStore Frequently Asked Questions (FAQ) How to Show Add to Cart buttons

Featured Plugins

wordpress_estore_icon
wordpress membership plugin icon
WP Express Checkout Plugin
Lightbox Ultimate Plugin
wordpress_affiliate_plugin_icon

Copyright © 2023 | eCommerce Plugins