Tips and Tricks WP eCommerce

eCommerce Solution for WordPress Blog

  • Home
  • eCommerce Plugins
  • WP eStore Documentation
  • WP Shopping Cart Doc

Apply a Discount or Coupon Code to the Cart via a URL or Link

WP eStore plugin has a feature to apply a discount code via the URL.

Step 1) First, you need to install the extra shortcodes addon (if you haven’t done it already)

Step 2) Now, you can append the following query argument to the end of an URL to create a link that will apply the discount code in the shopping cart:

?discount_code=COUPONCODE

Lets say for example, the WP eStore shopping cart is on the “http://www.example.com/cart” page, then the URL with the discount code will be the following:

http://www.example.com/cart/?discount_code=COUPONCODE

When you create a link using the above URL, it will apply the discount in the cart.

apply-discount-coupon-code-via-url-example

Add Item to the Cart and Apply Discount At the Same Time

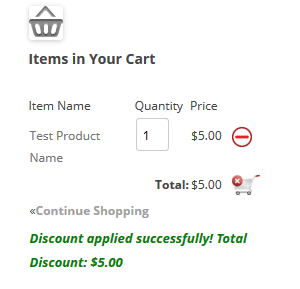
Sometimes you may want to add an item to the shopping cart via a link and then apply a discount to the cart at the same time. You can do that by specifying the discount code in the URL when using the purchase product via link feature.

When you do this, the customer clicking on the call to action link will see that the item is added to the cart with a discount applied to it.

You can learn how to use this feature here.

WP eStore – Save and Retrieve Cart Feature

You can enable the save and retrieve cart feature from the eStore settings menu by checking the “Enable Save and Retrieve Cart Feature” option.

When this feature is enabled, your customers will be able to add items to the shopping cart then save it. This will allow them to retrieve a previously saved cart and complete the checkout.

Add the following shortcode on a post, page or sidebar which will show a save and retrieve shopping cart section to allow your customers to save the current shopping cart or retrieve a previously saved cart.

[wp_eStore_save_retrieve_cart]

This is how it works in general:

  1. A customer visits your site
  2. Adds item(s) to the shopping cart
  3. Hits the save cart button which gives a unique “ID” to the customer
  4. This “ID” can be used later to retrieve an already saved cart and complete the checkout


Selling Audio/MP3/Music Files Using WP eStore Plugin

There are a few different ways you can configure the plugin and sell your music/mp3/audio files using the WP eStore plugin. Go through all these options and see which one works best for you.

Make sure to watch the basic setup video tutorial to familiarize yourself with WP eStore plugin before following any of the methods below.

1. Option One

Step i) Create a WordPress post or page (this will be your landing page for the audio/mp3 file you want to sell).

Step ii) Add the full details of the audio file along with any necessary images and videos for it to the page you just created. You have complete freedom in designing this page using the standard WordPress page editor.

Step iii) Use any WordPress audio player plugin to embed a preview for the audio file that you are selling on this page. Here are two potential audio players that you can use:

  • Compact WordPress Audio Player
  • WP Audio Player

Step iv) Create a WP eStore product for this audio file (lets say the eStore product ID is 1)

Step v) Use a WP eStore shortcode to place a purchase button on this page (this button lets your customer purchase the audio file).

Here is an example screenshot of how your WordPress page will look like when you use the above option:

sell-mp3-file-with-estore-option-1

2. Option Two

In this option we will take advantage of WP eStore’s fancy product display templates.

Step i) Create a WP eStore product for your audio file as usual.

Step ii) Use any audio player plugin to add an audio file preview in the “Product Description” field of the product.

sell-mp3-file-with-estore-option-2-step-1

Step iii) Use an eStore fancy display shortcode to show the product so your customers can purchase the item. WP eStore has a few fancy display templates that you can use.

Here is an example screenshot of how your WordPress page will look like when you use the above option:

sell-mp3-file-with-estore-option-2-step-2

3. Option Three

In this option we will take advantage of WP eStore’s fancy product display templates that were designed specifically for selling audio/mp3 files.

Step i) Install the compact audio player plugin (if you don’t have it already)

Step ii) Create an eStore product for your audio file.

Step iii) Use eStore’s fancy display template 12 to place the product on a WordPress page.

Here is an example screenshot of how your audio product will look like when you use the above option:

fancy 12 product display template

WP eStore Review

Here are a few WP eStore plugin reviews that some users have wrote on their sites and requested us to show it here.

  • WP eStore Review on Lunarlog
  • WP eStore Review on WPCheatSheets
  • WP eStore Review on PluginsWP.net
  • WP eStore Review on WPSolutionsHQ
  • WP eStore Review on v7n forum
  • WP eStore Review on CreativeDesignStudios
  • WP eStore Review on WPeCommerce
  • WP eStore Review on resellrightsonline
  • WP eStore Review on merlinsemporium
  • WP eStore Review on CharityCason

Note on Reviews: Some reviews are written by our competitors and some are written by affiliates. Reviews can be biased against us if it was written by our competitor or an affiliate of our competitor. It can be biased towards us if the user who wrote the review happens to be our affiliate. So please apply your own judgement when reading a review.

How to Use the Serial/License Key Code Selling Feature

WP eStore plugin has a serial/license key code selling feature that can help you in the following scenarios:

  • If your product needs to issue a serial number from a pool of serial numbers to each customer upon purchase.
  • If your product needs to issue a license key from a pool of pre-generated license keys to each customer upon purchase.
  • If you are selling tickets and you need to give a ticket number (from a pool of pre-generated ticket numbers) to each customer upon purchase.

product-image-orange-tickets

How To Use this Feature

Step 1: Generate your key codes/license codes/ticket numbers (you can generate as many as you want). These key codes that you generated should be separated by comma (,).

Example: The following is an example of 9 key codes that are separated by comma.

ABC18-CODE22, XCMEY-TJSTA, 123y0b9y7v, L363DC23, 1234567, Maiv882#i2, TICKET#1, TICKET#2, TICKET#3

Step 2: Specify the generated key codes separated by comma in the “Your Codes” field when creating an eStore product

WP eStore Specify Key Codes for a Product

Step 3: Use the following email tag in the “Buyer Email Body” field of eStore’s settings. The serial key will be inserted at that spot of the buyer email when a customer purchase the product.

{serial_key}

All done! Now, when a customer purchase a product that is using the serial key codes feature explained above, eStore will issue one key to this customer and update the database so the next customer will get the next key code.

Auto Generate License Keys

Alternatively, you can integrate WP eStore with our license manager plugin if you want to auto generate license keys when a customer purchase an item. The plugin will email the generated license key to the customer.

WP eStore Compact Cart Display Templates

WP eStore comes with a few compact shopping cart display templates. You can use these to show a compact version of the shopping cart on your sidebar.

You can add the following item to the cart and see how the compact shopping cart display looks like

Fancy Display Test 3
This is another test product to show how the fancy display looks like. This product has multiple images which are shown below the main thumbnail image. You can insert plain HTML in this description area too.
Price: $37.00
Price: $29.95

1) Compact Cart Display Option 1

This compact cart will display here when there are items in the cart.

2) Compact Cart Display Option 2

Cart is empty (0)

3) Compact Cart Display Option 3

Cart is empty $0.00

4) Compact Cart Display Option 4

Cart is empty $0.00

5) Compact Cart Display Option 5

0 Items

How to Use a Compact Shopping Cart on Your Site?

You can use any of the above mentioned compact cart on your site by using a shortcode. Please refer to our shortcodes list documentation for details.

Remember that the compact shopping cart also requires that you use the full cart somewhere on your site. You can create a specific checkout page where you show the full cart and then use the compact cart in the sidebar or header area.

This page explains how you can create a specific cart checkout page for your site. When the users click on the “view cart” link inside the compact cart, it will take them to this cart checkout page.

Full Shopping Cart Display Templates

In addition to the above compact cart templates, the WP eStore plugin comes with a few full cart shortcodes also.

View the shopping cart display options page to learn more about it.

WP eStore’s Pay Per View – Using WordPress Permalinks as Digital Products (APR)

Authenticated Page Redirect (APR) allows you to offer secure one-off access to WordPress pages and posts, without requiring the services of a membership plugin. You might find this capability useful in some cases for selling access to something like an event or time specific page or post, which may in turn provide access to live streaming video.

This feature is widely used to setup pay per view (PPV) content.

What to Expect

This is the scenario that we are after:

  1. A visitor arrives on your site and sees a purchase button for some Pay Per View (PPV) content.
  2. The visitor makes a purchase using the purchase button.
  3. The visitor then gets an encrypted link in the email (optionally you can also show the links on the Thank you page).
  4. The visitor clicks on the encrypted link which sends him to a WordPress page and allows him to see the content embedded on that page. If the visitor directly goes to this page without clicking on the encrypted link first (no content will be shown to the visitor).

How the APR Feature Protects the Content

The key thing to understand here is that the APR feature protects the content inside the APR shortcode (it doesn’t try to mask or hide the URL of the page). The content inside the APR Shortcode can only be viewed after the customers click on the encrypted link for that product that they receive after the purchase. If anyone directly goes to that URL the content inside the APR shortcode will be hidden this is why there is no need to hide the actual URL.

Setup Preparation (Basic Understanding)

The security mechanism used by APR is an encrypted session cookie; the APR Cookie. Each APR cookie is specific to a particular permalink, and contains encrypted timing information. On the pages being protected by APR, called APR Targets, an APR shortcode encloses the content being protected.  Content enclosed by an APR shortcode will only be displayed if one of the following specified conditions are met:

  • An APR cookie EXISTS in the current browser session.
  • An APR cookie exists and is LESS THAN an a specified number of minutes old.

Setup Authenticated Page Redirect

There is another pay per view feature video tutorial in our additional video tutorial section on the forum.

Step 1 (Create the Page with the Content and the Shortcode)

To setup a permalink as a digital product first you need to create the target page and setup the content that you want to deliver after the purchase.

Create a page or post that will become the APR target then enclose the content you want to protect using one of the following shortcodes:

  • Available Shortcodes for Authenticated Page Redirect Feature

Please make sure that the permalink you will be using works. Copy and paste it into the address bar of your browser. Specifically, ensure that the permalink you think you are going to use does not get modified by WordPress. If the permalink changes, then either fix the problem or use the resulting URL as the link you will use for the APR target URI.

Step 2 (Configure the Product)

Setup your digital product, using the URL of the APR target page in the “Digital Product URL” field.  CHANGE the URL scheme from ‘http’ to ‘aprtp’ or from ‘https’ to ‘aprtps’ in the “Digital Product URL” field. So for example if your APR target page URL is the following:

https://www.example.com/my-secret-page-with-awesome-video

Change the keyword “https” to “aprtps” and use that URL in the “Digital Product URL” field. So for the above example you will enter the following in the “Digital Product URL” field:

aprtps://www.example.com/my-secret-page-with-awesome-video

Now, whenever an encrypted link, pointing to an APR target is processed by eStore; an APR cookie will be issued, before the browser is redirected to the APR target, by the download manager script. This way your customers can only view the protected content on that page after they have made a payment.

Limitations

If an APR target contains the ‘nextpage’ tag, only content on the first page will be protected by the APR shortcodes.

Troubleshooting Tips

Reasons for why APR would not work include:

  1. The product URL does not specify the APRTP protocol. You forgot to use the correct URL format (see step 2 above) in the “Digital Product URL” field.
  2. The specified URL used with the APRTP protocol does not EXACTLY match the “pretty URL” format used for the non-APR URL. Example, if the non-APR URL is “http://site.com/page/” the APR URI must include the trailing “/” or it will not work.
  3. The browser is not accepting cookies.

This is an example of how to check for proper APR cookie authorization. Notice the conditional testing that is taking place. The conditional shortcode can be used to handle expired links.

[wp_eStore_APR expiry=0 status=unexpired]
Now you see me!
[/wp_eStore_APR]
[wp_eStore_APR expiry=0 status=expired]
Now you don't!
[/wp_eStore_APR]

Allow Indefinite Access

Read this post to learn how you can allow the purchasers to have indefinite access to the content.

How to Allow Customers to Specify a Price For a Product (Name Your Price)

WP eStore plugin allows you to create products whereby your customers can specify how much they want to pay for the product (pay what you want).

This feature can be helpful for accepting donation amount or selling a product for charity work.

How to Use “Offer Your Price” Feature

  1. Create a product as you normally do in eStore
  2. Specify the minimum amount your customers can pay in the “Price” field of the product. Payment Gateways do not allow $0 product checkout so you need to specify a minimum price value of the product.
  3. Check the “Allow Customers to Specify a Price” checkbox from the “Additional Product Details” section and that should do it.

Allow customers to specify a price


Now, when you put an “Add to Cart” button for this product on a page, it will have a price field next to the button so the customers can specify how much they want to pay for the item.

name-your-price-feature-example

Using it with a Product Display Template

If you are using a fancy product display template to show the product then it will look like the following:

Customer Specifies a Price Demo
This is a test description. This description is here to show how the description of this product looks like.
Price: $2.00
Your Price: $ 

Note:

  • The minimum price that you can set for a product can be as low as 0.01 but please keep in mind that the payment gateway (for example PayPal) may not like it as they are not getting any commission from these transactions.
  • If you want to offer a product for free then use the squeeze page form option to do so.

How to Setup a Revenue Sharing Product Selling Site (Split Profit Setup)

If you are setting up a revenue sharing site (to split profit with a partner) whereby you want to share the profit of the products with the author/creator of the product then you can use the “Revenue Sharing” feature of WP eStore.

How Revenue Sharing Works

WP eStore allows you to setup a revenue sharing site with the help of the WP Affiliate Software. Basically, you setup your authors as an affiliate then specify the affiliate ID of each author to their corresponding products when setting up the product in eStore (this links the author with a particular product). When a product is sold, eStore checks to see if this product is using revenue sharing. If revenue sharing is used for that product then it awards the appropriate amount to the corresponding author of the product in the form of affiliate commission. The commissions will keep accruing whenever this product sells. You can then payout all the outstanding commission (the authors share) at the end of the month or week or whatever.

How to Use the Revenue Sharing Feature

Step1: Enable the revenue sharing feature from the “AddOn” settings menu of WP eStore

Enable Revenue Sharing

Step2: Create an affiliate account for each of your authors/product creators (You can create affiliate account from the “Add/Edit Affiliates” menu of the WP Affiliate Platform plugin)

Step3: Specify the corresponding affiliate ID in the “Author ID for Revenue Sharing” section of the product when configuring the product in eStore.

Linking a product to a revenue sharing author

Linking a product to a revenue sharing author

Additionally, you can override the commission level to be used for this product’s revenue sharing calculation by specifying a number in the “Revenue Sharing Commission Level” field. This field is not mandatory. If you do not specify any value in this field it will simply use the commission level specified in the author/affiliate’s profile for revenue sharing calculation.

How the Revenue Sharing Cuts Work For Normal Transactions

The revenue sharing for normal transactions are very straightforward. The “author/partner” gets the percent specified in the revenue sharing section for the product.

For example, lets say it is a $100 Product and you have specified the author/partner to get 50%. The calculation will look like the following:

  • 50% author’s cut (so the author of the product gets $50)
  • The leftover is for the house ($50 in this case).

How the Revenue Sharing Cuts Work When Used Together with Normal Affiliate Commission

When revenue sharing is used in conjunction with a normal affiliate campaign then the calculation works like the following:

For exmaple, lets say it is a $100 Product and you specified the author to get 50% and the affiliates to get %50. The calculation will look like the following:

  • 50% affiliate commission (so affiliate gets $50)
  • 50% author commission (the author of the product gets 50% of profit). The affiliate commission is deducted from the product price and then the author gets 50% of the left over. So in this case the author will get 50% of ($100-$50) which equals to $25.
  • The leftover is for the house ($25 in this case).

Google Analytics E-Commerce Tracking for WP eStore

WP eStore has built in stats feature that gives you overall sales data as well as itemized sales stats. This statistics is very useful but having the option to track sales through Google Analytics is really good so we added this option to WP eStore plugin.

There is now an e-commerce tracking addon that makes this integration very easy.

How to Add Google Analytics E-Commerce Tracking on eStore

Refer to the addon’s page.

« Previous Page
Next Page »

Your Shopping Cart

Shopping Cart Empty
Shopping Cart is Empty
Visit The Shop

Search

Featured Documents

Stylish Product Display Options for WP eStore WP eStore Quick Setup and Usage Video Tutorial WP eStore Shortcodes and Functions Reference WordPress eStore Plugin Features WordPress eStore Plugin Demo What Our Customers Have to Say About Our Products WordPress eStore WishList (Feature Suggestions) WordPress eStore Frequently Asked Questions (FAQ) How to Show Add to Cart buttons

Featured Plugins

WP Express Checkout Plugin
wordpress_estore_icon
wordpress membership plugin icon
wordpress_affiliate_plugin_icon

Copyright © 2025 | eCommerce Plugins