Tips and Tricks WP eCommerce

eCommerce Solution for WordPress Blog

  • Home
  • eCommerce Plugins
  • WP eStore Documentation
  • WP Shopping Cart Doc

Stylish Product Display Options for WP eStore

This page has a list of all the different pre-configured product display templates and styles that you can use to display your products when using the WP eStore plugin.

Note: You are not restricted to using one of these product displays if they don’t suit your needs. You can design your own product display in a WordPress post or page then use eStore’s simple “Buy” button (there are shortcodes to embed plain buttons on a post or page) to facilitate the purchase of the product (very helpful when designing an optimized sales/landing page).

Stylish Product Display 1 (Fancy 1)

Demo 1 and Demo 2
Demo 1 and Demo 2
This is a test description. This description is here to show how the description of this product looks like. You can insert plain HTML in this field too. Some more text to fill the shopping cart product description.
Available Qty: 30
Price: $15.99

Stylish Product Display 2 (Fancy 2)

Test Product For Fancy Display
Some test description of the product to show how this description field looks like. You can insert plain HTML in this field too. Some more description of the product goes here. Damn! This product display looks good.
Price: $59.95

Stylish Product Display 3 (Fancy 3)

Test Product For Fancy Display
Price: $59.95

Stylish Product Display 4 (Fancy 4)

Fancy Display Test
Price: $29.95
Fancy Display Test
View Details
Some test description of the product to show how this description field looks like. You can insert plain HTML in this field too. Some more description of the product goes here. Damn! This product display looks good.

Stylish Product Display 5 (Fancy 5)

Fancy Display Test
Fancy Display Test
Some test description of the product to show how this description field looks like. You can insert plain HTML in this field too. Some more description of the product goes here. Damn! This product display looks good.
Price: $29.95
Details

Stylish Product Display 6 (Fancy 6)

Test Product For Fancy Display
Price: $59.95
Test Product For Fancy Display

Stylish Product Display 7 (Fancy 7)

If you wanted to show a very simple and plain product display with name, price and the purchase button then this template will come in handy. This display can be useful for users selling mp3/music/audio files too. Below is an example of how this template looks like:

fancy7-product-display-template-example

Stylish Product Display 8 (Fancy 8 )

Below is an example of how the fancy 8 product display template looks like. This display template is useful for audio/music/mp3 file sellers.

estore-fancy8-product-display-example

Stylish Product Display 9 (Fancy 9)

Fancy Display Test 2
Price: $37.00
Some test description of the product to show how this description field looks like. You can insert plain HTML in this field too.

If you don’t specify a description for a product then this display will become a very compact one with just name, price and a buy button.

Stylish Product Display 10 (Fancy 10)

Fancy Display Test 3
This is another test product to show how the fancy display looks like. This product has multiple images which are shown below the main thumbnail image. You can insert plain HTML in this description area too.
Price: $37.00
Price: $29.95

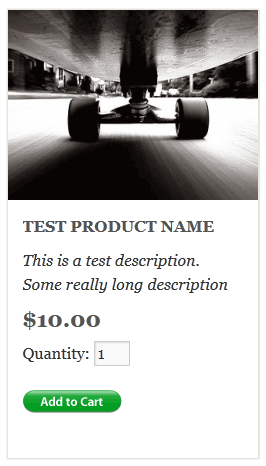
Fancy10 is a lot similar to the popular Fancy1 display except it has a section to show the additional images below the main thumbnail. The images will show in a lightbox when clicked. The default Add to Cart button has a nice elegant style too. You can still use a custom button image for the “Add to Cart” button just like any other displays.

Stylish Product Display 11 (Fancy 11)

Fancy Display Test Product Four
$49.95$39.95

Stylish Product Display 12 (Fancy 12)

This one is just like fancy 8 template but it uses our compact audio player plugin for the audio file preview. Below is an example of how this display template looks like:

fancy 12 product display template

Stylish Product Display 13 (Fancy 13)

Here is an example of how this display template looks like:

fancy 13 product display template example

Stylish Product Display 14 (Fancy 14)

Here is an example of how this display template looks like:

fancy14-display-template-sample

Stylish Product Display 15 (Fancy 15)

Here is an example of this display template:

estore-fancy-15-product-display-template-example

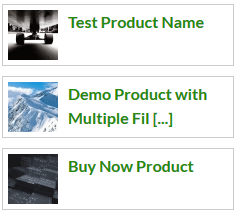
This is a very compact product display template that only has the product thumbnail image and the product name. This display template can be very helpful when you want to show a product on your sidebar or footer area (where you don’t have a lot of space). If you fill out the “Product details page” field of the product then the name will be linked to that page.

Here is an example of how it looks like when you stack a few products using this display template on your sidebar:

estore-fancy-15-product-display-template-example-stacked

Stylish Product Display 16 (Fancy 16)

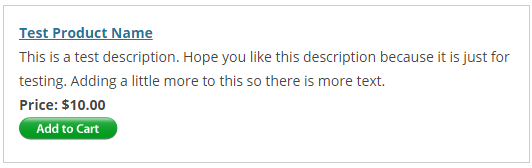
This template doesn’t use any product image thumbnail in the template. So this one should be good for users who don’t want to use an image for their product(s).

Below is an example of how this display template looks like:

estore-fancy-16-product-display-template-example

Stylish Product Display 17 (Fancy 17)

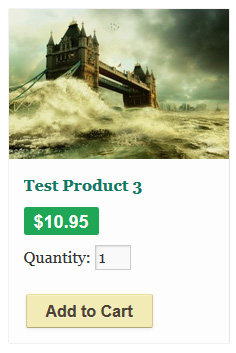
This template uses just the thumbnail image, product name and the add to cart button. It it good for using in a grid display layout.

The following screenshot is an example of how this template looks like:

estore-fancy-17-product-display-template-example

Stylish Product Display 18 (Fancy 18)

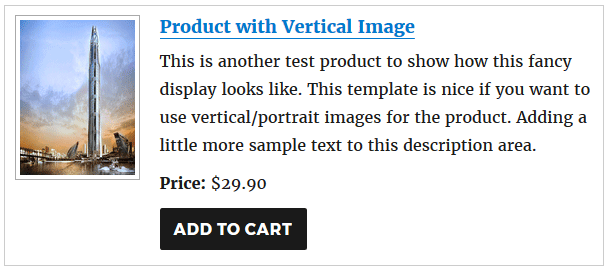
This template uses a vertical/portrait thumbnail size so it will be useful if you use a vertical image for your product.

The following screenshot is an example of how this template looks like:

estore-fancy-18-product-display-template

How to Use the Stylish Product Display Templates

To display a product in any of the above styles you simply have to use a Shortcode (to display it on a post or page) or use a line of PHP code (to display it from your theme files e.g. footer.php). All the available shortcodes and PHP function references can be found here.

Selling Large Files with WP eStore

WP eStore does not impose any restriction on the downloadable file size. As long as your server can handle it eStore will be fine. We have users serving files as big as 8 Giga bytes (GB) in size using the eStore plugin.

With that said, WP eStore sits between the actual file and the browser creating a shield (this is how eStore keeps the true location of the file hidden). However this means that eStore has to read the file and serve it to the browser (meaning the file will be temporarily loaded in your server’s RAM). If you are selling large files and your hosting plan has a limited RAM available for you to use then this could create a file download issue (the file won’t be downloaded fully).

When hosting companies refer to *unlimited* disk space they refer to the hard disk space not the RAM memory size. So make sure to ask your hosting provider how much RAM memory is available to your PHP application. To better understand this… imagine a computer having 500GB hard disk but having only 32MB RAM (see the difference between them?).

There are a few possible workarounds that can be tried:

  1. You could break the bigger file into multiple parts (e.g. each 50MB) and use the multi-part download option of eStore.
  2. Try one of the other download methods explained here and see how you go (there are a few different ways to get around this depending on your server’s configuration but it may not work on all servers).
  3. Use the Amazon S3 Integration option of eStore.
  4. Edit the eStore product in question and uncheck the “downloadable” checkbox for the product (look under the “Digital Content Details” section for this option). This will force eStore to let the browser handle the download.
  5. If you server supports mod_xsendfile (its an Apache module to handle large file downloads) then we can configure eStore to work with “mod_xsendfile” so large files can be downloaded without any issues.
  6. You can upgrade your hosting to a plan with enough RAM.

The bottom line is… Please make sure to check with your service provider about any upload/download restrictions or the available server RAM your hosting plan may have before you purchase the eStore plugin.

WP eStore – Checkout Demo

How to Bulk Upload eStore Products from a CSV File

You can use the WP CSV to DB plugin to upload product details from a CSV file into the WP eStore’s database.

Note: The WP CSV to DB Plugin may not work on all servers. If this happens to you then note that you can directly import content into MySQL database via PHPMyAdmin (you can find it from your cPanel). The video tutorial on How to Easily Import or Export any of Your WordPress Database Content article will help.

1. Setup/Preparation

  • Install the WP CSV to DB plugin.
  • Download the Products.csv template file and open it using Microsoft Excel.
  • Fill up the product details; One product per row (There are two example entries in that file so replace them with actual product details).
  • Once you are done entering all your product details then save the file as a CSV file.

2. Select the Database Table

  • Select the “wp_wp_eStore_tbl” option from the Database Table Name field (this is the database table name for the WP eStore’s products table given that you did not manually change the wordpress database table’s prefix).

3. Specify the Input CSV file

Simply use the upload option to upload the CSV file created in the setup/preparation step.

4. Specify the Options

  • Use a value of 2 in the “Select Starting Row” field (the first row is the column heading so we don’t want to import that row).
  • Check the “disable auto_increment column” field (this way the ID column values will be automatically generated for you).

5. Import into the Database

Hit the magic “Import to DB” button which will dump the product details from the CSV file into the eStore products database table.

The following screenshot shows the values you should be selecting when importing.

csv-to-db-product-import-settings

Now if you browse to the “Manage Products” menu of WP eStore, you should see all the new products that you just added.

Assigning Category To Your Bulk Uploaded Products

After you bulk upload your product you may want to assign some categories to some of the products you just uploaded.

  1. Download the product_id_to_category_relationship.csv template file and open it using Microsoft Excel.
  2. Fill up the category to product relation details; one per row (There are a few example entries in that file so replace those IDs with actual product and category ID).
  3. Browse to the CSV to DB plugin settings.
  4. Select “wp_wp_eStore_cat_prod_rel_tbl” from the “Database Table Name” field.
  5. Upload the CSV file and import it.
  6. Enter 2 in the starting row field
  7. Hit the “Import to DB” button

Add to Cart and Buy Button Images for Shopping Cart

The WP eStore and the Simple Shopping cart Comes with many “Add to Cart” button images that you can use. Here are some additional “Add to Cart” button images that you can use on your online shop.

You can use the following button images on your landing page to create professional looking Add to Cart, Buy Now, Download, Membership Join etc buttons.

Check this page for buy now button graphics

Check this page for subscription button graphics

Simply right click on the image and save it to your computer.

Get Instant access button

add-to-cart-golden-with-cart-icon

add to cart button image green

gift-now-via-paypal-button

retro-add-to-cart-button

green_matrix_add_to_cart

add to cart button for selling music

add to cart button for selling mp3

orange add to cart button

Blank Button Templates

The following are some empty button templates that you can customize with your own text and use them on your site.

Buy now button template for shopping cart

Vintage Style Buy Buttons

Download the vintage style button pack.

Quality Subscribe Buttons

Download the subscribe button pack.

Discount Tag Buttons

Download the blue discount tag buttons

How to Integrate WP eStore with AWeber

The WP eStore shopping cart plugin can be integrated with AWeber (Email marketing and Autoresponder service) so that your customers can get signed up to your AWeber list when they make a purchase.

The users are added to your AWeber list when any of the following event happens:

  1. A customer purchases a product.
  2. A visitor submits a squeeze form for a product.

Step 1: Make a Connection to the AWeber API

To connect eStore with the AWeber API, go to the eStore Settings -> Autoresponder Settings menu and authorize the “Tips and Tricks HQ” app (click on the following image to see a bigger screenshot):

AWeber Integration Settings

After you hit the “Make Connection” button you should see the following message (meaning the connection was established successfully):

AWeber Authorization Success

Step 2: Specify Your AWeber List ID or Name as Appropriate

Now all you need to do is specify the AWeber list ID of the list where you want your customers to be signed up to.

Below is an example of how an AWeber list ID looks like (you get this from your AWeber account):

awlist1234567

You can signup all of your customers to one global list by checking the “Global AWeber Signup” option and then specifying the list ID in the “Global AWeber List Name” field. Make sure to hit the “Update” button at the bottom of the Autoresponder settings page after you make the changes.

You can also signup your customers to a specific list on a per product basis by specifying the list ID value in the “List Name” field under the “Autoresponder settings” section of the product in question.

WP Shopping Cart Troubleshooting

Can’t Remove an Item from the Shopping Cart

Make sure you haven’t included special characters like apostrophe (‘) in your product name.

The Price Shows up as $0.00 in the Shopping Cart

Make sure you have entered the Price to two decimal places and didn’t put any symbols or characters. eg. 10.00 or 6.70 or 1999.95 etc (Do not put currency symbol in the price field)

NextGen Gallery doesn’t show the “Add to Cart” buttons correctly

  • Make sure the wp eStore template file is in the “view” directory of NextGen Gallery.
  • You using something similar to the following to display the gallery:

left_bracket2nggallery id=1 template=wp-eStore]

Variation Control Not Working

Please make sure your theme’s “footer.php” file has a call to the wp_footer() function of WordPress or it won’t add the javascripts in the footer. Many themes are not designed according to WordPress standard and causes problems. Simply add the following line in your “footer.php” file to solve this:

<?php wp_footer(); ?>

Add to Cart Button Not Showing in IE

This usually happens when the theme has some CSS issue. If you do the theme testing explained on this page then it will reveal the issue:

  • Theme and plugin conflict test

The Workaround

If you don’t want to change your theme then open the “wp_shopping_cart.php” file and do the following.

1) Search for the following piece of code string:

<object>

When you find it just delete this string. There will be a few occurrences so do the same for all of them.

2) Search for the following piece of code string:

</object>

When you find it just delete this string. There will be a few occurrences so do the same for all of them.

Save and upload this file and it should fix that issue.

WordPress e-Commerce Knowledgebase

Express Checkout System

The WordPress Shopping Cart and WP eStore plugins use the express checkout model for a simple and quick checkout process.

Typical online checkouts require customers to work through numerous steps, which involve entering personal, financial and delivery information. The fact is, every step in this often-tedious and frustrating process presents a real risk that your customer will change their mind and abandon the shopping cart.

The express checkout model allows you to fast track your checkout process by tapping into personal, financial and delivery information which existing PayPal customers already have stored with PayPal. Customers can checkout quickly with WP eStore as it requires minimum number of clicks and form filling from your users to perform a checkout (this helps keeping the cart abandonment rate low).

What is (Instant Payment Notification) IPN?

Instant Payment Notification (IPN) is PayPal’s interface for handling real-time purchase confirmation and server-to-server communications. IPN delivers immediate notification and confirmation of PayPal payments you receive and provides status and additional data on pending, cancelled, or failed transactions.

paypal-ipn-diagram_438

How does the WP eStore Plugin Work?

Most e-Commerce plugins take over your blog by automatically creating all kinds of pages for products and checkout and doesn’t give the ultimate flexibility in how you display a product. I am not saying it doesn’t have it’s usage but what if you wanted to fully design how your product display looks like and where exactly the “Add to Cart” buttons and the “Shopping Cart” appear? What if you wanted to sell something from your blog posts and pages? What if you wanted a shopping cart that integrates nicely into your existing site without having to redesign?

The WP eStore doesn’t create anything for you automatically, instead it gives you the building blocks of an e-Commerce site so you can build it the way you want it to look and function.

After you Add/Configure a product, you can display it in various ways anywhere you like on your WordPress powered site (eg. in the post, page, header, footer, sidebar etc).

You use a special piece of text (shortcodes) in your post or page where you want the product to be displayed. You can tell it to give you a bare “Add to Cart”, “Buy Now” or “Subscription” button on a post or page so you can fully design the product display with images and description yourself.

You can also use a pre-configured product display template to display the product if you don’t like to design the product display. The eStore comes with a few product display templates (You can see some examples here).

Once you have the Buy buttons in place, you can display the shopping cart wherever you like on your site. Again this is done through the use of a special piece of text (shortcode). You can create a “Checkout” page and display the shopping cart there or you can place the shopping cart on the same page where the buttons are or on the sidebar (the choice is yours).

All the WP eStore shortcodes and function references (building blocks of your eCommerce site) can be found here.

WP eStore’s Typical Transaction Cycle

The following block diagram gives an overview of the typical actions involved in a complete transaction cycle. This example uses PayPal as the payment gateway. The same principal applies to any payment gateway checkout via eStore.

wp_estore_overview_diagram

You receive the money in your PayPal account and the buyer gets an encrypted dynamically generated download link for the product in an email.

The Post Payment Verification Process

There are a number of parameters that are verified before the digital product is delivered to the customer. This following diagram explains what happens in the background once a customer makes a payment for a product. This example uses PayPal as the payment gateway. The same principal applies to any payment gateway checkout via eStore.

Post Payment Verification Process

Post Payment Verification Process

Buyers can pay using a Credit Card or their PayPal account

Buyers don’t have to have a paypal account to be able to pay you. They can pay by credit card too if you have a Premier or Business PayPal account (these are free). PayPal will give your customers the option to pay by credit card if they don’t have a PayPal account. When your customers go to the checkout page on PayPal they will see a line similar to the following that they can click on and use the credit card to pay:

Customer Can Choose to Pay Using a Credit Card

PayPal normally figures out if you have a PayPal account or not from the cookies on your computer. Try deleting all the cookies and hit the checkout button to go to PayPal and it will present you with the option to pay by credit card upfront (similar to the screenshot below).

Customer Can Pay via a Credit Card

Note: If you want to use recurring/subscription payment option and would like to accept credit card for the recurring payment then PayPal may require you to add “Enhanced Billing” option to your PayPal merchant account.

How to Collect Special Instructions from the Customer

If you need to collect special instructions from the customer for some customized work on the item you are selling then you can use the “Collect Customer Input” feature of eStore or  instruct your buyer to put it in the “Special instructions to merchant” box on PayPal during checkout. Please note that this option is shown on the “Review your payment” screen

paypal-special-instruction

Collecting Special Instruction from the Buyer

Review Payment

Review Payment Screen

WP eStore License

WP eStore
End User License Agreement
Copyright, Tips and Tricks HQ (https://www.tipsandtricks-hq.com/)
All rights reserved.

This plugin uses the GNU General Public License. By using the software, you agree to be bound by the terms of GPL license. If you have any questions about the terms, please contact Tips and Tricks HQ for clarification.

WP eStore Shortcodes and Functions Reference

This page has all the available Shortcodes and PHP functions that you can use to create various buy buttons, download buttons, shopping carts, product details etc. in various ways. Read through the list of shortcodes so you know all the product selling power you have when using this plugin.

If you are using the block editor, you can copy and paste any shortcode into a standard text or shortcode block.

WP eStore Standard Shortcodes List

The following PDF file has a list of all the standard shortcodes available in the WP eStore core plugin.

  • WP eStore Shortcodes & PHP Functions List
See the following section (Extra Shortcodes) for additional eStore shortcodes.

Extra Shortcodes Addon

Some people just like to go nuts with WordPress shortcodes and there is nothing wrong with that :). So if you are not satisfied with the default set of shortcodes that come with the WP eStore plugin then download and install the “Extra WP eStore Shortcodes” addon plugin and you will have access to many more cool shortcodes.

First, check the list of shortcodes and other functions that will be available to you when you use the extra shortcodes addon plugin from the PDF file below:

  • Extra WP eStore Shortcodes List

If you see a shortcode that you want to use then download the extra shortcodes addon from the addon download area of our customer only support forum

  • Addon download area (Extra Shortcodes Addon Version: v5.2.5)

Feel free to make a suggestions for shortcodes that you need and we will try to add it in.

Available Email Merge Tags

The following tags can be used in the “Email Body” of the email that is sent out after a purchase (the tags will be replaced with the value dynamically):

  • {first_name} – First name of the buyer
  • {last_name} – Last name of the buyer
  • {payer_email}- Buyer email address
  • {product_details} – Lists the item name (with variation), quantity, currency and price of every purchased item.
  • {product_details_tax_inclusive} – Lists the item name (with variation), quantity, currency and price of every purchased item (tax inclusive).
  • {product_name} – Name of the purchased products (comma separated)
  • {product_link} – List of purchased products and corresponding encrypted download links for the products.
  • {product_link_digital_items_only} – List of purchased digital items with encrypted download links (The item is only listed if the product has a downloadable file)
  • {product_price} – Price of the purchased products (comma separated)
  • {product_id} – Product IDs of the purchased products (comma separated)
  • {download_life} – Duration the download links are valid for.
  • {shipping_info} – Buyer’s shipping address
  • {shipping_option_selected} – The selected shipping variation for the transaction
  • {store_pickup} – If store pickup option is used, then it shows “yes” or “no”
  • {product_specific_instructions} – Add the product specific instructions (e.g password for a PDF file) specified in the product to the email body.
  • {purchase_date} – The date of the purchase.
  • {transaction_id} – The unique transaction ID of the purchase.
  • {purchase_amt} – The amount paid for the current transaction.
  • {total_tax} – Total tax amount for this transaction.
  • {total_shipping} – Total shipping amount for this transaction.
  • {total_minus_total_tax} – The total amount minus the total tax.
  • {total_minus_tax_and_shipping} – The total amount minus the tax and shipping.
  • {coupon_code} – The coupon code that was used in the transaction.
  • {discount_amount} – Shows the discount amount.
  • {counter} – A numeric counter. Each time you make a sale this counter goes up by 1.
  • {ip_address} – Shows the customer’s IP address.
« Previous Page
Next Page »

Your Shopping Cart

Shopping Cart Empty
Shopping Cart is Empty
Visit The Shop

Search

Featured Documents

Stylish Product Display Options for WP eStore WP eStore Quick Setup and Usage Video Tutorial WP eStore Shortcodes and Functions Reference WordPress eStore Plugin Features WordPress eStore Plugin Demo What Our Customers Have to Say About Our Products WordPress eStore WishList (Feature Suggestions) WordPress eStore Frequently Asked Questions (FAQ) How to Show Add to Cart buttons

Featured Plugins

WP Express Checkout Plugin
wordpress_estore_icon
wordpress membership plugin icon
wordpress_affiliate_plugin_icon

Copyright © 2025 | eCommerce Plugins