Tips and Tricks WP eCommerce

eCommerce Solution for WordPress Blog

  • Home
  • eCommerce Plugins
  • WP eStore Documentation
  • WP Shopping Cart Doc

WP eStore and ConvertKit Integration Addon

You can integrate the WP eStore plugin with Convertkit so that the customers can be automatically added to your ConvertKit sequence.

The users are added to the ConvertKit sequence when any of the following event happens:

  1. A customer purchases a product that has a ConvertKit sequence specified for it.
  2. A visitor submits a squeeze form for a product that has a ConvertKit sequence specified for it.

Installing the ConvertKit Addon

You can install this addon the same way you install any WordPress plugin:

  • Go to the Add New plugins screen in your WordPress admin area
  • Click the Upload button
  • Browse for the addon file (estore-convertkit-addon.zip)
  • Click Install Now and then activate the plugin

Addon Usage

Step 1) Click on the ConvertKit menu link from the main eStore plugin’s admin menu.

Step 2) Enable the integration then fill in the API key details. You can get the API details from your ConvertKit account.

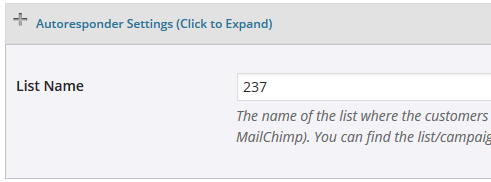
Step 3) Edit the eStore product in question and specify your ConvertKit Sequence Name in the List Name field of the product.

Example value: my-cv-sequence
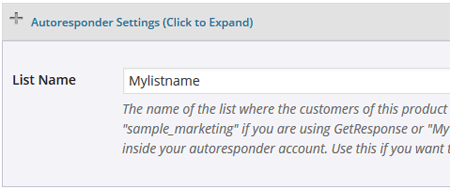
autoresponder-list-name-in-product

Get the ConvertKit Addon

The price of this addon is $39
WP eStore and ActiveCampaign Integration Addon

You can integrate the eStore plugin with ActiveCampaign autoresponder so that the customers can be automatically signed up to your ActiveCampaign list (with any tags that you want to apply).

The users are added to the ActiveCampaign list when any of the following event happens:

  1. A customer purchases a product that has an ActiveCampaign list ID specified for it.
  2. A visitor submits a squeeze form for a product that has an ActiveCampaign list ID specified for it.

Installing the ActiveCampaign Addon

You can install this addon the same way you install any WordPress plugin:

  • Go to the Add New plugins screen in your WordPress admin area
  • Click the Upload button
  • Browse for the addon file (estore-active-campaign-addon.zip)
  • Click Install Now and then activate the plugin

Addon Usage

Step 1) Click on the ActiveCampaign menu link from the main eStore plugin’s admin menu.

Step 2) Enable the integration then fill in the API key and API URL details. Then hit the “update” button to save.

You can get the API details from your ActiveCampaign account.

Step 3) You need to get the List ID of the list where you want to add the users.

Getting the List ID value of Your ActiveCampaign List

If you select the list and look in the URL you should see the list id there:

activecampaign-list-id-value

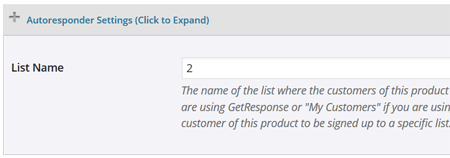
Edit the eStore product in question and specify your ActiveCampaign List ID in the List Name field of the product. Example value: 2

autoresponder-generic-list-id-tag-id-setup

The addon will add the customer to this list.

Specifying Tags (Optional)

Optionally, you can specify tags together with the list ID value. Lets say the list ID is 2 and you want to apply tags “tag1”, “tag2” and “tag3”. You would enter the list ID and tags using the following format:

2|tag1,tag2,tag3

Get the ActiveCampaign Addon

The price of this addon is $29.95

WP eStore and Constant Contact Integration Addon

This addon has been deprecated. It is no longer being sold.

The users are added to the Constant Contact list when any of the following event happens:

  1. A customer purchases a product that has a list name specified for it.
  2. A visitor submits a squeeze form for a product that has a list name specified for it.

Installing the Constant Contact Addon

You can install this addon the same way you install any WordPress plugin:

  • Go to the Add New plugins screen in your WordPress admin area
  • Click the Upload button
  • Browse for the addon file (estore-constant-contact-addon.zip)
  • Click Install Now and then activate the plugin

Addon Usage

Step 1) Click on the “Constant Contact” menu link from the main eStore plugin’s admin menu.

Step 2) Enable the integration then fill in the API key and other API details. Then hit the “update” button to save.

You can get the API details from your Constant Contact account.

Step 3) Edit the eStore product in question and specify your Constant Contact “List Name” in the List Name field of the product.

Now, when a customer purchase this product, the addon will automatically add this user to the specified list.

Example Code for Custom Autoresponder Integration with WP eStore

This documentation is only for developers. If you are not a developer then you have no need to read this.

First read this post to understand some basics.

The following is an example code that shows you how use the item specific signup hook (this hook is called for each item that the customer purchases):

add_action('eStore_item_specific_autoresponder_signup', 'my_estore_custom_signup');
function my_estore_custom_signup($signup_data)
{
    eStore_payment_debug('Received request for item specific autoresponder signup action.', true);
    $firstname = $signup_data['firstname'];
    $lastname = $signup_data['lastname'];
    $email = $signup_data['email'];
    $list_name = $signup_data['list_name'];
    //TODO - write your autoresponder signup code here.
}

The value you specify in the “List Name” field (under the autoresponder settings section of the product) will be passed in the above function using the “list_name” parameter.


WP eStore Sendy Integration Addon

This addon plugin allow you to integrate WP eStore plugin with the Sendy Email Marketing solution. You can use it to add customers to your Sendy email list when someone purchase your product(s).

Installing the Sendy Integration Addon

You can install this addon the same way you install any WordPress plugin:

  • Go to the “Add New” plugins screen in your WordPress admin area
  • Click the “upload” tab
  • Browse for the plugin file (eStore-sendy-integration-addon.zip)
  • Click “Install Now” and then activate the plugin

Using the Sendy Integration AddOn

After you install this addon using the above instruction do the following:

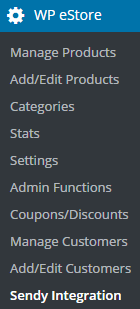
Step 1) Go to the Sendy integration settings interface from your main eStore menu.

screenshot of sendy integration menu in the estore plugin

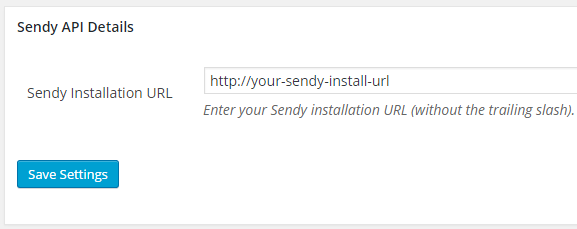
Step 2) Enter you Sendy Installation URL.

screenshot showing the sendy api details section in the estore plugin

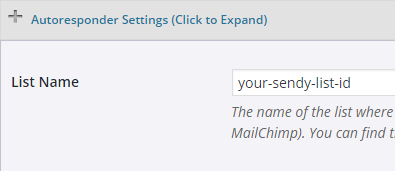
Step 3) Edit the eStore product (the one that you want to link to Sendy list) and specify the list ID in the List Name field.

screenshot of sendy autoresponder section in the estore product interface

Save the product and you are done!

Now every time  there is a new transaction or squeeze page form submission for this product, the customer will be automatically added to your Sendy list.

How to Get The Sendy Integration Addon/Extension

The price of this addon is $29.95

Please contact us to purchase this addon.

WP eStore and Infusionsoft Integration Addon

You can integrate the eStore plugin with Infusionsoft so that the customers can be automatically signed up to your Infusionsoft list.

Installing the Infusionsoft Integration Addon

You can install this addon the same way you install any WordPress plugin:

  • Go to the “Add New” plugins screen in your WordPress admin area
  • Click the “upload” tab
  • Browse for the addon file (estore-infusionsoft-addon.zip)
  • Click “Install Now” and then activate the plugin

Addon Usage

Step 1) Click on the “Infusionsoft” menu link from the main eStore plugin’s admin menu.

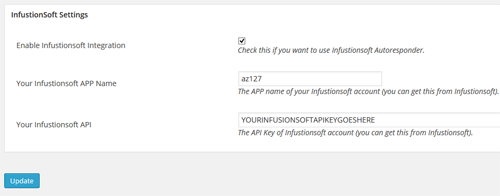
Step 2) Enable the integration then fill in the API key and your APP Name. Then hit the “update” button to save.

infusionsoft-integration-settings

API Key – You can get the API key from your Infusionsoft account.

APP Name – The appname is the subdomain value of your account URL. For example, if your Infusionsoft account URL is the following:

https://az127.infusionsoft.com/Admin/home.jsp

Then your app name is az127

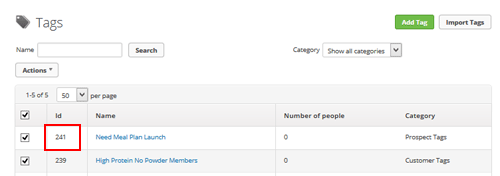
Step 3) Edit the eStore product in question and specify your Infusionsoft “Tag ID” in the List Name field of the product.

specifying-infusionsoft-tag-id

Now, when a customer purchase this product, the addon will automatically add this user to the specified Infusionsoft tag.

Getting Infusionsoft Tag ID

You can find all your Infusionsoft tags (they used to be called “groups”) from the tags interface of your Infusionsoft account.

getting-Infusionsoft-tag-id

Get the eStore Infusionsoft Addon

The price of this addon is $29.95

WP Shopping Cart and MailChimp Integration

Want to keep your buyers up to speed on your newest products or specials? This guide will help you use MailChimp for WP Shopping Cart to automatically add customers to a mailing list when they purchase your products.

screenshot showing the mailchimp account dashboard

This paid add-on can be purchased at the bottom of this page. We recommend users to carefully review the information provided here to fully understand its features before making a purchase. This ensures that the add-on meets your expectations and aligns with its capabilities.

Installing the Addon

You can install this addon the same way you install any WordPress plugin:

  • Go to the Add New plugins screen in your WordPress admin area
  • Click the upload tab
  • Browse for the addon file (simple-cart-mailchimp-integration.zip)
  • Click Install Now and then activate the plugin

Setup and Configuration

Step 1) Create your list on MailChimp

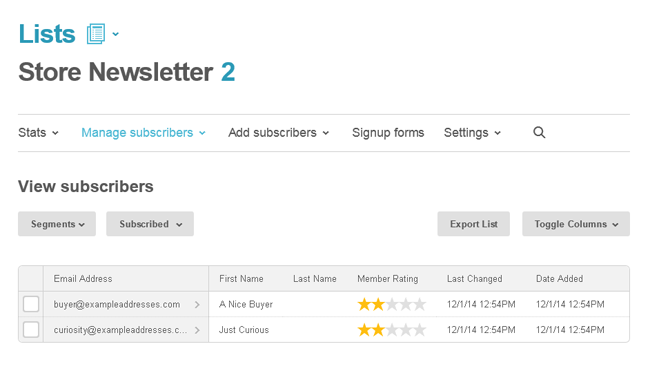
To use the addon, you’ll need to have a MailChimp account, so create one now if you don’t already have one. Once you have signed into your MailChimp account, you can select Lists from the menu to create a new mailing list, or choose from lists you’ve created previously.

Step 2) Find and add your List Name

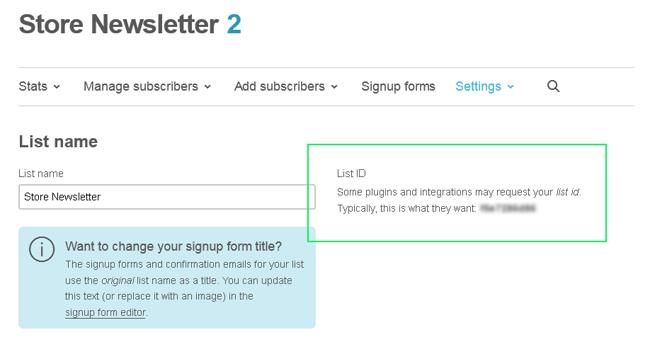
In your MailChimp account, open your list and select List Name & Defaults from the Settings menu. Copy the List Name displayed here to your clipboard.

screenshot showing how to find the mailchimp list id

Step 3) Enter the Mailchimp List Name in the Addon Settings

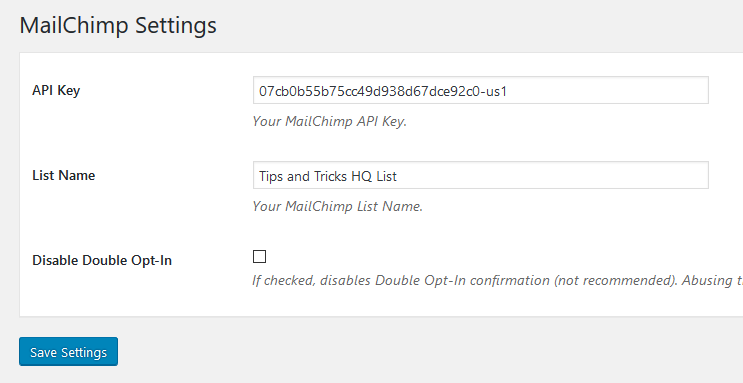
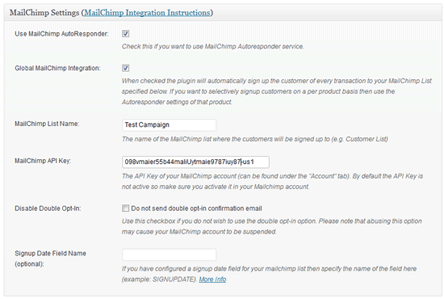
Now open MailChimp Addon Settings from the admin dashboard of your WordPress site, and paste the List Name you just copied into the List Name field.

simple-cart-mailchimp-addon-settings

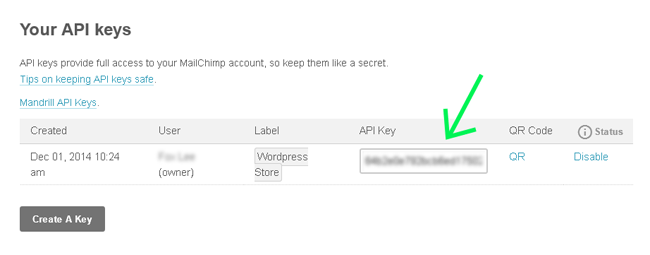
Step 4) Create and add your API Key

In your MailChimp account, open your account/user page and get the API Key. Copy the long string of numbers and letters from the API Key field to your clipboard.

screenshot showing how to find the mailchimp api keys

In MailChimp Addon Settings, paste the text you just copied into the API Key field.

Step 5) Additional settings

Finally, determine if you need to change any of the additional settings. The default options work fine out-of-the-box.

Now, when you get an order via the simple shopping cart plugin, that customer will get added to your MailChimp list.

Get the Simple Cart MailChimp Addon

The price of this addon is $29


eStore MadMimi Integration Addon

This addon plugin allow you to integrate WP eStore plugin with the MadMimi Email Marketing solution. You can use it to add customers to your MadMimi email list when someone purchase your product(s).

Installing the MadMimi Integration Addon

You can install this addon the same way you install any WordPress plugin:

  • Go to the Add New plugins screen in your WordPress admin area
  • Click the upload tab
  • Browse for the plugin file (eStore-madmimi-integration-addon.zip)
  • Click Install Now and then activate the plugin

Using the MadMimi Integration AddOn

After you install this addon using the above instruction do the following:

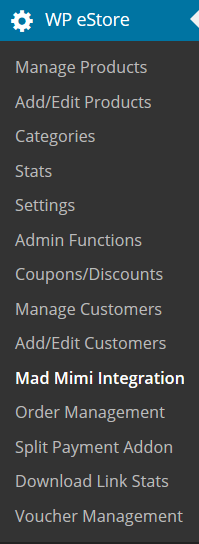
Step 1) Go to the MadMimi integration settings interface from your main eStore menu.

mad-mimi-integration-menu

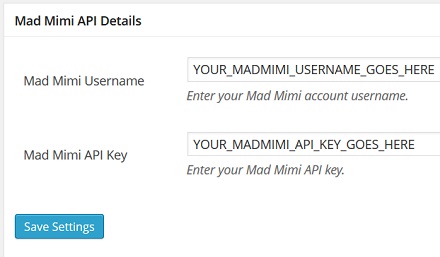
Step 2) Fill in the MadMimi Account Details

mad-mimi-integration-api-details

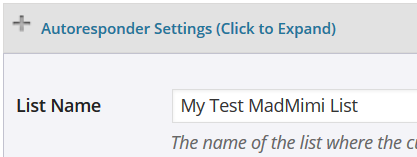
Step 3) Edit the eStore product (the one that you want to link to MadMimi list) and specify the list name in the List Name field.

mad-mimi-integration-list-name

Save the product and you are done!

Now every time  there is a new transaction or squeeze page form submission for this product, the customer will be automatically added to your MadMimi list.

AddOn Price

The MadMimi Integration Addon is FREE for all customers who purchased WP eStore plugin from us.

Download the Addon (v1.3)

You can download this addon from the addon download area of our customer only support forum.

WP eStore MailPoet Newsletter (formerly Wysija) Integration Addon

The eStore Mailpoet Newsletters integration addon allows you to add your eStore plugin customers to the Mailpoet/Wysija list after a purchase.

Installing the Mailpoet Newsletter Integration Addon

You can install this addon the same way you install any WordPress plugin:

  • Go to the “Add New” plugins screen in your WordPress admin area
  • Click the “upload” tab
  • Browse for the plugin file (estore-wysija-newsletter-addon.zip)
  • Click “Install Now” and then activate the plugin

Using the eStore Mailpoet Newsletters Addon

After you install this addon using the above instruction do the following:

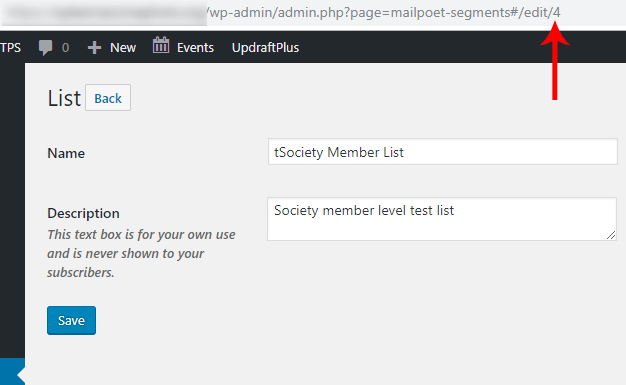
Step 1) Create a new list in the MailPoet Newsletters plugin (if you haven’t done so already). Now edit the list you just created and find the unique ID assigned to it.

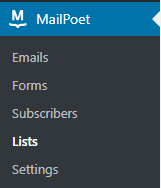
To edit a list you need to go to MailPoet -> Lists and select the “Edit” option under the list.

mailpoet-lists-menu-screenshot-1

Once you click the “Edit” option you will be able to find the list ID from your browser’s address bar.

mailpoet-list-id-from-the-list-edit-interface

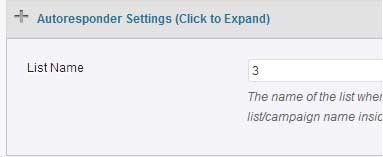
Step 2) Edit the eStore product which you would like to link to your MailPoet list and specify the list ID in the List Name field.

specify list id in product configuration

Save the product and you are done! Now every time  there is a new transaction/squeeze page form submission for this product, the customer will be automatically added to your MailPoet list (ID 3 in the above example).

AddOn Price

The MailPoet newsletter Addon is FREE for all customers who purchased WP eStore plugin from us.

Download the Addon

You can download this addon from the addon download area of our customer only support forum.

General Note

Please note that some of these free eStore addons are developed by our users in the community. So they do not have any advanced customization option. The description above explains exactly what this addon does.

WP eStore and MailChimp Integration

The WP eStore shopping cart plugin can be easily integrated with MailChimp (Email marketing and Email list manager).

The users are added to your MailChimp list when any of the following event happens:

  1. A customer purchases a product.
  2. A visitor submits a squeeze form for a product.

Video Tutorial on WP eStore MailChimp Integration

WP eStore MailChimp Integration

To integrate MailChimp with WP eStore simply go to the “Autoresponder Settings” tab from the eStore Settings menu and configure it.

Check the “Enable MailChimp Integration” checkbox then enter your MailChimp API details to set it up.

You can specify a list name on a per product basis too (useful when you want to signup your customers to a different list for different products).

MailChimp Integration Settings Menu

Using MailChimp Interest Groups

You can add interest groups when a customer is added to your MailChimp list too.

Add the interest group data in the “List Name” field of a product like the following:

List Name | groupname1, groupname2

Lets say you have the following scenario:

List Name: my-list-1
Interest Group Names: groupname1, groupname2

Then you would enter the following in the list name field of the eStore product configuration:

my-list-1 | groupname1, groupname2
Next Page »

Your Shopping Cart

Shopping Cart Empty
Shopping Cart is Empty
Visit The Shop

Search

Featured Documents

Stylish Product Display Options for WP eStore WP eStore Quick Setup and Usage Video Tutorial WP eStore Shortcodes and Functions Reference WordPress eStore Plugin Features WordPress eStore Plugin Demo What Our Customers Have to Say About Our Products WordPress eStore WishList (Feature Suggestions) WordPress eStore Frequently Asked Questions (FAQ) How to Show Add to Cart buttons

Featured Plugins

WP Express Checkout Plugin
wordpress_estore_icon
wordpress membership plugin icon
wordpress_affiliate_plugin_icon

Copyright © 2025 | eCommerce Plugins