Tips and Tricks WP eCommerce

eCommerce Solution for WordPress Blog

  • Home
  • eCommerce Plugins
  • WP eStore Documentation
  • WP Shopping Cart Doc

PayPal’s Pay in 4 (Buy Now Pay Later) with Simple Shopping Cart Plugin

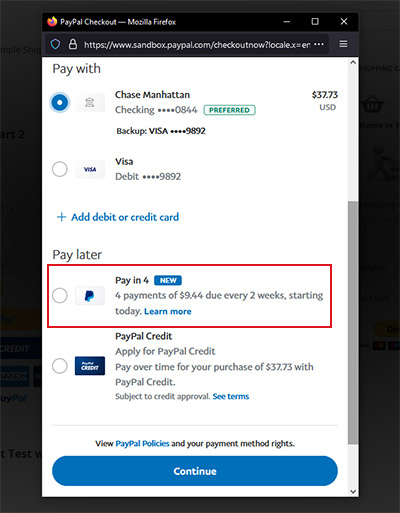
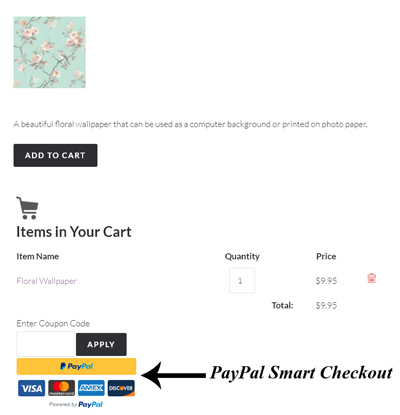
When you use any of the PayPal checkout options offered in the Simple Shopping Cart Plugin, your customers can checkout using PayPal’s Pay in 4 option. The Pay in 4 is PayPal’s Buy Now, Pay Later Interest-Free Installments Option. As the seller, you will receive the full amount for the product at the time of the purchase, the customer will pay it off to PayPal over time.

Set-Up Requirements for PayPal’s Pay in 4 Feature

PayPal stipulates a number of requirements for companies that wish to accept Pay-in-4 payments for goods and services they sell from their websites. Below are the set-up requirements for PayPal’s Pay in 4 option:

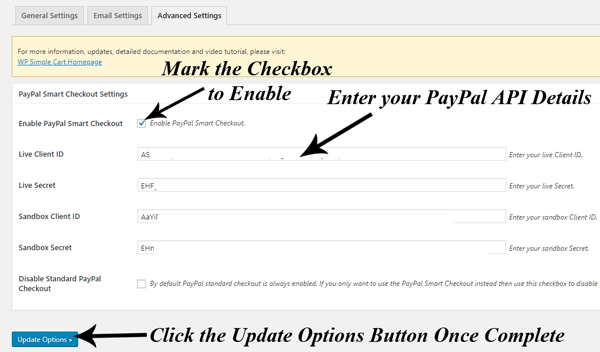
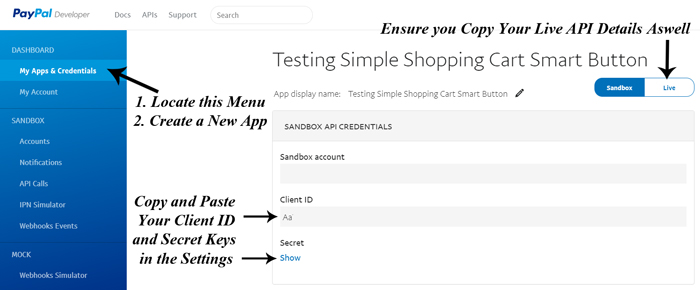
  1. Use any of the PayPal checkout options (PayPal Standard, PayPal Commerce Platform etc).
  2. The product you are selling needs to be between $30.00 and $1500.00 for the ‘Pay in 4’ option to appear on the checkout window.
  3. The customer must reside in an eligible country/state. United States is supported. The countries that PayPal offers the Pay in 4 feature is expanding, and in the future additional customers from around the world will be able to use this option to pay for goods and services. So check with PayPal if your country is supported at this moment.
  4. The customer will need to have a PayPal account.

You can read more about PayPal Pay in 4 eligibility on their website here.

If you have set up the Pay in 4 option in your PayPal account but the customer is not seeing the option during checkout, then this customer may not meet all the criteria to be able to use this payment option.

How Will the Customers Use the Pay in 4?

Once you have the Simple Shopping Cart Plugin activated and you have a product where the price is between $30.00 and $1500.00, those customers who reside in eligible countries should see the option to use ‘Pay in 4’. The option is shown within the checkout popup window. The customer can simply click to ‘Pay in 4’ payments, rather than having to pay the total amount upfront.

Enabling PayPal Smart Button Checkout – Setup and Configuration

Note: PayPal has deprecated the Smart Checkout feature. Switch to using the PayPal Commerce Platform (new API) which replaces the Smart Checkout option.


The PayPal Smart Checkout is an option you can enable in your WP Simple Cart Plugin. The Smart Checkout Button provides your customers with an alternative checkout method. The PayPal Smart Button Checkout contains a number of buttons that allow your customers to checkout using their PayPal Account, their credit card (Visa, Mastercard), Buy Now Pay Later or PayPal credit.

The checkout form is displayed to the customer in a popup window.

smart-paypal-checkout

Checkout Demo Video

The following video shows how a checkout works with PayPal smart button (from a customers point of view):

Configuring PayPal Smart Checkout Button

Step 1) Ensure you have the latest version of the WP Simple PayPal Shopping Cart Plugin installed and activated on your WordPress site.

Step 2) Click on the Settings menu under Simple Cart.

Step 3) Choose the Advanced Settings tab.

Step 4) You will now see a section titled PayPal Smart Checkout Settings.

Step 5) Mark the checkbox next to Enable PayPal Smart Checkout.

paypal-smart-button-configuration

Step 6) To set up this feature you will now need to Log in to your PayPal Developer Account to locate your API details. You will need a PayPal Business Account.

Step 7) Click on the My Apps & Credentials menu within your PayPal Developer Account.

Step 8) Scroll down to the Rest API Apps section.

Step 9) Click the Create App button.

Step 10) Give your app a name that relates to it’s intended use.

Step 11) Click the Create App button.

Step 12) You will now see your Sandbox Client ID and your Sandbox Secret Key (once you click the ‘show’ button).

Step 13) Click the Live button in the left hand corner to show your Live API Keys.

configuring-paypal-smart-button-wordpress

Step 14) Copy and paste both your Live and Test Client ID’s and your Live and Test Secret Keys from your PayPal account into the settings menu of your WP PayPal Shopping Cart. Ensure you paste them in the correct fields.

Step 15) If you would only like to offer Smart PayPal Checkout, mark the checkbox next to Disable Standard PayPal Checkout. Alternatively, you can choose to offer both at once by leaving this box unmarked.

Step 15) Click the Update Options button. You have now completed the setting configuration for PayPal Smart Checkout.

Step 16) Your Simple PayPal Shopping Cart Products will now be able to be purchased through this PayPal checkout method.

Purchasing a Product via PayPal Smart Checkout

A customer can add an item to your Simple PayPal Shopping Cart. Once the item appears in the cart, the customer can go ahead and checkout using PayPal Smart Checkout. They can click the button that applies to them.

For example, in the following example, the customer clicks the PayPal button because they wish to pay directly from their PayPal account.

Once a customer clicks on one of the PayPal Smart Checkout buttons, a popup appears where they can complete the checkout process by entering in the appropriate details.

paypal-smart-checkout-product
paypal-smart-checkout-popup

Customizing the Smart Checkout Buttons

Read our documentation on smart checkout buttons customization.

PayPal’s Pay In 4 (Buy Now Pay Later Option)

Read our PayPal’s buy now pay later documentation to learn more about it.

Simple Shopping Cart – Adding Values to PayPal Custom Field

The simple shopping cart plugin has a filter that you can use to add extra data to the PayPal custom field.

Note: The plugin already uses the PayPal custom field to pass some parameters to PayPal. So you should append your data to this custom field (to make sure you don’t erase the custom data added by this plugin)

Code Example

The following code example shows how you can append data to the custom field (add this code to your theme’s functions.php file or a custom plugin).

add_filter('wpspc_cart_custom_field_value', 'append_my_custom_data');
function append_my_custom_data($custom_value)
{
    //Append my data using query parameter
    $custom_value = $custom_value . '&my_data=XYZ';
    return $custom_value;
}

This will pass your data along with the cart’s custom data to the PayPal’s custom field.

How to Enable PayPal API Access and Get the API Details

The following steps (with screenshots) show you how you can enable API access in your PayPal account and get the API details to use in your shopping cart admin/configuration screen:

  • Log in to your PayPal Business account.
  • Make sure your PayPal account is verified (you need to verify your account before requesting API credentials).
  • Click on the My Account tab (if you are not there already)
  • Click on the Profile link.
  • Click on the My Selling Tools link

paypal-my-selling-tools-link

  • Click on the update button in the API Access row

paypal-api-access-link

  • Click Request API credentials link.

paypal-request-api-access-screen

  • Select the Request API signature radio box.
  • Click Agree and Submit.

api-request-agreement-screen

  • Copy and paste the API username, password, and signature into your shopping cart’s configuration or administration screen.

You can also check this page on PayPal for instruction on how to get your API details.

WP Payment Gateway Bundle – PayPal Payments Advanced Setup

The following video will give you a basic introduction of PayPal Payments Advanced and the requirements for the integration.

After you install the WP Payment Gateway Bundle plugin you will need to configure some PayPal Payments Advanced specific settings in the plugin and in your PayPal Manager Merchant account. This will allow you to accept payments using one of the hosted checkout templates.

You can find the PayPal Payments Advanced Checkout specific settings under the “Gateway Settings” tab when you go to the payment gateway bundle plugin’s settings menu. The following screenshot shows how you can access the settings page of this plugin:

Payment Gateway Bundle Plugin Settings

Payment Gateway Bundle Plugin Settings

In order to complete the PayPal Payments Advanced settings simply follow the steps outlined below:

Step 1: Check the “Use PayPal Payments Advanced Gateway” checkbox from the “PayPal Payments Advanced Settings” section of the plugin.

Step 2: Fill in the API details. There are four pieces of API information that you need to enter in the settings so the plugin can process the payment using PayPal Payments Advanced:

  • Partner
  • Vendor
  • User
  • Password

screenshot showing paypal payments advanced settings


These are basically the api credentials that you use to login to your PayPal Manager account.

screenshow showing how to login to paypal manager

If you don’t have an account yet you can create one by following the “I would like to create a new account” link.

Step 3: Once you have logged into your paypal manager account switch to the Service Settings tab.

screenshot showing paypal manager account

This is where you will be able to customise the settings and the layout for your hosted checkout page. First, click on the Set up option.

Step 4: The Set up tab contains most of your settings. The default options are fine. So I’m just going to walk you through some of the major options.

screenshot showing paypal manager setup error page

If you are going to run some testing before you go live make sure to set the Transaction Process Mode to “Test”. Otherwise it should be set to “Live”.

Enter a URL where the user will be redirected to upon cancellation or if an error occurs. You can just copy the value of Transaction Error Page (under Settings->Payment Gateway Bundle->General Settings) and paste it here for now.

Step 5: Move on to the Billing & Shipping info sections. You can just check the fields that you would like a user to fill out (or check everything so you can get all the information).

screenshot showing billing and shipping info of paypal manager

Step 6: Now is the important part which is the Payment Confirmation Section. This is where you need to specify how your website will receive the payment notification.

screenshot showing paypal manger payment confirmation section

Make sure that you have set the options to the following:

  • Show Confirmation page:  On my website
  • Enter Return URL: the return url specified in the eStore settings (WP eStore->Settings->General Settings->General Image and Page URL Settings->Return URL)
  • Return URL Method: Post

Step 7: In the Security Options section select Enable Secure Token: Yes.

screenshot showing paypal manager security token settings

Click on the Save Changes button to update your settings.

That’s pretty much it. There is still one thing that you need to do. Go back to the top of the page and select the Customize option.

screenshot showing paypal manager layout options

Select Layout A. Currently the gateway bundle addon is integrated with Layout A (since it gives a merchant the flexibility of customizing the checkout form with billing & shipping information). We plan to integrate the other two layout options in future.

Click on the Save and Publish button at the bottom of the page to update your settings.

Now your website is ready to accept payments using PayPal Payments Advanced.

Your Shopping Cart

Shopping Cart Empty
Shopping Cart is Empty
Visit The Shop

Search

Featured Documents

Stylish Product Display Options for WP eStore WP eStore Quick Setup and Usage Video Tutorial WP eStore Shortcodes and Functions Reference WordPress eStore Plugin Features WordPress eStore Plugin Demo What Our Customers Have to Say About Our Products WordPress eStore WishList (Feature Suggestions) WordPress eStore Frequently Asked Questions (FAQ) How to Show Add to Cart buttons

Featured Plugins

WP Express Checkout Plugin
wordpress_estore_icon
wordpress membership plugin icon
wordpress_affiliate_plugin_icon

Copyright © 2025 | eCommerce Plugins