Tips and Tricks WP eCommerce

eCommerce Solution for WordPress Blog

  • Home
  • eCommerce Plugins
  • WP eStore Documentation
  • WP Shopping Cart Doc

How to sell Both Digital and Non Digital Product with the WordPress eStore plugin

The WordPress eStore plugin is mainly used for selling digital products securely from your blog but you can still sell non-digital products using this same plugin. To sell non-digital content just leave the Download URL field empty when you add the product to the database. This way when the buyer receives the courtesy/confirmation email it won’t have any link there. Instead it will say there is no downloadable content for this product.

Shipping cost is only added to the cart if any item in the cart has a product with shipping cost specified in the “Shipping Cost” field of the product. So for example, if a customer adds a digital product together with a physical product to the cart only then the shipping cost of the Physical product and the base shipping cost (If this is specified in the settings menu) is applied to the cart.

Below is a screenshot of how the shopping cart looks like when someone adds both a digital and a physical product to the cart:
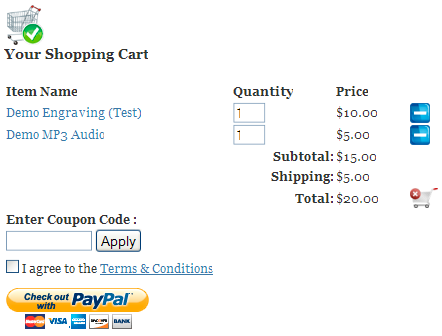
Shopping Cart Screenshot with both Physical and Digital products

Shopping Cart Screenshot with both Physical and Digital products

And this is a screenshot of what the customer will see in the email or the “Thank You” page after payment:
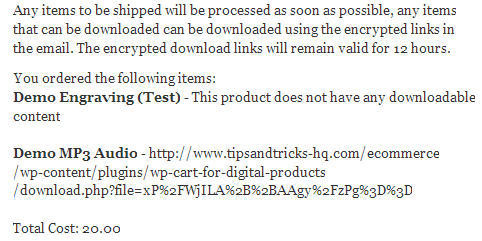
Screenshot of a Post Payment Message

Screenshot of a Post Payment Message

Please refer to the shipping cost calculation guide to understand how shipping cost is calculated for non-digital products.

How the Shipping Cost Calculation Works in WordPress eStore

WP eStore’s main strength is selling of digital product so we do not offer complex shipping options in the eStore plugin in an effort to keep the plugin easy to use and lightweight. Please feel free to read the available shipping options in eStore from this page so you can determine if it will meet your shipping needs.

1. Simple Shipping Option

If you just want to use flat shipping cost for each item then just enter “0” in the Base Shipping Cost option in the settings menu and add the individual shipping cost in the “Item Shipping Cost” field when you configure the product.

If you just want to use a fixed shipping cost for the cart no matter how many items are in the cart then you can achieve this by specifying this fixed amount in the base shipping cost. Remember, the base shipping cost is only added to the cart if a product in the cart has individual shipping value specified (this way if a customer buys digital product he doesn’t get charged any shipping). Use an individual shipping value of “0.001” for your physical items which won’t increase the shipping cost but will trigger the base shipping cost to be added as a fixed shipping rate.

2. Using PayPal’s Profile Based Shipping

You can have PayPal calculate shipping charges automatically. PayPal calculates shipping charges based on rates that you specify in your account profile. You can set up shipping rates as follows:

  • Domestic (U.S.-only) shipping rates for regions defined by state or zip code
  • International shipping rates for regions define by country or jurisdiction

You can specify shipping rate based on the weight of the items too. Within shipping regions, you can specify rates for different shipping methods, such as standard and express delivery.

We have a tutorial on how to setup paypal profile based shipping that you can look at if you have never configured profile based shipping before.

To use PayPal’s profile based shipping simply check the “Use PayPal Profile Based Shipping” checkbox in the settings menu of eStore and the shopping cart will use the shipping options you have specified in your PayPal account profile:

PayPal's profile based shipping

PayPal’s profile based shipping

If you use PayPal’s profile based shipping, your customers will be prompted to enter the shipping destination when they go to checkout via PayPal.

Choose destination for shipping calculation

Choose destination for shipping calculation

After the customer enter the destination it will automatically add the shipping amount based on what you have specified in your profile (eg. based on the weight of item and or delivery location).

Shipping is calculated based on the specified criteria in your profile

Shipping is calculated based on the specified criteria in your profile

ecommerce-shipping

3. How to Give Shipping Discount when Someone Buys Multiple Products

What if you want to use the simple shipping option but be a little more intelligent with the shipping cost calculation and want to use Base Shipping Cost in conjunction with the individual product shipping cost to offer your customers a better shipping price? You can do that too.

The base shipping cost is added to the total of the individual products shipping cost (The base shipping cost is only applied to the cart if any of the cart item has an individual shipping amount specified for it). So for example if you had two products that costs $50 each and you want to charge $10 shipping for each item then someone buying both the products would have to pay $100(product cost) + $20(shipping cost) = $120(total). That is not a very realistic shipping price since you are shipping both the products to the same address in one package so it will probably cost you $15 instead of $20.

How do you handle this situation?
You use a base shipping cost of $5 and individual product shipping cost of $5.

Now when someone buys both the products the shipping cost will be calculated as following:
$5(shipping for product1) + $5(shipping for product2) = $10(total individual products shipping cost)
Total shipping cost = $10(total individual products shipping cost) + $5(base shipping cost) = $15!

When someone buys one product the shipping cost will be calculated as following:
$5(shipping for product1) = $5(total individual products shipping cost)
Total shipping cost = $5(total individual products shipping cost) + $5(base shipping cost) = $10! (this is the shipping you wanted to charge for one product)

So, hopefully you can see that using the base shipping cost in conjunction with the individual product shipping cost you can be very dynamic in determining the total shipping cost for a purchase.

4. Using A Shipping Variation Option

You can use the shipping variation option field to add more shipping options for your need. For example, you can add a variation called Shipping with the values “Domestic” and “International” that adds different amount to the cart based on the user selection.

Please refer to the WP eStore Shipping Variation documentation to learn how to use variations.

5. Using Bulk Quantity Shipping Discount

Check the bulk quantity shipping discount addon for details.

6. Using Amount Based Shipping

The Amount Based Shipping addon allows you to automatically apply a shipping amount to the cart based on a price range.

How to Test the WordPress eStore to Make Sure Everything is Working Properly

The simplest way to test if the WordPress eStore plugin is working is to create a test product with the price of 1 cent ($0.01) and purchase that product yourself as a buyer.

It is a good idea to turn on debug (check the “Enable Debug” checkbox) from the settings menu and you will be able to see every step of the transaction process (IPN validation, product verification etc) in the ipn_handle_debug.log file.

wp-estore-testing

How to Test Using PayPal Sandbox

You can also use the plugin in SandBox mode (PayPal Sandbox) which will allow you to test it without having to perform a live transaction. To test it using PayPal Sandbox do the following:

  • Go to the settings menu of the WP eStore plugin.
  • Enter your sandbox seller’s email in the ‘Paypal Email Address’ field.
  • Tick the ‘Enable Sandbox Testing’ checkbox.

Please turn on debug from the settings menu and you will be able to see every step of the transaction processs (IPN validation, product verification etc) in the ipn_handle_debug.log file.

If you need a more detailed guide on using PayPal Sandbox then check the following post:

  • PayPal Sandbox and eStore Setup

What to do When Something is not Functioning as Expected

If something is not functioning as expected after the payment is made on PayPal (e.g. emails are not getting sent out) it is a good idea to enable debug and perform a test transaction so you can analyze the log file to identify the issue. The following URL will help:

  • How and when to enable debug and what does it do

Tips

  • Check this plugin testing checklist – setup preparation for testing
  • Remember to revert the changes to run the Plugin in Live mode again after you are done with the testing (change the paypal email address and uncheck the ‘Enable Sandbox Testing’ option).
  • The debug can be used in live or testing mode and can be very handy when you are trying to figure out an issue.
  • I always recommend testing the system in live mode, this way you have the plugin running in live mode and can see if it has any issues that the customers are likely to see.

WordPress eStore Installation and Update Guide

Installing and Upgrading WordPress eStore plugin is very easy. The installation of this plugin is similar to all the other WordPress plugins.

Fresh Installation of WP eStore

First deactivate the WP Simple Paypal Shopping cart plugin if you are using it. WP eStore plugin has all the functionality of the WP Simple Paypal Shopping cart.

  • Click on the “Add New” link from the “Plugins” menu inside your WordPress admin dashboard.
  • Click the “Upload Plugin” button from the top of this page.
  • Browse for the plugin’s zip file (wp-cart-for-digital-products.zip) and hit the “Install Now” button.
  • Activate the plugin through the Plugins menu in WordPress.

Installation Video

Upgrade WP eStore Plugin

Before you ask

Yes, the plugin will retain all the previous information that you saved. No data (your product details, settings values etc.) will get lost during the upgrade.

Important Note 1: If you have a live site with high traffic where customers are constantly making purchases then you should consider installing the new version of the plugin on a test WordPress site first to minimize any chance of upgrade related issue taking you out by surprise. Most people prefer to have a copy of WordPress installed in one of the sub-directories for testing purpose (you can install it in a sub-domain too). This way if you face an issue due to upgrading, you can report it to us and while we work on it, your main site won’t be affected.

Important Note 2: Some users have this bad habit of keeping multiple copies of the same plugin in the plugins directory. This is the source of many problems. Please note that you should only have one version of any WordPress plugin in the plugins directory at any given time. If you want to keep backups then you can keep it in your uploads directory or on your computer’s hard drive.

With that said, please follow the instructions below when upgrading the WordPress eStore plugin from an older version to a newer version:

Upgrade Steps

Do the following steps to upgrade the plugin:

  • Deactivate the current version of the WP eStore plugin from the Plugins menu.
  • Delete the current version of the WP eStore plugin from the Plugins menu.
  • Now, follow the fresh installation steps outlined above to install the plugin.

Don’t be scared to delete the plugin. It will retain all the previously entered settings and product information (no data will get lost during the upgrade).

Basic Usage Guide

Step 1. First add the product(s) to the database through the Add/Edit Products interface. Products can be modified through the Manage Products interface.

Step 2. To add the Add to Cart button simply add the following trigger text to a post or page next to the product.

[wp_eStore_add_to_cart id=PRODUCT-ID]

Replace PRODUCT-ID with the actual product id of the product (example, 1). Product IDs are unique numbers that are automatically created for you when you add a product to the database. All of your products IDs can be found in the Manage Products section.

Step 3. To add the shopping cart to a post, checkout page and/or sidebar simply add the following trigger text to a post or page in HTML view or use the sidebar widget. The shopping cart will only be visible when a customer adds a product in the post or page.

[wp_eStore_cart]

Additional Usage Guidance

  • Quick Setup Video Tutorials
  • How to Show “Add to Cart” buttons
  • How to Use “Buy Now” type buttons
  • How to Use “Subscription” type buttons
  • How to Use PayPal Donation type buttons

Please leave a comment below if you have any questions.

« Previous Page

Your Shopping Cart

Shopping Cart Empty
Shopping Cart is Empty
Visit The Shop

Search

Featured Documents

Stylish Product Display Options for WP eStore WP eStore Quick Setup and Usage Video Tutorial WP eStore Shortcodes and Functions Reference WordPress eStore Plugin Features WordPress eStore Plugin Demo What Our Customers Have to Say About Our Products WordPress eStore WishList (Feature Suggestions) WordPress eStore Frequently Asked Questions (FAQ) How to Show Add to Cart buttons

Featured Plugins

WP Express Checkout Plugin
wordpress_estore_icon
wordpress membership plugin icon
wordpress_affiliate_plugin_icon

Copyright © 2025 | eCommerce Plugins