Tips and Tricks WP eCommerce

eCommerce Solution for WordPress Blog

  • Home
  • eCommerce Plugins
  • WP eStore Documentation
  • WP Shopping Cart Doc

Enabling PayPal Smart Button Checkout – Setup and Configuration

Note: PayPal has deprecated the Smart Checkout feature. Switch to using the PayPal Commerce Platform (new API) which replaces the Smart Checkout option.


The PayPal Smart Checkout is an option you can enable in your WP Simple Cart Plugin. The Smart Checkout Button provides your customers with an alternative checkout method. The PayPal Smart Button Checkout contains a number of buttons that allow your customers to checkout using their PayPal Account, their credit card (Visa, Mastercard), Buy Now Pay Later or PayPal credit.

The checkout form is displayed to the customer in a popup window.

smart-paypal-checkout

Checkout Demo Video

The following video shows how a checkout works with PayPal smart button (from a customers point of view):

Configuring PayPal Smart Checkout Button

Step 1) Ensure you have the latest version of the WP Simple PayPal Shopping Cart Plugin installed and activated on your WordPress site.

Step 2) Click on the Settings menu under Simple Cart.

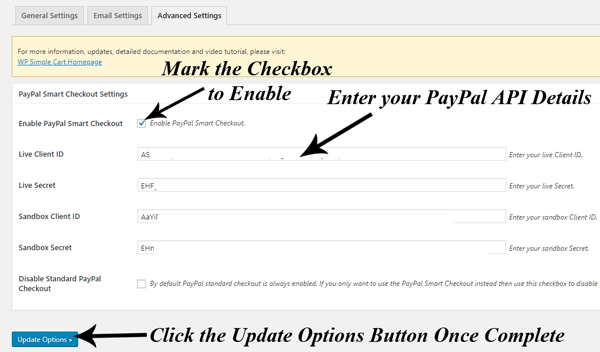
Step 3) Choose the Advanced Settings tab.

Step 4) You will now see a section titled PayPal Smart Checkout Settings.

Step 5) Mark the checkbox next to Enable PayPal Smart Checkout.
paypal-smart-button-configuration

Step 6) To set up this feature you will now need to Log in to your PayPal Developer Account to locate your API details. You will need a PayPal Business Account.

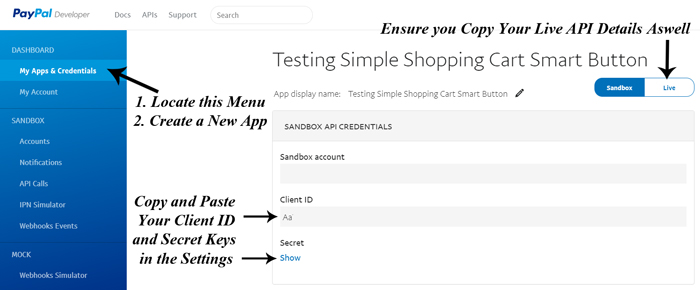
Step 7) Click on the My Apps & Credentials menu within your PayPal Developer Account.

Step 8) Scroll down to the Rest API Apps section.

Step 9) Click the Create App button.

Step 10) Give your app a name that relates to it’s intended use.

Step 11) Click the Create App button.

Step 12) You will now see your Sandbox Client ID and your Sandbox Secret Key (once you click the ‘show’ button).

Step 13) Click the Live button in the left hand corner to show your Live API Keys.
configuring-paypal-smart-button-wordpress

Step 14) Copy and paste both your Live and Test Client ID’s and your Live and Test Secret Keys from your PayPal account into the settings menu of your WP PayPal Shopping Cart. Ensure you paste them in the correct fields.

Step 15) If you would only like to offer Smart PayPal Checkout, mark the checkbox next to Disable Standard PayPal Checkout. Alternatively, you can choose to offer both at once by leaving this box unmarked.

Step 15) Click the Update Options button. You have now completed the setting configuration for PayPal Smart Checkout.

Step 16) Your Simple PayPal Shopping Cart Products will now be able to be purchased through this PayPal checkout method.

Purchasing a Product via PayPal Smart Checkout

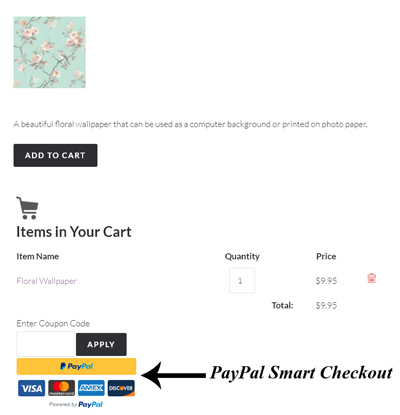
A customer can add an item to your Simple PayPal Shopping Cart. Once the item appears in the cart, the customer can go ahead and checkout using PayPal Smart Checkout. They can click the button that applies to them.

For example, in the following example, the customer clicks the PayPal button because they wish to pay directly from their PayPal account.

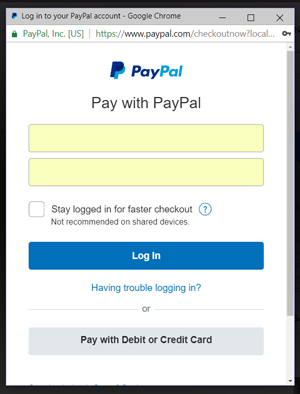
Once a customer clicks on one of the PayPal Smart Checkout buttons, a popup appears where they can complete the checkout process by entering in the appropriate details.
paypal-smart-checkout-product
paypal-smart-checkout-popup

Customizing the Smart Checkout Buttons

Read our documentation on smart checkout buttons customization.

PayPal’s Pay In 4 (Buy Now Pay Later Option)

Read our PayPal’s buy now pay later documentation to learn more about it.
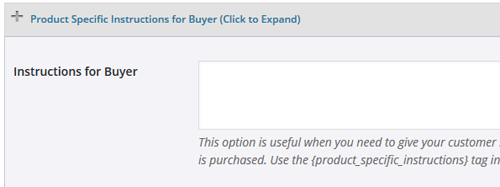
Using Product Specific Instructions in WP eStore

You can use the “Product Specific Instructions” feature of WP eStore to send special instructions (specific to a product) to your customers.

Your customers will only get this info when they purchase this product in question.

This is great for the following:

  • Send some special usage instructions specific to that product.
  • Explain some steps that they need to do before they can use the item.
  • Send them access to a URL that is password protected (you can share the URL and the password using this option).
  • Share the password to open the file (if there is one).
  • … and so on …

Step 1) Edit the product in question and enter the info in the “Product Specific Instructions” field

product-specific-instructions-configuration

Step 2) Edit the buyer email body (from the Email Settings menu of WP eStore).

Enter the following email shortcode in there (where you want the product specific instructions to show):

{product_specific_instructions}

WP eStore – Save and Retrieve Cart Feature

You can enable the save and retrieve cart feature from the eStore settings menu by checking the “Enable Save and Retrieve Cart Feature” option.

When this feature is enabled, your customers will be able to add items to the shopping cart then save it. This will allow them to retrieve a previously saved cart and complete the checkout.

Add the following shortcode on a post, page or sidebar which will show a save and retrieve shopping cart section to allow your customers to save the current shopping cart or retrieve a previously saved cart.

[wp_eStore_save_retrieve_cart]

This is how it works in general:

  1. A customer visits your site
  2. Adds item(s) to the shopping cart
  3. Hits the save cart button which gives a unique “ID” to the customer
  4. This “ID” can be used later to retrieve an already saved cart and complete the checkout


WP eStore – Instant Digital Product Delivery on A Thank You Page

In addition to the product delivery via email (which is the default delivery method), you can also choose to deliver the digital products on a post-payment return page (example, a Thank You page). This allows the customer to be able to download the Digital goods via an encrypted link instantly after the transaction.

Emails are delivered instantly too but sometimes it can take a few minutes (if PayPal’s server is busy they can take a few minutes to send the payment notification that is used for emailing the customer).

Examples

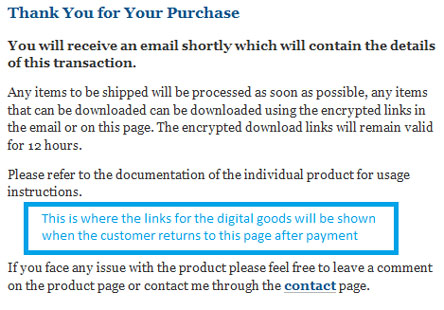
The following is a screenshot of my “Thank You” page that is using the “Instant Digital Product Delivery on the Thank You page” feature:

Thank You Page Screenshot Before Payment

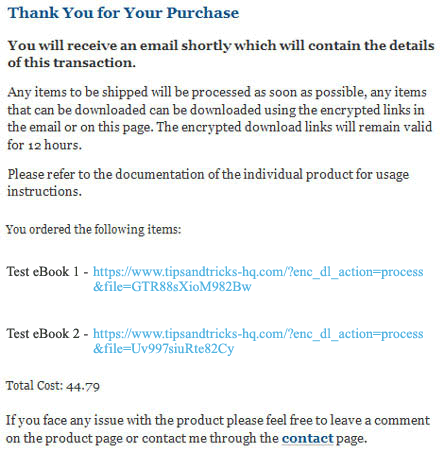
The following is a screenshot of the same page when someone makes a purchase and returns to this page after payment:

Thank You Page Screenshot After Payment

Product with Multiple File Downloads

If you have a product that has multiple downloadable files (example: a large file broken into multiple parts) then it will appear as separate file downloads (each file will be a separate download).

How to Use the Instant Digital Delivery Feature

Just to make it clear… this is an additional product delivery option that you can use. The plugin will automatically send an email to the buyer after a purchase with the download links by default even if you are not using this method/feature.

This function uses PayPal’s PDT (Payment Data Transfer) feature. Watch the video tutorial (recommended) or follow the steps outlined below to take advantage of this feature:

Video Tutorial

Step By Step Setup Instructions

Step 1) Make a post-payment return page (example, a Thank You or Transaction Result page). Use the URL of this page in the “Return URL” field of the settings menu of eStore. This is the page where your customers are going to land when they return from PayPal after the payment. Make sure you do not make this page a private page (private pages can only be accessed by someone who is logged into WordPress). It doesn’t matter if someone goes to this page without making the payment (the links only appear after they make the payment).

Step 2) Add whatever message you want to add to this “Thank You” page and then put the following shortcode where you want to display the transaction result (product download links):

[wp_eStore_display_transaction_result]

Step 3) Enable PDT feature in your PayPal profile. If you don’t know how to enable PDT and get the PDT Identity Token then this document should help (check the “Activating PDT” section on that page).

Step 4) Make sure you have enabled “Auto Return” option too . You can enable the “Auto Return” option from the same PayPal profile page where you enable PDT.

Step 5) Specify the PDT Identity Token that you received from PayPal in the “PDT Identity Token” field of the PayPal Payment Gateway Settings menu of WP eStore.

Step 6) Finally, enable the “Thank You” page display feature in eStore by checking the “Enable Transaction Result Display” in the settings (Post Payment Process Settings) menu of WP eStore.

The transaction result will display the message that the customers are also going to get in the email. It will have a list of products they ordered with a unique encrypted download link for each digital product so it can be downloaded instantly.

WP eStore Shortcodes and Functions Reference

This page has all the available Shortcodes and PHP functions that you can use to create various buy buttons, download buttons, shopping carts, product details etc. in various ways. Read through the list of shortcodes so you know all the product selling power you have when using this plugin.

If you are using the block editor, you can copy and paste any shortcode into a standard text or shortcode block.

WP eStore Standard Shortcodes List

The following PDF file has a list of all the standard shortcodes available in the WP eStore core plugin.

  • WP eStore Shortcodes & PHP Functions List
See the following section (Extra Shortcodes) for additional eStore shortcodes.

Extra Shortcodes Addon

Some people just like to go nuts with WordPress shortcodes and there is nothing wrong with that :). So if you are not satisfied with the default set of shortcodes that come with the WP eStore plugin then download and install the “Extra WP eStore Shortcodes” addon plugin and you will have access to many more cool shortcodes.

First, check the list of shortcodes and other functions that will be available to you when you use the extra shortcodes addon plugin from the PDF file below:

  • Extra WP eStore Shortcodes List

If you see a shortcode that you want to use then download the extra shortcodes addon from the addon download area of our customer only support forum

  • Addon download area (Extra Shortcodes Addon Version: v5.2.5)

Feel free to make a suggestions for shortcodes that you need and we will try to add it in.

Available Email Merge Tags

The following tags can be used in the “Email Body” of the email that is sent out after a purchase (the tags will be replaced with the value dynamically):

  • {first_name} – First name of the buyer
  • {last_name} – Last name of the buyer
  • {payer_email}- Buyer email address
  • {product_details} – Lists the item name (with variation), quantity, currency and price of every purchased item.
  • {product_details_tax_inclusive} – Lists the item name (with variation), quantity, currency and price of every purchased item (tax inclusive).
  • {product_name} – Name of the purchased products (comma separated)
  • {product_link} – List of purchased products and corresponding encrypted download links for the products.
  • {product_link_digital_items_only} – List of purchased digital items with encrypted download links (The item is only listed if the product has a downloadable file)
  • {product_price} – Price of the purchased products (comma separated)
  • {product_id} – Product IDs of the purchased products (comma separated)
  • {download_life} – Duration the download links are valid for.
  • {shipping_info} – Buyer’s shipping address
  • {shipping_option_selected} – The selected shipping variation for the transaction
  • {store_pickup} – If store pickup option is used, then it shows “yes” or “no”
  • {product_specific_instructions} – Add the product specific instructions (e.g password for a PDF file) specified in the product to the email body.
  • {purchase_date} – The date of the purchase.
  • {transaction_id} – The unique transaction ID of the purchase.
  • {purchase_amt} – The amount paid for the current transaction.
  • {total_tax} – Total tax amount for this transaction.
  • {total_shipping} – Total shipping amount for this transaction.
  • {total_minus_total_tax} – The total amount minus the total tax.
  • {total_minus_tax_and_shipping} – The total amount minus the tax and shipping.
  • {coupon_code} – The coupon code that was used in the transaction.
  • {discount_amount} – Shows the discount amount.
  • {counter} – A numeric counter. Each time you make a sale this counter goes up by 1.
  • {ip_address} – Shows the customer’s IP address.

How to Use Coupons/Discounts in WP eStore

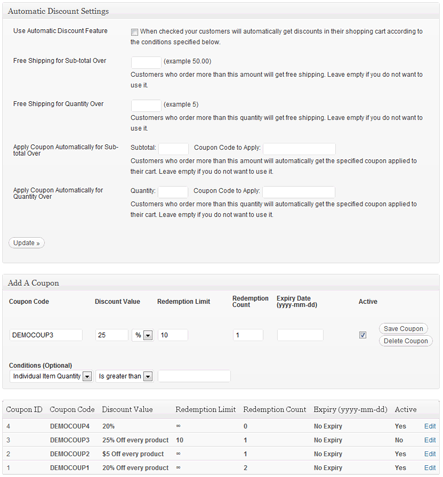
Configuring the WP eStore to use Coupons is very easy. Simply go to the Coupons/Discounts menu, enable the usage of coupons and add a few coupons to the system so your customers can use it.

Screenshot of Coupons/Discounts Menu

You can create conditional coupons that are only applied to the shopping cart if it meets certain conditions. For example, you can create conditional coupons like the following:

  • Apply 20% discount if the total amount is greater than $50.00
  • Apply 25% discount if the total number of items in the cart is greater than 5
  • Apply a discount only on a certain product
  • Give free shipping if the total amount is greater than $100.00

Coupon Usage Demo

I have already configured two coupons “DEMOCOUP1” and “DEMOCOUP2” for demonstration. Add the following demo product to the shopping cart and apply one of these coupons to see how it works.

Demo T-Shirt 3
Demo T-Shirt 3
Variation control demo with different prices
Price: $20.00
Color :

Discounts only get applied to the product price (shipping price doesn’t get discounted). Also, coupons don’t stack up, only one coupon can be applied to the cart at a time (this is to make sure the customers can’t apply multiple coupons to exploit the system).

Applying Discount Via URL

Read this documentation to learn about the discount via URL feature.

How to Use Variation Control in WordPress eStore Plugin

This post explains how you can configure your product to use variation control when using the WP eStore plugin.

variation_control_sc

The “Variation1” and “Variation2” fields can be used To configure a product with Variation. Say for example, you want to sell a T-Shirt which comes in various sizes (small, medium, large, XL). Enter the following in the “Variation1” field of this product when you add it to the database:

Size|Small|Medium|Large|XL

Once you add variation control to the product it will look similar to the following:

Demo T-Shirt
Demo T-Shirt
Price: $20.00
Size :

Feel free to hit the add to cart buttons to see how they appear on the shopping cart when variation control is used.

Now, what if you wanted to add another variation to that product? You can do that too. Say for example, you want to add a color variation to the T-Shirt. Enter the following in the “Variation2” field:

Color|Green|Red|Black

Once you add the second variation to the product it will stack up and look similar to the following:

Demo T-Shirt 2
Demo T-Shirt 2
Price: $25.00
Size :
Color :

Variation Control With Different Prices

What if you want to have different prices for different variations? You can do that too by adding the price increment next to the variation name. Say for example, the shirt comes in Green color which costs $20.00 and you want to charge $5 extra if someone wants to get the Red one and $7.50 extra for the Black one. Add the following to your “Variation” field to achieve this:

Color|Green|Red:5|Black:7.50

Now customers will be charged depending on the variation they choose.

Demo T-Shirt 3
Demo T-Shirt 3
Variation control demo with different prices
Price: $20.00
Color :

You can use both the variation fields to use different prices or any other combinations.

Demo Photo
Demo Photo
A product with variation control. Variation control allows the customer to choose the variation that they want to purchase.
Price: $50.00
Size :
Resolution :

Variation Control for Digital products

The above variation control mechanism can be used for any type of product (digital or non-digital) but if you have a product that requires the digital delivery of different files depending on the customer selection, then you can use the “Digital Product Variation” field to achieve this.

Say for example, you are selling a WordPress theme that comes in 3 different options (Single, Business and Professional) and you have 3 different downloadable files to offer based on user selection. Lets say we have the following details in this situation:

Name of the variation group: License
Variation Names: Single, Business and Professional
Downloadable Files: example.com/single-license.zip (Single Option), example.com/business-license.zip (Business Option), example.com/pro-license.zip (Professional Option)

Enter the content of the following example in the “Digital Product Variation” field (you will need to adjust the name and file URLs for your items):

License|Single::http://yourdomain.com/downloads/somefile.zip|Business::http://yourdomain.com/downloads/somefile2.zip|Professional::http://yourdomain.com/downloads/somefile3.zip

Now customers will receive the corresponding file for the option they select during the purchase (example: the customer who buys the Single License option of this product will receive the “single-license.zip” file).

If you want to charge different amount for different option then you can use the following example:

License|Single::http://yourdomain.com/downloads/somefile.zip|Business::10::http://yourdomain.com/downloads/somefile2.zip|Professional::15::http://yourdomain.com/downloads/somefile3.zip

The product display will look similar to the following:

Digital Product With Variation
This product demonstrates how you can configure a digital product with variation control that delivers different file based on the user's selection
Price: $50.00
License :

If the base price of this product (with single license) is $50, then a customer will be charged $60 for the business option and $65 for the professional option.

Collecting Customer Input

Sometimes you may need to collect input from your customer for a particular product (eg. to engrave something). Simply check the “Collect Customer Input” option for that product and it will allow the customer to enter some text similar to the following (you can also customize the label of the instruction field):

Demo Engraving
Demo Engraving
A product that requires instructions from customer. The customer can add text in the "Instruction" text box below
Price: $10.00
Instructions:

Variation Configuration UI

If you are creating lots of variations then it maybe useful for you to use eStore’s variation UI addon. You can also do inventory control per variation when you use the advanced variation control UI addon.

Inventory Control

If you want to do inventory control for your variations, you can use the eStore’s variation UI addon which has an option for inventory control.

Limitations:

I understand that some of you would like to show the total amount beside the variation text and not the incremental amount but that’s not how variation control usually works. It may work if you have one variation but what do you do when you have multiple variations that needs to stack? Adding the amount is the only way to handle this.

This is exactly why sites like www.apple.com, www.dell.com etc uses incremental variations rather than the total fixed amount next to the variation text (this is a standard practice).

Also, with WP eStore you can have a maximum of four variations (including the digital variation) per product.

WordPress Shopping Cart – Additional Resources

WP Shopping Cart CSS

The following CSS classes have been included in the plugin. You will just have to update the CSS in the style sheet file (wp_shopping_cart_style.css) of the wordpress paypal shopping cart plugin if you want to customize the look and feel of the shopping cart.

  • shopping_cart
  • wp_cart_button.
  • wp_cart_checkout_button

Where is the Settings Menu for the Shopping Cart?

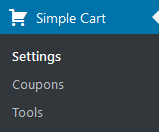
The settings menu for the Shopping cart is located under the Simple Cart Admin menu. Please see the following screenshot:

simple-shopping-cart-settings-menu-sc-1

How to Make the Shopping Cart Show the “Empty Cart” Message on a Post or Page

Use the following cart shortcode which will show the cart even if there are no items in it. When the cart is empty, it will show an empty cart message.

[always_show_wp_shopping_cart]

How to Resize the Add to Cart Buttons

Add the following to the CSS file of this pluign (wp_shopping_cart_style.css)

.wp_cart_button{
height: 20px;
width: 76px;
}

You will have to adjust the size to your needs.

How to Show the Add To Cart Buttons in the Sidebar (Method 1)

We have recently added new shortcodes that uses the WordPress shortcodes API. You can use these shortcodes to place a purchase button for a product on the sidebar widget of your WordPress site:

Here is how to do it:

Step 1) Go to the widgets menu of your WP Admin

Step 2) Add a standard text widget to the sidebar of your site

Step 3) Use one of the shortcodes to create a purchase button for your product that you want to sell:

[wp_cart_button name=”Test Product One” price=”29.95″]

[wp_cart_button name=”Test Product Two” price=”19.95″ shipping=”4.99″]

How to Show the Add To Cart Buttons in the Sidebar (Method 2)

Step 1) Download and activate the Executable PHP code plugin if you don’t have it already (any other PHP executable plugin will work too):

This plugin lets you call php functions from the widgets (it’s similar to the Text widget but it allows you execute PHP code too).

Step 2) Go to the widgets menu and add a ‘PHP Code’ widget to the sidebar (where you want to display the ‘Add to Cart’ buttons or shopping cart). Now you can enter HTML and PHP code here to display whatever you want to show. For example, entering the following line will display an add to cart button:

<?php
$product_name = "Product Name";
$product_price = "10.00";
echo print_wp_cart_button_for_product($product_name, $product_price);
?>

How to Collect Special Instructions from the Customer

If you need to collect special instructions from the customer for some customized work on the item you are selling then you can use the Collect Customer  Input Addon.

Setting up PayPal IPN Notification Feature

Read the PayPal IPN setup documentation.

Get the Total Number of Items in the Shopping Cart

If you are creating a mod/tweak for the simple shopping cart and you want to know the total number of items in the cart then check this post.

Return to the WP Shopping Cart plugin page.

WordPress eStore Miscellaneous Tweaks

1. How to Show the Shopping Cart Widget Only When There are Items in the Cart

Add a standard WordPress text widget to the sidebar widget. Then use the following shortcode in that text widget:

[wp_eStore_cart_when_not_empty]

2. How to Change the Look and Feel of the Shopping Cart?

If you want to customize/change the way your shopping cart looks (for example you want to change the size of the ‘Your Shopping Cart’ title) then just introduce the following ‘div’ in your wordpress theme’s Stylesheet (style.css) file. Alternatively, you can just modify the ‘wp_eStore_style.css’ file that came with the plugin.

.shopping_cart{
font-size:12px;
color:#228CD2;
}
.shopping_cart h2{
font-size:14px;
}

Of course you will have to change the font size and color etc to your needs and maybe add more style to it. This is just a guideline.

3. How to Use a Custom Image as the button

Simply put the URL of the image that you want to use as the button (for customized button image) in the “Button Image URL” field of that product under the “Additional Product Details” section. There are some button images included in the “images” directory of the plugin that you can use freely.

4. How to Use the ‘Buy Now’ or ‘Subscribe’ button on a Standalone HTML page

If you want to use the ‘Buy Now’ or ‘Subscribe’ button on a standalone HTML page (eg. landing page) on a domain where you have the WP eStore plugin installed then you can use the following option to achieve this:

  • How to Use a Text Link to Accommodate the Purchase of a Product

Alternatively, you can use the following method:

  • Configure a product with ‘Subscription’ or ‘Buy Now’ button using the WP eStore.
  • Put this product on a WordPress post or page then preview the page or publish it so you can view the page from the front end.
  • Now, select view source in the browser so you can view the HTML code of this page. Find the HTML code generated for the button.
  • Then copy and paste the HTML code for this button in the standalone HTML page.

The plugin will handle the post payment processing when someone makes a purchase using this button.

5. How to make the “instruction” input box bigger

Search for the following line in the “eStore_button_display_helper.php” file:

<input type="text" name="custom_input" value="" class="eStore_text_input" />

Once you find it replace it with the following (there will be 2 occurrences so change them both):

<textarea name="custom_input" cols="20" rows="3" /></textarea>

Please note that you shouldn’t use the Instruction input box to collect long instructions as that field has a limit of 256 characters. If you need to collect long instructions from the customer during checkout then you should use PayPal’s special instruction input section explained here.

6. How to Customize the Checkout Page on PayPal

  • Customize the Checkout Page on PayPal with Customer Header image and border

7. How to Hide a Page (eg. Thank You page) from the WordPress Menu

The pages in the menu are displayed using the following code in your template file (it may have some additional parameters):

<?php wp_list_pages(); ?>

You just have to change that to use the following:

<? php wp_list_pages('exclude=5,8'); ?>

This way WordPress will exlcude pages with the id 5 and 8 from displaying on the navigation. You will have to replace these number with the page id of the pages that you want to hide from displaying.

If you don’t want to do it manually then you can use a plugin eg. the Page Exclude Plugin that helps you exclude pages from displaying.

8. How to Display Button(s) on the Sidebar

In order to add button(s) to the sidebar you will need to use one of the PHP function calls. Please refer to the WP eStore Shortcodes for a list of available functions.

Now if you are calling the function from the theme’s template file (sidebar.php, header.php, footer.php etc) then you are fine but there is another way to do this using the widgets which could be more practical in some cases.

1. Download and activate the Executable PHP code plugin if you don’t have it already. This plugin lets you call php functions from the widgets (it’s similar to the Text widget but it lets you execute PHP code too).

2. Go to the widgets menu and add a ‘PHP Code’ widget to the sidebar (where you want to display the ‘Add to Cart’ buttons). Now you can enter PHP code here to display the buttons.

<?php echo print_eStore_buy_now_button(1); ?>

This will display a ‘Buy Now’ type button for the product with product id 1.

9. How to Display the Shopping Cart Using a PHP Function Call

If you ever want to show the shopping cart by calling a php function for whatever reason then the following bit of code should do the trick:

<?php echo eStore_cart_when_not_empty(); ?>

10. How to Display a Simple List of all the Products with ‘Add to Cart’ Buttons

WP eStore allows the listing of all the products configured in the database with a simple trigger text or by calling a function. To show the listing of all the products in a post or page use the following trigger text in HTML view.

show_products_table_tag

You can also call the following function from any template file of your theme to display the products list.

show_products_table_function

Credit: This feature was suggested and implement by Cornel Ivanescu

11. How to Display the MP3 Tracks as Preview

Step1: Download the WordPress audio player plugin

Step2: Create your preview/demo mp3 file (eg. first 10 seconds of your real mp3 music).

Step3: Embed this demo mp3 using the Audio player

Step4: Configure a product using the eStore’s Add/Edit Products menu (specify the URL of the real mp3 file as the downloadable file)

Step5: Put the “Add to Cart” or “Buy Now” button next to the embedded demo that you created in step 3 so customers can purchase it.

When anyone makes a purchase using that “Add to Cart” button they will get the full version mp3 as the download.

12. How to Create Buttons to Accept Payment in Multiple Currencies

You can create “Buy Now” type buttons in any currency you like. For example, you can have two buttons for the same product (one in USD and the other in EUR).

To create “Buy Now” type buttons in different currencies simply specify it in the “Buy Now Type Button Specific Settings” section of the product (enter it in the “Currency Code” field).

This does not work for “Add to Cart” type buttons though. Here is the reason if you are asking why:

What happens when the customer adds multiple products to the shopping cart that are in different currencies? How do you calculate the total? Not to mention that PayPal won’t process a payment if a checkout has items in different currencies.

13. Making Credit Card the Default PayPal Checkout Option

Use this addon plugin to force PayPal to show the credit card as the default option on the checkout page.

How to Make a Squeeze Page Using the WordPress eStore Plugin

You can use the WordPress eStore plugin to make squeeze page type pages to collect emails and build a list for email marketing. According to Wikipedia – “Squeeze pages are landing pages created to solicit opt-in email addresses from prospective subscribers”.

Why Should You Use The Squeeze Page Form of eStore Plugin?

There are many reasons but the following is an example of the most obvious one. If the following sounds like you then this page has your solution:

I want to allow a customer or visitor to my website to get a free download of my digital content (e.g a pdf or mp3 file). Right now I use a widget from my Autoresponder (e.g MailChimp, AWeber) on my WordPress site and the website visitor gets directed to a download area that is not encrypted or secure and though the stuff is free, I do want to capture an optin to my mailing list in exchange for the free stuff. I don’t want the link to be passed around or be posted to a forum.

How it works?

You use a shortcode in a post or page to display a form that lets the user download a free product (eg. an ebook or a mp3 file) after they fill in their names and email addresses. Once the visitor fills in his/her details (name and email address) and hits the ‘Download’ button the plugin sends an email with the encrypted link that can be used to download the product. The plugin adds the name and the email address of the visitor in the customer database.

How to Add a Squeeze Page Type Form in a Post or Page

Add a new product to your products database using the ‘Add/Edit Products’ menu. (Don’t forget to fill the ‘Button Image URL’ field when you add the product. this image will be shown as the ‘download now/Get Now’ button. The plugin comes with a download button (download_icon.png) that is stored in the images directory of the plugin)

Squeeze form shortcode

Use the following shortcode where you want to insert a squeeze form on your site:

[wp_eStore_free_download_squeeze_form id=5]

5 is the product id of the product I configured. Below is the form that you get when you add the above shortcode in a post, page or sidebar of your site.

Video Tutorial

Can I Signup the Users to My Autoresponder List?

When someone submits the squeeze form, the name and email gets added to the the customer database of eStore plugin. You can optionally add the user to your Autoresponder (AWeber, MailChimp, GetResponse) list too.

If you want to signup the users to your Autoresponder list, you can do that by enabling the option in the plugin settings. It works like the following when you enable this option:

  1. A user comes to your site and visits the page where you have a squeeze form
  2. The user fills in the name and email address field of the squeeze form
  3. The details is captured in the customer database record of the eStore plugin
  4. The user also gets signed up to your autoresponder list

Creating a Stylish Squeeze Form Easily

You can use our stylish squeeze form addon plugin to create a nice looking opt-in form easily.

Redirect Users to a Thank You Page After Squeeze Form Submission

Edit the product in question and specify the “Thank You” page URL in the following area of this product:

Buy Now or Subscription Type Button Specific Settings -> Return URL

When a user fills in the squeeze form for this product, he will be redirected to the URL you specify in the above mentioned field.

How to Use the Squeeze Page Type Form from a PHP file

To use the squeeze page type form from a PHP file (eg. the sidebar.php) use the following PHP function:

eStore_free_download_form($product_id)

So the following line of code will add a squeeze type form for a product who’s product id is 5:

<?php echo eStore_free_download_form(5); ?>

Using an Ajax/JQuery Powered Squeeze form

You can only put one Ajax powered squeeze type form in one page though. So if you want to put multiple forms (one in header, one in footer, one in sidebar etc) in one page then don’t use this option.

How to Add CSS style to the Squeeze Page Form

The squeeze form is written in a div class named “free_download_form”. Simply add the style definition to the ‘wp_eStore_style.css’ file to add styling to the form. For example, the following will add a background image to the form:

.free_download_form{
background: url(https://www.tipsandtricks-hq.com/ecommerce/images/some-background-image.jpg);
}

Pre-configured Stylish Squeeze Forms

See the stylish squeeze forms addon page for details.

Next Page »

Your Shopping Cart

Shopping Cart Empty
Shopping Cart is Empty
Visit The Shop

Search

Featured Documents

Stylish Product Display Options for WP eStore WP eStore Quick Setup and Usage Video Tutorial WP eStore Shortcodes and Functions Reference WordPress eStore Plugin Features WordPress eStore Plugin Demo What Our Customers Have to Say About Our Products WordPress eStore WishList (Feature Suggestions) WordPress eStore Frequently Asked Questions (FAQ) How to Show Add to Cart buttons

Featured Plugins

WP Express Checkout Plugin
wordpress_estore_icon
wordpress membership plugin icon
wordpress_affiliate_plugin_icon

Copyright © 2025 | eCommerce Plugins