Payment Data Transfer – Basic Understanding of PDT
Before I explain in detail how you can enable PDT in your PayPal account, it is important to first understand what PDT is, and when it should be used.
While for most website owners reading this documentation, an extensive understanding of Payment Data Transfer (PDT) is not necessary, basic knowledge of this feature of the PayPal platform can allow you to understand what automated steps are taking place after a transaction.
What is PDT?
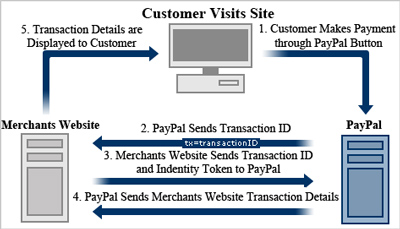
In short terms, PDT is a notification service that enables admin to show additional transaction details on their website. This feature allows the site to become more user friendly by displaying transaction details to the customer.
Payment Data Transfer, often referred to as “PDT” is a unique feature of the PayPal platform. PDT once enabled can send a notification after a payment that allows admin to display some transaction related details on their website. These transaction details can then be displayed in a ‘Thank you’ page or similar to demonstrate to the buyer that their payment has been confirmed.
What Operations Does PDT Allow Admin to Carry Out? – The 3 Main Functions of PDT
While Payment Data Transfer is more commonly used to display some basic post payment information, there are a couple more advanced options that this feature allows for.
- PDT Allows Admin to Securely Display Transaction Details to the Customer.
The PDT feature sends transaction details to the merchants website that are then read by a script on the website. This script then displays the information in a user friendly way. - PDT Allows Admin to Automatically Supply the Customer with their Digital Products.
Using PDT, the customer’s digital download link can be added to a thank you page or similar after a successful transaction. (for example: The PDT feature can be used in the eStore Plugin to automatically provide their customers with the digital product link immediately after the transaction). - PDT Allows Admin to Better Manage Inventory.
The script of a plugin can be updated so that inventory is updated after a successful transaction. The PDT notification communicates with the script to ensure correct stock levels are displayed if an item or two has been purchased.
What is the Difference Between Instant Payment Notification (IPN) and Payment Data Transfer (PDT)?
If you are new to the eCommerce world, PayPal IPN and PayPal PDT may seem like similar functions of PayPal. While they are similar in the way they ‘notify’ the website in order to complete the next action, they have different scenarios in which each of them should be used. In the section below we will discuss what the differences between PayPal IPN and PayPal PDT are, and when each of them should be used.
PayPal PDT vs PayPal IPN
PDT sends a prompt notification message after the payment is complete. This means that if you are running a site where an immediate payment notification is to be shown, PDT is the best choice for you. On the other hand, while IPN does send a notification to the merchants website, there is a material lag from the time the payment is completed and the time the notification is sent. IPN is not timely enough for functions such as immediate digital download after payment.
While it may seem that PDT is definitely the better choice, it does have it’s disadvantages. While it is faster, the notification sent out by PDT only happens once and once only! This means that if for some reason your site goes down for a couple seconds, the notification will be lost. IPN on the other hand continuously sends messages until the website acknowledges that the message has been received. This is why PayPal often recommends IPN over PDT when it is crucial that the message is received.
Furthermore, IPN can send multiple messages such as charge back notification and order confirmations while PDT is only useful for order confirmations. For the most part, as a user of a eCommerce solution you will not have to fully understand IPN and PDT (more just how to enable these features), having a basic understanding can help if you ever need to troubleshoot.
|
PDT vs IPNÂ |
Payment Data Transfer (PDT) | Instant Payment Notification (IPN) |
|
Speed of Notification |
Almost Instant |
Tends to Lag (slower than PDT) |
|
Number of Notification Attempts |
Notification is Sent Once (1) |
Notification is Sent Until the Site Acknowledges that it has Been Received |
| Notifications Sent |
Order Confirmations |
Charge-back Notifications Order Confirmations |
How Can I Enable PDT in my PayPal Account?
Some plugins require you to enable PDT in your PayPal account for post payment features. If you have found yourself needing to understand how to enable Payment Data Transfer, the following section will guide you in doing so.
Video Tutorial: Enabling PayPal PDT and Locating PDT Identity Token
Written Instructions: Enabling PayPal PDT and Locating Identity Token
Step 1) Log in to your PayPal account.
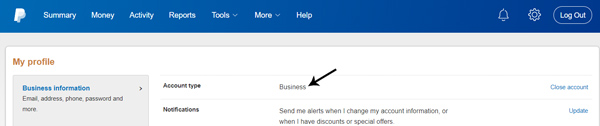
Step 2)Â Ensure you have a PayPal Business account.
You can confirm this by logging into your account and clicking on the Account Settings menu. Your account type will need to be either a Business or Premier account to be able to enable PDT. If you have a personal account and wish to upgrade to a business account find out how here.
Step 3) Click on the Settings Tog in the right-hand corner of your PayPal account. This will take you to the My Profile page.
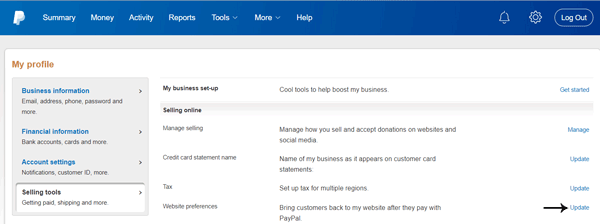
Step 4) Click on the Selling Tools menu. Under the Selling Online section, click the Update button across from Website Preferences.
Step 5) Enable Auto-return by marking the ‘check circle’. Specify the return URL where your customer should be sent after their payment. This should be your ‘Thank You’ page or similar.
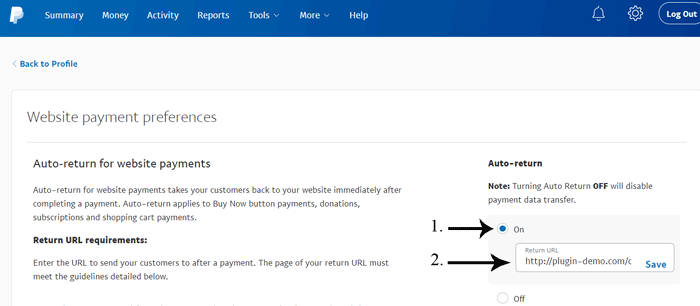
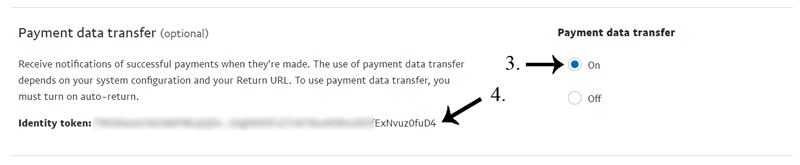
Step 6) Scroll down on the Website Payment Preferences page and ensure that Payment Data Transfer is On. This is indicated by a marked ‘check circle’.
Step 7) Your Identity Token for Payment Data Transfer (PDT) can be found in the Payment Data Transfer section. Copy your identity token and paste it into the required PDT field of the eCommerce plugin you are using. You should not share this token with anyone else other than site admins. Saving this identity token in the notepad on your computer can save time if you need this for another plugin in the near future.
Step 8)Â Exit your PayPal and set up the rest of the plugin you are using. Complete test transactions and ensure the PDT functions are working correctly on your site.
Absolutely Awesome. I was running around watching One OLD Video after another and nothing was working lol. THANK YOU for this Very Simple and easy to implement walk through.