In this article I am going to walk through the process of creating a custom checkout flow for your PayPal customers. I’ll explain how to use it with your PayPal buttons and then at the end I will show you how to add your new custom style for use in WP eStore.
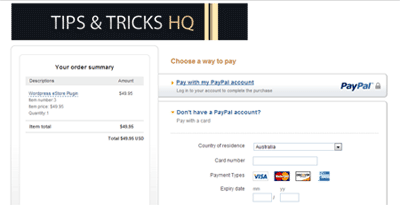
The following screenshot is an example of a custom PayPal checkout page style:
To prepare, you can get a logo and header image ready. PayPal doesn’t host these images for you. You must host them yourself on a secure server (https). If https isn’t used, the checkout will warn the customer that there are insecure elements on the page which will do nothing for their confidence when inputting secure information. So, be sure they are served securely through https.
For the logo, the max size is 190×60 (in pixels) and it is 750×90 for the header image. You will also be asked to specify a few different hex values for colors to match your site. You can use the values from the provided color selector but if you know the exact colors for your site, that will allow for a more uniform look and feel. The Eye Dropper extension for Chrome can help make sure you get exact matching colors. You can just use the eye dropper to select a specific pixel of any web page to learn the hex color value.
Video Tutorial (creating a page style)
Steps for Creating a Custom Checkout Page Style for PayPal
Note: The steps may vary slightly from your PayPal dashboard (based on your country and language).
- Login to your PayPal account.
- Under My Account, click Profile.
- In the My Selling Tools section (left side), click on Update next to Custom payment pages.
- Click the Add button.
- Choose a unique name for the payment pages style.
- Specify the URL for the logo image. Make sure it is on a secure server. It’s optional but shouldn’t be.
- Specify the secure URL for the header image.
- Input all of the colors that you want to change.
- You can then Preview how it looks, then Save when complete.
How to Specify a Custom Page Style When Creating a PayPal Button
Now that you have a new style created, you can make it the primary style and it will be used by default anytime someone goes through the PayPal checkout. To use it as the primary style, follow these quick steps:
1) After saving your custom payment page style you will be brought back to the list of styles. If not, follow the first 3 steps above to get back there.
2) Select the newly created payment pages style and click Make Primary.
Now that payment page style will be used by default.
You can also add a variable to a PayPal button code to use it on a button by button basis. To do that for a new PayPal button follow the steps below:
1) In the Merchant Services section where you create a new button, go through the standard steps to get the button setup first.
2) Then be sure to enter into the optional Customize advanced features section.
3) Scroll to the bottom, turn on the Add advanced variables option.
4) In the box, type in “page_style={custom_style_name}” without quotes. Replace {custom_style_name} with the name of the style you just created.
5) Create your button!
How to Use Your New PayPal Checkout Style for the Payment Flow from Your WP eStore Setup
Here are the quick steps for setting up the custom page style in WP eStore.
1) Click WP eStore >> Settings.
2) Click Payment Gateway Settings across the top.
3) Scroll down and look for Custom Checkout Page Style Name and enter the style name you just created in there.
4) Click the Update button at the bottom of the page.
How to Use Custom PayPal Checkout Page Style for WP Simple Shopping Cart
Here are the quick steps for setting up the custom page style in Simple WP Shopping Cart.
1) Click Settings >> WP Shopping Cart.
2) Scroll down and look for Custom Checkout Page Style Name and enter the style name you just created.
3) Click the Update button at the bottom of the page to save the changes.
simple and clear post, nice one. I had already used your technic and its working like a charm, thanks
@Nick, This feature comes with the standard PayPal account. You don’t need to pay anything extra for this.
Hi, is this possible with a personal Paypal account or does it have to be a Pro account? I don’t see any way to do this for free through Payapl, it looks like I need to pay $30/month for the option to customize, or am I missing something? Thanks!