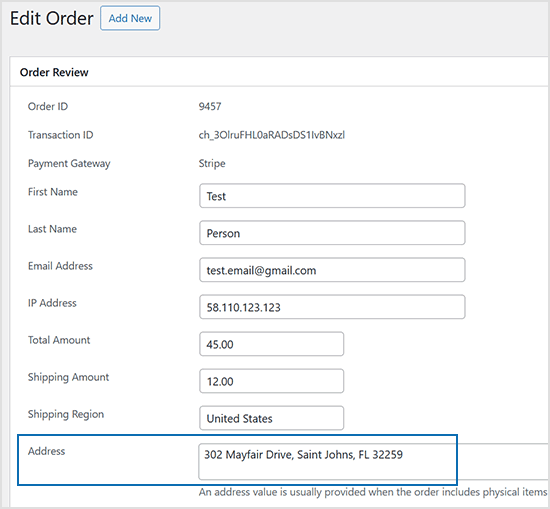
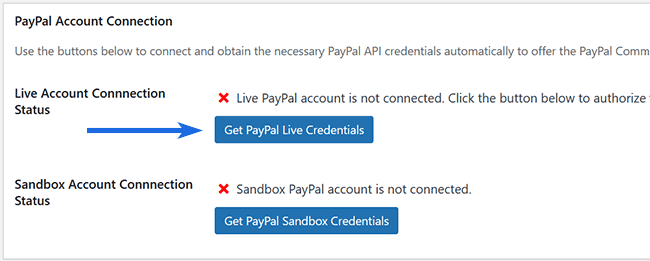
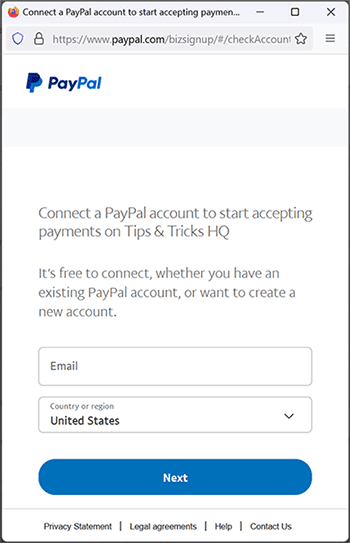
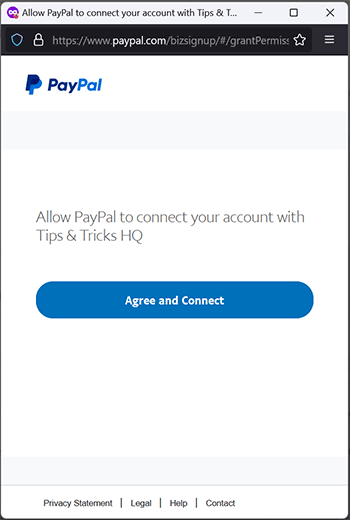
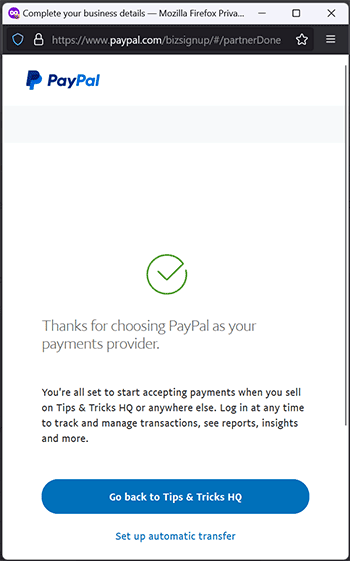
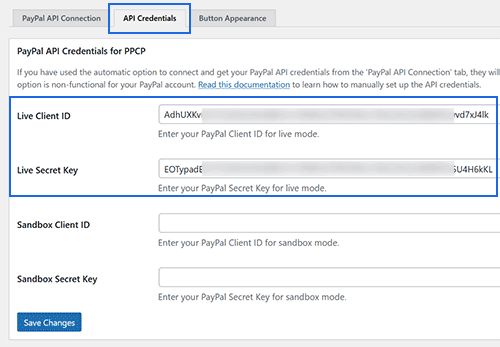
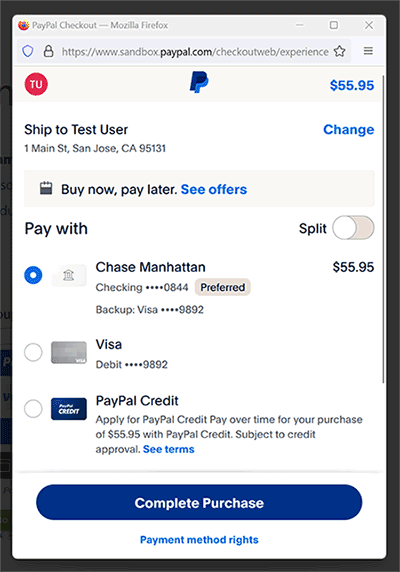
As the shop administrator, shipping physical products requires the customer’s shipping address. The plugin streamlines this by utilizing PayPal or Stripe’s shipping address collection during checkout, enhancing the customer’s experience. The address is then stored with the order for easy access from your site’s admin dashboard. Additionally, you can view the shipping address directly in your PayPal or Stripe merchant account.
Simple Shopping Cart – Enabling Terms and Conditions
The Simple Shopping Cart plugin offers a dedicated feature for implementing Terms and Conditions. This functionality allows administrators to incorporate a Terms and Conditions or Privacy Policy page that customers are required to acknowledge and accept before completing a purchase. Utilizing this feature ensures transparent communication regarding the handling of personal information, fostering trust between your business and your customers.
Upon activation of the Terms and Conditions feature, a mandatory checkbox will appear on the shopping cart. This checkbox serves as an acknowledgment from customers that they have read, understood, and agreed to the stipulated Terms and Conditions or Privacy Policy. A potential customer must accept the Terms and Conditions prior to proceeding with the checkout process.
Enabling Terms and Conditions
To activate the Terms and Conditions feature in the Simple Shopping Cart plugin, please follow these steps:
- Navigate to the Settings menu of the Simple Shopping Cart plugin.
- Within the Settings menu, scroll to the “Terms and Conditions Settings” section.
- Check the “Enable Terms and Conditions” checkbox to activate the feature.
- Utilize the “Checkbox Text” field to customize the display text and the hyperlink associated with the Terms and Conditions.
- Click “Save” to apply the changes.
Manually Getting PayPal API Credentials for PayPal Commerce Platform
The Simple Shopping Cart plugin offers an automated method for acquiring your PayPal API credentials, detailed in the PayPal PPCP Setup and Configuration documentation. Use the manual approach outlined below only if the automatic option isn’t functioning on your site.
Note: The following guide serves as a backup option and is typically not required. It’s recommended to utilize the automated option found in the plugin’s PayPal API Connection settings tab.
Table of Contents
- Live Client ID and Secret Key
- Sandbox (Testmode) Client ID and Secret Key
- Save the API Credentials in the Plugin’s Settings
Live Client ID and Secret Key
Follow these steps to manually obtain your Live Client ID and Secret Key:
Step 1) Log into PayPal Developer Account
- Log into your PayPal Developer Account.
- Click on the ‘Apps and Credentials‘ menu.
Note: If the sandbox/live toggle isn’t visible in the top right corner, click on ‘Developer Dashboard’. Once on the dashboard, you should see the ‘Apps and Credentials’ menu.
Step 2) Toggle to Live Mode
- Locate and click the toggle button in the top right-hand corner to switch to ‘Live‘ mode. This will allow you to access your Live Client ID and Live Secret Key.
Step 3) Create App and Get API Credentials
- Click ‘Create App‘. Enter a meaningful App Name and click ‘Create App‘ again.
- You’ll be directed to a page displaying your Live Client ID.
- Click ‘Show‘ to reveal your Live Secret Key.
- Copy each key separately and paste them into the corresponding fields in the Simple Shopping Cart plugin’s settings menu.
Sandbox (Testmode) Client ID and Secret Key
If you wish to conduct sandbox or test mode transactions with PayPal, you must create a separate app for this purpose. Follow these steps to acquire your sandbox API credentials:
Step 1) Log into PayPal Developer Account
- Log into your PayPal Developer Account.
- Click on the ‘Apps and Credentials‘ menu.
Note: If the sandbox/live toggle isn’t visible in the top right corner, click on ‘Developer Dashboard’. Once on the dashboard, you should see the ‘Apps and Credentials’ menu.
Step 2) Toggle to Sandbox Mode
- Locate and click the toggle button in the top right-hand corner to switch to ‘Sandbox‘ mode. This will allow you to access your Sandbox Client ID and Sandbox Secret Key.
Step 3) Create App and Get API Credentials
- Click ‘Create App‘. Enter a meaningful App Name and click ‘Create App‘ again.
- You’ll be directed to a page displaying your Sandbox Client ID.
- Click ‘Show‘ to reveal your Sandbox Secret Key.
- Copy each key separately and paste them into the corresponding fields in the Simple Shopping Cart plugin’s settings menu.
Save the API Credentials in the Plugin’s Settings
After copying your Client IDs and secret keys, paste them into the ‘API Credentials’ tab in the plugin’s settings menu.
PayPal Commerce Platform (PPCP) – Setup and Configuration
PayPal Commerce Platform (PPCP) is the new/latest product from PayPal, it offers the PayPal checkout and adds more payment options for global customers so that all your funds will be in one place, but your customers will see familiar payment methods.
This documentation outlines how to use it with the WP Simple Shopping Cart Plugin.
Table of Contents
- Feature Overview
- Configure PayPal Commerce Platform Checkout
- Optional/Additional Configuration Steps
- Customer Experience with the Commerce Platform
- Troubleshooting Related
Feature Overview
The PayPal Commerce Platform Checkout is an option you can enable in the WP Simple Cart Plugin. It adds checkout buttons like the ones shown below to your shopping cart when enabled. It provides optimal payment solutions tailored to your customers’ country/region.
Configure PayPal Commerce Platform Checkout
To use the PayPal Commerce Platform (PPCP) Checkout with the WP Simple Cart plugin, enable the feature and set up the API credentials.
Step 1) Enabling PPCP Checkout option
- Navigate to ‘Settings‘ under Simple Cart and select the “PayPal PPCP” tab.
- Find the section titled ‘Enable Commerce Platform Checkout’.
- Check the box to activate it and save your settings.
Step 2) Acquiring the API Credentials
- Scroll to the ‘PayPal Account Connection’ section.
- Click on ‘Get PayPal Live Credentials’ to begin the authorization process and obtain API credentials from your PayPal account.
- A popup will appear, prompting you to log into your PayPal account. Log in and authorize our app to access your account and retrieve the API credentials.
These screenshots provide examples of what you may encounter during the authorization process and the acquisition of API credentials. Depending on the status of your business account and your location, PayPal may pose additional questions. Upon completing these steps, the plugin will automatically receive and store the API credentials in the database, finalizing the API acquisition process.
Step 3) Verify Acquisition of API Credentials
- Navigate to the “API Credentials” subtab to confirm that the plugin has successfully acquired and stored the API credentials.
- If the API credentials section displays the API keys, the setup for the PPCP checkout option is complete and ready for use.
Optional/Additional Configuration Steps
Sandbox Account
If you wish to conduct sandbox/test mode transactions with this API, follow the above steps using the ‘Get PayPal Sandbox Credentials’ button.
Button Appearance
For customization of the PayPal Commerce Platform checkout button appearance in your shopping cart, navigate to the ‘Button Appearance’ subtab. The default settings are optimized for immediate use, but you can modify them as needed.
Customer Experience with the Commerce Platform
When customers add an item to the Simple Shopping Cart, they can proceed to checkout using the PayPal Commerce Platform buttons. Upon clicking a PayPal Checkout button, a popup will appear for them to finalize the checkout process.
The following is an example of how the payment popup window appears.
Troubleshooting Related
If you encounter issues logging into your PayPal account during the API credential retrieval step, try this: Open a separate window, go to PayPal.com, log out of your account, clear your browser’s cookies, and then attempt the process again.
Simple Shopping Cart – Using the Debug Logging Feature to Troubleshoot
If you have ran into an issue while using the Simple Shopping Cart plugin on your WordPress website, perhaps your customers are not receiving their sales notification after a successful purchase, the debug log is a great troubleshooting resource.
What is Debug Logging?
The debug logging feature logs steps of the payment process and those steps that were not able to be completed are marked as a ‘Failure’. This gives admin an insight into which step of the payment process needs attention in order to work correctly.
Generally, a failure in the payment process is caused by an incomplete or incorrect set up of the plugin. Please browse through the documentation page to ensure you have completed all setup required for the Simple Shopping Cart Plugin.
How Can I Enable the Debug Logging Feature?
By default, the debug log is not enabled. If you are testing the Simple Shopping Cart plugin’s transaction process, it is a good idea to enable the debug log first. This way, if you find that there is a problem with a step in the payment process or the email is not being sent to either the merchant or the customer, you can diagnose the issue quickly and easily.
To enable the debug log for the Simple Shopping Cart plugin complete the following:
- Click on the Settings menu of the Simple Shopping Cart plugin.
- Towards the bottom of the General Settings tab, you will see a section titled ‘Testing and Debug Settings’.
- Check the Enable Debug option to enable the debug logging feature.
- Click the Save Changes button.
Viewing the Debug Log File to Solve an Issue
Once you have enabled the debug logging feature and completed a test or live transaction on your website using the Simple Cart plugin, you can click on the View Debug Log File to see the details and potentially find a step of the process that is failing.
The following screenshot shows an example of the debug logging output:
After you have completed troubleshooting you may like to disable the debug logging feature and clear the log file.
Other Usefule Resources
Setting Up Product Variations
The Simple Shopping Cart plugin has a very simple variation setup feature. You can use Variation Control to design products as shown in the following screenshot.
Video Tutorial: Configuring Product Variations
Shortcode Parameter for Product Variation
To apply variation control to your product, utilize the ‘var1’, ‘var2’, ‘var3’ parameters in the shortcode, as demonstrated below:
[wp_cart_button name="Test Product" price="25.95" var1="VARIATION-NAME|VARIATION1|VARIATION2|VARIATION3"]
Here is an example product shortcode using one variation option:
[wp_cart_button name="Test Product" price="29.95" var1="Size|Small|Medium|Large"]
Below is an example product shortcode using 3 variations:
[wp_cart_button name="Test Product" price="29.95" var1="Size|small|medium|large" var2="Color|red|green|blue" var3="Sleeve|short|full"]
Exporting Cart Orders Data
The Export Cart Orders Data functionality of the WP Simple Shopping Cart Plugin allows website operators to easily generate a well-structured CSV file that contains detailed order information from their customers. This feature proves beneficial for business owners as it enables them to export cart orders, facilitating effective sales monitoring and enhancing targeted marketing efforts.
How to Export Cart Orders Data
If you are using the WP Simple Shopping Cart Plugin on your WordPress website and you wish to export your cart orders, complete the following steps:
- Within the WordPress dashboard, click on the ‘Simple Cart‘ menu and then on ‘Tools‘.
- From the ‘Simple Cart Tools‘ page, you will see a section titled ‘Export Cart Orders Data‘.
- Click the ‘Export Data‘ button to have your cart orders compiled in one CSV/Excel file. You will see this file pop straight up which you can then click on and save to your computer.
What Will be Included in the Cart Orders CSV File?
By downloading the CSV file, you will be able to view all cart orders from your particular website, comprising the following headers:
- Order ID
- Transaction ID
- Date
- First Name
- Last Name
- IP Address
- Total
- Shipping
- Coupon Code
- Address
- Items Order
The content under these headers will mirror the provided information. In cases where certain details are absent, such as digital items not requiring customer address collection, the corresponding header will remain empty. The following screenshot displays a single cart order exported to a CSV file:
Customize the Item Name in the Shopping Cart
You can customize the item name display in the shopping cart by overriding the default output.
By default, the item name will link to the page where the item was added from. In the following section I will show you how it can be overridden and the link is removed.
The “wspsc_cart_item_name” filter can be used to override the item name that gets displayed in the shopping cart.
Add the following block of code to your functions.php file of the theme which will replace the linked item name with just plain text name:
add_filter('wspsc_cart_item_name', 'wspsc_customize_cart_item_name', 10, 2); function wspsc_customize_cart_item_name( $item_name, $item ){ $item_name = esc_attr( $item['name'] ); return $item_name; }
[Deprecated] – Integrate WP eStore with AWeber via Email Parser
This documentation is old and has been deprecated. It should not be used anymore. Use the new documentation for eStore and AWeber integration.
Before AWeber introduced their API, they only supported 3rd party integration using email parsers. This documentation explains how to integrate eStore using AWeber’s email parser method.
Step 1: Create an Email Parser
AWeber use email parsers in situations where you want subscribers to add to your list via an email from a third party, typically a payment processor, rather than the subscriber sending an email directly from their email program.
To add a new custom email parser select “Email Parser” from the “My Lists” menu and choose “Add New” from the “Custom Parsers” section.
- My List -> Email Parser
- Custom Parsers -> Add New
The new email parser configuration will look similar to the following (Click to enlarge)
There are only two fields (Description and Trigger Rule) that need changing here.
- Give a description for this parser, eg. eStore Parser
- In the Trigger Rule field, replace the “user\@domain\.com” with the email address that you have specified in the “From Email Address” field of WP eStore’s settings menu (This step is very important).
- If you have multiple lists in your account then edit the parser you just created then check the “Enable parser for all lists in this account” checkbox and save it (This step is also very important). Enabling this option will not harm any of your other lists… all it does is that it activates this parser so it can filter signup request from eStore and assigns the contact to the correct list.
For example, the email address I have specified in my “From Email Address” field is [email protected] so I need to replace:
with
Below is a screenshot of my email parser (click to enlarge):
Adding an Email Parser is really simple but even a small error can throw everything off.
Step 2: Configure the WP eStore’s Autoresponder Settings
Now all you need to do is specify the AWeber list name that you want your customers to be signed up to and enable AWeber Signup Globally or Specify it in the “Autoresponder Settings” of the product if you want to selectively signup customers to a specific list on a per product basis.