Tips and Tricks WP eCommerce

eCommerce Solution for WordPress Blog

  • Home
  • eCommerce Plugins
  • WP eStore Documentation
  • WP Shopping Cart Doc

How to Create PayPal Donation Button

WordPress eStore allows you to create Donate button functionality so you can accept donation for a cause. The donation type buttons takes the user directly to the PayPal payment page for payment when clicked.

Creating a PayPal Donate Button

Step 1) Create an eStore product the same way you configure any eStore product. You can watch our video tutorials if you don’t know how to create a product in eStore.

Set the product price to 0.00 (zero) if you want to allow your users to be able to specify the donation amount when they make the payment.

Alternatively, set the product price value to a fixed amount (example: 25.00) to accept donation for that amount only.

Step 2) Create a WordPress post or page where you want to place the “Donate” button. You can explain why people should donate to your on this page.

Step 3) Use the following shortcode where you want eStore to put the donate button on the page (you created this in step 2):

[wp_eStore_donate id=1]

1 is the product id of the product you created in step 1.

Here is a live example of a PayPal donate button created with WP eStore. Click on it to see how it works:

You can use the PayPal donation button shortcode anywhere on your site to place a donate button. For example, if you want to place a donate button on your sidebar then add a “Text Widget” to the sidebar and use the above mentioned shortocde.

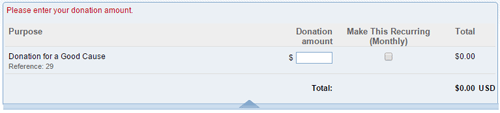
When the users go to the PayPal payment page, they will be able to enter a donation amount and pay. They can also make that a recurring donation payment (if they want to). See example below:

paypal-donation-payment-example

Customizing the “Donate” Button

Option 1) Using a Custom Button Image

You can use a custom image for your donate button to make it look pretty. The following documentation explains how to use a custom button image for any eStore product.

  • How to use a custom button image for a product

Option 2) Customizing the Text of the Button

If you want to use a custom text for the button (instead of using a custom button image), you can do that too. You can add a parameter called “button_text” to specify the text you want to use for the donate button.

Here is an example usage:

[wp_eStore_donate id=1 button_text="Donate Money via PayPal"]

The above shortcode will create a donate button with the text Donate Money via PayPal for product 1.

WP eStore Quick Setup and Usage Video Tutorial

You should watch all the following video tutorials to familiarize yourself with the basic functionality of the WP eStore plugin.

1. WP eStore Installation

2. WP eStore Quick Setup, Product Creation and Basic Testing

Miscellaneous Basic eStore Tutorials

A. WP eStore Settings Configuration

B. How to Configure a Product

C. Display a Product on a Post or Page

D. How to Use Product Display Templates

E. Using a Link To Sell Your Item

F. Creating a PayPal Buy Now Button Using eStore

G. Creating a PayPal Subscription Button Using eStore

H. Creating a PayPal Donation Button Using WP eStore

Hide a Page from The Navigation Menu

You can follow the navigation menu customization tutorial to learn how you can customize your navigation menu.

If you want to see more video tutorials then please leave your suggestion in the comment section below.

WP eStore – Instant Digital Product Delivery on A Thank You Page

In addition to the product delivery via email (which is the default delivery method), you can also choose to deliver the digital products on a post-payment return page (example, a Thank You page). This allows the customer to be able to download the Digital goods via an encrypted link instantly after the transaction.

Emails are delivered instantly too but sometimes it can take a few minutes (if PayPal’s server is busy they can take a few minutes to send the payment notification that is used for emailing the customer).

Examples

The following is a screenshot of my “Thank You” page that is using the “Instant Digital Product Delivery on the Thank You page” feature:

Thank You Page Screenshot Before Payment

The following is a screenshot of the same page when someone makes a purchase and returns to this page after payment:

Thank You Page Screenshot After Payment

Product with Multiple File Downloads

If you have a product that has multiple downloadable files (example: a large file broken into multiple parts) then it will appear as separate file downloads (each file will be a separate download).

How to Use the Instant Digital Delivery Feature

Just to make it clear… this is an additional product delivery option that you can use. The plugin will automatically send an email to the buyer after a purchase with the download links by default even if you are not using this method/feature.

This function uses PayPal’s PDT (Payment Data Transfer) feature. Watch the video tutorial (recommended) or follow the steps outlined below to take advantage of this feature:

Video Tutorial

Step By Step Setup Instructions

Step 1) Make a post-payment return page (example, a Thank You or Transaction Result page). Use the URL of this page in the “Return URL” field of the settings menu of eStore. This is the page where your customers are going to land when they return from PayPal after the payment. Make sure you do not make this page a private page (private pages can only be accessed by someone who is logged into WordPress). It doesn’t matter if someone goes to this page without making the payment (the links only appear after they make the payment).

Step 2) Add whatever message you want to add to this “Thank You” page and then put the following shortcode where you want to display the transaction result (product download links):

[wp_eStore_display_transaction_result]

Step 3) Enable PDT feature in your PayPal profile. If you don’t know how to enable PDT and get the PDT Identity Token then this document should help (check the “Activating PDT” section on that page).

Step 4) Make sure you have enabled “Auto Return” option too . You can enable the “Auto Return” option from the same PayPal profile page where you enable PDT.

Step 5) Specify the PDT Identity Token that you received from PayPal in the “PDT Identity Token” field of the PayPal Payment Gateway Settings menu of WP eStore.

Step 6) Finally, enable the “Thank You” page display feature in eStore by checking the “Enable Transaction Result Display” in the settings (Post Payment Process Settings) menu of WP eStore.

The transaction result will display the message that the customers are also going to get in the email. It will have a list of products they ordered with a unique encrypted download link for each digital product so it can be downloaded instantly.

WordPress eStore Product Categorization

You can categorize your products into groups to help your customers browse them easily.

eStore-product-category

Product Category Management Menu

Once you create a product category from the Category Management menu you can assign a product to that category when configuring the product details.

eStore-product-category-produts-menu

Assigning a Product to a Category

You can display all the product(s) from a particular category using a shortcode:

There are many more shortcodes available to utilize product categories. See the shortcodes list documentation for details.

I have created a demo category called “Prod Cat A” and assigned two products to this category. The products are displayed as the following when using the category shortcode.

Demo Product for Category
This is a demo product that belongs to Category A for demonstration.
Price: $10.00
Digital Product With Variation
This product demonstrates how you can configure a digital product with variation control that delivers different file based on the user's selection
Price: $50.00
License :

Read the following documentation to learn some advanced techniques for displaying products from a category on a WordPress page:

  • Display products on a page from a particular category with additional options

How to Add/Create a Subscription Button for Recurring Payment

Configuring a Subscription button for recurring payment and adding it to a post or page is very easy using the WP eStore plugin.

Please note that this documentation is for creating a PayPal subscription button only

Subscription payments for other payment gateways are handled via the payment gateway bundle addon. Refer to the documentation of that addon if you are creating a subscription button for a different gateway.

Creating A PayPal Subscription Button

Follow the steps below to create a subscription product/button in eStore plugin:

Step 1: Click on the “Add/Edit Products” menu in your WP eStore admin area to create a new product.

Step 2: Fill in the product details as you see fit. You can enter a descriptive price in the “Price” field of a subscription product. Example values:

  • 29 USD Per Month
  • 47 USD for 3 Installments
  • 7 Days Trial Then 19 USD Per Month

Step 3: Go to the “Subscription/Recurring Payment Specific Settings” section of this product and enter the subscription details correctly. Save the product when you are done.

Configuring a Subscription Payment

Step 4: Type the following shortcode to display a subscription button for this product on a WordPress post or page.

[wp_eStore_subscribe_button id="15"]

Replace the PRODUCT-ID with the actual id of the product (example: 15)

Example Subscription Button

The following Subscription button charges the customer $29.95 USD for the first 7 days Then $49.95 USD for each month, for 6 installments.

You can also display the subscription button using one of the fancy displays like the following:

Test Membership Subscription
Subscription button that charges the customer $29.95 USD for the first 7 days Then $49.95 USD for each month, for 6 installments
Price: $29.95

Feel free to hit the subscription button to see how it works.

Frequently Asked Questions

  • Can I customize the button image? – Yes, simply specify your custom button image URL in the “Button Image URL” field when configuring the product.
  • Can I display a subscription button using one of the fancy displays? – Yes, please check the shortcodes documentation to find a suitable shortcode.
  • Can the subscription be added to the shopping cart? – No, please see the “Notes” section at the bottom of this page for detailed explanation.

Example Values for a Subscription Button

Here are some examples showing you what values to use to create a subscription button

Example 1: To create a subscription button  that charges $27.00 USD for each month until canceled use the following values:

Trial Billing Amount -> (leave empty)
Trial Billing Period -> (leave empty)
Recurring Billing Amount -> 27.00
Recurring Billing Cycle -> 1 Month
Recurring Billing Count -> (leave empty)

Example 2: To create a subscription button  that charges $29.95 USD for the first 7 days Then $49.95 USD for each month, for 6 installments use the following values:

Trial Billing Amount -> 29.95
Trial Billing Period -> 7 days
Recurring Billing Amount -> 49.95
Recurring Billing Cycle -> 1 Month
Recurring Billing Count -> 6

How to Test A Subscription Payment

  • Please read this post before you test a subscription payment button.

Note:

Please note that the subscription payment cannot be added to the shopping cart. Why? because PayPal handles subscription payments through a different API than the normal one (Subscription payments are usually complex). How do you process two of the following payments together when you checkout using the shopping cart?

  • Charge the customer $29.95 USD for the first 7 days Then $49.95 USD for each month
  • Charge the customer $49.95 USD for the first 14 days Then $19.95 USD for each month, for 6 installments.

Also, PayPal will not process multiple subscriptions through the cart checkout API so if a customer added 5 subscriptions to the cart and then tried to checkout it will get stuck.

How to Use Coupons/Discounts in WP eStore

Configuring the WP eStore to use Coupons is very easy. Simply go to the Coupons/Discounts menu, enable the usage of coupons and add a few coupons to the system so your customers can use it.

Screenshot of Coupons/Discounts Menu

You can create conditional coupons that are only applied to the shopping cart if it meets certain conditions. For example, you can create conditional coupons like the following:

  • Apply 20% discount if the total amount is greater than $50.00
  • Apply 25% discount if the total number of items in the cart is greater than 5
  • Apply a discount only on a certain product
  • Give free shipping if the total amount is greater than $100.00

Coupon Usage Demo

I have already configured two coupons “DEMOCOUP1” and “DEMOCOUP2” for demonstration. Add the following demo product to the shopping cart and apply one of these coupons to see how it works.

Demo T-Shirt 3
Demo T-Shirt 3
Variation control demo with different prices
Price: $20.00
Color :

Discounts only get applied to the product price (shipping price doesn’t get discounted). Also, coupons don’t stack up, only one coupon can be applied to the cart at a time (this is to make sure the customers can’t apply multiple coupons to exploit the system).

Applying Discount Via URL

Read this documentation to learn about the discount via URL feature.

How to Use Variation Control in WordPress eStore Plugin

This post explains how you can configure your product to use variation control when using the WP eStore plugin.

variation_control_sc

The “Variation1” and “Variation2” fields can be used To configure a product with Variation. Say for example, you want to sell a T-Shirt which comes in various sizes (small, medium, large, XL). Enter the following in the “Variation1” field of this product when you add it to the database:

Size|Small|Medium|Large|XL

Once you add variation control to the product it will look similar to the following:

Demo T-Shirt
Demo T-Shirt
Price: $20.00
Size :

Feel free to hit the add to cart buttons to see how they appear on the shopping cart when variation control is used.

Now, what if you wanted to add another variation to that product? You can do that too. Say for example, you want to add a color variation to the T-Shirt. Enter the following in the “Variation2” field:

Color|Green|Red|Black

Once you add the second variation to the product it will stack up and look similar to the following:

Demo T-Shirt 2
Demo T-Shirt 2
Price: $25.00
Size :
Color :

Variation Control With Different Prices

What if you want to have different prices for different variations? You can do that too by adding the price increment next to the variation name. Say for example, the shirt comes in Green color which costs $20.00 and you want to charge $5 extra if someone wants to get the Red one and $7.50 extra for the Black one. Add the following to your “Variation” field to achieve this:

Color|Green|Red:5|Black:7.50

Now customers will be charged depending on the variation they choose.

Demo T-Shirt 3
Demo T-Shirt 3
Variation control demo with different prices
Price: $20.00
Color :

You can use both the variation fields to use different prices or any other combinations.

Demo Photo
Demo Photo
A product with variation control. Variation control allows the customer to choose the variation that they want to purchase.
Price: $50.00
Size :
Resolution :

Variation Control for Digital products

The above variation control mechanism can be used for any type of product (digital or non-digital) but if you have a product that requires the digital delivery of different files depending on the customer selection, then you can use the “Digital Product Variation” field to achieve this.

Say for example, you are selling a WordPress theme that comes in 3 different options (Single, Business and Professional) and you have 3 different downloadable files to offer based on user selection. Lets say we have the following details in this situation:

Name of the variation group: License
Variation Names: Single, Business and Professional
Downloadable Files: example.com/single-license.zip (Single Option), example.com/business-license.zip (Business Option), example.com/pro-license.zip (Professional Option)

Enter the content of the following example in the “Digital Product Variation” field (you will need to adjust the name and file URLs for your items):

License|Single::http://yourdomain.com/downloads/somefile.zip|Business::http://yourdomain.com/downloads/somefile2.zip|Professional::http://yourdomain.com/downloads/somefile3.zip

Now customers will receive the corresponding file for the option they select during the purchase (example: the customer who buys the Single License option of this product will receive the “single-license.zip” file).

If you want to charge different amount for different option then you can use the following example:

License|Single::http://yourdomain.com/downloads/somefile.zip|Business::10::http://yourdomain.com/downloads/somefile2.zip|Professional::15::http://yourdomain.com/downloads/somefile3.zip

The product display will look similar to the following:

Digital Product With Variation
This product demonstrates how you can configure a digital product with variation control that delivers different file based on the user's selection
Price: $50.00
License :

If the base price of this product (with single license) is $50, then a customer will be charged $60 for the business option and $65 for the professional option.

Collecting Customer Input

Sometimes you may need to collect input from your customer for a particular product (eg. to engrave something). Simply check the “Collect Customer Input” option for that product and it will allow the customer to enter some text similar to the following (you can also customize the label of the instruction field):

Demo Engraving
Demo Engraving
A product that requires instructions from customer. The customer can add text in the "Instruction" text box below
Price: $10.00
Instructions:

Variation Configuration UI

If you are creating lots of variations then it maybe useful for you to use eStore’s variation UI addon. You can also do inventory control per variation when you use the advanced variation control UI addon.

Inventory Control

If you want to do inventory control for your variations, you can use the eStore’s variation UI addon which has an option for inventory control.

Limitations:

I understand that some of you would like to show the total amount beside the variation text and not the incremental amount but that’s not how variation control usually works. It may work if you have one variation but what do you do when you have multiple variations that needs to stack? Adding the amount is the only way to handle this.

This is exactly why sites like www.apple.com, www.dell.com etc uses incremental variations rather than the total fixed amount next to the variation text (this is a standard practice).

Also, with WP eStore you can have a maximum of four variations (including the digital variation) per product.

How to Make a Squeeze Page Using the WordPress eStore Plugin

You can use the WordPress eStore plugin to make squeeze page type pages to collect emails and build a list for email marketing. According to Wikipedia – “Squeeze pages are landing pages created to solicit opt-in email addresses from prospective subscribers”.

Why Should You Use The Squeeze Page Form of eStore Plugin?

There are many reasons but the following is an example of the most obvious one. If the following sounds like you then this page has your solution:

I want to allow a customer or visitor to my website to get a free download of my digital content (e.g a pdf or mp3 file). Right now I use a widget from my Autoresponder (e.g MailChimp, AWeber) on my WordPress site and the website visitor gets directed to a download area that is not encrypted or secure and though the stuff is free, I do want to capture an optin to my mailing list in exchange for the free stuff. I don’t want the link to be passed around or be posted to a forum.

How it works?

You use a shortcode in a post or page to display a form that lets the user download a free product (eg. an ebook or a mp3 file) after they fill in their names and email addresses. Once the visitor fills in his/her details (name and email address) and hits the ‘Download’ button the plugin sends an email with the encrypted link that can be used to download the product. The plugin adds the name and the email address of the visitor in the customer database.

How to Add a Squeeze Page Type Form in a Post or Page

Add a new product to your products database using the ‘Add/Edit Products’ menu. (Don’t forget to fill the ‘Button Image URL’ field when you add the product. this image will be shown as the ‘download now/Get Now’ button. The plugin comes with a download button (download_icon.png) that is stored in the images directory of the plugin)

Squeeze form shortcode

Use the following shortcode where you want to insert a squeeze form on your site:

[wp_eStore_free_download_squeeze_form id=5]

5 is the product id of the product I configured. Below is the form that you get when you add the above shortcode in a post, page or sidebar of your site.

Video Tutorial

Can I Signup the Users to My Autoresponder List?

When someone submits the squeeze form, the name and email gets added to the the customer database of eStore plugin. You can optionally add the user to your Autoresponder (AWeber, MailChimp, GetResponse) list too.

If you want to signup the users to your Autoresponder list, you can do that by enabling the option in the plugin settings. It works like the following when you enable this option:

  1. A user comes to your site and visits the page where you have a squeeze form
  2. The user fills in the name and email address field of the squeeze form
  3. The details is captured in the customer database record of the eStore plugin
  4. The user also gets signed up to your autoresponder list

Creating a Stylish Squeeze Form Easily

You can use our stylish squeeze form addon plugin to create a nice looking opt-in form easily.

Redirect Users to a Thank You Page After Squeeze Form Submission

Edit the product in question and specify the “Thank You” page URL in the following area of this product:

Buy Now or Subscription Type Button Specific Settings -> Return URL

When a user fills in the squeeze form for this product, he will be redirected to the URL you specify in the above mentioned field.

How to Use the Squeeze Page Type Form from a PHP file

To use the squeeze page type form from a PHP file (eg. the sidebar.php) use the following PHP function:

eStore_free_download_form($product_id)

So the following line of code will add a squeeze type form for a product who’s product id is 5:

<?php echo eStore_free_download_form(5); ?>

Using an Ajax/JQuery Powered Squeeze form

You can only put one Ajax powered squeeze type form in one page though. So if you want to put multiple forms (one in header, one in footer, one in sidebar etc) in one page then don’t use this option.

How to Add CSS style to the Squeeze Page Form

The squeeze form is written in a div class named “free_download_form”. Simply add the style definition to the ‘wp_eStore_style.css’ file to add styling to the form. For example, the following will add a background image to the form:

.free_download_form{
background: url(https://www.tipsandtricks-hq.com/ecommerce/images/some-background-image.jpg);
}

Pre-configured Stylish Squeeze Forms

See the stylish squeeze forms addon page for details.

WordPress eStore Plugin Change Log

WordPress eStore v8 Change Log

  • Some minor inventory control updates
  • Added an option to turn off sale notification email for admin
  • Added a new email tag {product_details_tax_inclusive}
  • Ability to enable ajax option on the add to cart button action
  • Ability to show fancy template with Donate now buttons
  • Fixed the {total_tax} email tag for manual checkout
  • Some minor enhancements for the area specific tax checkbox feature
  • Added a new feature for store pickup option (allow you customers to pickup at your store)
  • Added another condition in the recurring payment check function
  • The “store action” page will now be hidden from the navigation menu by default
  • The “Store pickup” option (if selected by the customer) will be shown in the manual checkout email.
  • Added a new subscription button shortcode.
  • Updated the standard manual checkout interface
  • Added a “Add New Product” link at the top of the page in the add/edit products interface
  • Added a new option in the PayPal gateway settings to collect special instructions on the PayPal checkout page
  • Added the product name data in the manage customers summary list menu
  • Added a new option to enable ajax in the advanced settings menu
  • Added Mad Mimi integration
  • Added a copy option in the “Manage Customers” menu of the plugin
  • Added an option to reset the counter tag value
  • Added a new filter for doing affiliate tracking via discount coupons/codes
  • Changed the MailChimp integration’s listsubscribe call to use “updatable” parameter to have a value of true
  • The AWeber signup will now work for both List name and List ID value
  • The popular products list shortcode can now take category ID and exclude product IDs value
  • The plugin will show a warning in the admin side when you have the “Sandbox” mode enabled
  • Added more action hooks and filters in the plugin
  • Added a new option to turn off the PayPal IPN validation step after a PayPal checkout
  • Significantly improved the manual checkout form’s look and feel
  • Added a new option to disable the automatic encrypted link expiry feature. useful if you don’t want the links to expire
  • Added a new option to enable admin notification via email when a squeeze form is submitted
  • Upgraded the shopping cart basket icon in the cart
  • Fixed an issue with download now button type and digital product variation
  • Added a new product display template (fancy 17) that can be used to show products in a grid display
  • Added a new product display template (fancy 18)
  • Enhanced the serial key retrieval function.
  • Added a new option in the manage customers interface to export a list of serial keys that has been issued to the customers
  • Improved the fixed amount discount implementation.
  • Download link shortening feature now uses Bitly API
  • Removed the extra “new line” character from the {product_link} email tag.
  • Added an empty new line character after each download link listing in the email.
  • Added an option to view the corresponding member profile from a customer entry record.
  • Added an option to capture the subsequent recurring payment sales data in the customers menu.
  • Updated the nav menu appearance in the settings interface to a better looking one.
  • The sales count and available inventory columns can be sorted from the Manage Products interface.
  • when “Show Quantity Update Button” option is enabled, it will show the quantity field with the up/down arrow options in the cart.
  • Added a checkbox in the “Addon Settings” so PDF files can be stamped at the time of download.
  • The selected shipping variation option from a checkout is saved in the admin notes field of the manager customers menu
  • Added a new settings in the advanced settings tab so the plugin can use the same timezone specified in WordPress General Settings
  • Ability to apply discount code via the URL
  • New feature to allow download now functionality using a text link (instead of shortcode).
  • New option in the Receipt Creator addon to export the receipt entries to a CSV file.
  • The subscriber ID value is now shown in the edit customers menu (applicable for subscription payments only).
  • New option to create gateway specific subscription payment via a URL.
  • Added a new filter to allow customization of the “no_shipping” field value of PayPal checkout parameter.
  • Created a new addon to collect customer input in the cart. https://www.tipsandtricks-hq.com/ecommerce/?p=4004
  • Added a new email merge tag for IP Address {ip_address} that can be used in the notification email body.
  • Manage Customer menu interface has been revamped. The functionality has been redesigned using menu tabs to make it more user-friendly and easy to use.
  • The conditional coupon now supports the “category id” is “greater than” condition.
  • Ability to enforce the customer to select an option from the variation dropdown (when you don’t want to use a default option).
  • Added a new email merge tag {total_minus_tax_and_shipping}
  • Added a new email merge tag {discount_amount}
  • Added new Amazon S3 integration option.
  • Added a new option to specify the checkout selector label in the cart (when using multiple payment gateways option)
  • Added a new settings option to set the alignment of the checkout button in the shopping cart.
  • Upgraded the shortcode inserter (TinyMCE button) to include more shortcodes.
  • Replaced the paypal’s deprecated page style parameter with image url.
  • Added filter for the seller notification email body.
  • Reworked the file uploader interface and made it more user-friendly.
  • The “Send Emails to Buyer After Purchase” feature now works for manual checkout emails also.
  • The {purchase_date} email merge tag now outputs a formatted date value according to your WordPress settings.
  • Added an option to specify Cancel URL on a per product basis.
  • Added an option (in the customer export data interface) to reset the export files.

WordPress eStore v7 Change Log

  • Updated the Add/Edit products menu user interface
  • Added a new product display template (Fancy 9 Display)
  • Added a new email tag for phone number – {customer_phone} (it will work when a customer enters the phone number during checkout
  • Optionally add the buyer email and some payment parameters in the admin notification email
  • Ability to reset the cart when the user browse to a different WordPress install in the same domain
  • Option to enable “No affiliate commission for self purchase”
  • WishList Members integration for Manual/offline Checkout
  • Added a new product display template (Fancy10 product display)
  • New shortcode to dynamically show a particular details of a product. Demo Product One shortcode will show the name of product 1.
  • Ability to show the original price (before the coupon discount application) side by side of the discounted price.
  • Added the save and retrieve cart feature
  • Image set will work by default on a per product basis.
  • Added an option to stamp the {transaction_id} in the PDF file when used with PDF Stamper plugin
  • Added an option to show an “Update” button next to the quantity field in the shopping cart
  • Changed the Authorize.net checkout description field’s value to include the Product IDs
  • Increased the z-index value of eStore’s lightbox CSS
  • Added a new email tag for counter. Use {counter} to add a counter in the emails
  • Added a new email tag for coupon code. Use {coupon_code} to add the coupon code used for the transaction in the emails
  • Added a new elegant looking compact cart shortcode
  • Text link option for PayPal subscription product
  • New “Download Now” button image for the squeeze form
  • Added an option to enable tax calculation on shipping amount
  • Added the quantity purchased information for a product in the “Manage Customers” area.
  • Updated the encrypted link shortener feature to use the new Google API with the API Key
  • New dynamic eStore and eMember protected buttons using the “restricted” parameter
  • New AWeber API integration
  • Ability to return to a product specific “Thank You” page for “Add to Cart” type button for one item checkout
  • Serial number/license key selling feature
  • Ability to reset the cart action messages on page load
  • Google base feed addon for your products
  • New shopping cart template (Fancy Shopping Cart 2)
  • Order summary shortcode (to list a summary of current shopping cart items)
  • Ability to customize the anchor text of the download links on the “Thank You” page to say “Click here to download”
  • Better WP Super Cache integration
  • Added a new product display template (Fancy 11 Product display template)
  • Ability to turn off the email that gets sent after the eStore squeeze form submission
  • Added an “Admin Notes” section in the manage customer area
  • Added links to the product in the purchase history shortcode
  • New checkout redirection option to minimize session conflict on some servers
  • An option to allow coupon stacking (if you want to allow your customers to apply multiple coupons and stack them in one checkout)
  • When a refund is issued via PayPal, it will update the order management addon’s transaction too
  • Ability to display the Unique Registration Completion URL on the “Thank You” page
  • Ability to enforce shipping variation selection before shipping price is shown
  • Option to show the currency symbol after the amount
  • Ability to POST the refund IPN to an external URL for 3rd party integration
  • Added a site diagnostic section in the “Admin Functions” menu of the plugin
  • Added an option to stamp the PDF file at the time of download.
  • Added an option in the eStore settings menu to show tax inclusive price
  • The total price amount dynamically gets updated when a user changes the variation drop down options
  • Added an option that will allow you to create a squeeze form that can redirect the user to a particular page after the squeeze form is submitted
  • Fixed some minor fancy2 product display template CSS glitch
  • All payment gateway compatible “Buy Now” type button shortcode (previously this was only available to PayPal)
  • Upgraded the settings menu tab look and feel
  • Added the ability to specify a language by force for the PayPal checkout page
  • Updated the CSS classes of the squeeze form so it can be customized easily from the CSS file.
  • Upgraded the checkout with paypal image to make it look better.
  • Added a check to make sure a customer has to select and update a shipping variation before he/she can checkout (if you are using the shipping variation feature)
  • Added an option to show the eMember’s memberhsip level IDs next to the “Reference Text” field (only if eMember is used together with eStore)
  • Updated some of the delete entry confirmation to be more user friendly
  • Added an option to turn off the welcome email sending for mailchimp autoresponder signup when double opt-in is disabled.
  • Ability to generate a list of unique customer email addresses (comma separated)
  • Added a new shortcode to create PayPal donations buttons to accept Donation via PayPal for a cause
  • Added a new shiny default “Sold Out” button image
  • Ability to specify a custom button image in the add to cart button shortcode to override the button image
  • Added more filters in the shopping cart output
  • Added the ability to apply interest grouping/list segmentation for MailChimp signups
  • Added the ability to bulk delete products in the products management interface
  • Added an option to open the download links on the thank you page in a new window.
  • New shortcode to display the purchase history of a customer.
  • Updated the eStore order management addon to do manual checkout “unpaid” and “paid” status handling
  • Added an option to specify a “Text” instead of an image for the sold out button message
  • Added a coupon start date field so you can create a coupon that for a future event
  • Added a “Go to Page” option in the eStore product display pagination area for easy navigation
  • When uploading product thumbnail image, you can choose the thumbnail size in the uploader and it will use that version
  • Added a settings option to customize the price display format.
  • The donation type buttons can also use the product specific return URL
  • Moved the email settings fields to a new tab called “Email Settings”
  • Added an option so you can now send the “Purchase confirmation email” as a HTML type email.
  • You can now customize the squeeze form email via the eStore email settings menu
  • You can now specify a download expiry time and download count limit on a per product basis
  • There is now a settings option in the “Advanced Settings” menu to enable the alternative redirection method
  • Ability to add email tags in the product specific instruction section of a product
  • Added an option to create buy now text link for any gateway available in the plugin
  • Ability to use a simple anchor text for the download links on the thank you page
  • Added a next product and previous product link in the edit product menu of the plugin
  • The {product_details} email tag will show a modified details for a subscription product

WordPress eStore v6 Change Log

  • Added an option to specify a number of products to show for each category when using the category fancy shortcode
  • Added IP address capture option for every customer in the customers database
  • Added a shortcode to display purchase history with product download option (Useful for eStore and eMember use)
  • Ability to use a text link for a Buy Now button. Example: http://www.your-domain.com/?wp_eStore_buy_now=2 (this can be used to post a link on your facebook or twitter page)
  • Added an option to disable the double opt-in email confirmation feature for MailChimp Autoresponder.
  • Made the package product download option more robust so you are allowed to nest package product inside another package product or a multi-part product.
  • Added an option to allow the admin to sort the products or categories by their name in the admin dashboard.
  • Ability to make a product tax exempt even when using the PayPal profile based tax option.
  • Added an email tag to include the shipping variation selected by the user in the email. {shipping_option_selected}
  • Enhanced the download now shortcode to work with digital variation
  • Enhanced the authorize.net post payment processing check to include the failure reason (if any) in the transaction result display.
  • Added an option whereby the admin can choose to automatically shorten the encrypted download URL to make it look cleaner.
  • Added the ability to specify a commission override on a per product basis when using the revenue sharing option
  • Added the ability to POST the PayPal IPN to a 3rd party script which can be used for additional 3rd party integration purpose.
  • Satellite Affiliate plugin integration option
  • Added the “Do Not Award Commission if Coupon Used” feature
  • Ability to left or right align the checkout button section in the shopping cart via CSS.
  • Ability to specify the variation addition symbol to your liking (by default it is the “+” sign but you can make it whatever you like)
  • Ability to POST the payment notification (IPN) to an external URL/script for all payment gateway (previously this was only available to PayPal gateway)
  • When shipping variation is used it will always prompt the customer to hit the “Update” button at least once to adjust the selected shipping choice.
  • Ability to specify multiple notification email address (the plugin can notify multiple email addresses after each sale)
  • Added a new email tag {product_link_digital_items_only} This will only list the products links for digital items in the shopping cart.
  • Made the pagination section for products more user friendly and customizable via CSS
  • Ability to hide the quantity in the shopping cart. Helpful if you are selling digital items only.
  • Download now button also tracks the sales/inventory counter
  • Added Mod X-Sendfile method for file download
  • Changing quantity or removing items after a coupon is applied won’t reset the cart anymore.
  • Added more email tags {total_tax}, {total_shipping}, {total_minus_total_tax}
  • Quantity limit per customer for individual product (this need to go to the features page).
  • Quantity limit per shopping cart checkout for an individual customer.
  • Changed how the revenue sharing calculation is calculated when affiliate campaign is used together.
  • Ability to use the email tags in the email subject area too.
  • New shortcode for recent products list
  • New shortcode for random products list
  • New shortcode for popular products list
  • Added Some Charts in the stats menu
  • Additional security check for free product download option (check the “Enforce Zero Price Checking on Free Product Download” option in the eStore settings)
  • Digital variation robustness when used in conjunction with normal variation
  • Upgraded the look and feel of the checkout redirection to the payment gateway
  • Ability to specify a minimum and maximum cart amount checkout limitation value
  • Ability to place the manual checkout form on a WordPress post or page
  • Fixed commission per transaction option
  • Ability to display the links on the thank you page for Authorize.net and Manual transactions (the same way PayPal transactions work).
  • Ability to add reCAPTCHA on the squeeze form.
  • Fixed analytic bug with Yoast’s Google Analytics Plugin

WordPress eStore v5 Change Log

  • Added the ability to specify product specific commission for tier2
  • Ability for the customer to enter a price they wish to pay for the product
  • Added a new shortcode to display a list of latest products (recently added products)
  • Added an option to copy the details of an existing customer when manually entering details of a new customer
  • Added the option to display products from a category using any of the fancy display options
  • Added an option whereby you can sort the product displays from a category
  • Added a few different download methods for sites having download issues
  • Ability to clean the encrypted download links table by performing bulk delete
  • Added the option to use PayPal’s PDT feature to display the links on the thank you page
  • Added CSS class for the variation select boxes so it can be customized with CSS
  • Added an option for shipping variation
  • Added support for Multiple categories per product (you can now assign more than one category for a product)
  • Added option to display Terms and conditions checkbox for buy now and subscription type buttons
  • Added option to display multiple product image in lightbox
  • Added Fancy6 display option in the extra shortcodes plugin
  • Added Fancy7 display option in the extra shortcodes plugin
  • Added Fancy8 display option in the extra shortcodes plugin
  • Added more download method option in the “AddOn Settings” tab
  • Added a check to verify if a specified Image URL is valid when creating or updating products
  • Manual payment gateway displays a summary of the items a customer is checking out
  • If using with WP eMember (WordPress membership plugin) then the manual checkout will auto fill in the form with the logged in member’s details
  • Added an option to reset the settings options to default
  • Added an option to reset the sales data so you can reset all the test transactions before going live
  • Amazon S3 Integration so that the downloadable files can be stored on Amazon S3
  • NextGen gallery auto integration for “Add to Cart” type buttons
  • Ability to capture lead on squeeze form submission (check under the addon settings menu)
  • Ability to automatically create affiliate accounts for buyers after purchase
  • Ability to specify an old price for a product (the old price is displayed as a slashed out price in some fancy displays)
  • Added an option to specify an expiry date for a coupon

WordPress eStore v4 Change Log

  • Google Analytics e-Commerce tracking
  • Ability to display purchase history of members when used with the WordPress Membership plugin
  • NextGen gallery alternate integration
  • Added smart thumbnail options. If your product thumbnail images look a little bit squashed then this feature will fix that issue.
  • Ability to POST PayPal IPN data to a external script (Can be used to integrate with the Memberwing plugin)
  • Better checkout flow with an option of using fancy redirection to the payment gateway.
  • Ability to track coupon per transaction
  • W3 Total Cache Integration
  • Fancy 3 display
  • Fancy 4 display
  • MemberWing Plugin Integration
  • Limit download by number of download count
  • Option to add customers to the database for manual checkout
  • Changed the look and feel of the checkout redirection page.
  • The product name, customer’s address and phone number also gets stored in the customer’s database
  • PDF Stamper integration
  • Added variation control options for “Buy Now” and “Subscription” type buttons
  • Added GetResponse autoresponder inegration
  • Option to only allow logged in members to checkout when used with WordPress Membership plugin to create an Amazon site type checkout system.
  • Added a fancy display option for the shopping cart.
  • Added order summary display option on the Manual checkout page.
  • Added an option to add product download links to the email that gets sent after the manual checkout.
  • Added built-in tax option
  • Ability to setup a revenue sharing site
  • TinyMCE butons to insert shortcodes
  • Added the option to display a quantity text box with the add to cart button.
  • Ability to display the product prices in a secondary currency side by side your primary currency (this is for display purpose only… the actual transaction will use the primary currency)

WordPress eStore v3 Change Log

  • Added the option to add product specific instructions for buyers on a per product basis (the instruction gets appended to the main email body).
  • Added a new shortcode that allows you to display a category with name, thumbnail and description (Refer to the eStore Shortcodes page).
  • Added an option to display the Compact cart in the sidebar widget (useful for sites with narrow sidebar)
  • Added the thumbnail display option in the “Manage Products” page for easy product identification.
  • Added the “One Time Commission for Subscription Payment” option (Check under the Addon Settings tab).
  • Option to upload product details from a CSV file using the WP CSV to DB plugin.
  • Added Itemized sale stats in the “Stats” menu.
  • Fixed some other minor bugs.

WordPress eStore v2.9 Change Log

  • Product names can now be linked to another page when using the fancy display options.
  • Product details copy option to copy an existing product.
  • WishList Members plugin can be integrated through the settings menu of the plugin (3rd party integration tab).
  • Added an option whereby a customer can enter an “Affiliate ID” in the shopping cart to give reward to an affiliate
  • Added the capability to link the “Affiliate ID” field with the coupons table so customers entering an “Affiliate ID” in the shopping cart will also be able to receive a discount
  • Added an option in the “manual checkout settings” section to turn on or off automatic commission awarding for manual checkout.
  • Now a custom page style name can be specified in the paypal gateway settings section to allow custom template checkout page
  • Upselling feature (a textarea in the discounts feature where the admin can put in some coupon codes which the customers only get after a checkout).
  • Fixed an issue whereby subscription payment wasn’t sending quantity value so available qty didn’t change

WordPress eStore v2.5 – v2.8 Change Log

  • Added a feature so downloadable goods can be delivered on the “Thank You” page after payment. See the instructions page to learn more.
  • Ability to display the shopping cart in your own language.
  • Added a trigger text that allows the shopping cart to be placed on a checkout page and it displays empty cart (add it to the shortcodes post)
  • Added the capability to use the WordPress’s mailing system
  • Ajax/JQuery powered squeeze page type form
  • Be able to automatically redirect to Checkout page after add to cart button is clicked
  • Fix quantity to not update when it is more than the available copies
  • Ability to take customer input for special instructions
  • Ability to offer multiple file downloads per product
  • Fixed it so the Admin function link generation works for package products and muli part files
  • The buy now and subscription buttons display normal buttons when the button image is not specified
  • Shopping cart multi-language support
  • Paginate and Search capability for Customer display list (also added transaction id, date etc display)
  • Better product search capability – Partial search for products and customers
  • Price round to two digit so PayPal doesn’t have issue after coupon code is applied
  • Wishlist plugin integration for “Add to Cart” and “Buy Now” buttons.
  • Added a 4th variation option
  • The instruction/customer input field is customizable
  • Added a second fancy product display option
  • AWeber Integration
  • Added PayPal profile based shipping capability (You can now use weights for products and specify weight based shipping in your paypal profile)
  • Sell different products in different currencies from one site when using the “Buy Now” type buttons.
  • Added Redeemable coupon option (also displays a message when you apply a coupon)
  • Did some sopping cart beautification
  • Ability to link the thumbnail image to any URL
  • Ability to make the add to cart button redirect to a URL rather than adding the product to the cart (useful when you don’t sell your own products)
  • Ability to customize the ruturn button text after payment on paypal
  • Added manual checkout option
  • Added 2checkout option. Read the payment gateway instructions page to learn more.
  • Option to place a “Continue shopping” link in the cart
  • Auto customer record reversal upon refund
  • WP eStore can now be integrated with iDev Affiliate Software
  • WP eStore can now be integrated with JROX JAM Affiliate Software
  • Added shortcodes to display sales and available copy counter
  • The plugin now sends email to the admin when payment verification fails
  • Added a few options for automatic Free Shipping Discount
  • Added conditional coupon option
  • Added option to display category list like the fancy product display

WordPress eStore v2.4 Change Log

  • Product categorization (ability to categorize products and display all products from that category)
  • Ability to configure a “Subscription” button for any type of subscription payment.
  • Variation control for digital product (digital delivery of different files depending on the selection)
  • LightBox effect on product display images (Just click on a thumbnail image to see how it works).
  • Ability to setup “Buy Now” type buttons with different PayPal email address (per button basis). Useful on a multi-author blog where different authors can setup “Buy Now” buttons with their products and get the money directly into their PayPal account.
  • Add/edit products page face lift
  • WPMU options page fix
  • Added more security checks in the post-payment processing handling script.
  • Ability to insert HTML (eg. URL of a page) in the product description field (Useful when you want to link to a detailed description page for that product).

WordPress eStore v2.3 Change Log

  • Added Coupon Code/Discounts Feature (How to Use Coupons / Discounts in WP eStore)
  • Added variation control feature (How to use variation control in a product)
  • Ability to offer product specific affiliate commission when using with the WP Affiliate Platform plugin.
  • Added a stats page to display some basic stats (I will add more stats and graphs in a future release)
  • Option to display a link to the products/shop page in the shopping cart widget when the cart is empty.
  • Added Subscription option.
  • Added an empty Cart button in the shopping cart.
  • Display the product name of each product next to the encrypted link in the email.
  • When using the stylish display it shows the Available Quantities of that product if specified.
  • Ability to use an image to display the empty shopping cart instead of just plain text (Shopping cart empty).
  • Fixed a bug whereby refund was issuing another email.
  • Tidied up the Pagination on the display all products page a little bit.
  • Tidied up some labels
  • Fixed some minor bugs and tightened some validation checking for more security.

WordPress eStore V2.2 Change Log

  • Added the capability to configure packaged/bundled products from the existing products (How to Configure bundled product).
  • Products can now be configured with a thumbnail image and a description and can be displayed in a stylish way with a trigger text (Display product in a stylish way).
  • A list of all products can be displayed on a page in a stylish way through the use of a trigger text (Display a list of all the products).
  • Added an option so the download URL can be customized (How to Customize the download URL).
  • Added an option so the plugin can be run in Sandbox mode (for PayPal sandbox testing) with one tick (Running the plugin in sandbox mode).
  • Added pagination in the manage products screen. This will help anyone who has configured a lot of products by splitting the page into smaller pages (eg. displays 20 products per page).
  • Added product search option from the Manage products screen.
  • Added a minor tweak so the return page from PayPal doesn’t show the POST data in the URL.
  • Removed the Currency field from the Add/Edit products menu (This value is now derived from the settings menu globally).
  • Fixed the hardcoded $ (currency) sign in display all products.
  • Fixed a bug whereby the squeeze page was not working in Internet Explorer.

WordPress eStore V2.1 Change Log

  • Integrated with the WP Affiliate Platform Plugin.
  • Some minor code refactoring.

WordPress eStore V2 Change Log

  • Added a Customer Database (When a Customer purchases an Item the Name and Email address goes to the database)
  • Individual return URL for ‘Buy Now’ type buttons (Each ‘Buy Now’ buttons can have a different return URL to the one specified in the settings menu)
  • Ability to offer a ‘Squeeze Page’ type free product download option (This can be used to let the visitors download a free digital product after they fill in their name and email address. Very effective for email list building)
  • Capability to limit the maximum number of copies to be sold for a specific product (Useful when you only want to sell 50 copies of a product for example)
  • Added shipping calculation capability (Useful for non-digital products)
  • Added a counter for ‘sales count’ for each product (Useful to find out how many copies of a product has been sold)
  • Some other minor additions

WordPress eStore Installation and Update Guide

Installing and Upgrading WordPress eStore plugin is very easy. The installation of this plugin is similar to all the other WordPress plugins.

Fresh Installation of WP eStore

First deactivate the WP Simple Paypal Shopping cart plugin if you are using it. WP eStore plugin has all the functionality of the WP Simple Paypal Shopping cart.

  • Click on the “Add New” link from the “Plugins” menu inside your WordPress admin dashboard.
  • Click the “Upload Plugin” button from the top of this page.
  • Browse for the plugin’s zip file (wp-cart-for-digital-products.zip) and hit the “Install Now” button.
  • Activate the plugin through the Plugins menu in WordPress.

Installation Video

Upgrade WP eStore Plugin

Before you ask

Yes, the plugin will retain all the previous information that you saved. No data (your product details, settings values etc.) will get lost during the upgrade.

Important Note 1: If you have a live site with high traffic where customers are constantly making purchases then you should consider installing the new version of the plugin on a test WordPress site first to minimize any chance of upgrade related issue taking you out by surprise. Most people prefer to have a copy of WordPress installed in one of the sub-directories for testing purpose (you can install it in a sub-domain too). This way if you face an issue due to upgrading, you can report it to us and while we work on it, your main site won’t be affected.

Important Note 2: Some users have this bad habit of keeping multiple copies of the same plugin in the plugins directory. This is the source of many problems. Please note that you should only have one version of any WordPress plugin in the plugins directory at any given time. If you want to keep backups then you can keep it in your uploads directory or on your computer’s hard drive.

With that said, please follow the instructions below when upgrading the WordPress eStore plugin from an older version to a newer version:

Upgrade Steps

Do the following steps to upgrade the plugin:

  • Deactivate the current version of the WP eStore plugin from the Plugins menu.
  • Delete the current version of the WP eStore plugin from the Plugins menu.
  • Now, follow the fresh installation steps outlined above to install the plugin.

Don’t be scared to delete the plugin. It will retain all the previously entered settings and product information (no data will get lost during the upgrade).

Basic Usage Guide

Step 1. First add the product(s) to the database through the Add/Edit Products interface. Products can be modified through the Manage Products interface.

Step 2. To add the Add to Cart button simply add the following trigger text to a post or page next to the product.

[wp_eStore_add_to_cart id=PRODUCT-ID]

Replace PRODUCT-ID with the actual product id of the product (example, 1). Product IDs are unique numbers that are automatically created for you when you add a product to the database. All of your products IDs can be found in the Manage Products section.

Step 3. To add the shopping cart to a post, checkout page and/or sidebar simply add the following trigger text to a post or page in HTML view or use the sidebar widget. The shopping cart will only be visible when a customer adds a product in the post or page.

[wp_eStore_cart]

Additional Usage Guidance

  • Quick Setup Video Tutorials
  • How to Show “Add to Cart” buttons
  • How to Use “Buy Now” type buttons
  • How to Use “Subscription” type buttons
  • How to Use PayPal Donation type buttons

Please leave a comment below if you have any questions.

Your Shopping Cart

Shopping Cart Empty
Shopping Cart is Empty
Visit The Shop

Search

Featured Documents

Stylish Product Display Options for WP eStore WP eStore Quick Setup and Usage Video Tutorial WP eStore Shortcodes and Functions Reference WordPress eStore Plugin Features WordPress eStore Plugin Demo What Our Customers Have to Say About Our Products WordPress eStore WishList (Feature Suggestions) WordPress eStore Frequently Asked Questions (FAQ) How to Show Add to Cart buttons

Featured Plugins

WP Express Checkout Plugin
wordpress_estore_icon
wordpress membership plugin icon
wordpress_affiliate_plugin_icon

Copyright © 2025 | eCommerce Plugins