Tips and Tricks WP eCommerce

eCommerce Solution for WordPress Blog

  • Home
  • eCommerce Plugins
  • WP eStore Documentation
  • WP Shopping Cart Doc

Setup Pay Per View with Indefinite Access to the Purchased Content

Normally when you setup pay per view content and sell access to a page, the access expires after a configurable amount of time.

If you don’t want the access to expire (so the user can view the page indefinitely) then do the following:

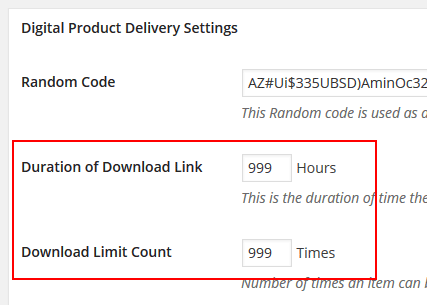
  • Go to eStore settings menu
  • Enter a value of “999” in the “Duration of Download Link” field
  • Enter a value of “999” in the “Download Limit Count” field
  • Save the settings.

disable-link-expiry-feature-settings

This will turn off the automatic link expiry feature. So after a user purchase the item, they can click on that link whenever they want to view the content and they will be given access to that page.

How to Display a List of Latest Products

The latest products shortcode allows you to display any number of latest products (based on the date added to your store).

How to Display Your Latest Products.

You can use the eStore and the Extra Shortcodes add-on to display a list of your latest products. To do this all you need to do is follow the steps outlined below.

Step 1: You will need to have the eStore and the Extra Shortcodes add-on installed on your site.

Step 2: Create a page where you want to display the list of latest products. You can also use an existing page or widget.

Step 3: Place the below shortcode where you want a list of your latest products to be displayed.

[wp_eStore_latest_products number=5 style=1]

Parameters you can modify in this shortcode.

• Number of products (number) This is how many products you want to be displayed using the shortcode. Example: If you set this number to 5 the shortcode will display the 5 most popular products.

• Style (style) This allows you to use different fancy displays to show your products. You can see a full list of the fancy display templates here.

Related Documents

  • Display a List of Random Products
  • Display a List of Popular Products

How to Display a List of Random Products

The random products shortcode allows you to display any number of random products from your available products .

How to Display Your Latest Products.

You can use the eStore and the Extra Shortcodes add-on to display a list of your random products. To do this all you need to do is follow the steps outlined below.

Step 1: You will need to have the eStore and the Extra Shortcodes add-on installed on your site.

Step 2: Create a page where you want to display the list of random products. You can also use an existing page or widget.

Step 3: Place one of the below shortcodes where you want a list of random products to be displayed.

Shortcodes

1. [wp_eStore_random_products number=1 style=1 type=1]

Parameters you can modify in this shortcode.

• Number of products (number) This is how many products you want to be displayed using the shortcode. Example: If you set this number to 5 the shortcode will display the 5 most popular products.

• Style (style) This allows you to use different fancy displays to show your products. You can see a full list of the fancy display templates here.

• Button type (type) This allows you to specify what type of button you want to use. Example: Buy Now, Add to Cart, Subscription or Download Now.

2. [wp_eStore_random_products number=1 style=1 type=1 cat_id=1]

Parameters you can modify in this shortcode.

• Number of products (number) This is how many products you want to be displayed using the shortcode. Example: If you set this number to 5 the shortcode will display the 5 most popular products.

• Style (style) This allows you to use different fancy displays to show your products. You can see a full list of the fancy displays here.

• Button type (type) This allows you to specify what type of button you want to use. Example: Buy Now, Add to Cart, Subscription or Download Now.

• Category ID (cat_id) This allows you to specify a category that you want the random products to be displayed from. When you use this shortcode it will only take the random products from the specified category.

Related Documents

  • Display a List of Latest Products
  • Display a List of Popular Products

How to Display a List of Popular Products

The popular products shortcode allows you to do the following:

Display any number of popular products (based on the number of quantity sold) from your available products.

How to Display Your Popular Products.

You can use the eStore and the Extra Shortcodes add-on to display popular products easily. You just need to follow the steps outlined below.

Step 1: You will need to have the eStore and the Extra Shortcodes add-on installed on your site.

Step 2: Create a page where you want to display the list of popular products. You can also use an existing page or widget.

Step 3: Place the below shortcode where you want your popular products to be displayed.

[wp_eStore_popular_products number=1 style=1 type=1]

Parameters you can modify in this shortcode.

• Number of products (number) This is how many products you want to be displayed using the shortcode. Example: If you set this number to 5 the shortcode will display the 5 most popular products.

• Style (style) This allows you to use different fancy displays to show your products. You can see a full list of the fancy display templates here.

• Button type (type) This allows you to specify what type of button you want to use. Example: Buy Now, Add to Cart, Subscription or Download Now.

Related Documents

  • Display a List of Random Products
  • Display a List of Latest Products

Shortcode Inserter Addon for eStore Plugin

All the shortcodes are listed on this page. You can copy and paste any shortcode into a standard text or shortcode block.

This addon is no longer needed. The main plugin has this functionality already.

The shortcode inserter addon allows you to easily insert eStore shortcodes into your WordPress post/page editor.

Using This Addon

Once you have actived this addon a tinyMCE button (eStore) will appear in your post/page editor. You can click it to directly insert any eStore shortcode. screenshot of the shortcode manager addon

Clicking on the “eStore” button will popup a window where you can choose the shortcode you want to insert.

Select the shortcode then enter any necessary ID value and hit the “Insert and Close” button.

shortcode-inserter-user-interface

Download the Addon (v1.1)

You can download this addon from the addon download area of our support forum.

Please note that some of these free eStore addons are developed by our users in the community. So they do not have any advanced customization option. The description above explains exactly what this addon does.

WP eStore Bulk Discount By Line Item AddOn

The eStore Bulk Discount By Line Item addon allows your customers to automatically get a discount based on the number of items they are purchasing.

Installing the eStore Bulk Discount By Line Item Addon

You can install this addon the same way you install any WordPress plugin:

  • Go to the “Add New” plugins screen in your WordPress admin area
  • Click the “upload” tab
  • Browse for the addon file (eStore-bulk-discount-by-line-item.zip)
  • Click “Install Now” and then activate the plugin

Using this Addon

When this addon is active, You can easily configure some conditions that will be used to automatically apply a discount on the items in the shopping cart.

To configure a new discount condition click on the “eStore bulk discount” sub-menu under the WP eStore plugin menu.

screenshot showing how to access the estore bulk discount addon menu

To add a new discount condition you need to enter the following information:

  • From (Quantity): The minimum number of items required to apply this coupon. For example – 7.
  • To (Quantity): The maximum number of items required in the shopping cart to apply this coupon. For example- 9.
  • Discount Rate (%): The rate of discount in percentage that will be applied on the item amount. For example – 20.

Click the “Save” button which will add the new discount condition.

screenshot showing how to configure a bulk discount condition

How Does the Discount Condition Work

This addon is an improved version of eStore Bulk Discount addon. It calculates the total quantities of an item and apply the discount accordingly (instead of calculating the total quantities of all the items in the shopping cart).

Suppose, you have three products (ID#s: 2, 3, 4) and your condition is configured like the following:

  • Quantity 1 – 4: discount 20%
  • Quantity 5 – 6: discount 25%
  • Quantity 7 – 9: discount 30%

If a user on your site orders product 2 ( quantity – 7), product 3 (quantity – 5), product 4 (quantity – 11) discount will be applied as:

  • Product 2 – discount 30%
  • Product 3 – discount 25%
  • Product 4 – no discount

AddOn Price

The eStore Bulk Discount By Line Item Addon is FREE for all customers who purchased WP eStore plugin from us.

Download the Addon

You can download this addon from the addon download area of our customer only support forum.

General Note

Please note that some of these free eStore addons are developed by our users in the community. So they do not have any advanced customization option. The description above explains exactly what this addon does.

Product Display Template for Selling Videos

If you are selling videos from your WordPress site and you want to present the video product using a nice template then use this addon plugin.

You can configure a preview of the video that you are selling so your customers can preview it before purchasing the item.

Note: The video preview will need to be a YouTube video.

screenshot showing the video product template

Clicking on the “Play” button will preview the video in a lightbox window (see example below).

video-product-display-lightbox-preview

Installing the Video Product Template Addon

You can install this addon the same way you install any WordPress plugin:

  • Go to the “Add New” plugins screen in your WordPress admin area
  • Click the “upload” tab
  • Browse for the addon file (eStore-video-products.zip)
  • Click “Install Now” and then activate the plugin

Using this Addon

When this addon is active, You can easily enter some video specific information in the “Add/Edit Product” interface.

  • Video Preview URL: URL of the video that will be used as a preview on the front end (YouTube/Vimeo)
  • Video Duration: Duration of the video (It will also be displayed on the front end)

screenshot showing how to configure information for video product template

Since the video template requires a thumbnail for the video you will need to specify one in the Thumbnail Image URL field.

screenshot showing the thumbnail image url field of video product

Click the “Save” button to update the product.

Video Product Template Display

Create a new post/page and specify the following shortcode to show your video template:

[wp_eStore_video_product_template id=”2″]

Here, The value of id is the unique product ID for your eStore video product.

screenshot showing the video product template

Get the Video Product Display Template Addon

The price of this addon is $39.95

Please contact us to purchase this addon.

Automatically Apply Discounted Product Prices for Members

You can automatically give a discount to your emember users on your eStore products.

How Auto Member Discounts Work

Normal visitors (non-members) of the site will see the standard full product price. Logged in members of the site will see a discounted price (according to the discount rate you set in the settings).

discounted-product-prices-for-site-members

Configuring the Automatic Discounts for Members

Step 1) Download and install the eStore dynamic discounts/coupons addon

Step 2) Go to the “Dynamic Coupons” menu in from the eStore admin dashboard area

Step 3) Go to the “WP eMember Integration” section and check the “Enable Auto Discounts For Members” option.

Step 4) Specify a discount rate in the “Member Discount Amount” field. For example: use a value like 25 if the members should automatically receive a 25% discount.

Step 5) Save the settings

Step 6) This step is optional. You can edit your membership level and apply a different discount rate if you want to offer different discount to different levels. For example: you may want to apply 15% discount to silver level members and 30% discount to gold level members.

When members go to your store page, they will automatically see the discounted product price (according to their membership access level). Normal visitors (non-members) will continue to see the standard product price.

This works for any fancy product display templates offered in WP eStore. So this will work even if you are using it on a sales/landing page (instead of a store page).

WP eStore Manual Checkout Form Builder AddOn

General Description

The eStore Manual Checkout Form Builder Addon is a plugin which allows you to customize the manual/offline checkout form.

The user can add new form fields or control how the form will be displayed using this addon.

See example screenshot below:

screenshot of manual form using estore checkout form builder addon


Using the eStore Manual Checkout Form Builder Addon

1. Once you have installed the addon it will appear in the eStore plugin menu

screenshot of checkout form builder addon menu in the estore settings

2. The addon automatically configures all the default form elements during activation.

screenshot of estore checkout form builder addon settings

3. To add a new form element enter the following and click the “Save Form Element” button.

a) Field label: The text for the input field

b) Field Name: The name of the input field (it needs to be unique)

c) Required: Check this option if you want to make this field required

d) Display Order: The order in which this field will be rendered (example: 11).

screenshot of how a new form element can be created in the estore checkout form builder addon

Get the Manual Checkout Form Builder Addon

The price of this addon plugin is $29.95

Copy Customer Details to Create a New Customer Record

If you needed to create multiple customer record entries with a slight variation then use the “copy customer record” feature of the eStore plugin.

Go to the “Add/Edit Customers” interface and look at the “Copy Customer Details from an Existing Customer” section. See screenshot below:

copy-customer-details-interface

You can copy the existing customer record then change the value of some fields (for example: the products they purchased) then save it as a new record.


« Previous Page
Next Page »

Your Shopping Cart

Shopping Cart Empty
Shopping Cart is Empty
Visit The Shop

Search

Featured Documents

Stylish Product Display Options for WP eStore WP eStore Quick Setup and Usage Video Tutorial WP eStore Shortcodes and Functions Reference WordPress eStore Plugin Features WordPress eStore Plugin Demo What Our Customers Have to Say About Our Products WordPress eStore WishList (Feature Suggestions) WordPress eStore Frequently Asked Questions (FAQ) How to Show Add to Cart buttons

Featured Plugins

WP Express Checkout Plugin
wordpress_estore_icon
wordpress membership plugin icon
wordpress_affiliate_plugin_icon

Copyright © 2025 | eCommerce Plugins