Tips and Tricks WP eCommerce

eCommerce Solution for WordPress Blog

  • Home
  • eCommerce Plugins
  • WP eStore Documentation
  • WP Shopping Cart Doc

WP eStore’s Pay Per View – Using WordPress Permalinks as Digital Products (APR)

Authenticated Page Redirect (APR) allows you to offer secure one-off access to WordPress pages and posts, without requiring the services of a membership plugin. You might find this capability useful in some cases for selling access to something like an event or time specific page or post, which may in turn provide access to live streaming video.

This feature is widely used to setup pay per view (PPV) content.

What to Expect

This is the scenario that we are after:

  1. A visitor arrives on your site and sees a purchase button for some Pay Per View (PPV) content.
  2. The visitor makes a purchase using the purchase button.
  3. The visitor then gets an encrypted link in the email (optionally you can also show the links on the Thank you page).
  4. The visitor clicks on the encrypted link which sends him to a WordPress page and allows him to see the content embedded on that page. If the visitor directly goes to this page without clicking on the encrypted link first (no content will be shown to the visitor).

How the APR Feature Protects the Content

The key thing to understand here is that the APR feature protects the content inside the APR shortcode (it doesn’t try to mask or hide the URL of the page). The content inside the APR Shortcode can only be viewed after the customers click on the encrypted link for that product that they receive after the purchase. If anyone directly goes to that URL the content inside the APR shortcode will be hidden this is why there is no need to hide the actual URL.

Setup Preparation (Basic Understanding)

The security mechanism used by APR is an encrypted session cookie; the APR Cookie. Each APR cookie is specific to a particular permalink, and contains encrypted timing information. On the pages being protected by APR, called APR Targets, an APR shortcode encloses the content being protected.  Content enclosed by an APR shortcode will only be displayed if one of the following specified conditions are met:

  • An APR cookie EXISTS in the current browser session.
  • An APR cookie exists and is LESS THAN an a specified number of minutes old.

Setup Authenticated Page Redirect

There is another pay per view feature video tutorial in our additional video tutorial section on the forum.

Step 1 (Create the Page with the Content and the Shortcode)

To setup a permalink as a digital product first you need to create the target page and setup the content that you want to deliver after the purchase.

Create a page or post that will become the APR target then enclose the content you want to protect using one of the following shortcodes:

  • Available Shortcodes for Authenticated Page Redirect Feature

Please make sure that the permalink you will be using works. Copy and paste it into the address bar of your browser. Specifically, ensure that the permalink you think you are going to use does not get modified by WordPress. If the permalink changes, then either fix the problem or use the resulting URL as the link you will use for the APR target URI.

Step 2 (Configure the Product)

Setup your digital product, using the URL of the APR target page in the “Digital Product URL” field.  CHANGE the URL scheme from ‘http’ to ‘aprtp’ or from ‘https’ to ‘aprtps’ in the “Digital Product URL” field. So for example if your APR target page URL is the following:

https://www.example.com/my-secret-page-with-awesome-video

Change the keyword “https” to “aprtps” and use that URL in the “Digital Product URL” field. So for the above example you will enter the following in the “Digital Product URL” field:

aprtps://www.example.com/my-secret-page-with-awesome-video

Now, whenever an encrypted link, pointing to an APR target is processed by eStore; an APR cookie will be issued, before the browser is redirected to the APR target, by the download manager script. This way your customers can only view the protected content on that page after they have made a payment.

Limitations

If an APR target contains the ‘nextpage’ tag, only content on the first page will be protected by the APR shortcodes.

Troubleshooting Tips

Reasons for why APR would not work include:

  1. The product URL does not specify the APRTP protocol. You forgot to use the correct URL format (see step 2 above) in the “Digital Product URL” field.
  2. The specified URL used with the APRTP protocol does not EXACTLY match the “pretty URL” format used for the non-APR URL. Example, if the non-APR URL is “http://site.com/page/” the APR URI must include the trailing “/” or it will not work.
  3. The browser is not accepting cookies.

This is an example of how to check for proper APR cookie authorization. Notice the conditional testing that is taking place. The conditional shortcode can be used to handle expired links.

[wp_eStore_APR expiry=0 status=unexpired]
Now you see me!
[/wp_eStore_APR]
[wp_eStore_APR expiry=0 status=expired]
Now you don't!
[/wp_eStore_APR]

Allow Indefinite Access

Read this post to learn how you can allow the purchasers to have indefinite access to the content.

Amazon Web Services Simple Storage Service (AWS S3) Integration

We now have a free addon for Amazon S3 integration. This addon makes the S3 integration simpler. The following integration will still work but it is recommended that you use the addon going forward.

The WP eStore plugin can be integrated with Amazon S3. This feature lets you securely store and deliver digital products/downloads using Amazon’s Simple Storage Service (S3).

Amazon S3 integration is really helpful when you want to sell large files without using/wasting bandwidth of your server.

The Amazon S3 integration involves the following two steps:

  1. Specify the Amazon S3 API details in the eStore plugin’s settings
  2. Specify the URI of your digital asset in the digital product URL field of the product in question

Amazon S3 Integration Video Tutorial

Checkout the amazon S3 integration video tutorial from our additional video tutorials section.

Amazon S3 Integration Details

Step 1 – Specify Amazon S3 API Details

The amazon S3 integration options can be found under the “AddOn Settings” tab in eStore Settings menu. Go to the following interface and specify your S3 API details:

WP eStore Settings -> AddOn Settings -> Amazon Web Services (AWS)

If you don’t already have your Amazon S3 API keys then read this document to learn how to get Amazon S3 API keys (you can find similar information on Amazon site also).

Once you have configured the amazon S3 access key and secret access key in the S3 settings section under the AddOn Settings tab of eStore, you are ready to start using your Amazon s3 account with WP eStore.

Step 2- Specify the S3 Asset Location

You need to tell WP eStore to redirect encrypted download links to the AWS S3 server using the AS3TP URI in the Digital Product URL field of the product. Basically, enter your Product URL using the following method in the “Digital Product URL” field:

as3tp://bucket.s3.amazonaws.com/folder/object

Here, “bucket” is the name of the S3 bucket containing the digital product, and “folder/object” is the S3 key which points to the digital product.

You may also use “as3tps://” in place of “as3tp://” if you want the S3 download to be SSL encrypted. You also have the option of inserting “public@” before the bucket name, if the S3 object is marked as “public” on the S3 server.

The following screen capture shows how to properly create this URI value

Amazon S3 Integration

Here are some typical examples of valid AS3TP URI that you can use in eStore:

  • as3tp://bucket.s3.amazonaws.com/object
  • as3tp://bucket.s3.amazonaws.com/folder/object
  • as3tps://bucket.s3.amazonaws.com/folder/folder/object
  • as3tps://[email protected]/object

Remember to use one of the above URI methods to enter your product URL in the “Digital Product URL” field (Don’t just use the normal amazon S3 URL of the product in that field).

Use of Amazon S3 is completely optional, but provides several advantages for those who use it. The biggest advantage is that your eStore server is relieved of the burden of having to act as an intermediary when processing anonymized downloads. This will enhance the download experience for users, because they are directly downloading files from the higher bandwidth S3 server. And because the redirection is done using an expiring AWS presigned URL request, your digital products are protected; even if the user saves the redirection URL. And, successful downloads are no longer dependent upon the reliability of your hosting provider’s server.

What File Permission To Use in Amazon S3

When you upload a file to your amazon S3 account, you should make it private (not public). If you make a file private, then no one can download that file other than going via the encrypted link eStore creates after a purchase.

The following screenshot shows how you can make a file in your amazon S3 account private.

Amazon S3 File Permission

Amazon S3 File Permission

IMPORTANT NOTES:

  • Strict S3 bucket naming restrictions are enforced.
  • Only virtual hosted style bucket names are supported. Path style bucket name access is not supported.
  • CNAME DNS aliases are supported.
  • Region specific end points are not supported.
  • Use of “public@” tells eStore not to presign URL for public objects. Forgetting to add “public@” to the URI, generates a presigned URL, but no redirection errors will occur.
  • Remote hosting (on S3) of PDF Stamper files is not supported (if you are using the PDF Stamper plugin).

WP eStore Shipping Variation

This post explains how you can configure a shipping variation for your products when using the WP eStore plugin.

The shipping variation can be very useful if you want to charge different shipping amount to your customers based on their selection.

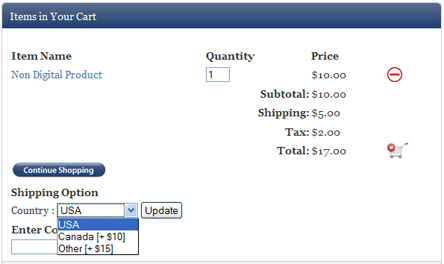
The “Shipping Variation Option” field located in the settings menu of eStore can be used when you need to adjust the shipping price based on a selection the customer makes. Say for example, you have configured all the products with shipping price that covers domestic shipping. Now, you want to charge $10 extra for shipping items to Canada and $15 extra for shipping items to any other country. Enter the following text in the “Shipping Variation Option” field and save the settings.

Country|USA|Canada:10|Other:15

This will give the customers an option in the shopping cart that will let them select the destination. If they are located in the US (domestic shipping) then no extra shipping will be charged but if they are from Canada or other county then the appropriate amount will be added to the shipping cost:

Shopping Cart with Shipping Variation Option

What to do if I do not want to charge an individual shipping for an item but want to use the shipping variation?

Simply enter “0.001” in the shipping field of the individual item. The value “0.001” is very small so it will not add any individual item shipping but will trigger the display of the shipping variation as the shopping cart will treat this item as a physical product.

When to use the “Always Display Shipping Variation” field?

By default the shipping variation is only displayed if any of the items in the shopping cart has a shipping value specified. This is so the shipping variation does not get displayed to customers buying digital products only.

If you are only selling physical products then you can check this option and the shipping variation will be displayed to the customer all the time even though you haven’t specified a shipping value in the items.

How to Allow Customers to Specify a Price For a Product (Name Your Price)

WP eStore plugin allows you to create products whereby your customers can specify how much they want to pay for the product (pay what you want).

This feature can be helpful for accepting donation amount or selling a product for charity work.

How to Use “Offer Your Price” Feature

  1. Create a product as you normally do in eStore
  2. Specify the minimum amount your customers can pay in the “Price” field of the product. Payment Gateways do not allow $0 product checkout so you need to specify a minimum price value of the product.
  3. Check the “Allow Customers to Specify a Price” checkbox from the “Additional Product Details” section and that should do it.

Allow customers to specify a price


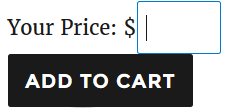
Now, when you put an “Add to Cart” button for this product on a page, it will have a price field next to the button so the customers can specify how much they want to pay for the item.

name-your-price-feature-example

Using it with a Product Display Template

If you are using a fancy product display template to show the product then it will look like the following:

Customer Specifies a Price Demo
This is a test description. This description is here to show how the description of this product looks like.
Price: $2.00
Your Price: $ 

Note:

  • The minimum price that you can set for a product can be as low as 0.01 but please keep in mind that the payment gateway (for example PayPal) may not like it as they are not getting any commission from these transactions.
  • If you want to offer a product for free then use the squeeze page form option to do so.

How to Setup a Revenue Sharing Product Selling Site (Split Profit Setup)

If you are setting up a revenue sharing site (to split profit with a partner) whereby you want to share the profit of the products with the author/creator of the product then you can use the “Revenue Sharing” feature of WP eStore.

How Revenue Sharing Works

WP eStore allows you to setup a revenue sharing site with the help of the WP Affiliate Software. Basically, you setup your authors as an affiliate then specify the affiliate ID of each author to their corresponding products when setting up the product in eStore (this links the author with a particular product). When a product is sold, eStore checks to see if this product is using revenue sharing. If revenue sharing is used for that product then it awards the appropriate amount to the corresponding author of the product in the form of affiliate commission. The commissions will keep accruing whenever this product sells. You can then payout all the outstanding commission (the authors share) at the end of the month or week or whatever.

How to Use the Revenue Sharing Feature

Step1: Enable the revenue sharing feature from the “AddOn” settings menu of WP eStore

Enable Revenue Sharing

Step2: Create an affiliate account for each of your authors/product creators (You can create affiliate account from the “Add/Edit Affiliates” menu of the WP Affiliate Platform plugin)

Step3: Specify the corresponding affiliate ID in the “Author ID for Revenue Sharing” section of the product when configuring the product in eStore.

Linking a product to a revenue sharing author

Linking a product to a revenue sharing author

Additionally, you can override the commission level to be used for this product’s revenue sharing calculation by specifying a number in the “Revenue Sharing Commission Level” field. This field is not mandatory. If you do not specify any value in this field it will simply use the commission level specified in the author/affiliate’s profile for revenue sharing calculation.

How the Revenue Sharing Cuts Work For Normal Transactions

The revenue sharing for normal transactions are very straightforward. The “author/partner” gets the percent specified in the revenue sharing section for the product.

For example, lets say it is a $100 Product and you have specified the author/partner to get 50%. The calculation will look like the following:

  • 50% author’s cut (so the author of the product gets $50)
  • The leftover is for the house ($50 in this case).

How the Revenue Sharing Cuts Work When Used Together with Normal Affiliate Commission

When revenue sharing is used in conjunction with a normal affiliate campaign then the calculation works like the following:

For exmaple, lets say it is a $100 Product and you specified the author to get 50% and the affiliates to get %50. The calculation will look like the following:

  • 50% affiliate commission (so affiliate gets $50)
  • 50% author commission (the author of the product gets 50% of profit). The affiliate commission is deducted from the product price and then the author gets 50% of the left over. So in this case the author will get 50% of ($100-$50) which equals to $25.
  • The leftover is for the house ($25 in this case).

WP eStore Tax Calculation

Charging sales tax for your products when using WP eStore plugin to sell your product(s) is very easy. There are a few ways you can use the tax feature of eStore:

  • Use the built-in tax feature of eStore.
  • Use the PayPal’s profile based tax feature.
  • Use the table rate tax addon.
  • Use the TaxCloud integration.

Using the Built-in Tax Feature of eStore

Simply enable the tax calculation option from the settings menu and specify the tax rate for your store and that’s it.

WP eStore Tax Settings

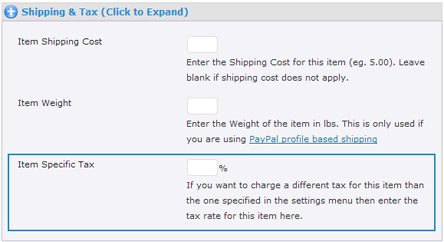
Sometimes you maybe selling product(s) where sales tax is not applicable or you may want to charge a different tax rate for a particular item. With eStore you can achieve that by overriding the tax rate for a particular product from the individual product’s tax option:

Overriding Sales Tax for an Individual Product

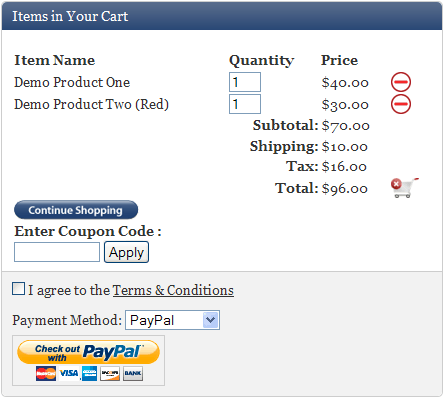
The sales tax is displayed in the shopping cart when the tax feature is enabled (the following is an example screenshot of the shopping cart with tax feature enabled)

WP eStore Cart Screenshot

Using the PayPal Profile Based Tax Feature

Please see the how to use regional or international sales tax when selling via PayPal post for this option.

WP eStore Table Rate Tax

Table rate tax allows you to charge tax in the shopping cart based on the customer’s country. See the table rate tax addon page for details.

Table Rate Tax by Item Type

The Table Rate Tax by Item Types addon allows you to charge tax in the shopping cart based on the user’s country and type of items they are purchasing.

Using TaxCloud Integration

WP eStore has an integration with TaxCloud, a free sales tax management service, to automatically calculate tax for every address in the United States.

View the eStore TaxCloud addon page to get more details on this integration.

WP eStore and MemberWing Plugin Integration

WP eStore can be integrated with the MemberWing Plugin.

MemberWing Plugin Integration Steps

Step 1: You will need one piece of information from the MemberWing plugin. So browse to the “Integration with other systems” menu from the “MemberWing-X” section of your WordPress Dashboard:

Admin dashboard => MemberWing-X => Integration with other systems

Step 2: Copy the URL from “MemberWing Universal Paypal Postback URL” field. It will look something like the following:

http://www.your-domain.com/wp-content/plugins/memberwing-x/mwx-notify-paypal.php?mwx_api_key=dfb0e9e3b9359541&skip_postback=1

Step 3: Browse to the “3rd Party Integration” tab from the WP eStore’s settings menu and paste the above URL in the “MemberWing Integration Settings” section:

MemberWing Plugin Integration

All done, now when someone makes a purchase using a payment button configured using eStore, it will automatically create a membership account for that customer.

Google Analytics E-Commerce Tracking for WP eStore

WP eStore has built in stats feature that gives you overall sales data as well as itemized sales stats. This statistics is very useful but having the option to track sales through Google Analytics is really good so we added this option to WP eStore plugin.

There is now an e-commerce tracking addon that makes this integration very easy.

How to Add Google Analytics E-Commerce Tracking on eStore

Refer to the addon’s page.

Stylish Product Display Options for WP eStore

This page has a list of all the different pre-configured product display templates and styles that you can use to display your products when using the WP eStore plugin.

Note: You are not restricted to using one of these product displays if they don’t suit your needs. You can design your own product display in a WordPress post or page then use eStore’s simple “Buy” button (there are shortcodes to embed plain buttons on a post or page) to facilitate the purchase of the product (very helpful when designing an optimized sales/landing page).

Stylish Product Display 1 (Fancy 1)

Demo 1 and Demo 2
Demo 1 and Demo 2
This is a test description. This description is here to show how the description of this product looks like. You can insert plain HTML in this field too. Some more text to fill the shopping cart product description.
Available Qty: 30
Price: $15.99

Stylish Product Display 2 (Fancy 2)

Test Product For Fancy Display
Some test description of the product to show how this description field looks like. You can insert plain HTML in this field too. Some more description of the product goes here. Damn! This product display looks good.
Price: $59.95

Stylish Product Display 3 (Fancy 3)

Test Product For Fancy Display
Price: $59.95

Stylish Product Display 4 (Fancy 4)

Fancy Display Test
Price: $29.95
Fancy Display Test
View Details
Some test description of the product to show how this description field looks like. You can insert plain HTML in this field too. Some more description of the product goes here. Damn! This product display looks good.

Stylish Product Display 5 (Fancy 5)

Fancy Display Test
Fancy Display Test
Some test description of the product to show how this description field looks like. You can insert plain HTML in this field too. Some more description of the product goes here. Damn! This product display looks good.
Price: $29.95
Details

Stylish Product Display 6 (Fancy 6)

Test Product For Fancy Display
Price: $59.95
Test Product For Fancy Display

Stylish Product Display 7 (Fancy 7)

If you wanted to show a very simple and plain product display with name, price and the purchase button then this template will come in handy. This display can be useful for users selling mp3/music/audio files too. Below is an example of how this template looks like:

fancy7-product-display-template-example

Stylish Product Display 8 (Fancy 8 )

Below is an example of how the fancy 8 product display template looks like. This display template is useful for audio/music/mp3 file sellers.

estore-fancy8-product-display-example

Stylish Product Display 9 (Fancy 9)

Fancy Display Test 2
Price: $37.00
Some test description of the product to show how this description field looks like. You can insert plain HTML in this field too.

If you don’t specify a description for a product then this display will become a very compact one with just name, price and a buy button.

Stylish Product Display 10 (Fancy 10)

Fancy Display Test 3
This is another test product to show how the fancy display looks like. This product has multiple images which are shown below the main thumbnail image. You can insert plain HTML in this description area too.
Price: $37.00
Price: $29.95

Fancy10 is a lot similar to the popular Fancy1 display except it has a section to show the additional images below the main thumbnail. The images will show in a lightbox when clicked. The default Add to Cart button has a nice elegant style too. You can still use a custom button image for the “Add to Cart” button just like any other displays.

Stylish Product Display 11 (Fancy 11)

Fancy Display Test Product Four
$49.95$39.95

Stylish Product Display 12 (Fancy 12)

This one is just like fancy 8 template but it uses our compact audio player plugin for the audio file preview. Below is an example of how this display template looks like:

fancy 12 product display template

Stylish Product Display 13 (Fancy 13)

Here is an example of how this display template looks like:

fancy 13 product display template example

Stylish Product Display 14 (Fancy 14)

Here is an example of how this display template looks like:

fancy14-display-template-sample

Stylish Product Display 15 (Fancy 15)

Here is an example of this display template:

estore-fancy-15-product-display-template-example

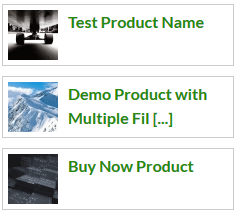
This is a very compact product display template that only has the product thumbnail image and the product name. This display template can be very helpful when you want to show a product on your sidebar or footer area (where you don’t have a lot of space). If you fill out the “Product details page” field of the product then the name will be linked to that page.

Here is an example of how it looks like when you stack a few products using this display template on your sidebar:

estore-fancy-15-product-display-template-example-stacked

Stylish Product Display 16 (Fancy 16)

This template doesn’t use any product image thumbnail in the template. So this one should be good for users who don’t want to use an image for their product(s).

Below is an example of how this display template looks like:

estore-fancy-16-product-display-template-example

Stylish Product Display 17 (Fancy 17)

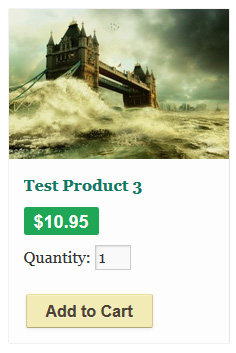
This template uses just the thumbnail image, product name and the add to cart button. It it good for using in a grid display layout.

The following screenshot is an example of how this template looks like:

estore-fancy-17-product-display-template-example

Stylish Product Display 18 (Fancy 18)

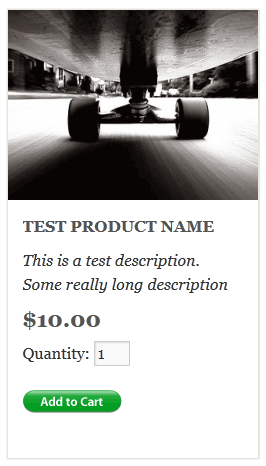
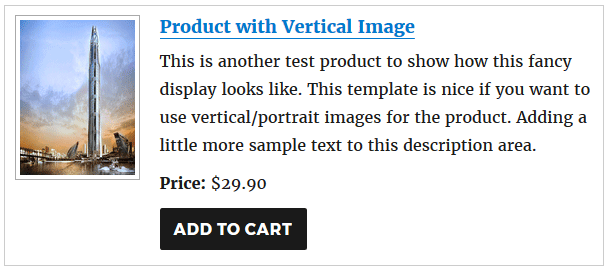
This template uses a vertical/portrait thumbnail size so it will be useful if you use a vertical image for your product.

The following screenshot is an example of how this template looks like:

estore-fancy-18-product-display-template

How to Use the Stylish Product Display Templates

To display a product in any of the above styles you simply have to use a Shortcode (to display it on a post or page) or use a line of PHP code (to display it from your theme files e.g. footer.php). All the available shortcodes and PHP function references can be found here.

Selling Large Files with WP eStore

WP eStore does not impose any restriction on the downloadable file size. As long as your server can handle it eStore will be fine. We have users serving files as big as 8 Giga bytes (GB) in size using the eStore plugin.

With that said, WP eStore sits between the actual file and the browser creating a shield (this is how eStore keeps the true location of the file hidden). However this means that eStore has to read the file and serve it to the browser (meaning the file will be temporarily loaded in your server’s RAM). If you are selling large files and your hosting plan has a limited RAM available for you to use then this could create a file download issue (the file won’t be downloaded fully).

When hosting companies refer to *unlimited* disk space they refer to the hard disk space not the RAM memory size. So make sure to ask your hosting provider how much RAM memory is available to your PHP application. To better understand this… imagine a computer having 500GB hard disk but having only 32MB RAM (see the difference between them?).

There are a few possible workarounds that can be tried:

  1. You could break the bigger file into multiple parts (e.g. each 50MB) and use the multi-part download option of eStore.
  2. Try one of the other download methods explained here and see how you go (there are a few different ways to get around this depending on your server’s configuration but it may not work on all servers).
  3. Use the Amazon S3 Integration option of eStore.
  4. Edit the eStore product in question and uncheck the “downloadable” checkbox for the product (look under the “Digital Content Details” section for this option). This will force eStore to let the browser handle the download.
  5. If you server supports mod_xsendfile (its an Apache module to handle large file downloads) then we can configure eStore to work with “mod_xsendfile” so large files can be downloaded without any issues.
  6. You can upgrade your hosting to a plan with enough RAM.

The bottom line is… Please make sure to check with your service provider about any upload/download restrictions or the available server RAM your hosting plan may have before you purchase the eStore plugin.

« Previous Page
Next Page »

Your Shopping Cart

Shopping Cart Empty
Shopping Cart is Empty
Visit The Shop

Search

Featured Documents

Stylish Product Display Options for WP eStore WP eStore Quick Setup and Usage Video Tutorial WP eStore Shortcodes and Functions Reference WordPress eStore Plugin Features WordPress eStore Plugin Demo What Our Customers Have to Say About Our Products WordPress eStore WishList (Feature Suggestions) WordPress eStore Frequently Asked Questions (FAQ) How to Show Add to Cart buttons

Featured Plugins

WP Express Checkout Plugin
wordpress_estore_icon
wordpress membership plugin icon
wordpress_affiliate_plugin_icon

Copyright © 2025 | eCommerce Plugins