Tips and Tricks WP eCommerce

eCommerce Solution for WordPress Blog

  • Home
  • eCommerce Plugins
  • WP eStore Documentation
  • WP Shopping Cart Doc

WP Payment Gateway Bundle – Braintree Subscription Setup

After you install the WP Payment Gateway Bundle plugin, you will need to configure some Braintree Gateway specific settings in the plugin which you will need to obtain from your Braintree merchant account.

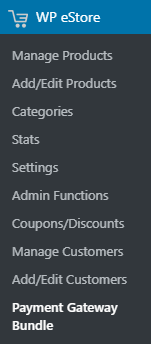
You can find the Braintree specific settings required by the plugin under the “Gateway Settings” tab when you go to the payment gateway bundle plugin’s settings menu. The following screenshot shows how you can access the settings page of this addon:

In order to configure the Braintree Subscription portion of the payment gateway bundle you will need to obtain the required details from your Braintree merchant account by following the steps outlined below:

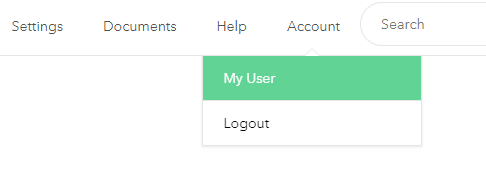
Step 1: Log into your Braintree merchant account and click My User under Account.
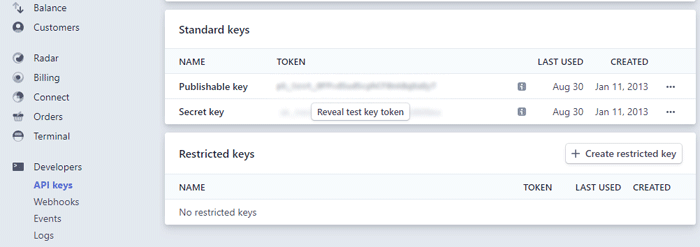
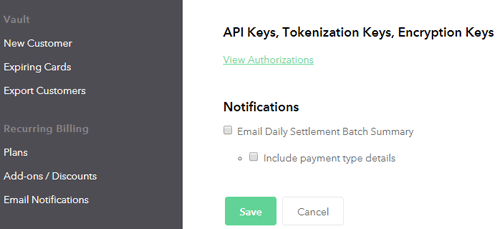
screenshot1 showing how to get the braintree credentials from the merchant account


Step 2: Go to the API Keys, Tokenization Keys, Encryption Keys section and click View Authorizations. Copy and paste your account credentials into a notepad for later use.

screenshot2 showing how to get the braintree credentials from the merchant account


Step 3: Now from your WordPress administration panel, go to Braintree Subscription Settings (under Payment Gateway Bundle->Gateway Settings).

Step 4: Enter your Merchant ID.

Step 5: Enter your Public key.

Step 6: Enter Private key.

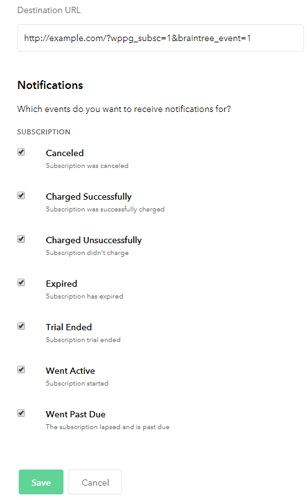
Step 7: Copy the  Braintree Webhook URL for your site and specify it in your merchant account (Settings > Webhooks).

configure a webhook for braintree subscription

You can choose to receive notifications for all the subscription events. However, the plugin will currently handle these events – Cancelled, Charged Successfully and Expired.

configuring braintree webhook notification types for a subscription

Step 8: Hit the “Update” button to save your Braintree account credentials in the Payment Gateway Bundle settings.

Create a Subscription Plan

In order to accept recurring payments for your eStore subscription product, you will need to create a plan in your Braintree account. If you have 10 eStore subscription products that you wish sell with Braintree, you will need to create 10 separate plans in your Braintree merchant account. Each plan interface is very similar to the subscription settings section of an eStore product. For example: Recurring Billing Price, Recurring Billing Cycle etc.

configure a plain in braintree

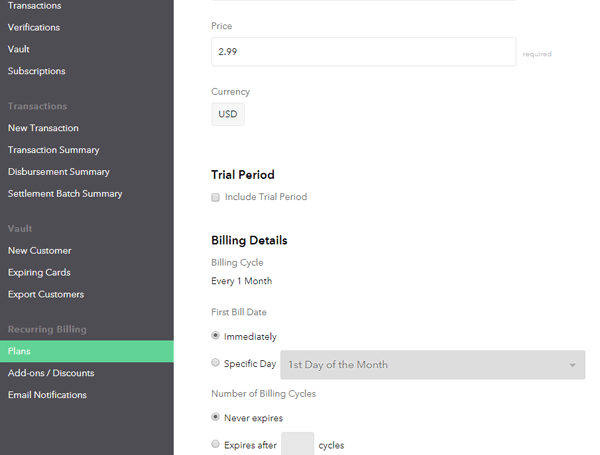
When a new subscription is created on your site, Braintree will charge/rebill the customer based on these configurations (not your eStore subscription product). Your eStore subscription product will just be a template for the plan that you create in your Braintree account. Unfortunately, Braintree API doesn’t allow an external script to create this plan (you will need to do this manually). That means the payment gateway bundle addon needs to assume the ID of the plan that you are going to create for an eStore product.

How to Name a Plan ID

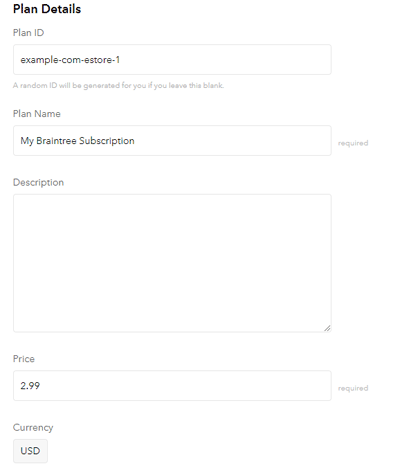
The Plan name can be anything you like. However, The Plan ID needs to be unique in your account and something that can be synchronized with the eStore product in question. In order to integrate an eStore product with a plan created in your Braintree account, your Plan ID should be:

SiteAddress-estore-EstoreProductID

Here, SiteAddress is the URL specified in your WordPress dashboard (Settings > General > Site Address) and EstoreProductID is the eStore product ID (example: 1). Since you can only use limited special characters in the plan ID you will need to remove http:// or https:// from SiteAddress and replace all dots with hyphens.

Plan ID Example

1. if your SiteAddress is http://example.com and you are creating a plan for eStore product 2, your plan ID should be:

example-com-estore-2

2. if your SiteAddress is http://www.example.com and you are creating a plan for eStore product 7, your plan ID should be:

www-example-com-estore-7

3. if your SiteAddress is http://www.my-site.com and you are creating a plan for eStore product 10, your plan ID should be:

www-my-site-com-estore-10

configure a plan name in braintree

Subscription Limitation

When a new subscription is created, Braintree plan allows you to bill the customer in a future date (instead of charging immediately). Unfortunately, we can’t support this feature since our eStore product was designed to charge the customer immediately.

Shortcode for Subscription Button

You need to embed the following shortcode in a WordPress Post/Page to accept recurring payments via Braintree:

[wp_pg_eStore_subscription_button id="1" gateway="braintree_subsc"]

(Replace 1 with your actual eStore product ID)

Customizing the Look of the Braintree Subscription Button

WP eStore plugin allows you to customize all of your subscription buttons by using a custom button image of your choice. If you want to customize the look of your Braintree subscription button then read this post.

Using Braintree Subscription Button with Fancy Display Template

You can use the following shortcode to use a fancy display template with the Braintree subscription button:

[wp_eStore_fancy_display id="50" type="3" style="1" gateway="braintree_subsc"]

WP eStore product ID of the item is 50 in the above example. You will need to change that value to your actual product ID.

WP Payment Gateway Bundle – Stripe Basic Gateway Setup

Read this page to get a good idea of how the checkout flow works when you use the gateway bundle addon.

Note: There are a couple of different checkout flows available for the Stripe gateway. The recommended setup is the Stripe SCA setup explained here.

Stripe Basic is a simplified method for accepting payments with the Stripe payment gateway. When you enable this option in the payment gateway bundle addon, the payment information is collected in a popup form instead of our default checkout page.

screenshot of Stripe basic payment form in a popup

This method is useful if you just want to quickly accept payments from your customers.

screenshot of Stripe basic credit card form

Stripe Basic Setup

After you install the WP Payment Gateway Bundle addon, you will need to configure some Stripe Gateway specific settings in the plugin which you will need to obtain from your Stripe merchant account.

You can find the Stripe Basic specific settings under the “Gateway Settings” tab when you go to the payment gateway bundle plugin’s settings menu. The following screenshot shows how you can access the settings page of this addon:

In order to configure the Stripe portion of the payment gateway bundle you will need to obtain the required details from your Stripe merchant account by following the steps outlined below:

Step 1: Log into your Stripe merchant account and click on the API Keys menu item (Under Developers).

Step 2:  Copy the values for the secret key and the publishable key as shown in the figure above.

Step 3: Now from your WordPress administration panel, go to Stripe Basic Settings (under WP eStore -> Payment Gateway Bundle -> Gateway Settings) and check “Use Stripe Basic Payment Gateway” option.

Step 4: Enter your Test Secret Key.

Step 5: Enter your Test Publishable Key.

Step 6: Enter your Live Secret Key.

Step 7: Enter your Live Publishable Key.

Step 8: Enter a selector label for Stripe Basic option. For example: Stripe Payment (This text will be displayed in the select box in the shopping cart as a checkout option).

Step 9: Copy the Stripe Webhook URL for your site and add it as a webhook endpoint in your Stripe account (Developers -> Webhooks). You should only have one webhook set up for our plugin (remove any other URL that you may have configured previously for our plugin).

You can either choose to be notified of all the events (may increase load on your server) or select the ones that our plugin processes at the moment:

  • charge.refunded
  • checkout.session.completed
  • invoice.payment_succeeded
  • customer.subscription.deleted
  • invoice.payment_failed

Step 10: Hit the “Update” button at the bottom to save the settings and now your customers can checkout using the stripe basic payment form.

Creating Buy Now Type Buttons For Stripe Basic

If you want to use “Buy Now” type buttons instead of the standard “Add to Cart” buttons then check the following documentation to learn how to create a buy now buttons for any payment gateways offered in WP eStore plugin:

  • How to use payment gateway specific buy now button

Shortcode for Subscription Button

You need to embed the following shortcode in a WordPress Post/Page to accept recurring payments via Stripe Basic:

[wp_pg_eStore_subscription_button id="1" gateway="stripe_basic_subsc"]

(Replace 1 with your actual eStore product ID)

Customizing the Look of the Stripe Subscription Button

WP eStore plugin allows you to customize all of your subscription buttons by using a custom button image of your choice. If you want to customize the look of your stripe subscription button then read this post.

Using Stripe Subscription Button with Fancy Display Template

You can use the following shortcode to use a fancy display template with the Stripe subscription button:

[wp_eStore_fancy_display id="50" type="3" style="1" gateway="stripe_basic_subsc"]

WP eStore product ID of the item is 50 in the above example. You will need to change that value to your actual product ID.

WP eStore and ActiveCampaign Integration Addon

You can integrate the eStore plugin with ActiveCampaign autoresponder so that the customers can be automatically signed up to your ActiveCampaign list (with any tags that you want to apply).

The users are added to the ActiveCampaign list when any of the following event happens:

  1. A customer purchases a product that has an ActiveCampaign list ID specified for it.
  2. A visitor submits a squeeze form for a product that has an ActiveCampaign list ID specified for it.

Installing the ActiveCampaign Addon

You can install this addon the same way you install any WordPress plugin:

  • Go to the Add New plugins screen in your WordPress admin area
  • Click the Upload button
  • Browse for the addon file (estore-active-campaign-addon.zip)
  • Click Install Now and then activate the plugin

Addon Usage

Step 1) Click on the ActiveCampaign menu link from the main eStore plugin’s admin menu.

Step 2) Enable the integration then fill in the API key and API URL details. Then hit the “update” button to save.

You can get the API details from your ActiveCampaign account.

Step 3) You need to get the List ID of the list where you want to add the users.

Getting the List ID value of Your ActiveCampaign List

If you select the list and look in the URL you should see the list id there:

activecampaign-list-id-value

Edit the eStore product in question and specify your ActiveCampaign List ID in the List Name field of the product. Example value: 2

autoresponder-generic-list-id-tag-id-setup

The addon will add the customer to this list.

Specifying Tags (Optional)

Optionally, you can specify tags together with the list ID value. Lets say the list ID is 2 and you want to apply tags “tag1”, “tag2” and “tag3”. You would enter the list ID and tags using the following format:

2|tag1,tag2,tag3

Get the ActiveCampaign Addon

The price of this addon is $29.95

WP eStore Addon – Collect Customer Input in the Shopping Cart

WP eStore plugin has a built in option to collect customer input for each of your products. However, if you need to collect an input from your customers in the shopping cart (not just for individual products) then this extension should be helpful.

You can use this addon to collect upto 2 custom input from your customers per shopping cart transaction.

It can be used to show an input field in the cart like the following example:

estore-cart-with-customer-input-field-example
[Read more…]

WP eStore – Store Opening Hours AddOn

The eStore Opening Hours addon allows you to restrict purchases to certain times. You can configure as many opening/closing times for your shop (each day of the week) in the settings. When a visitor comes to a page to purchase something outside of the configured hours, a message will be displayed to them.

Installing the eStore Opening Hours Addon

You can install this addon the same way you install any WordPress plugin:

  • Go to the “Add New” plugins screen in your WordPress admin area
  • Click the “upload” tab
  • Browse for the addon file (estore-opening-hours.zip)
  • Click “Install Now” and then activate the plugin

Using this Addon

1) In order to configure opening hours for your store, click on the “eStore opening hours” sub-menu under the WP eStore plugin menu.

estore-opening-hours-menu

2) Add opening hours in a 24 hour time format.

estore-opening-hours-configuration

3) Enter the page/post IDs where you want to apply the configured hours.

estore-opening-hours-settings

4) Enter the message that you want to display to the users outside of opening hours.

5) Finally click the “Enable Opening Hours” checkbox.

The addon will not function until you enable this option. This is to make sure that you get some time to configure the hours for your store.

6) Click the Save button

How to Find the Post/Page ID

Each WordPress post or page has a unique ID with it. If your site uses web friendly permalink format, You might not be able to find the ID just by viewing the page. Here is a trick that you can apply to find the ID of a post/page:

1)Go to Pages -> All Pages or Posts -> All Posts.

wordpress-post-id

2) Hover your mouse over the Edit link.

3) The post/page ID should appear on the bottom left corner of your screen (it will be a numeric value).

Get the Opening Hours Addon

The price of this addon is $29

Please contact us to purchase this addon.

WP eStore Table Rate Tax by Item Types AddOn

The eStore Table Rate Tax by Item Types addon allows you to charge tax in the shopping cart based on the user’s country and type of items.

Installing the eStore Table Rate Tax by Item Types Addon

You can install this addon the same way you install any WordPress plugin:

  • Go to the “Add New” plugins screen in your WordPress admin area
  • Click the “upload” tab
  • Browse for the addon file (estore-table-rate-tax-by-item-types.zip)
  • Click “Install Now” and then activate the plugin

Using this Addon

When this addon is active, You can easily configure rates that will be used to apply tax in the shopping cart based on the customer’s country.

To access the addon settings click on the “Table Rate Tax” sub-menu under the WP eStore plugin menu.

screenshot showing how to access the estore table rate tax addon by item types menu

To add a new tax zone you need to select a country, type of product and specify a tax rate for it (For example: 20).

Click the “Save” button which will add the zone.

If you do not wish to configure a rate for every country you can specify a flat rate (For example: 15). By default it is set to 0.

screenshot showing the settings of table rate tax by item types addon

screenshot showing the default options of table rate tax by item types addon

screenshot showing the countries configured in the table rate tax by item types addon


How Does It Work

Lets say, a customer is browsing your website from Denmark. When that user adds a digital product to the shopping cart a 25% tax/VAT will be automatically applied.

screenshot showing the eStore table rate tax addon by item types country dropdown in the shopping cart

The location of the user is determined based on the IP address. But they can also manually select their country (the addon will calculate the tax accordingly).

If the user is from a zone that you haven’t configured (Example: USA) a 15% tax will be automatically applied.

Tax will be applied the same way for physical products.

AddOn Price

The eStore Table Rate Tax by Item Types Addon is FREE for all customers who purchased WP eStore plugin from us.

Download the Addon (v1.0.1)

You can download this addon from the addon download area of our customer only support forum.

General Note

Please note that some of these free eStore addons are developed by our users in the community. So they do not have any advanced customization option. The description above explains exactly what this addon does.

WP eStore and Infusionsoft Integration Addon

You can integrate the eStore plugin with Infusionsoft so that the customers can be automatically signed up to your Infusionsoft list.

Installing the Infusionsoft Integration Addon

You can install this addon the same way you install any WordPress plugin:

  • Go to the “Add New” plugins screen in your WordPress admin area
  • Click the “upload” tab
  • Browse for the addon file (estore-infusionsoft-addon.zip)
  • Click “Install Now” and then activate the plugin

Addon Usage

Step 1) Click on the “Infusionsoft” menu link from the main eStore plugin’s admin menu.

Step 2) Enable the integration then fill in the API key and your APP Name. Then hit the “update” button to save.

infusionsoft-integration-settings

API Key – You can get the API key from your Infusionsoft account.

APP Name – The appname is the subdomain value of your account URL. For example, if your Infusionsoft account URL is the following:

https://az127.infusionsoft.com/Admin/home.jsp

Then your app name is az127

Step 3) Edit the eStore product in question and specify your Infusionsoft “Tag ID” in the List Name field of the product.

specifying-infusionsoft-tag-id

Now, when a customer purchase this product, the addon will automatically add this user to the specified Infusionsoft tag.

Getting Infusionsoft Tag ID

You can find all your Infusionsoft tags (they used to be called “groups”) from the tags interface of your Infusionsoft account.

getting-Infusionsoft-tag-id

Get the eStore Infusionsoft Addon

The price of this addon is $29.95

WP eStore Country Blocking AddOn

The eStore Country Blocking addon prevents users of certain countries from being able to checkout.

You can also select to only block selling of digital products (instead of all products) to the selected countries.

Installing the eStore Country Blocking Addon

You can install this addon the same way you install any WordPress plugin:

  • Go to the “Add New” plugins screen in your WordPress admin area
  • Click the “upload” tab
  • Browse for the addon file (estore-country-blocking.zip)
  • Click “Install Now” and then activate the plugin

Using this Addon

To access the addon settings click on the “Country Blocking” sub-menu under the WP eStore plugin menu.

screenshot showing how to access the estore country blocking addon menu

Select one or more country which you wish to block by using the checkboxes.

screenshot showing how to select countries to block


How Does It Work

Lets say, a customer is browsing your website from Austria and you have blocked that country in the settings. When that user adds a product to the shopping cart an error message will be displayed instead of the checkout button.

screenshot showing the eStore country blocking addon demo

Get the Country Blocking Addon

Download the Country Blocking addon.

WP eStore Download With Discount or Coupon AddOn

Addon Plugin Description

The eStore Download With Discount Addon is a plugin which allows your users to download a digital product by applying a 100% discount or coupon code.

This is very handy if you want to give the downloadable item for free to certain users.

Installing the Addon

You can install this addon just like you install any other WordPress plugin.

Using the eStore Download With Discount Addon

Once you have installed the addon you can create a download form by inserting the following shortcode:

[eStore_dl_with_discount id="19"]

Here, id is your eStore product ID.

The above shortcode will produce output like the following:

screenshot showing the download with discount estore addon demo

If a user enters a 100% discount code/coupon, he will be able to download the item instantly.

You can create 100% discount codes by going to the Coupons/Discounts menu in the eStore plugin.

Get the Download With Discount Addon

The price of this addon is $29.95

WP eStore Table Rate Tax AddOn

The eStore Table Rate Tax addon allows you to charge tax in the shopping cart based on the user’s country.

Installing the eStore Table Rate Tax Addon

You can install this addon the same way you install any WordPress plugin:

  • Go to the “Add New” plugins screen in your WordPress admin area
  • Click the “upload” tab
  • Browse for the addon file (estore-table-rate-tax.zip)
  • Click “Install Now” and then activate the plugin

Using this Addon

When this addon is active, You can easily configure rates that will be used to apply tax in the shopping cart based on the customer’s country.

To access the addon settings click on the “Table Rate Tax” sub-menu under the WP eStore plugin menu.

screenshot showing how to access the estore table rate tax addon menu

To add a new tax zone you need to select a country and specify a tax rate for it (For example: 20).

Click the “Save” button which will add the zone.

If you do not wish to configure a rate for every country you can specify a flat rate in the “Tax Rate For Other Zones” field (For example: 15). By default it is set to 0.

screenshot showing how to configure a table rate tax

How Does It Work

Lets say, a customer is browsing your website from Denmark. When that user adds a product to the shopping cart a 25% tax/VAT will be automatically applied.

screenshot showing the eStore table rate tax addon country dropdown

The location of the user is determined based on the IP address. But they can also manually select their country (the addon will calculate the tax accordingly).

If the user is from a zone that you haven’t configured (Example: USA) a 15% tax will be automatically applied.

AddOn Price

The eStore Table Rate Tax Addon is FREE for all customers who purchased WP eStore plugin from us.

Download the Addon (v1.0.1)

You can download this addon from the addon download area of our customer only support forum.

General Note

Please note that some of these free eStore addons are developed by our users in the community. So they do not have any advanced customization option. The description above explains exactly what this addon does.

Next Page »

Your Shopping Cart

Shopping Cart Empty
Shopping Cart is Empty
Visit The Shop

Search

Featured Documents

Stylish Product Display Options for WP eStore WP eStore Quick Setup and Usage Video Tutorial WP eStore Shortcodes and Functions Reference WordPress eStore Plugin Features WordPress eStore Plugin Demo What Our Customers Have to Say About Our Products WordPress eStore WishList (Feature Suggestions) WordPress eStore Frequently Asked Questions (FAQ) How to Show Add to Cart buttons

Featured Plugins

WP Express Checkout Plugin
wordpress_estore_icon
wordpress membership plugin icon
wordpress_affiliate_plugin_icon

Copyright © 2025 | eCommerce Plugins