Tips and Tricks WP eCommerce

eCommerce Solution for WordPress Blog

  • Home
  • eCommerce Plugins
  • WP eStore Documentation
  • WP Shopping Cart Doc

WP eStore Stylish Squeeze Form Addon

The eStore Stylish Squeeze Form Addon allows you to create a nice looking squeeze form using a shortcode.

A squeeze form will help you build an email list by giving a digital download away for free.

Using the Stylish Squeeze Form Addon

When this addon is active, you you can use a shortcode like the following to create a stylish squeeze form anywhere on your WordPress site:

[wp_eStore_ssf id=2]

2 is the eStore product ID in the above shortcode.

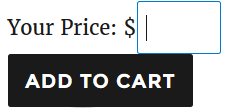
Here is a screenshot of how a stylish squeeze form looks like:

stylish squeeze form

Here is an example of a shortcode where you can customize the “Download” button text via the shortcode:

[wp_eStore_ssf id=1 button_text="Download Now"]

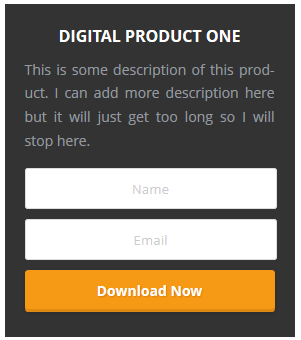
Stylish Squeeze Form Template 2

The 2nd template shows the thumbnail image of the product. The following screenshot shows how it looks:

stylish squeeze form template 2

Here is an example of a shortcode that uses template 2:

[wp_eStore_ssf id=1 template=2]

Stylish Squeeze Form Template 3

Here is an example of how the 3rd template looks like:

stylish-squeeze-form-template3-example

Use the following shortcode to use template 3:

[wp_eStore_ssf id=1 template=3]

Stylish Squeeze Form Template 4

Here is an exmaple of how the 4th template looks like

stylish-squeeze-form-template-4-example

Use the following shortcode to use template 4:

[wp_eStore_ssf id=1 template=4]

AddOn Price

The eStore Subscription Coupons Addon is FREE for all customers who purchased WP eStore plugin from us.

Download the Addon (v1.4)

You can download this addon from the addon download area of our customer only support forum.

Installing the Stylish Squeeze Form Addon

You can install this addon the same way you install any WordPress plugin:

  • Go to the Add New plugins screen in your WordPress admin area
  • Click the upload tab
  • Browse for the addon file (estore-stylish-squeeze-form.zip)
  • Click Install Now and then activate the plugin

General Note

Please note that some of these free eStore addons are developed by our users in the community. So they do not have any advanced customization option. The description above explains exactly what this addon does.

WP eStore Subscription Coupon/Discount Addon

The eStore Subscription Coupon addon allows your customers to apply a coupon/discount on your PayPal subscription products.

Using the eStore Subscription Coupons Addon

When this addon is active, your customers will get a chance to enter a discount coupon when they purchase a subscription.

Simply create a subscription product (if you haven’t done so already) and place the subscription button on a post/page (your landing page). When a user clicks the “Subscribe” button they will be sent to a page where they can choose to enter a coupon to get a discount on the recurring price.

If they do not wish to apply any coupon they will be charged the normal recurring price.

AddOn Price

The eStore Subscription Coupons Addon is FREE for all customers who purchased WP eStore plugin from us.

Download the Addon (v1.6)

You can download this addon from the addon download area of our customer only support forum.

Installing the Subscription Coupon Discount Addon

You can install this addon the same way you install any WordPress plugin:

  • Go to the Add New plugins screen in your WordPress admin area
  • Click the upload tab
  • Browse for the addon file (eStore-subscription-discount.zip)
  • Click Install Now and then activate the plugin

General Note

Please note that some of these free eStore addons are developed by our users in the community. So they do not have any advanced customization option. The description above explains exactly what this addon does.

WP eStore Dynamic Coupons/Discounts Addon

The eStore Dynamic Coupons addon allows you to dynamically generate one time usage coupons for your customers after the purchase. This addon will generate unique coupon codes on a per transaction basis. You can specify the discount amount for these coupons.

AddOn Price

The eStore Dynamic Coupons Addon is FREE for all customers who purchased WP eStore plugin from us.

Download the Addon (v1.7)

You can download this addon from the addon download area of our customer only support forum.

Installing the Addon

You can install this addon the same way you install any WordPress plugin:

  • Go to the “Add New” plugins screen in your WordPress admin area
  • Click the “upload” tab
  • Browse for the addon file (eStore-dynamic-coupons.zip)
  • Click “Install Now” and then activate the plugin

Using the eStore Dynamic Coupons Addon

Use the following documentation to learn how to use this addon.

  • eStore dynamic coupons addon documentation
  • Configuring Automatic Discounts for Members

General Note

Please note that some of these free eStore addons are developed by our users in the community. So they do not have any advanced customization option. The description above explains exactly what this addon does.

WP eStore Post Payment Actions Addon

General Description

The eStore Post Payment Actions addon is a useful utility plugin which can cater for various additional actions which a merchant may want to perform immediately following an eStore product sale.

Post Payment Actions Addon Details

This addon currently provides the ability for a merchant to automatically send an email to a specified recipient after the sale of a particular eStore product. This is handy if you want to notify someone different for each of your product sale or notify a 3rd party vendor.

The administrator is asked to configure a product ID, email address and email body text via the settings page and this plugin will then listen for an eStore sale notification event and will send the appropriate emails based on the addon’s settings.

It is envisaged that there will be many more post payment features offered by this addon as time goes by, so please stay tuned and check back here from time to time.

AddOn Price

The eStore Post Payment Actions Addon is FREE for all customers who purchased WP eStore plugin from us.

Download the Post Payment Actions Addon (v1.2)

You can download this addon from the addon download area of our customer only support forum.

Installing the Addon

You can install this addon the same way you install any WordPress plugin:

  • Go to the “Add New” plugins screen in your WordPress admin area
  • Click the “upload” tab
  • Browse for the plugin file (eStore-post-payment-actions.zip)
  • Click “Install Now” and then activate the plugin

Using the eStore Post Payment Actions Addon

Please see the following document for how to use the eStore Post Payment Actions Addon.

  • eStore Post Payment Action Addon Usage

General Note

Please note that some of these free eStore addons are developed by our users in the community. So they do not have any advanced customization option. The description above explains exactly what this addon does.

How to Use the Serial/License Key Code Selling Feature

WP eStore plugin has a serial/license key code selling feature that can help you in the following scenarios:

  • If your product needs to issue a serial number from a pool of serial numbers to each customer upon purchase.
  • If your product needs to issue a license key from a pool of pre-generated license keys to each customer upon purchase.
  • If you are selling tickets and you need to give a ticket number (from a pool of pre-generated ticket numbers) to each customer upon purchase.

product-image-orange-tickets

How To Use this Feature

Step 1: Generate your key codes/license codes/ticket numbers (you can generate as many as you want). These key codes that you generated should be separated by comma (,).

Example: The following is an example of 9 key codes that are separated by comma.

ABC18-CODE22, XCMEY-TJSTA, 123y0b9y7v, L363DC23, 1234567, Maiv882#i2, TICKET#1, TICKET#2, TICKET#3

Step 2: Specify the generated key codes separated by comma in the “Your Codes” field when creating an eStore product

WP eStore Specify Key Codes for a Product

Step 3: Use the following email tag in the “Buyer Email Body” field of eStore’s settings. The serial key will be inserted at that spot of the buyer email when a customer purchase the product.

{serial_key}

All done! Now, when a customer purchase a product that is using the serial key codes feature explained above, eStore will issue one key to this customer and update the database so the next customer will get the next key code.

Auto Generate License Keys

Alternatively, you can integrate WP eStore with our license manager plugin if you want to auto generate license keys when a customer purchase an item. The plugin will email the generated license key to the customer.

WP eStore Stats Menu

The stats menu gives you an overview of the sales stats of your store.

WP eStore Sales Stats

WP eStore’s Pay Per View – Using WordPress Permalinks as Digital Products (APR)

Authenticated Page Redirect (APR) allows you to offer secure one-off access to WordPress pages and posts, without requiring the services of a membership plugin. You might find this capability useful in some cases for selling access to something like an event or time specific page or post, which may in turn provide access to live streaming video.

This feature is widely used to setup pay per view (PPV) content.

What to Expect

This is the scenario that we are after:

  1. A visitor arrives on your site and sees a purchase button for some Pay Per View (PPV) content.
  2. The visitor makes a purchase using the purchase button.
  3. The visitor then gets an encrypted link in the email (optionally you can also show the links on the Thank you page).
  4. The visitor clicks on the encrypted link which sends him to a WordPress page and allows him to see the content embedded on that page. If the visitor directly goes to this page without clicking on the encrypted link first (no content will be shown to the visitor).

How the APR Feature Protects the Content

The key thing to understand here is that the APR feature protects the content inside the APR shortcode (it doesn’t try to mask or hide the URL of the page). The content inside the APR Shortcode can only be viewed after the customers click on the encrypted link for that product that they receive after the purchase. If anyone directly goes to that URL the content inside the APR shortcode will be hidden this is why there is no need to hide the actual URL.

Setup Preparation (Basic Understanding)

The security mechanism used by APR is an encrypted session cookie; the APR Cookie. Each APR cookie is specific to a particular permalink, and contains encrypted timing information. On the pages being protected by APR, called APR Targets, an APR shortcode encloses the content being protected.  Content enclosed by an APR shortcode will only be displayed if one of the following specified conditions are met:

  • An APR cookie EXISTS in the current browser session.
  • An APR cookie exists and is LESS THAN an a specified number of minutes old.

Setup Authenticated Page Redirect

There is another pay per view feature video tutorial in our additional video tutorial section on the forum.

Step 1 (Create the Page with the Content and the Shortcode)

To setup a permalink as a digital product first you need to create the target page and setup the content that you want to deliver after the purchase.

Create a page or post that will become the APR target then enclose the content you want to protect using one of the following shortcodes:

  • Available Shortcodes for Authenticated Page Redirect Feature

Please make sure that the permalink you will be using works. Copy and paste it into the address bar of your browser. Specifically, ensure that the permalink you think you are going to use does not get modified by WordPress. If the permalink changes, then either fix the problem or use the resulting URL as the link you will use for the APR target URI.

Step 2 (Configure the Product)

Setup your digital product, using the URL of the APR target page in the “Digital Product URL” field.  CHANGE the URL scheme from ‘http’ to ‘aprtp’ or from ‘https’ to ‘aprtps’ in the “Digital Product URL” field. So for example if your APR target page URL is the following:

https://www.example.com/my-secret-page-with-awesome-video

Change the keyword “https” to “aprtps” and use that URL in the “Digital Product URL” field. So for the above example you will enter the following in the “Digital Product URL” field:

aprtps://www.example.com/my-secret-page-with-awesome-video

Now, whenever an encrypted link, pointing to an APR target is processed by eStore; an APR cookie will be issued, before the browser is redirected to the APR target, by the download manager script. This way your customers can only view the protected content on that page after they have made a payment.

Limitations

If an APR target contains the ‘nextpage’ tag, only content on the first page will be protected by the APR shortcodes.

Troubleshooting Tips

Reasons for why APR would not work include:

  1. The product URL does not specify the APRTP protocol. You forgot to use the correct URL format (see step 2 above) in the “Digital Product URL” field.
  2. The specified URL used with the APRTP protocol does not EXACTLY match the “pretty URL” format used for the non-APR URL. Example, if the non-APR URL is “http://site.com/page/” the APR URI must include the trailing “/” or it will not work.
  3. The browser is not accepting cookies.

This is an example of how to check for proper APR cookie authorization. Notice the conditional testing that is taking place. The conditional shortcode can be used to handle expired links.

[wp_eStore_APR expiry=0 status=unexpired]
Now you see me!
[/wp_eStore_APR]
[wp_eStore_APR expiry=0 status=expired]
Now you don't!
[/wp_eStore_APR]

Allow Indefinite Access

Read this post to learn how you can allow the purchasers to have indefinite access to the content.

Sell Pay Per View – Setting Up Pay Per View Option Using WP eStore Plugin

Pay-per-view (PPV) is a type of service by which a customer can purchase events to view on your site.

You sell access to a post or page that has the content inside it. The content is available for view after the customer makes a payment. The content can be a video (embedded on the post or page), a digital download, images etc.

When to Use “Pay Per View” or “On Demand” Delivery Method?

There are 2 ways you can deliver digital content to your customers:

  • Direct download via encrypted file download option
  • Pay Per View / On-Demand Access to a webpage that has the content in it

Direct Download:
The direct download method means you are letting your customer download a file to their computer (this is the default method of digital content delivery)

Pay Per View / On-Demand Access:
This covers everything else that does not fall under the direct download category. This method is used to give a customer access to the content without a direct download (the customer views the content on your site via the browser). If you want to give your customer access to a webpage which contains the digital content (for example: a page with embedded streaming video) then use one of the “Pay Per View” methods explained below.

1. The New “Pay Per View” Method

The newly added “Using WordPress Permalink as Digital Product” feature can be used to configure better “Pay Per View” option:

  • Using WordPress Permalink as Digital Product

2. Old “Pay Per View” Method

This method should not be used anymore as we will only support the new Pay Per View method (which is more robust) going forward.

The following video shows how to setup a Pay Per View model to sell streaming videos using WP eStore:

eStore Pay Per View

How to Allow Customers to Specify a Price For a Product (Name Your Price)

WP eStore plugin allows you to create products whereby your customers can specify how much they want to pay for the product (pay what you want).

This feature can be helpful for accepting donation amount or selling a product for charity work.

How to Use “Offer Your Price” Feature

  1. Create a product as you normally do in eStore
  2. Specify the minimum amount your customers can pay in the “Price” field of the product. Payment Gateways do not allow $0 product checkout so you need to specify a minimum price value of the product.
  3. Check the “Allow Customers to Specify a Price” checkbox from the “Additional Product Details” section and that should do it.

Allow customers to specify a price


Now, when you put an “Add to Cart” button for this product on a page, it will have a price field next to the button so the customers can specify how much they want to pay for the item.

name-your-price-feature-example

Using it with a Product Display Template

If you are using a fancy product display template to show the product then it will look like the following:

Customer Specifies a Price Demo
This is a test description. This description is here to show how the description of this product looks like.
Price: $2.00
Your Price: $ 

Note:

  • The minimum price that you can set for a product can be as low as 0.01 but please keep in mind that the payment gateway (for example PayPal) may not like it as they are not getting any commission from these transactions.
  • If you want to offer a product for free then use the squeeze page form option to do so.

How to Setup a Revenue Sharing Product Selling Site (Split Profit Setup)

If you are setting up a revenue sharing site (to split profit with a partner) whereby you want to share the profit of the products with the author/creator of the product then you can use the “Revenue Sharing” feature of WP eStore.

How Revenue Sharing Works

WP eStore allows you to setup a revenue sharing site with the help of the WP Affiliate Software. Basically, you setup your authors as an affiliate then specify the affiliate ID of each author to their corresponding products when setting up the product in eStore (this links the author with a particular product). When a product is sold, eStore checks to see if this product is using revenue sharing. If revenue sharing is used for that product then it awards the appropriate amount to the corresponding author of the product in the form of affiliate commission. The commissions will keep accruing whenever this product sells. You can then payout all the outstanding commission (the authors share) at the end of the month or week or whatever.

How to Use the Revenue Sharing Feature

Step1: Enable the revenue sharing feature from the “AddOn” settings menu of WP eStore

Enable Revenue Sharing

Step2: Create an affiliate account for each of your authors/product creators (You can create affiliate account from the “Add/Edit Affiliates” menu of the WP Affiliate Platform plugin)

Step3: Specify the corresponding affiliate ID in the “Author ID for Revenue Sharing” section of the product when configuring the product in eStore.

Linking a product to a revenue sharing author

Linking a product to a revenue sharing author

Additionally, you can override the commission level to be used for this product’s revenue sharing calculation by specifying a number in the “Revenue Sharing Commission Level” field. This field is not mandatory. If you do not specify any value in this field it will simply use the commission level specified in the author/affiliate’s profile for revenue sharing calculation.

How the Revenue Sharing Cuts Work For Normal Transactions

The revenue sharing for normal transactions are very straightforward. The “author/partner” gets the percent specified in the revenue sharing section for the product.

For example, lets say it is a $100 Product and you have specified the author/partner to get 50%. The calculation will look like the following:

  • 50% author’s cut (so the author of the product gets $50)
  • The leftover is for the house ($50 in this case).

How the Revenue Sharing Cuts Work When Used Together with Normal Affiliate Commission

When revenue sharing is used in conjunction with a normal affiliate campaign then the calculation works like the following:

For exmaple, lets say it is a $100 Product and you specified the author to get 50% and the affiliates to get %50. The calculation will look like the following:

  • 50% affiliate commission (so affiliate gets $50)
  • 50% author commission (the author of the product gets 50% of profit). The affiliate commission is deducted from the product price and then the author gets 50% of the left over. So in this case the author will get 50% of ($100-$50) which equals to $25.
  • The leftover is for the house ($25 in this case).
« Previous Page
Next Page »

Your Shopping Cart

Shopping Cart Empty
Shopping Cart is Empty
Visit The Shop

Search

Featured Documents

Stylish Product Display Options for WP eStore WP eStore Quick Setup and Usage Video Tutorial WP eStore Shortcodes and Functions Reference WordPress eStore Plugin Features WordPress eStore Plugin Demo What Our Customers Have to Say About Our Products WordPress eStore WishList (Feature Suggestions) WordPress eStore Frequently Asked Questions (FAQ) How to Show Add to Cart buttons

Featured Plugins

WP Express Checkout Plugin
wordpress_estore_icon
wordpress membership plugin icon
wordpress_affiliate_plugin_icon

Copyright © 2025 | eCommerce Plugins