Tips and Tricks WP eCommerce

eCommerce Solution for WordPress Blog

  • Home
  • eCommerce Plugins
  • WP eStore Documentation
  • WP Shopping Cart Doc

Allow Your Customers to Pickup the Products From Your Store

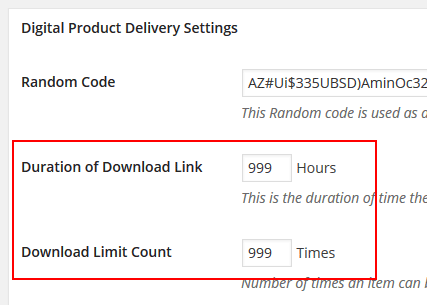
You can offer a store pickup option when using the WP eStore plugin. This option allows your customers to pickup the products from your store (so they don’t incur the shipping charge).

To enable this option, go to the settings menu and check the “Enable Store Pickup” field then save the settings.

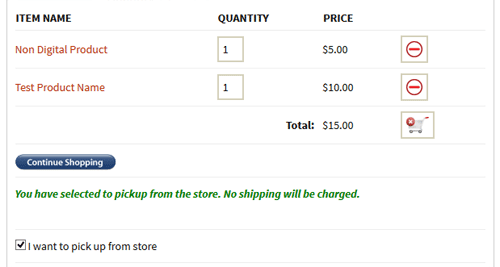
Your customers will now see a store pickup checkbox in their shopping cart (see screenshot below):

store-pickup-option-in-cart-before

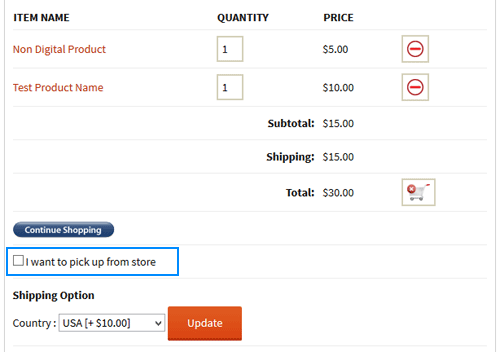
When a customer checks that option, the plugin will automatically remove the shipping amount from the cart (so no shipping fee is charged to this customer).

store-pickup-option-in-cart-after

WP eStore Country Blocking AddOn

The eStore Country Blocking addon prevents users of certain countries from being able to checkout.

You can also select to only block selling of digital products (instead of all products) to the selected countries.

Installing the eStore Country Blocking Addon

You can install this addon the same way you install any WordPress plugin:

  • Go to the “Add New” plugins screen in your WordPress admin area
  • Click the “upload” tab
  • Browse for the addon file (estore-country-blocking.zip)
  • Click “Install Now” and then activate the plugin

Using this Addon

To access the addon settings click on the “Country Blocking” sub-menu under the WP eStore plugin menu.

screenshot showing how to access the estore country blocking addon menu

Select one or more country which you wish to block by using the checkboxes.

screenshot showing how to select countries to block


How Does It Work

Lets say, a customer is browsing your website from Austria and you have blocked that country in the settings. When that user adds a product to the shopping cart an error message will be displayed instead of the checkout button.

screenshot showing the eStore country blocking addon demo

Get the Country Blocking Addon

Download the Country Blocking addon.

Setup Pay Per View with Indefinite Access to the Purchased Content

Normally when you setup pay per view content and sell access to a page, the access expires after a configurable amount of time.

If you don’t want the access to expire (so the user can view the page indefinitely) then do the following:

  • Go to eStore settings menu
  • Enter a value of “999” in the “Duration of Download Link” field
  • Enter a value of “999” in the “Download Limit Count” field
  • Save the settings.

disable-link-expiry-feature-settings

This will turn off the automatic link expiry feature. So after a user purchase the item, they can click on that link whenever they want to view the content and they will be given access to that page.

How to Display a List of Random Products

The random products shortcode allows you to display any number of random products from your available products .

How to Display Your Latest Products.

You can use the eStore and the Extra Shortcodes add-on to display a list of your random products. To do this all you need to do is follow the steps outlined below.

Step 1: You will need to have the eStore and the Extra Shortcodes add-on installed on your site.

Step 2: Create a page where you want to display the list of random products. You can also use an existing page or widget.

Step 3: Place one of the below shortcodes where you want a list of random products to be displayed.

Shortcodes

1. [wp_eStore_random_products number=1 style=1 type=1]

Parameters you can modify in this shortcode.

• Number of products (number) This is how many products you want to be displayed using the shortcode. Example: If you set this number to 5 the shortcode will display the 5 most popular products.

• Style (style) This allows you to use different fancy displays to show your products. You can see a full list of the fancy display templates here.

• Button type (type) This allows you to specify what type of button you want to use. Example: Buy Now, Add to Cart, Subscription or Download Now.

2. [wp_eStore_random_products number=1 style=1 type=1 cat_id=1]

Parameters you can modify in this shortcode.

• Number of products (number) This is how many products you want to be displayed using the shortcode. Example: If you set this number to 5 the shortcode will display the 5 most popular products.

• Style (style) This allows you to use different fancy displays to show your products. You can see a full list of the fancy displays here.

• Button type (type) This allows you to specify what type of button you want to use. Example: Buy Now, Add to Cart, Subscription or Download Now.

• Category ID (cat_id) This allows you to specify a category that you want the random products to be displayed from. When you use this shortcode it will only take the random products from the specified category.

Related Documents

  • Display a List of Latest Products
  • Display a List of Popular Products

How to Display a List of Popular Products

The popular products shortcode allows you to do the following:

Display any number of popular products (based on the number of quantity sold) from your available products.

How to Display Your Popular Products.

You can use the eStore and the Extra Shortcodes add-on to display popular products easily. You just need to follow the steps outlined below.

Step 1: You will need to have the eStore and the Extra Shortcodes add-on installed on your site.

Step 2: Create a page where you want to display the list of popular products. You can also use an existing page or widget.

Step 3: Place the below shortcode where you want your popular products to be displayed.

[wp_eStore_popular_products number=1 style=1 type=1]

Parameters you can modify in this shortcode.

• Number of products (number) This is how many products you want to be displayed using the shortcode. Example: If you set this number to 5 the shortcode will display the 5 most popular products.

• Style (style) This allows you to use different fancy displays to show your products. You can see a full list of the fancy display templates here.

• Button type (type) This allows you to specify what type of button you want to use. Example: Buy Now, Add to Cart, Subscription or Download Now.

Related Documents

  • Display a List of Random Products
  • Display a List of Latest Products

How to Use Pay What You Want Price for Your Product

In this tutorial I will explain how you can charge a “Pay What You Want Price” to sell your products.

There is an option in the eStore that allows you to make products where customers can choose what they want to pay you for a product.

How to Setup the “Pay What You Want” Feature

Step 1: Create a product as you would normally do.

Step 2: Specify the minimum amount you want your customers to pay in the “Price” field for this product. Example: $5.00

Step 3: In the product settings under “Additional Product Details” section, check the following option:

pay what you want price

Now, when you put the “Add to Cart” button on the page for this product, it will have an option to enter a custom price field next to the button. This will allow the customer to specify how much they want to pay for this product. Example Below:

pay-what-you-want-price-example

Using Pay What You Want Price with a Display Template

If you want to use a fancy display template with this feature, it will look like the following:

Customer Specifies a Price Demo
This is a test description. This description is here to show how the description of this product looks like.
Price: $2.00
Your Price: $ 

Create a Grid Display for Your Products Using the WP eStore Plugin

You can show your products in nice grid display using the WP eStore plugin. First, make sure that you have the following installed:

  1. WP eStore
  2. Extra eStore Shortcodes Addon

Fancy Display Templates that Support Grid Display

You will need to pick which fancy template you want to use for your grid display.

The following fancy display templates can be used to make a grid layout

  • Fancy 3
  • Fancy 5
  • Fancy 6
  • Fancy 11
  • Fancy 13
  • Fancy 14
  • Fancy 17

You can find an example of all the Fancy display templates here.

Steps for Making a Grid Display

Step 1: Install the WP eStore plugin and Extra eStore Shortcodes Addon (if you haven’t done it already).

Step 2: Choose which display template you want to use. Lets say you want to use fancy display template 3.

Step 3: Choose which category display option you want to use. You can see all the options here.

Step 4:  Now, create a new WordPress page or post and use the category product display shortcode (using your preferred display template) and it will automatically show all the products from that category in a grid layout.

Example: Below is an example shortcode that will show all products from category 1 using the a grid layout:

[wp_eStore_category_products_fancy id=1 style=3]

Using the style parameter you can modify which display template you want to use for your grid layout. In this example we are using the fancy display template 3:

estore-product-grid-display-example

Note: You can also use the display all products shortcode found here to show all your products in a grid layout.

How to Setup PayPal IPN Notification

Instant Payment Notification (IPN) allows you to integrate your PayPal payments with your website’s back-end operations, so you get immediate notification and authentication of the PayPal payments you receive.

Note: This is not needed for the PayPal Commerce Platform (PayPal’s New API).

Video Tutorial on PayPal IPN Setup

Written Instruction

Do the following to enable IPN in your PayPal account:

locating-IPN-new-PayPal
  1. Log into your PayPal account.
  2. Click on the “cog” icon in the right hand corner and then on “Account Settings“.
  3. Under “Solutions and Services” click on “Website Payments“.
  4. Look for an option labelled “Instant Payment Notification“. Click on the update button for that option.
  5. Click “Choose IPN Settings“.
  6. Enter the URL of your website and hit “Save“.
enable-paypal-ipn-in-your-profile

Resend PayPal IPN Message

Read the how to Resend PayPal IPN message tutorial.

PayPal Beginner Video Tutorials

The PayPal beginner video tutorials is a good resource to check if you are new to PayPal as a merchant.

WP eStore – Save and Retrieve Cart Feature

You can enable the save and retrieve cart feature from the eStore settings menu by checking the “Enable Save and Retrieve Cart Feature” option.

When this feature is enabled, your customers will be able to add items to the shopping cart then save it. This will allow them to retrieve a previously saved cart and complete the checkout.

Add the following shortcode on a post, page or sidebar which will show a save and retrieve shopping cart section to allow your customers to save the current shopping cart or retrieve a previously saved cart.

[wp_eStore_save_retrieve_cart]

This is how it works in general:

  1. A customer visits your site
  2. Adds item(s) to the shopping cart
  3. Hits the save cart button which gives a unique “ID” to the customer
  4. This “ID” can be used later to retrieve an already saved cart and complete the checkout


WP eStore Dime Sale and Time Sale Addon Plugin

The eStore Dime Sale and Time Sale addon plugin provides website owners the ability to setup a “dime sale” scenario when selling their eStore products.

This addon allows you to automatically increase the price of selected products based on a per-number-of-sales basis and/or a per-time-interval basis.

The Dime Sale addon allows you to easily configure the required parameters by simply editing your eStore products.

You can configure the following options when using the dime sale addon plugin:

  • Increment Price After Specified Number Of Sales
  • Number of Sales Per Price Increase
  • Price Increment Amount
  • Increment Price After an Interval
  • Price Increment Amount
  • Time Interval
  • Maximum Price

Dime Sale Addon Plugin Usage

Read the following documentation to learn how the dime sale addon plugin works

  • Dime sale and time sale addon plugin usage

How to Install the Dime Sale Addon

You can install this addon the same way you install any WordPress plugin:

  • Go to the “Add New” plugins screen in your WordPress admin area
  • Click the “upload” tab
  • Browse for the addon file (eStore-dime-sale-addon.zip)
  • Click “Install Now” and then activate the plugin

How to Get The Dime Sale Addon/Extension

Currently we are selling this addon to our WP eStore customers only.

The price of this addon is $39.95

« Previous Page
Next Page »

Your Shopping Cart

Shopping Cart Empty
Shopping Cart is Empty
Visit The Shop

Search

Featured Documents

Stylish Product Display Options for WP eStore WP eStore Quick Setup and Usage Video Tutorial WP eStore Shortcodes and Functions Reference WordPress eStore Plugin Features WordPress eStore Plugin Demo What Our Customers Have to Say About Our Products WordPress eStore WishList (Feature Suggestions) WordPress eStore Frequently Asked Questions (FAQ) How to Show Add to Cart buttons

Featured Plugins

WP Express Checkout Plugin
wordpress_estore_icon
wordpress membership plugin icon
wordpress_affiliate_plugin_icon

Copyright © 2025 | eCommerce Plugins