• Skip to primary navigation
  • Skip to main content
  • Skip to primary sidebar
  • Skip to footer

Tips and Tricks HQ

  • Home
  • Blog
  • Projects
    • All Projects
    • Simple WP Shopping Cart
    • WP Express Checkout Plugin
    • WP Download Monitor
    • WP Security and Firewall Plugin
    • WP eStore Plugin
    • WP Affiliate Platform
    • WP eMember
    • WP Lightbox Ultimate
    • WP Photo Seller
  • Products
    • All Products
    • Checkout
  • Support
    • Support Portal
    • Customer Only Forum
    • WP eStore Documentation
    • WP Affiliate Software Documentation
    • WP eMember Documentation
  • Contact

How to Resend a PayPal IPN Message for a Transaction

You are here: Home / Shop Admin Tips / How to Resend a PayPal IPN Message for a Transaction

Last updated: February 20, 2019 by Chanel Stone


There may come a time that for some reason the IPN (Instant Payment Notification) message did not arrive successfully from PayPal to the plugin you are using. IPN is most commonly used for membership/subscriptions sites and a failed IPN message can result in a members account not updating correctly.

There is a number of reasons that a PayPal IPN may not successfully reach the plugin you are using. This tutorial will teach you how to resend an IPN message from your PayPal account to resolve the issue you are facing.

If you don’t even have the IPN notification feature enabled in your PayPal account, then first you need to enable the IPN notification feature.

How to Resend the Instant Payment Notification Message

Video Tutorial on How to Resend IPN Message


Locating the IPN History Page

Step 1) Log in to your PayPal account.

Step 2) Click here to be directed to the ‘IPN History Page‘ or alternatively follow the next steps.
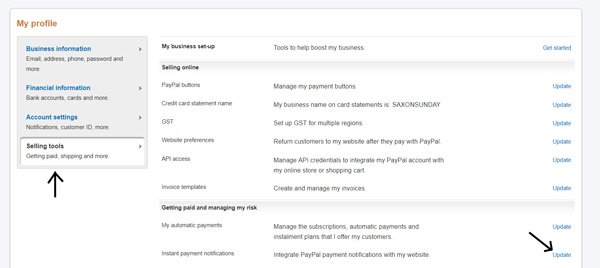
Step 3) Click on the ‘Profile‘ menu in the top right hand corner of your PayPal account and then on ‘Profile and Settings‘.

Step 4) Choose the ‘Selling Tools‘ menu and then you will see a section titled ‘Getting Paid and Managing my Risk‘.

Step 5) Click the ‘Update‘ button for ‘Instant Payment Notifications‘.
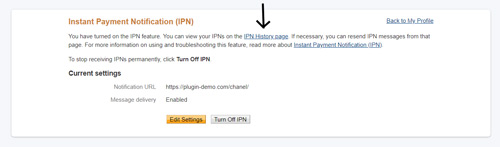
paypal-ipn-resend

Step 6) You will now be in your IPN settings. Click the link that reads ‘IPN History Page‘. This will take you to the page needed to move on in this tutorial.

IPN-history-page

Re-sending an IPN Message

Step 1) Select the date that the original IPN message was sent. This will allow you to locate the IPN message(s) that you intend on re-sending. Alternatively you can choose to search for an IPN message by transaction ID or delivery status.

ways-to-search-for-ipn-message

Step 2) Once you have located the IPN message(s) that you wish to resend, tick the checkbox on the left hand side of the message(s).

Step 3) Once an IPN message box is ticked, the option to ‘Resend Selected‘ appears below search results. Press the ‘Resend Selected‘ button to resend all marked IPN messages. You are able to resend multiple messages at once.

resending-selected-ipn-message

Step 4) ‘Confirm’ the confirmation request to resend the IPN message.

Step 5) The status of IPN messages that you have resent will change to ‘resending‘.

resending-ipn

Related Posts

  • WordPress Simple PayPal Shopping Cart Plugin
  • Playing In PayPal’s Sandbox
  • Creating a Simple Online Store Using the Stripe Payment Gateway for Free
  • A Bucket Full Of Objects — Amazon S3

Shop Admin Tips,  Web Development Instant Payment Notification,  Payment Gateways,  Paypal,  paypal shopping cart,  PayPal Tutorials,  shopping cart,  Troubleshooting,  WordPress Shopping Cart,  WordPress tutorial

Reader Interactions

Comments (4 responses)

  1. admin says:
    March 17, 2019 at 2:49 am

    @Obie, Thank you.

  2. Obie says:
    March 17, 2019 at 2:43 am

    I worked this out… See below…

    To send the message to the current profile URL instead of the URL associated with the message, check the box for ***To send an IPN again to a profile URL***. If you do not select this option, PayPal sends the message to the same URL to which the original message was sent, which is not necessarily the current profile URL.

  3. admin says:
    March 17, 2019 at 2:42 am

    @Obie, PayPal doesn’t allow you to send an old transaction to a new IPN URL. You will need to make a new transaction with the updated IPN URL.

  4. Obie says:
    March 17, 2019 at 2:37 am

    I have updated my webhook URL. Anyway I can send the old data to the NEW URL.

    As when I do a “resend” like this article talks about it must be sending to the OLD webhook URL and not the new updated webhook URL.

    Anyway can send old requests to the updated webhook URL?

Leave a Reply

Your email address will not be published. Required fields are marked *

Primary Sidebar

Featured & Popular Articles

Video Answers to Top WordPress QuestionsWordPress Optimization Tips and Tricks for Better Performance and SpeedEssential WordPress Security Tips - Is Your Blog Protected?WordPress Simple PayPal Shopping Cart PluginTop 15 Search Engine Optimization (SEO) Techniques I Forget to DoList of the Best and Must Use WordPress PluginsHow do I Start a Blog and Make Money Online?Good Domain Name Picking Tips for Your Blog SetupFind Out Which WordPress Web Hosting Company Offers the Cheapest and Reliable Web Hosting Solution

Featured WordPress Plugins

wordpress estore plugin
wordpress membership plugin
WP Express Checkout Plugin
WordPress Lightbox Ultimate Plugin
WordPress photo seller plugin
wordpress affiliate plugin

Recent Posts

  • Accept Donations via PayPal from Your WordPress Site Easil [...]
  • Buy Now Button Graphics for eCommerce Websites [...]
  • Subscription Button Graphics for eCommerce Websites [...]
  • Adding PayPal Payment Buttons to Your WordPress Sidebar Ea [...]
  • PayPal QR Codes [...]

Comment & Socialize

  • @Rodrigo Souza, Thank you f ...
    - admin
  • The example for 'slm_add_ed ...
    - Rodrigo Souza
  • @Ron, All the valid transac ...
    - admin
  • Hello, when people have sel ...
    - Ron
  • We have hte following featu ...
    - admin

Check out our solutions

View our WordPress plugin collection and start using them on your site.

Our WordPress Solutions

Footer

Company

  • About
  • Privacy Policy
  • Terms and Conditions
  • Affiliate Login

Top WordPress Plugins

  • Simple Shopping Cart
  • PayPal Donations
  • WP Express Checkout
  • WP eStore
  • WP eMember

Blogging Tips

  • How to Start a Blog
  • Selecting a Good Domain
  • Cheap WP Hosting
  • WP Video Tutorials
  • Simple SEO Tips

Search


Keep In Touch

Copyright © 2023 | Tips and Tricks HQ