Tips and Tricks WP eCommerce

eCommerce Solution for WordPress Blog

  • Home
  • eCommerce Plugins
  • WP eStore Documentation
  • WP Shopping Cart Doc

Sell Products in Your Customers Currency

If you sell your products globally then you may want to allow your customers to choose the currency they use to purchase your item(s).

Here is an example of the scenario that we are going to cover in this tutorial.

When customers from US visit your site, they purchase the products using US Dollars. However, the customers from Europe can change the currency to EURO and purchase the products using EURO.

Step 1) Install the eStore Plugin

First step is to install and configure the eStore plugin (if you don’t have it already).

Step 2) Install the Multi-Currency Addon

Next, install and configure the multi-currency addon.

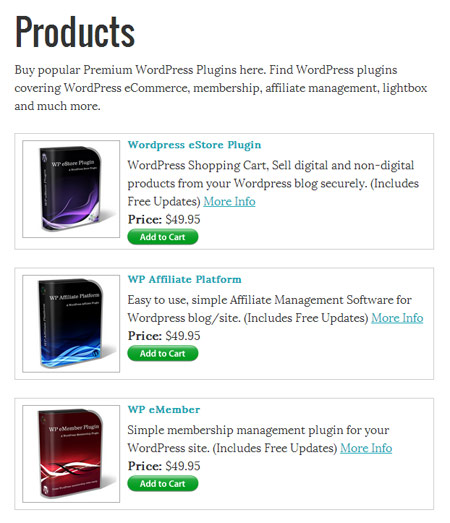
Step 3) Create a Products Page

Create a page from your WordPress admin dashboard and put all the products that you want to sell on this page. Here is an example of how it may look like:

products-page-example

Step 4) Add the Currency Conversion Widget

Now, you can add the currency conversion widget on your products page or on the sidebar.

The currency conversion widget allows your customer to switch the currency to their preferred currency.

store-currency-conversion-widget-screenshot

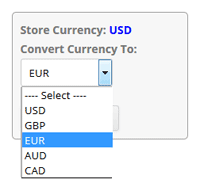
Use the following shortcode to put the currency conversion widget on a page or in the sidebar:

[eStore_multi_currency_widget code="USD,GBP,EUR,AUD,CAD"]

You can remove some of the currencies from the shortcode (if you don’t want to offer them all).

  • USD – United States Dollar
  • GBP - Pound Sterling
  • EUR – Euro
  • AUD – Australian Dollar
  • CAD – Canadian Dollar

Now, your customers can pay you using the currency they prefer.

How to Setup PayPal IPN Notification

Instant Payment Notification (IPN) allows you to integrate your PayPal payments with your website’s back-end operations, so you get immediate notification and authentication of the PayPal payments you receive.

Note: This is not needed for the PayPal Commerce Platform (PayPal’s New API).

Video Tutorial on PayPal IPN Setup

Written Instruction

Do the following to enable IPN in your PayPal account:

locating-IPN-new-PayPal
  1. Log into your PayPal account.
  2. Click on the “cog” icon in the right hand corner and then on “Account Settings“.
  3. Under “Solutions and Services” click on “Website Payments“.
  4. Look for an option labelled “Instant Payment Notification“. Click on the update button for that option.
  5. Click “Choose IPN Settings“.
  6. Enter the URL of your website and hit “Save“.
enable-paypal-ipn-in-your-profile

Resend PayPal IPN Message

Read the how to Resend PayPal IPN message tutorial.

PayPal Beginner Video Tutorials

The PayPal beginner video tutorials is a good resource to check if you are new to PayPal as a merchant.

How To Sell Sheet Music From Your WordPress Site Securely

In this tutorial I will cover how you can sell sheet music from your WordPress site securely (protecting the sheet music file).

This will be a simple and quick tutorial.

Things you will need to sell sheet music from your WordPress site.

  • A WordPress site
  • WP eStore Plugin
  • PDF Stamper Plugin

Step 1: Install eStore and configure the plugin:

You will need to install the eStore plugin on your WordPress site. You can use the following links to get the plugin. Then check the install/usage videos to set it up (it is very easy to set it up).

  • Get the eStore
  • Install and Usage Videos

Step 2: Install the PDF Stamper (optional):

Next you will need to install the PDF Stamper (this step is optional). The PDF Stamper is to help protect your sheet music files from being shared. You can read more about the PDF Stamper plugin here.

  • Get the PDF Stamper
  • PDF Stamper Documentation

Step 3: Start selling your sheet music online:

Once you have both plugins installed and configured you are ready to create your products and start selling your sheet music securely.

How to Hide a WordPress Page from the Navigation Menu

WordPress adds all your pages to the navigation menu by default unless your theme supports the new menu option.

The following video will show you how you can hide WordPress page(s) from your navigation menu.

This is very helpful when you do not want to show some particular pages of your site to the navigation menu.

How to Show a Download Button to Members and a Buy Button to Non Members

In this article (and video) I am going to explain how to offer a digital item for sale and for download with just one shortcode. Essentially what we will be doing is checking if the current visitor is an approved member or not, and then automatically displaying the appropriate button to them based on that criteria.

As expected, permitted members will see a download button for the digital item, while non (or anonymous) members will see a purchase button of some kind (buy now, add to cart, subscribe).

Before we continue, let’s make certain that you have the proper plugins and add-ons in place.

This tutorial requires the following plugins:

  • WordPress eStore Plugin
  • WordPress eMember Membership Plugin

And the following free eStore add-ons:

  • Extra eStore Shortcodes
  • eStore Members Only

How to Provide Digital Downloads to Members Only

Once all of the above software is in place, please follow along with the steps below.

  1. In your WordPress dashboard, go to WP eStore >> Members Only Button
  2. Enter in the WP eStore Product ID for the product that you want to setup. You can go to WP eStore >> Manage Products to find the ID for the product.
  3. Choose from one of the Fancy displays. You can start with “1” (without quotes) and modify it from the generated shortcode if you want to try a different product display later. Here are the different options.
  4. In the Permitted Membership Level IDs include all of the membership levels that you want to have download access to the product. Separate each ID with a dash or hyphen. You can go to WP eMember >> Membership Level to find the IDs for the membership levels.
  5. In the Button for Non Permitted Users box enter the value for the type of button that you want to use. 1 is for “add to cart” and 2 is for “buy now” but you can have it display a subscribe (3) or download (4) button for non-permitted members as well.
  6. Specify a button type for “permitted” users now. Here you would most likely use “4” to create a download button, although all other button types are still available.
  7. Click the Generate Shortcode button.
  8. Paste the generated shortcode into a post or page.

Please post below if there are any questions.

Your Shopping Cart

Shopping Cart Empty
Shopping Cart is Empty
Visit The Shop

Search

Featured Documents

Stylish Product Display Options for WP eStore WP eStore Quick Setup and Usage Video Tutorial WP eStore Shortcodes and Functions Reference WordPress eStore Plugin Features WordPress eStore Plugin Demo What Our Customers Have to Say About Our Products WordPress eStore WishList (Feature Suggestions) WordPress eStore Frequently Asked Questions (FAQ) How to Show Add to Cart buttons

Featured Plugins

WP Express Checkout Plugin
wordpress_estore_icon
wordpress membership plugin icon
wordpress_affiliate_plugin_icon

Copyright © 2025 | eCommerce Plugins