You’ve created an online website using Shopify, an increasingly popular eCommerce platform although you can’t quite work out how to set up PayPal, the world’s leading online payment service.
Follow along to learn how you can enable PayPal to allow your Shopify customer’s to begin making payments directly into your account.
What You Need to Know to Integrate PayPal with Shopify
To integrate PayPal with Shopify there are a few key things to know.
Number one is obvious for most but you will need a verified PayPal account and a Shopify website.
Secondly your PayPal account will need to be a Business Account. If you already have a Personal PayPal Account you can simply upgrade to a Business Account.
If you have set up those three things, you’ll be ready to integrate PayPal with Shopify. While Shopify push to use their bank depositing system known as ‘Shopify Pay‘, there are multiple other payment gateways and forms of payments you can accept on your website. When considering which payment gateway is right for you, consider the per transaction fee as this may save you a dime or two daily.
If you’d like to start accepting payments with PayPal by selling goods and services on your Shopify website, take a look at PayPal’s fees and features first.
Why Should I Accept PayPal Payments on my Shopify Website?
PayPal is one of the most widely recognized and well known payment gateways. Ask any person and I am sure they’ll be able to tell you the colors of the PayPal logo that appears on thousands and thousands of checkout pages. Due to the trust and reliability of using PayPal, customers have confidence in using it to pay for goods and services.
The charge-back feature of PayPal allows customers to dispute any charges that they did not complete themselves. This option gives the customer confidence in purchasing from a website that they have not used previously.
While PayPal do charge transaction fees, just like any other payment gateway, these fees are kept to a minimum due to the extensive customer base.
What Payment Gateways Can be Integrated with Shopify?
If PayPal is not for you, the good news is a range of different payment gateways and payment forms are accepted with Shopify.
For example, if you are located in the United States, you can accept the following means of payment on your Shopify website:
- Adyen
- Affirm
- Afterpay
- Alipay
- Amazon Pay
- Asiabill
- Authorize.net
- Bambora
- BitPay
- Cartão de Crédito e Boleto via EBANX
- Cartão de Crédito em até 12x via EBANX
- Cayan
- Chase Paymentech (Orbital)
- Coinbase Commerce
- CyberSource
- Divido
- Elavon Converge
- First Data Payeezy
- FirstData US
- G2A Pay
- GoCoin
- Ignite Payments
- Kash Direct Debit
- Merchant e-Solutions
- MONEI
- Pay Later with Klarna
- PayBright
- Payment Express
- PayPal Express Checkout
- PayPal Pay-flow Pro
- Paysafe
- PinwheelPay
- Psigate
- QuickBooks Payments
- Sage Payment Solutions
- Sezzle
- Shopify Payments
- Skrill
- Slice it. Pay over time with Klarna
- Vantiv (Litle Platform)
- Vantiv Integrated Payments
- WorldPay (Direct)
As you can see, when you have a Shopify website, the means of payments are extensive and allow you to connect to a global customer base. While the payment gateways you can use on your Shopify website vary from one country to another, PayPal can be used in 200 countries/regions around the world.
Overview: Accepting PayPal Payments with Shopify
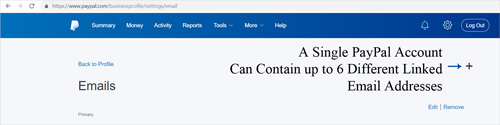
Don’t stress, due to Shopify’s integration with PayPal, accepting payments from customers can be achieved in a number of minutes. In fact, when you create a Shopify store, a PayPal Express Checkout is automatically created using the specified email of your website. PayPal is a default Shopify payment provider. While this works for the majority of users, if you have a number of email addresses, you may need to create a new PayPal account with the email you specified when creating Shopify. Alternatively you can add this additional address to your existing PayPal account.
Once you’ve gone ahead and made sure that you have a PayPal account with the same address that you used when creating your Shopify website, you can start accepting payments for goods and services. Sounds easy, right?
While you can begin to accept payments there is one catch, if you’d like to manually capture payments or issue any refunds you’ll need to give Shopify permission from your PayPal account. See the next section on how to thoroughly set up PayPal with Shopify.
Adding PayPal to Shopify
Video Tutorial: How to Offer PayPal on a Shopify Website
Written Tutorial: How to Add PayPal to Your Shopify Website
Above we discussed how PayPal is automatically added when creating a Shopify website. If you will be using PayPal as your main payment gateway, you should set it up thoroughly so that in the future refunds can be issued if needed.
Step 1) Ensure you have created a Shopify Account and a PayPal Account.
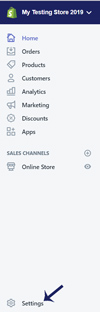
Step 2) Log into your Shopify admin dashboard, and in the far left corner click on the ‘Settings Tog‘.
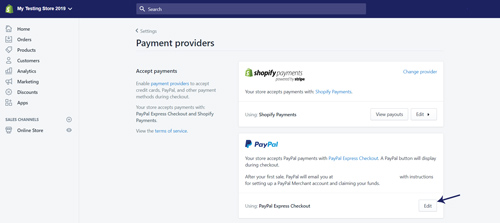
Step 3) Now click on the ‘Payment Providers‘ button.
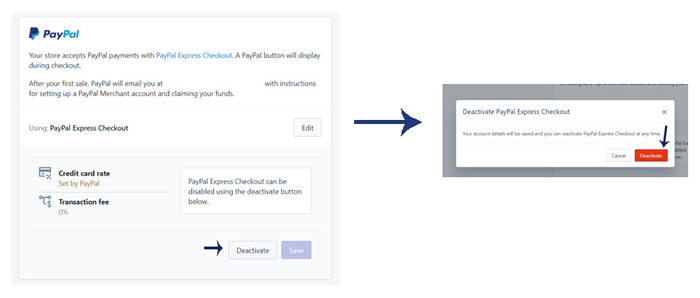
Step 4) You will see a ‘PayPal section‘. You will need to click the ‘Edit‘ button.
Step 5) Click the deactivate button. Confirm deactivation. We will need to deactivate the PayPal account so that we configure it correctly and easily allow Shopify access so that in future we can issue refunds.
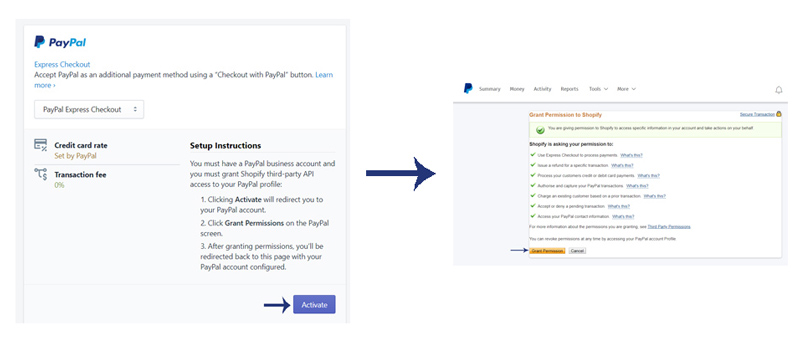
Step 6) Now in the PayPal section, go ahead and ‘Activate’ your PayPal account. You will need to enter your password as well. If you would like to change the PayPal address to use a different PayPal account to accept Shopify Payments, it’s at this stage that the email can be edited. If you are logged into your PayPal account within the same browser, it will already select that PayPal account so you will only need to click ‘Grant Permission’.
Step 7) You will see a ‘PayPal Permissions Page’. You will need to click ‘I Give Permission’ to allow for a complete PayPal/Shopify integration to occur.
Step 8) Once you have completed the set up, complete a PayPal Test Transaction to ensure everything is working correctly. (Test transactions can only be completed once your store has been launched and is not in the free trial period).
Leave a Reply