Do you find many unwanted messages clogging up your Gmail account? Or do you find that important messages are going unnoticed?
Filters are a great way to organize the way emails are dealt with when they are sent to your account.
Like most email services, Gmail allows users to create filters. These filters determine how different emails coming into the account should be handled. You can choose to filter your emails by a range of different aspects and then choose what should happen if you do receive those emails.

Gmail Filter Functions
Gmail allows users to filter their emails by:
- A ‘From‘ Address (A specific email address)
- A ‘To‘ Address (Who the email has been addressed to)
- The ‘Subject‘ Line (A word or phrase that appears in an email subject line)
- Specific ‘Words‘ Contained within the Email (Keywords that are found in the email subject/body)
- When an Email ‘Doesn’t Have‘ Specific Words (A specific word/word that an email doesn’t contain)
- The ‘Size‘ of the Email (Filter by the size of an email)
- Whether the email has ‘Attachments‘ or ‘Chats‘
You can then decide what should happen if you receive an email that falls into one of your filter categories:
- Immediately ‘Archive‘ the email (The email will never appear in your primary messages)
- Mark the email as ‘Read‘ (It will appear as though it has already been read)
- Mark the email with a ‘Star‘ (The email will be highlighted with a star)
- Apply a specific ‘Label‘ (A label of your choosing will be automatically applied to the email)
- ‘Forward‘ the email (The email will be automatically forwarded to an address you specify)
- ‘Delete‘ the email (The email will go to the trash)
- Never mark the email as ‘Spam‘ (The email will always appear in your primary messages)
- Mark those emails as ‘Important‘ (The email will come through as important)
- Never mark the emails as ‘Important‘ (The email will not be marked as important)
- ‘Categorize‘ the emails (The email will be put into a specific category that you have specified)
Why Use Gmail Filters?
You may be questioning why users take the time to set up Gmail filters. Gmail filters can:
- Increase your response time to customers
- Automatically sort out your mail
- Ensure all important mail is received and does not end up in the spam bin
- Allows account owners to save time dealing with promotional content
- Automates your inbox
Creating Email Filters for a Gmail Account
The following instructions outline how you can create email filters when using a Gmail account.
Step 1)Â Log in to your Gmail account.
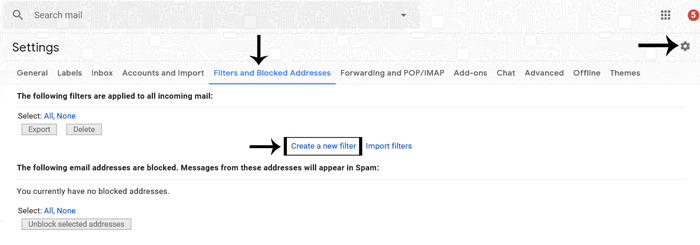
Step 2) Click on the Settings Cog and then on the Settings menu.
Step 3) Choose the Filters and Blocked Addresses tab.
Step 4) Now you will see the words Create a new filter. Click on them to create your first Gmail filter.
Step 5)Â Choose what type of emails you would like to filter. Enter either a word, email or phrase into the appropriate field. You can choose to enter information into multiple fields. An example screenshot can be found below.
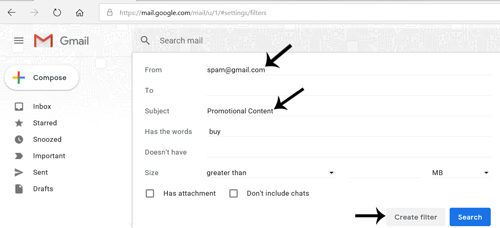
Step 6) Click on the Create Filter button.
Step 7)Â Now you will need to choose what should happen to emails that come through that match the criteria. These may be important emails or from a known spam email.
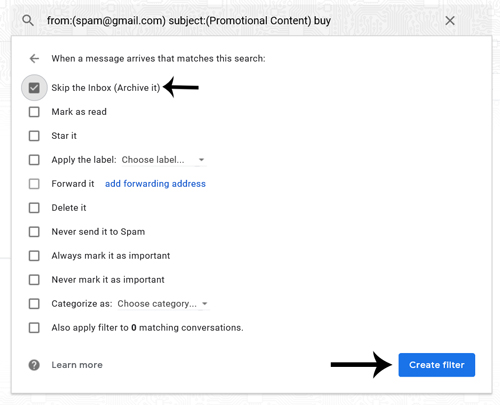
Step 8) Once you have chosen how filtered emails should be handled, click the Create filter button.
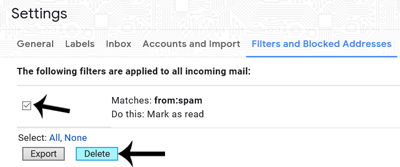
Step 9) Your filter will now appear under the Filters and Blocked Address tab. If you need to delete a filter for any reason you can find out how in the section below.

How to Remove a Gmail Filter
If you wish to remove a gmail filter you can mark the check box next to the filter in question and then click the Delete button. The filter will be removed from your Gmail account.
Leave a Reply