Tips and Tricks WP eCommerce

eCommerce Solution for WordPress Blog

  • Home
  • eCommerce Plugins
  • WP eStore Documentation
  • WP Shopping Cart Doc

Simple Shopping Cart – Adding Values to PayPal Custom Field

The simple shopping cart plugin has a filter that you can use to add extra data to the PayPal custom field.

Note: The plugin already uses the PayPal custom field to pass some parameters to PayPal. So you should append your data to this custom field (to make sure you don’t erase the custom data added by this plugin)

Code Example

The following code example shows how you can append data to the custom field (add this code to your theme’s functions.php file or a custom plugin).

add_filter('wpspc_cart_custom_field_value', 'append_my_custom_data');
function append_my_custom_data($custom_value)
{
    //Append my data using query parameter
    $custom_value = $custom_value . '&my_data=XYZ';
    return $custom_value;
}

This will pass your data along with the cart’s custom data to the PayPal’s custom field.
W3 Total Cache and Simple Shopping Cart Integration

The simple shopping cart plugin was designed to work with the W3 Total Cache plugin.

Integration Steps for W3 Total Cache Plugin

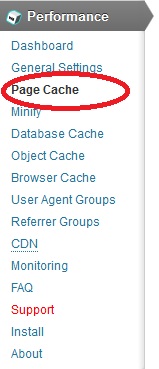
Step 1) Go to the “Page Cache” menu in your W3 Total Cache plugin.

Step 2) Add the following line in the “Rejected Cookies” field under the “Page Cache” settings menu of the W3 Total Cache plugin and all done:

cart_in_use

Where is the “Page Cache” menu in W3 Total Cache Plugin?

The folloiwng screenshot will tell you where to find the page cache menu:

WP Shopping Cart and MailChimp Integration

Want to keep your buyers up to speed on your newest products or specials? This guide will help you use MailChimp for WP Shopping Cart to automatically add customers to a mailing list when they purchase your products.

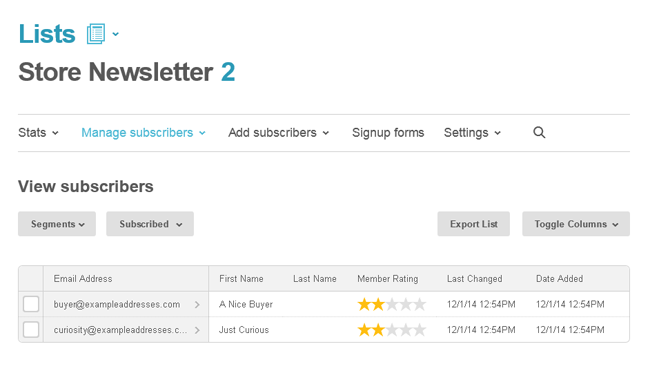
screenshot showing the mailchimp account dashboard

This paid add-on can be purchased at the bottom of this page. We recommend users to carefully review the information provided here to fully understand its features before making a purchase. This ensures that the add-on meets your expectations and aligns with its capabilities.

Installing the Addon

You can install this addon the same way you install any WordPress plugin:

  • Go to the Add New plugins screen in your WordPress admin area
  • Click the upload tab
  • Browse for the addon file (simple-cart-mailchimp-integration.zip)
  • Click Install Now and then activate the plugin

Setup and Configuration

Step 1) Create your list on MailChimp

To use the addon, you’ll need to have a MailChimp account, so create one now if you don’t already have one. Once you have signed into your MailChimp account, you can select Lists from the menu to create a new mailing list, or choose from lists you’ve created previously.

Step 2) Find and add your List Name

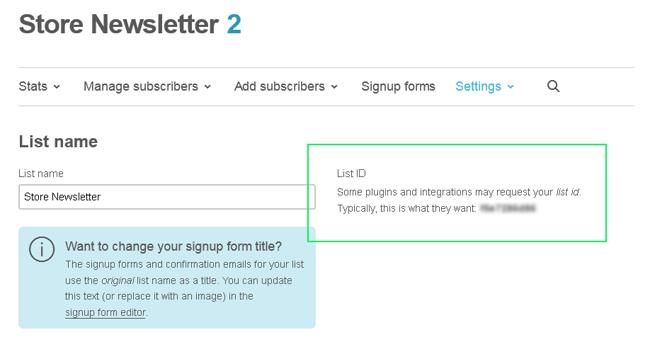
In your MailChimp account, open your list and select List Name & Defaults from the Settings menu. Copy the List Name displayed here to your clipboard.

screenshot showing how to find the mailchimp list id

Step 3) Enter the Mailchimp List Name in the Addon Settings

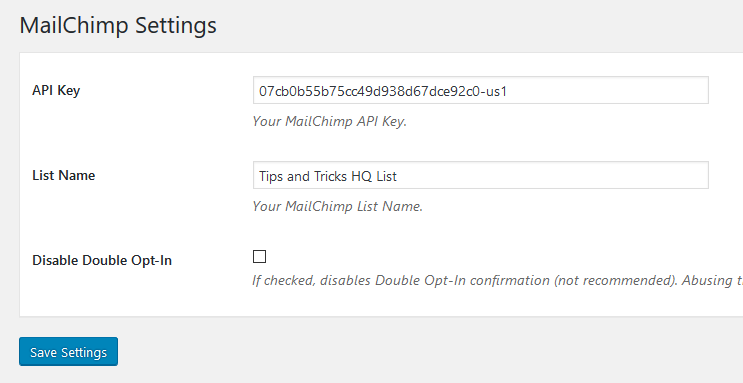
Now open MailChimp Addon Settings from the admin dashboard of your WordPress site, and paste the List Name you just copied into the List Name field.

simple-cart-mailchimp-addon-settings

Step 4) Create and add your API Key

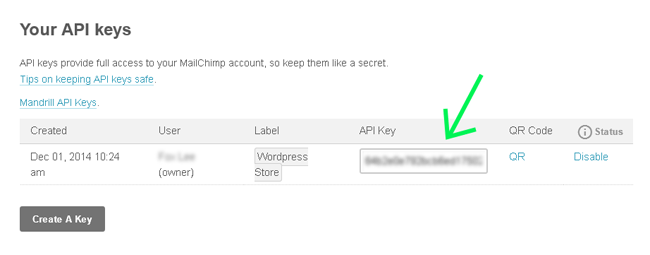
In your MailChimp account, open your account/user page and get the API Key. Copy the long string of numbers and letters from the API Key field to your clipboard.

screenshot showing how to find the mailchimp api keys

In MailChimp Addon Settings, paste the text you just copied into the API Key field.

Step 5) Additional settings

Finally, determine if you need to change any of the additional settings. The default options work fine out-of-the-box.

Now, when you get an order via the simple shopping cart plugin, that customer will get added to your MailChimp list.

Get the Simple Cart MailChimp Addon

The price of this addon is $29


Running Additional Tasks After a Sale via the Simple Cart Plugin

You can run some additional tasks after the simple cart plugin has processed a sale.

Note: This should only be tried by a developer as it involves custom PHP coding.

The plugin includes action hooks that are triggered after the checkout data is processed. These hooks allow you to perform additional custom tasks. Below is a code snippet demonstrating how to use one of these action hooks.

You can add this code to the functions.php file of your theme or to a custom plugin.

Table of Contents

  • PayPal Commerce Platform
  • PayPal Standard
  • Stripe Checkout

PayPal Commerce Platform

Here is example code if you are using the PayPal Commerce Platform (PPCP) checkout option.

add_action('wpsc_paypal_checkout_ipn_processed', 'wpsc_custom_post_payment_tasks');
function wpsc_custom_post_payment_tasks($ipn_data)
{
    //You can write the $ipn_data array's content to a file.
    $firstname = $ipn_data['first_name'];
    $lastname = $ipn_data['last_name'];
    $email = $ipn_data['payer_email']
    //TODO - Do something with the data
}

PayPal Standard

Here is example code if you are using the standard PayPal checkout option.

add_action('wpsc_paypal_ipn_processed', 'wpsc_pp_ipn_tasks');
function wpsc_pp_ipn_tasks($ipn_data)
{
//You can write the $ipn_data array's content to a file to see
//what paypal sends in the IPN
$firstname = $ipn_data['first_name'];
$lastname = $ipn_data['last_name'];
$email = $ipn_data['payer_email']
//Do something with the data

}

The PayPal IPN message consists of variables and is available as an array inside your function. You can access an element of the array by using the proper variable name. To see a list of all the available variables please check the PayPal IPN documentation page.

Stripe Checkout

Here is example code if you are using the Stripe checkout option.

add_action('wpsc_stripe_ipn_processed', 'wpsc_stripe_post_payment_tasks');
function wpsc_stripe_post_payment_tasks($ipn_data)
{
//You can write the $ipn_data array's content to a file.
$firstname = $ipn_data['first_name'];
$lastname = $ipn_data['last_name'];
$email = $ipn_data['payer_email']
//TODO - Do something with the data
}

Simple Shopping Cart – Customize the Thumbnail Section of the Product Box

You can customize the thumbnail image section of the product box display to suite the way you want to show it.

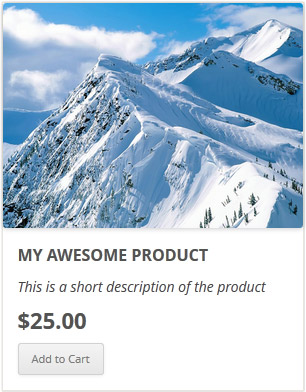
Below is an example of how the thumbnail section of the product display box looks like:

product display box example

Now, lets say you are using a lightbox plugin and you wanted to add lightbox to the thumbnail image. Below is an example snippet of code to show you how you can customize the thumbnail image section to accommodate that:

add_filter('wspsc_product_box_thumbnail_code', 'wspsc_my_custom_thumbnail_code', 10, 2);
function wspsc_my_custom_thumbnail_code($img_code, $args)
{
    $thumbnail_src = $args['thumbnail'];
    $img_code = '<a href="'.$thumbnail_src.'" rel="lightbox"><img src="'.$thumbnail_src.'" alt="'.$args['name'].'" ></a>';
    return $img_code;
}

How to Receive Buyer’s Phone Number from PayPal

To receive contact phone number of buyers, you will need to enable an option in your PayPal merchant account.

Step 1) Log into your PayPal account

Step 2) Go to Profile -> My Selling Tools -> Website preferences

It should be at this page in your PayPal account.

Note: PayPal changes their website interface frequently so you may have to look for it a bit.

Step 3) Set Contact Telephone to On (Required Field)

screenshot showing how to accept buyer phone number with a paypal order

Step 4) Save your settings

Simple Shopping Cart – Resize/Customize the Shopping Cart Width

The simple shopping cart is responsive, so it will automatically fit into the container you put it in. However, if you want to re-size the width of the cart shortcode output then use the following CSS tweak:

Step 1) Grab this custom CSS plugin

Step 2) Add the following CSS code in that plugin.

The following make the width of the shopping cart 70% of the parent container:

.shopping_cart{
width: 70% !important;
}

Alternatively, you could use a pixel value like the following:

.shopping_cart{
width: 300px !important;
}

Customizing Price Amount Display Currency Formatting

You can customize the price amount display formatting to suite the way prices are displayed in your country and currency.

Here are some examples:

By default the price amount is display like the following:

$25.00

In your country and currency, you may want to show the currency symbol at the end of the amount. Below is an example of how you can customize the price display amount.

Simply add the following block of code to your functions.php file of the theme:

add_filter('wspsc_print_formatted_price', 'wspsc_my_custom_price_format', 10, 3);
function wspsc_my_custom_price_format($formatted_price, $price, $symbol)
{
    $formatted_price = number_format($price, 2, '.', ',') . ' '. $symbol;
    return $formatted_price;
}

It will now show the price amount like the following

25.00 zł

You could also change the decimal separator to be “,” and the thousand separator to be “.” in the price output. Here is an example of how to do that (add the following code to your functions.php file of the theme):

add_filter('wspsc_print_formatted_price', 'wspsc_my_custom_price_format', 10, 3);
function wspsc_my_custom_price_format($formatted_price, $price, $symbol)
{
    $formatted_price = $symbol . number_format($price, 2, ',', '.');
    return $formatted_price;
}

It will now show the price amount like the following

₤25,00

WP Simple Shopping Cart – How to Use Discount Coupons

WP Simple Shopping Cart plugin allows you to configure unlimited discount coupon codes. A user will be able to apply a coupon code to get a discount for the items they are purchasing from your site.

Coupon/Discount Configuration

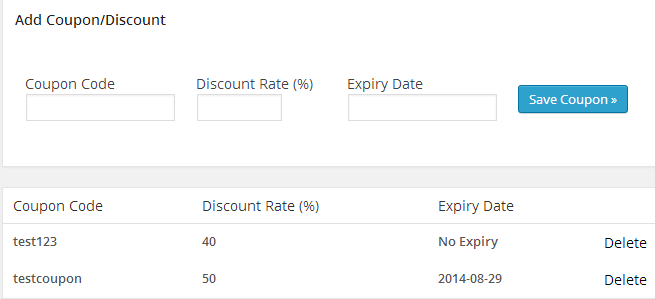
Once you have installed the plugin, Go to following interface menu to create a new discount coupons:

Simple Cart -> Coupons

You can then give these coupon codes to your customers.

screenshot showing the wp shopping cart coupon/discount menu

You can leave the “Expiry Date” field empty to create coupons that never expire.

Showing a Shopping Cart with Product Image Thumbnails

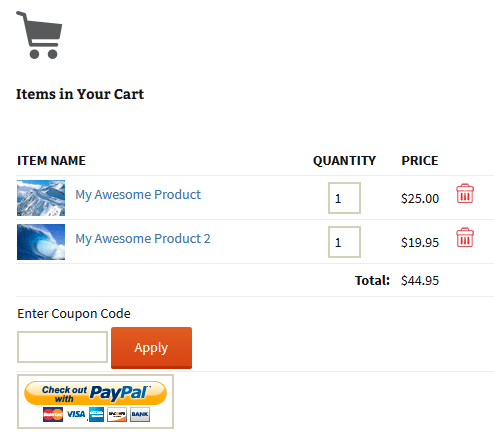
In this tutorial, I will show you how you can show an image thumbnail of your product in the shopping cart when using the Simple Shopping Cart plugin. The goal is to create a shopping cart that looks like the following example:

shopping-cart-with-product-image-thumbnail

Step 1. Specify the Thumbnail Image URL in the Button Shortcode

Specify your thumbnail image in the add to cart button shortcode using the “thumbnail” parameter. See example below:

[wp_cart_button name="Test Product" price="19.95" thumbnail="http://www.example.com/my-product-image.jpg"]

Step 2. Specify the Show Thumbnail Parameter in the Shopping Cart Shortcode

Add the “show_thumbnail” parameter in your shopping cart shortcode. See example below:

[show_wp_shopping_cart show_thumbnail="1"]

or

[always_show_wp_shopping_cart show_thumbnail="1"]

Now, when your customers add items to the cart, they will see the product image thumbnails that you specified in the add to cart button shortcode.

What If I am Using WP eStore Plugin?

There is a similar feature in the WP eStore plugin also. So you will be able to create a shopping cart with product image thumbnails if you are using that plugin also.

« Previous Page
Next Page »

Your Shopping Cart

Shopping Cart Empty
Shopping Cart is Empty
Visit The Shop

Search

Featured Documents

Stylish Product Display Options for WP eStore WP eStore Quick Setup and Usage Video Tutorial WP eStore Shortcodes and Functions Reference WordPress eStore Plugin Features WordPress eStore Plugin Demo What Our Customers Have to Say About Our Products WordPress eStore WishList (Feature Suggestions) WordPress eStore Frequently Asked Questions (FAQ) How to Show Add to Cart buttons

Featured Plugins

WP Express Checkout Plugin
wordpress_estore_icon
wordpress membership plugin icon
wordpress_affiliate_plugin_icon

Copyright © 2025 | eCommerce Plugins