Tips and Tricks WP eCommerce

eCommerce Solution for WordPress Blog

  • Home
  • eCommerce Plugins
  • WP eStore Documentation
  • WP Shopping Cart Doc

Showing a Shopping Cart with Product Image Thumbnails

In this tutorial, I will show you how you can show an image thumbnail of your product in the shopping cart when using the Simple Shopping Cart plugin. The goal is to create a shopping cart that looks like the following example:

shopping-cart-with-product-image-thumbnail

Step 1. Specify the Thumbnail Image URL in the Button Shortcode

Specify your thumbnail image in the add to cart button shortcode using the “thumbnail” parameter. See example below:

[wp_cart_button name="Test Product" price="19.95" thumbnail="http://www.example.com/my-product-image.jpg"]

Step 2. Specify the Show Thumbnail Parameter in the Shopping Cart Shortcode

Add the “show_thumbnail” parameter in your shopping cart shortcode. See example below:

[show_wp_shopping_cart show_thumbnail="1"]

or

[always_show_wp_shopping_cart show_thumbnail="1"]

Now, when your customers add items to the cart, they will see the product image thumbnails that you specified in the add to cart button shortcode.

What If I am Using WP eStore Plugin?

There is a similar feature in the WP eStore plugin also. So you will be able to create a shopping cart with product image thumbnails if you are using that plugin also.

Filed Under: WordPress Shopping Cart Tagged With: Add to Cart Button, cart shortcode, WP Shopping Cart

Adding a Shopping Cart to The Sidebar of Your WordPress site

Use the following steps to add a shopping cart to the sidebar of your WordPress site. This will allow your customers to see what items they have in their cart when browsing and adding items to the cart.

Steps to Add a Sidebar Shopping Cart

Step 1) Go to the widgets menu of your WordPress admin dashboard area.

Step 2) Add a standard text widget to the sidebar of your site. Your theme need to support sidebars.

adding-a-sidebar-cart-widget

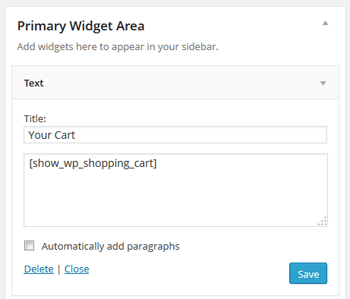
Step 3) Use one of the following shortcodes to add the cart in this sidebar widget:

[show_wp_shopping_cart]

or

[always_show_wp_shopping_cart]

The first shortcode will only show the cart if there are any items in the cart. The 2nd one will always show the cart (even if the cart is empty).

Try them both and use the one that you like.

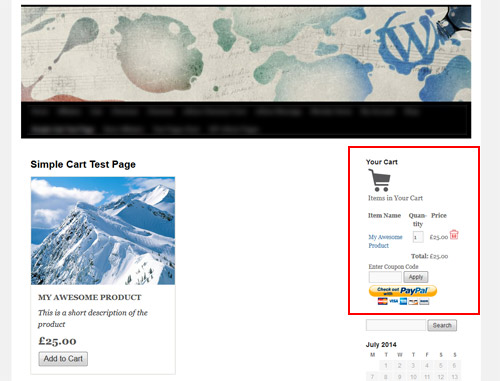
Below is an exmaple of how the cart should look on the sidebar:

how-the-cart-looks-on-the-sidebar

Adding the Cart to the Sidebar via a Template File

If you are a developer and you are trying to add the cart to the sidebar from your theme’s template file then use the following PHP function:

<?php echo print_wp_shopping_cart(); ?>

Filed Under: Additional Guidance Tagged With: cart shortcode, e-commerce, WP Shopping Cart

WP Shopping Cart – Stacking Multiple Product Boxes Side by Side

I received the following question today from one user:

I love the display box feature, yet I cannot get them to align horizontally on the page. How can I get more that one item per line?

In this tutorial I will explain how you can stack the product boxes side by side to display multiple products in one line.

Preparation

If you don’t know how to create a product box using the WP Shopping Cart plugin then read this page first.

CSS Tweaks

I am going to apply a few custom CSS tweaks to stack the product boxes horizontally.

Step 1) Grab this custom css plugin (it allows you to add your custom CSS code without modifying the main plugin).

Step 2) Lets make the product boxes narrower so there is more room to have multiple boxes side by side.

Add the following block of CSS code in the custom CSS plugin’s interface to define a maximum width of 250px for the boxes.

.wp_cart_product_display_box{
max-width: 250px;
}

You can use a different value if you want to make it narrower.

Step 3) Lets float the product boxes so they stack. Add the following CSS code just below the max-width that you defined in step 2:

float: left;

You should have the following combined CSS code and the boxes should be stacked side by side now:

.wp_cart_product_display_box{
max-width: 250px;
float: left;
}

Step 4) Finally, lets give it some margin to add some space between the boxes.

Add the following CSS code just below what you defined in step 3:

margin-right: 10px;

You should have the following combined CSS which is the final code

.wp_cart_product_display_box{
max-width: 250px;
float: left;
margin-right: 10px;
}

The Final Output

The final output should look like the following example (your product boxes will be aligned horizontally):

shopping-cart-grid-product-boxes-example

Our WP eStore plugin has more product display templates and better grid layout options. You can check the styles offered in WP eStore by visiting this page.

Filed Under: WordPress Shopping Cart Tagged With: e-commerce, grid layout, product box, Product Display, WP Shopping Cart

Simple Cart – Showing a Compact Shopping Cart

Sometimes you may want to display a compact shopping cart on your sidebar or in a post. This allows the users to see that they have items in the cart and they can click a view cart button to go to the full shopping cart page.

Use the following shortcode where you want to show the compact shopping cart:

[wp_compact_cart]

You can add this shortcode in a standard text widget to add the compact cart to the sidebar of your theme.

When there are no items in the cart, the shorcode will produce the following output:

compact-cart-shortcode-output-for-empty-cart

When users add item(s) to the cart, it will show a compact shopping cart output like the following:

compact-cart-shortcode-output-items-in-cart

Clicking the “view cart” link will take them to the page that you specified in the “Checkout Page URL” field of the plugin settings.

Compact Cart Style 2

This second compact cart uses a different style than the one mentioned above. It looks like the following example:

simple-cart-compact-cart-2-example

To use this compact cart on your site, use the following shortcode:

[wp_compact_cart2]

You can add this shortcode in a standard text widget to add it to the sidebar of your site.

Creating a Specific Checkout Page for Your Site

You should create a checkout page before using the compact cart shortcode. Here is how to do it (if you haven’t done it already):

Step 1) Create a new WordPress page

Step 2) Add the following shortcode to this newly created page

[always_show_wp_shopping_cart]

Step 3) Go to the plugin settings and specify the URL of this newly created page in the “Checkout Page URL” field.

Showing a Compact Cart In Your Theme’s Header

Add the following code in your “header.php” file to show a compact cart in your theme’s header area:

<?php echo do_shortcode('[wp_compact_cart]'); ?>

Filed Under: WordPress Shopping Cart Tagged With: cart shortcode, compact cart, WP Shopping Cart

How to Enable PayPal API Access and Get the API Details

The following steps (with screenshots) show you how you can enable API access in your PayPal account and get the API details to use in your shopping cart admin/configuration screen:

  • Log in to your PayPal Business account.
  • Make sure your PayPal account is verified (you need to verify your account before requesting API credentials).
  • Click on the My Account tab (if you are not there already)
  • Click on the Profile link.
  • Click on the My Selling Tools link

paypal-my-selling-tools-link

  • Click on the update button in the API Access row

paypal-api-access-link

  • Click Request API credentials link.

paypal-request-api-access-screen

  • Select the Request API signature radio box.
  • Click Agree and Submit.

api-request-agreement-screen

  • Copy and paste the API username, password, and signature into your shopping cart’s configuration or administration screen.

You can also check this page on PayPal for instruction on how to get your API details.

Filed Under: WordPress Shopping Cart Tagged With: paypal advanced, paypal api, paypal pro, WP Shopping Cart

Translating The WP Simple Shopping Cart Plugin

Method 1

You can translate the plugin from translate.wordpress.org site. Link below:

https://translate.wordpress.org/projects/wp-plugins/wordpress-simple-paypal-shopping-cart

Method 2

Alternatively, You can use the PO File editor to do the translation. Here is a step by step guide on how you can translate the WordPress Simple Shopping Cart plugin in your language.

1. Download and install Poedit (http://www.poedit.net/download.php)

2. Get the plugins POT file (wordpress-simple-paypal-shopping-cart.pot). You can find this file inside the “languages” folder of this plugin.

3. Run Poedit software (if it is not running already)

4. Open the POT file in Poedit. (Click the open link in the software then browse to the POT file location and select that file)

5. Select each translatable text and add the translation in the box that says “Translation”

6. Finish translating the whole file.

7. Go to File -> Save as to save your translations in a PO file.

8. When you are finished translating, go to File -> Save as again to generate the MO file.

Or you can set your Poedit to always compile a MO file when saving changes by clicking File -> Preferences and on the Editor tab check the Automatically compile .mo file on save box.

9. Contact us and send us the translated .mo and .po files and we will add it to the plugin.

Filed Under: WordPress Shopping Cart Tagged With: translation, WP Shopping Cart

WP Simple Shopping Cart – How to Sell Digital Downloads

WP Simple Shopping Cart allows you to easily sell digital downloads from your WordPress site.

Here is an example shortcode that shows how you can specify a download link for a digital product with the standard add to cart button:

[wp_cart_button name="My Download" price="5.00" file_url="http://example.com/wp-content/uploads/2014/03/ebook1.pdf"]

Below is an example shortcode that shows how you can specify a download link for digital item with the product box display shortcode:

[wp_cart_display_product name="My Download Product" price="5.00" file_url="http://example.com/uploads/ebook1.pdf" thumbnail="http://www.example.com/product-image.jpg" description="This is a short description of the product"]

Digital File Delivery to Your Customer

Once the payment is complete, your customer will receive a notification email containing the download link(s) for the items they purchased.

Below is a screenshot of the email your customer will receive:

screenshot showing how download link is sent via email by wp shopping cart plugin

PayPal IPN Feature Settings

You will need to make sure that you have enabled PayPal IPN feature in your paypal account. Log into your PayPal account and enable the IPN feature if you don’t have it enabled already. Check the how to setup PayPal IPN video tuorial.

Filed Under: WordPress Shopping Cart Tagged With: digital downloads, WP Shopping Cart

How to Show a Product Display Box

You can use the “wp_cart_display_product” shortcode to create a product display box on the fly when using the Simple WP Shopping cart plugin. This can be very handy to display your products on a post, page or sidebar easily.

Here is an exmaple shortcode that shows you how to use a product display box.

[wp_cart_display_product name="My Awesome Product" price="25.00" thumbnail="http://www.example.com/images/product-image.jpg" description="This is a short description of the product"]

Replace the values with your product specific data to show a product display box for your product(s).

The above shortcode will product a product display box similar to the following screenshot:

product display box example

Using a Product Box with Product Variation

Here is an example shortcode usage with product variation:

[wp_cart_display_product name="My Awesome Product" price="25.00" thumbnail="http://www.example.com/images/product-image.jpg" description="This is a short description of the product" var1="Size|Small|Medium|Large" var2="Color|Red|Blue|Green|Black"]

The above shortcode will display a product for sale like the following:

product box with variation

Using Shipping With the Product Box

Here is an example of how to add the shipping parameter with the product box shortcode:

[wp_cart_display_product name="My Awesome Product" price="25.00" thumbnail="http://www.example.com/images/product-image.jpg" description="This is a short description of the product" var1="Size|Small|Medium|Large" var2="Color|Red|Blue|Green|Black" shipping="5"]

Specifying an Alt Tag for the Thumbnail Image

You can use the thumb_alt parameter in the shortcode to specify an alt tag for the thumbnail image to be used in the product box. Below is an example:

[wp_cart_display_product name="My Awesome Product" price="29.00" thumbnail="http://www.example.com/images/product-image.jpg" description="This is a short description of the product" thumb_alt="Test alt tag for the thumbnail image"]

Creating a Grid Display With Product Boxes

Check this tutorial to learn how you can stack the product boxes side by side.

Filed Under: WordPress Shopping Cart Tagged With: e-commerce, product box, Product Display, WP Shopping Cart

Sell Photos From WordPress Site Using Free Plugins

You have got a WordPress site and you want to sell photos from your WordPress site for free? In this tutorial I will cover how you can sell photos from your WordPress site for free.

The following screenshot show what we will be creating to sell the photos.

sell photos wordpress site

Setup Steps

Video Tutorial

Step 1: Install the NextGen Gallery Plugin

Download and install the NextGen gallery plugin.

Step 2: Install the simple WP shopping cart plugin

Download and install the free simple WP shopping cart plugin.

Step 3: Create Your Photo Gallery

  • If you haven’t created a photo selling gallery already, then go to the add new gallery menu under the NextGen Gallery plugin and upload your photos.
  • Go to the Manage Gallery menu and edit the gallery that you want to use to sell photos.
  • Add the following in the “Alt & Title Text/Description” area of each photo (adjust the name and price for each of the photos).
Photo 1
Price: $19.95
[wp_cart_button name=”My Photo 1″ price=”19.95″]

Step 4: Create Your Photo Selling Page

Create a WordPress page and insert the following shortcode in this page to show your photos to the site visitors.

Your users will be able to browse your photos then buy the one that they like. After the purchase, you simply ship the photo to your customer’s address:

[nggallery id=1 template=”wp-cart”]

In the above example, 1 is the gallery ID. You will need to use the correct gallery ID for your photo gallery.

We also have a premium plugin just for selling photos.

Filed Under: WordPress Shopping Cart Tagged With: sell photo wordpress, sell photos, sell photos wordpress, wordpress sell photo, WP Shopping Cart

Sell Pay Per View – Setting Up Pay Per View Option Using WP eStore Plugin

Pay-per-view (PPV) is a type of service by which a customer can purchase events to view on your site.

You sell access to a post or page that has the content inside it. The content is available for view after the customer makes a payment. The content can be a video (embedded on the post or page), a digital download, images etc.

When to Use “Pay Per View” or “On Demand” Delivery Method?

There are 2 ways you can deliver digital content to your customers:

  • Direct download via encrypted file download option
  • Pay Per View / On-Demand Access to a webpage that has the content in it

Direct Download:
The direct download method means you are letting your customer download a file to their computer (this is the default method of digital content delivery)

Pay Per View / On-Demand Access:
This covers everything else that does not fall under the direct download category. This method is used to give a customer access to the content without a direct download (the customer views the content on your site via the browser). If you want to give your customer access to a webpage which contains the digital content (for example: a page with embedded streaming video) then use one of the “Pay Per View” methods explained below.

1. The New “Pay Per View” Method

The newly added “Using WordPress Permalink as Digital Product” feature can be used to configure better “Pay Per View” option:

  • Using WordPress Permalink as Digital Product

2. Old “Pay Per View” Method

This method should not be used anymore as we will only support the new Pay Per View method (which is more robust) going forward.

The following video shows how to setup a Pay Per View model to sell streaming videos using WP eStore:

eStore Pay Per View

Filed Under: Additional Guidance Tagged With: pay per view, WP eStore

  • « Previous Page
  • 1
  • 2
  • 3
  • 4
  • Next Page »

Your Shopping Cart

Shopping Cart Empty
Shopping Cart is Empty
Visit The Shop

Search

Featured Documents

Stylish Product Display Options for WP eStore WP eStore Quick Setup and Usage Video Tutorial WP eStore Shortcodes and Functions Reference WordPress eStore Plugin Features WordPress eStore Plugin Demo What Our Customers Have to Say About Our Products WordPress eStore WishList (Feature Suggestions) WordPress eStore Frequently Asked Questions (FAQ) How to Show Add to Cart buttons

Featured Plugins

wordpress_estore_icon
wordpress membership plugin icon
WP Express Checkout Plugin
Lightbox Ultimate Plugin
wordpress_affiliate_plugin_icon

Copyright © 2023 | eCommerce Plugins