Tips and Tricks WP eCommerce

eCommerce Solution for WordPress Blog

  • Home
  • eCommerce Plugins
  • WP eStore Documentation
  • WP Shopping Cart Doc

WordPress eStore and WishList Members plugin Integration

Integrating WishList with the WP eStore plugin is very easy. First you should read the integration scenario post from the following URL to get a visualization of what to expect from this integration though:

  • WP eStore and WishList integration scenerio

You also need to make sure that you have the latest version of WishList Members pluign. Move to the next section when you are ready to do the integration.

What Info will You Need?

You will need 3 pieces of information from WishList members plugin to configure a “Buy Now”, “Subscribe” or “Add to Cart” button that integrates with the WP eStore plugin. The info you need  are:

  1. The Post URL
  2. The Secret Word
  3. Membership Level SKU Number

All these information can be found on the “Integration” tab of the WishList members plugin (Select Generic System integration)
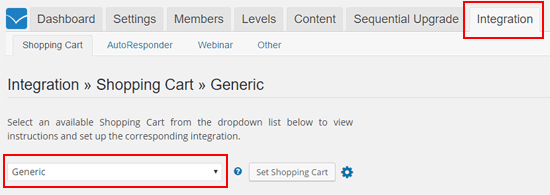
wishlist-members-generic-integration-menu

WP eStore Settings for WishList Members Integration

Step 1) Go to the “3rd Party Integration” tab from the settings menu of WP eStore plugin.
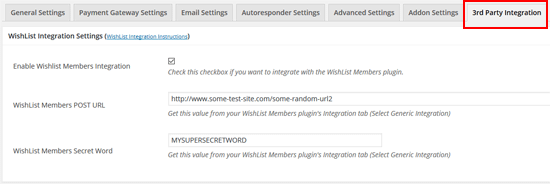
esotre-and-wishlist-members-integration-settings

Step 2) Check the “Enable Wishlist Members Integration” checkbox from the “WishList Integration Settings” section.

Step 3) Fill in the “POST URL” and the “Secret Word” in the corresponding fields and save the settings by clicking the “Update” button.

Step 4) When configuring an eStore product, use the Membership Level SKU (this is number that corresponds to a particular membership level of your WishList members plugin) in the “Reference Text” field under the Additional product details section of the product.

Now, when someone pays using that eStore product, the plugin will know which membership level to create for that user. Once the user makes a payment, the plugin will talk to the WishList members plugin to create a membership account and send an email which will have a link to complete the registration.

Handling the Thank You Page URL

The user needs to click on the unique link sent to them via email in order to complete the registration after payment. So you can send the users to a generic “Thank You” page (after payment) where you instruct them to check the email for the special registration link and click on it.

What to Do When You Have Multiple Membership Levels?

Create a new eStore product for each of your membership levels and use the corresponding SKU value of the level in the reference text field of the eStore product.
WordPress eStore Product Categorization

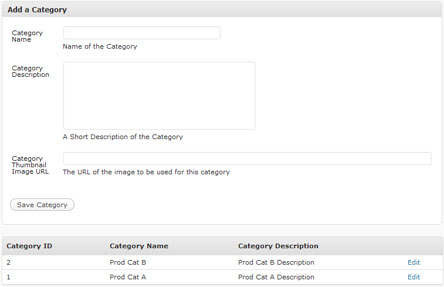
You can categorize your products into groups to help your customers browse them easily.

eStore-product-category

Product Category Management Menu

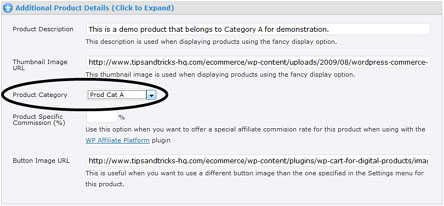
Once you create a product category from the Category Management menu you can assign a product to that category when configuring the product details.

eStore-product-category-produts-menu

Assigning a Product to a Category

You can display all the product(s) from a particular category using a shortcode:

There are many more shortcodes available to utilize product categories. See the shortcodes list documentation for details.

I have created a demo category called “Prod Cat A” and assigned two products to this category. The products are displayed as the following when using the category shortcode.

Demo Product for Category
This is a demo product that belongs to Category A for demonstration.
Price: $10.00
Digital Product With Variation
This product demonstrates how you can configure a digital product with variation control that delivers different file based on the user's selection
Price: $50.00
License :

Read the following documentation to learn some advanced techniques for displaying products from a category on a WordPress page:

  • Display products on a page from a particular category with additional options

How to Add/Create a Subscription Button for Recurring Payment

Configuring a Subscription button for recurring payment and adding it to a post or page is very easy using the WP eStore plugin.

Please note that this documentation is for creating a PayPal subscription button only

Subscription payments for other payment gateways are handled via the payment gateway bundle addon. Refer to the documentation of that addon if you are creating a subscription button for a different gateway.

Creating A PayPal Subscription Button

Follow the steps below to create a subscription product/button in eStore plugin:

Step 1: Click on the “Add/Edit Products” menu in your WP eStore admin area to create a new product.

Step 2: Fill in the product details as you see fit. You can enter a descriptive price in the “Price” field of a subscription product. Example values:

  • 29 USD Per Month
  • 47 USD for 3 Installments
  • 7 Days Trial Then 19 USD Per Month

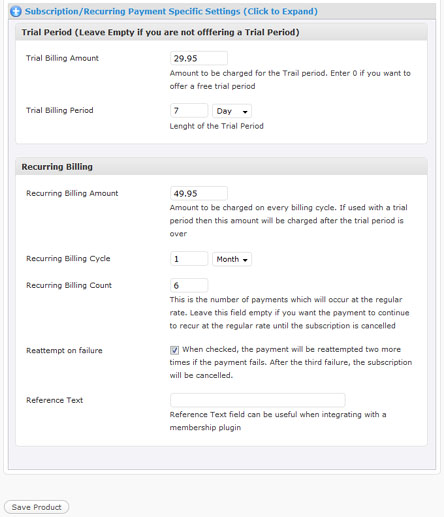
Step 3: Go to the “Subscription/Recurring Payment Specific Settings” section of this product and enter the subscription details correctly. Save the product when you are done.

Configuring a Subscription Payment

Step 4: Type the following shortcode to display a subscription button for this product on a WordPress post or page.

[wp_eStore_subscribe_button id="15"]

Replace the PRODUCT-ID with the actual id of the product (example: 15)

Example Subscription Button

The following Subscription button charges the customer $29.95 USD for the first 7 days Then $49.95 USD for each month, for 6 installments.

You can also display the subscription button using one of the fancy displays like the following:

Test Membership Subscription
Subscription button that charges the customer $29.95 USD for the first 7 days Then $49.95 USD for each month, for 6 installments
Price: $29.95

Feel free to hit the subscription button to see how it works.

Frequently Asked Questions

  • Can I customize the button image? – Yes, simply specify your custom button image URL in the “Button Image URL” field when configuring the product.
  • Can I display a subscription button using one of the fancy displays? – Yes, please check the shortcodes documentation to find a suitable shortcode.
  • Can the subscription be added to the shopping cart? – No, please see the “Notes” section at the bottom of this page for detailed explanation.

Example Values for a Subscription Button

Here are some examples showing you what values to use to create a subscription button

Example 1: To create a subscription button  that charges $27.00 USD for each month until canceled use the following values:

Trial Billing Amount -> (leave empty)
Trial Billing Period -> (leave empty)
Recurring Billing Amount -> 27.00
Recurring Billing Cycle -> 1 Month
Recurring Billing Count -> (leave empty)

Example 2: To create a subscription button  that charges $29.95 USD for the first 7 days Then $49.95 USD for each month, for 6 installments use the following values:

Trial Billing Amount -> 29.95
Trial Billing Period -> 7 days
Recurring Billing Amount -> 49.95
Recurring Billing Cycle -> 1 Month
Recurring Billing Count -> 6

How to Test A Subscription Payment

  • Please read this post before you test a subscription payment button.

Note:

Please note that the subscription payment cannot be added to the shopping cart. Why? because PayPal handles subscription payments through a different API than the normal one (Subscription payments are usually complex). How do you process two of the following payments together when you checkout using the shopping cart?

  • Charge the customer $29.95 USD for the first 7 days Then $49.95 USD for each month
  • Charge the customer $49.95 USD for the first 14 days Then $19.95 USD for each month, for 6 installments.

Also, PayPal will not process multiple subscriptions through the cart checkout API so if a customer added 5 subscriptions to the cart and then tried to checkout it will get stuck.

How to Use Coupons/Discounts in WP eStore

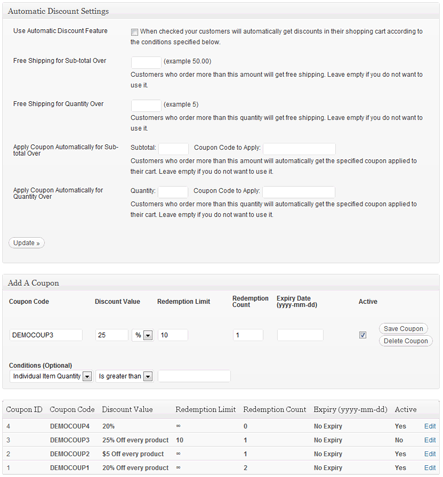
Configuring the WP eStore to use Coupons is very easy. Simply go to the Coupons/Discounts menu, enable the usage of coupons and add a few coupons to the system so your customers can use it.

Screenshot of Coupons/Discounts Menu

You can create conditional coupons that are only applied to the shopping cart if it meets certain conditions. For example, you can create conditional coupons like the following:

  • Apply 20% discount if the total amount is greater than $50.00
  • Apply 25% discount if the total number of items in the cart is greater than 5
  • Apply a discount only on a certain product
  • Give free shipping if the total amount is greater than $100.00

Coupon Usage Demo

I have already configured two coupons “DEMOCOUP1” and “DEMOCOUP2” for demonstration. Add the following demo product to the shopping cart and apply one of these coupons to see how it works.

Demo T-Shirt 3
Demo T-Shirt 3
Variation control demo with different prices
Price: $20.00
Color :

Discounts only get applied to the product price (shipping price doesn’t get discounted). Also, coupons don’t stack up, only one coupon can be applied to the cart at a time (this is to make sure the customers can’t apply multiple coupons to exploit the system).

Applying Discount Via URL

Read this documentation to learn about the discount via URL feature.

How to Use Variation Control in WordPress eStore Plugin

This post explains how you can configure your product to use variation control when using the WP eStore plugin.

variation_control_sc

The “Variation1” and “Variation2” fields can be used To configure a product with Variation. Say for example, you want to sell a T-Shirt which comes in various sizes (small, medium, large, XL). Enter the following in the “Variation1” field of this product when you add it to the database:

Size|Small|Medium|Large|XL

Once you add variation control to the product it will look similar to the following:

Demo T-Shirt
Demo T-Shirt
Price: $20.00
Size :

Feel free to hit the add to cart buttons to see how they appear on the shopping cart when variation control is used.

Now, what if you wanted to add another variation to that product? You can do that too. Say for example, you want to add a color variation to the T-Shirt. Enter the following in the “Variation2” field:

Color|Green|Red|Black

Once you add the second variation to the product it will stack up and look similar to the following:

Demo T-Shirt 2
Demo T-Shirt 2
Price: $25.00
Size :
Color :

Variation Control With Different Prices

What if you want to have different prices for different variations? You can do that too by adding the price increment next to the variation name. Say for example, the shirt comes in Green color which costs $20.00 and you want to charge $5 extra if someone wants to get the Red one and $7.50 extra for the Black one. Add the following to your “Variation” field to achieve this:

Color|Green|Red:5|Black:7.50

Now customers will be charged depending on the variation they choose.

Demo T-Shirt 3
Demo T-Shirt 3
Variation control demo with different prices
Price: $20.00
Color :

You can use both the variation fields to use different prices or any other combinations.

Demo Photo
Demo Photo
A product with variation control. Variation control allows the customer to choose the variation that they want to purchase.
Price: $50.00
Size :
Resolution :

Variation Control for Digital products

The above variation control mechanism can be used for any type of product (digital or non-digital) but if you have a product that requires the digital delivery of different files depending on the customer selection, then you can use the “Digital Product Variation” field to achieve this.

Say for example, you are selling a WordPress theme that comes in 3 different options (Single, Business and Professional) and you have 3 different downloadable files to offer based on user selection. Lets say we have the following details in this situation:

Name of the variation group: License
Variation Names: Single, Business and Professional
Downloadable Files: example.com/single-license.zip (Single Option), example.com/business-license.zip (Business Option), example.com/pro-license.zip (Professional Option)

Enter the content of the following example in the “Digital Product Variation” field (you will need to adjust the name and file URLs for your items):

License|Single::http://yourdomain.com/downloads/somefile.zip|Business::http://yourdomain.com/downloads/somefile2.zip|Professional::http://yourdomain.com/downloads/somefile3.zip

Now customers will receive the corresponding file for the option they select during the purchase (example: the customer who buys the Single License option of this product will receive the “single-license.zip” file).

If you want to charge different amount for different option then you can use the following example:

License|Single::http://yourdomain.com/downloads/somefile.zip|Business::10::http://yourdomain.com/downloads/somefile2.zip|Professional::15::http://yourdomain.com/downloads/somefile3.zip

The product display will look similar to the following:

Digital Product With Variation
This product demonstrates how you can configure a digital product with variation control that delivers different file based on the user's selection
Price: $50.00
License :

If the base price of this product (with single license) is $50, then a customer will be charged $60 for the business option and $65 for the professional option.

Collecting Customer Input

Sometimes you may need to collect input from your customer for a particular product (eg. to engrave something). Simply check the “Collect Customer Input” option for that product and it will allow the customer to enter some text similar to the following (you can also customize the label of the instruction field):

Demo Engraving
Demo Engraving
A product that requires instructions from customer. The customer can add text in the "Instruction" text box below
Price: $10.00
Instructions:

Variation Configuration UI

If you are creating lots of variations then it maybe useful for you to use eStore’s variation UI addon. You can also do inventory control per variation when you use the advanced variation control UI addon.

Inventory Control

If you want to do inventory control for your variations, you can use the eStore’s variation UI addon which has an option for inventory control.

Limitations:

I understand that some of you would like to show the total amount beside the variation text and not the incremental amount but that’s not how variation control usually works. It may work if you have one variation but what do you do when you have multiple variations that needs to stack? Adding the amount is the only way to handle this.

This is exactly why sites like www.apple.com, www.dell.com etc uses incremental variations rather than the total fixed amount next to the variation text (this is a standard practice).

Also, with WP eStore you can have a maximum of four variations (including the digital variation) per product.

WordPress eStore Plugin Features

The main features of the WP eStore Plugin are listed below:

WP eStore will help you with the following:

  • Get rid of any ongoing subscriptions you may have with a 3rd party site for your eCommerce needs
  • We don’t charge you for future plugin updates. So you will be able to get newer versions of the plugin for free.
  • Get rid of any heavyweight, bloated and site performance impacting e-Commerce software from your site
  • Use a plugin that is always kept upto date to work with the current version of WordPress (this way you won’t get stuck with a plugin that stops working after a WordPress upgrade)
  • Get a response from professional developers if you face an issue with the plugin (we won’t sell you a product then disappear)

Digital Product Delivery

  • Automatic instant digital product delivery. Upon payment the buyer receives a product download link in the email and also on the post-payment return page (eg. a Thank You page)
  • Encrypted Product download link (The buyer always receives an encrypted product download link which means the actual link to the product always remains secret)
  • Automatic Link Expiration (The encrypted link the buyer receives also gets expired after a configurable amount of time (eg. 12 hours) so the link doesn’t get passed around)
  • Ability to limit the number of downloads per link. An encrypted download link will automatically expire after a specified number of downloads (eg. 3 times) if this option is used
  • Ability to offer multiple file downloads per product
  • Allow your customers to redownload the digital files that they purchased
  • Ability to dispatch a serial number or license key (from a pool of pre-configured keys/numbers) to your customer upon purchase of a product
  • Variation control for digital product (digital delivery of different files depending on the selection)
  • You can also host your digital files at a non-web-accessible URL of your server such as “/home/var/digital_products/myproduct.zip”. WP eStore will be able to feed this file to your customers via an encrypted download link
  • Ability to automatically shorten the encrypted download URL using Google’s free URL shortener (this makes a complex URL look nice and tidy)
  • You (the admin) can re-generate encrypted download links manually for a digital product and send it to the buyer (useful when a buyer misses a download link)
  • Product Specific Instructions for the buyer. This option is useful when you need to give your customer some specific instruction that applies only to that product
  • Ability to offer a “Squeeze Page” type form (This allows the site visitors to download a free digital product after they fill in their name and email address. This can be used for email list building). See example
  • Ability to create download now buttons to serve free downloads to your users using the encrypted download system
  • Option to create free encrypted download now buttons (for downloadable items) using a simple link
  • You can let your customers see their purchase history

Security

  • WP eStore is PCI compliant.
  • You don’t need to have a SSL certificate to use WP eStore plugin
  • WP eStore easily works with your secure SSL (https) pages if you want to use a SSL certificate on your website
  • Automatic Instant Payment Notification (IPN) validation (The IPN sent from PayPal is validated against your products database and with PayPal, before the product download link is sent to the buyer. This stops anyone trying to scam the system by sending a fake IPN)
  • Automatic post payment product details verification. This stops anyone from trying to scam you by changing the product price or currency on the webpage by injecting queries into the form (learn more)
  • Product downloads are always delivered via encrypted download links
  • Keeps the true location of your digital asset hidden. This ensures the security of your digital asset

Lots of Free Addons

  • WP eStore has many extensions/addons that you can add to your site and extend some functionality if needed

Amazon S3 Integration

  • Can be integrated with Amazon S3 so that the downloadable files can be stored on your Amazon S3 account and served via secure encrypted download
  • This method can be used to protect the digital items that you are selling or to protect the downloadable files that you are offering to your members (if you have created a membership site)
  • This option can be really good if you have an overcrowded shared hosting and you have a limited memory allowance on your server

Pay Per View Content

  • Simple Pay Per View Content Protection. Instant delivery of pay per view content, the true URL of the page where the content is embedded (e.g. a steaming video) does not get revealed
  • The link can be configured so it redirects the buyer to a web page instead of giving them a download (useful when you want to redirect the buyer to a web page which contains streaming videos for example)

Support

  • Free lifetime plugin updates. Please see the following post on how updates are handled
  • Free technical support for our plugin. Please see our support site to find out the available support options
  • Use the plugin on all of your sites (the sites that you own and operate)

Payment Related

  • Ability to use “Add to Cart”, “Buy Now” or “Subscription” type buttons
  • Ability to setup PayPal Donate buttons to accept donation for a cause
  • Ability to setup Subscription/Recurring payment via PayPal. Configure a “Subscription” button for any type of subscription payment. (See demo)
  • Ability to setup “Buy Now” type buttons with different PayPal email addresses (per button basis). Useful on a multi-author blog where different authors can setup “Buy Now” buttons with their products and get the money directly into their PayPal account after a sale
  • Allow customers to specify a product price (learn more).
  • Option to specify a PayPal checkout page style
  • Multiple Payment Gateways. Customers can pay via PayPal, 2Checkout, Authorize.net or a manual/offline process (learn more)
  • Option to add more payment gateways if you need via a premium gateway bundle addon

Currency and Language

  • Accept money in your preferred currency (Can be configured to accept money in any currency that is supported by PayPal or the payment gateway in use)
  • Ability to configure a secondary currency that can be used to display the equivalent price of the products in that currency (this is for display purpose only, the transaction takes place in the primary currency of your store).
  • Any texts or messages that your visitors can see, can be customized through the language file
  • Some language files for the commonly used languages are already included but others can be added upon request
  • You can customize the price currency display format (useful for European users)

Shopping Cart Related

  • Ability to specify a minimum checkout amount (example: only allow customers to checkout if the cart sub total value is more than $50.00)
  • Ability to specify a maximum checkout amount limit (example: do not allow customers to checkout if the cart sub total value is more than $500.00)
  • Ability to specify a per customer item quantity limit (example: only allow a customer to purchase a maximum of one copy of an item)
  • Ability to allow your customers to save their shopping cart so that it can be retrieved at a later time
  • Set an automatic redirection to the checkout page once a customer adds an item to the shopping cart
  • Hide the quantity field in the shopping cart (can be useful when selling only digital items)
  • Optionally display a continue shopping link in the shopping cart
  • Ability to specify a custom image that is displayed when the shopping cart is empty
  • Ability to add a product to the shopping cart on your site via a simple text link (helpful when you want to place a buy link on facebook, twitter etc).

Setup and Design

  • Easy to use and the freedom of adding an “Add to Cart”, “Buy Now” or “Subscription” type button for a product or service anywhere on your blog (posts, pages, sidebars, header, footer)
  • Products can be configured with a thumbnail image and a description and can be displayed in a stylish way by using a shortcode. (See demo)
  • Shopping cart – session based (The shopping cart can be displayed anywhere on your blog posts, pages and sidebar)
  • All the buttons are customizable through the usage of button images and CSS
  • Easy Checkout. Simple one-click checkout through PayPal or 2Checkout or Manual Checkout
  • Sell both digital and non-digital products with this one WordPress plugin
  • WP eStore DOES NOT create any page or post automatically (I find it untidy when plugins automatically create pages). WP eStore gives you all the shortcodes that you can embed on posts or pages to get various functionality but you will have to create the pages yourself (in my opinion this gives the designer more design flexibility)
  • Products can be listed under product categories allowing for easy placement of multiple items (the items you specify for this category) on one product page. e.g. You can display all the eBooks you have for sale by placing a shortcode on the products page
  • Terms and Conditions – You have the ability to require your customers to agree to your “Terms and Conditions” before they can purchase any item
  • PayPal custom template checkout pages can be used with the eStore plugin to customize your checkout page on PayPal
  • Simple Up-selling feature (the admin can use this feature to put in some coupon codes which the customers only get after they have made a purchase)
  • Collect Customer Input. This will display a text box next to the Add to Cart button where the customer can enter special instruction for that product (eg. a Name if selling Engraving)
  • Capability to limit the quantity to be sold for a specific product (Useful when you only want to sell 50 copies of a product for example)
  • Coupon Code/Discounts Feature. Offer coupons and discounts to your customers
  • Ability to offer product specific affiliate commission when using with the WP Affiliate Program plugin
  • Can be used with PayPal’s profile based shipping for dynamic shipping calculation based on location or weight
  • Ability to use the simple shipping and tax calculation feature that comes with the plugin or use the shipping and tax settings specified in your PayPal profile
  • Option to add a shipping variation in the shopping cart
  • Ability to apply tax calculation on shipping amount
  • Option to allow customers to pickup the items from your store. The cart won’t charge shipping to customers who choose to pickup from your store

Integration Options

  • Can be integrated with the NextGen Gallery Plugin to create a Digital Photo Store from the NextGen Gallery (sell photos from your WordPress site):
    • Integration option 1
    • Integration option 2
  • Can be integrated with Google Analytics E-Commerce tracking (learn more)
  • Pre-integrated with the WP Affiliate Platform plugin (the affiliate plugin is not included with the eStore plugin). So, in the future if you want to use an affiliate program to boost your sales all you have to do is activate the other plugin
  • Pre-integrated with WP eMember Plugin (the eMember plugin is not included with the eStore plugin). WordPress eMember is a membership plugin that can turn your existing or new WordPress site into a membership site easily. You can also setup recurring payment via the eStore for membership payments
  • Pre-Integrated with the WP PDF Stamper: This plugin allows you to protect your eBook from being uploaded to file sharing sites. Automatically stamping the footer of your eBook with the customer’s personal details (e.g. name, email, address) upon purchase
  • Can be easily integrated with the WishList Members plugin (Create Membership a Site)
  • AWeber Integration option. customers are automatically signed up to your AWeber list for email marketing purpose
  • MailChimp Integration option. This allows your customers to be signed up automatically to MailChimp list for email marketing purpose
  • GetResponse Integration option. This allows your customers to be signed up automatically to GetResponse campaign for email marketing purpose
  • Can be integrated with iDev Affiliate software
  • Can be integrated with the Memberwing Membership plugin
  • Ability to use Google base feed for your eStore products

Miscellaneous

  • Earnings and sales charts for your products.
  • Export customers record to a CSV file.
  • Export serial keys issued to your customers to a CSV file.
  • MySQL Database driven.
  • Customer Database (When a Customer purchases an Item his/her details are stored in the database).
  • WP eStore works well with any properly coded (valid xHTML code) WordPress theme (example: Thesis Theme, Genesis Theme, Elegant Themes etc.)

Visit the WordPress eStore Plugin Page.

How to Configure a Bundled Product Using the Existing Products

Making a packaged/bundled product from a bunch of existing products is very easy.

Step 1: Create a new eStore product that will be your bundled product

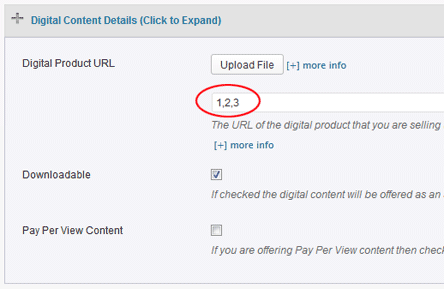
Step 2: Write down the product IDs of the existing eStore products that you want to bundle. The product IDs should be separated by commas (,). Example: 1,2,3

Step 3: Enter the product ids from step 2 in the “Digital Product URL” field of the new product that you are creating.

The screenshot below shows how the product ids are entered in the ‘Digital Product URL’ field to bundle multiple products together:

This new product will be a bundled product that includes product 1, product 2 and product 3. So when someone purchase this item he/she will receive three download links (one for product 1, one for product 2 and one for product 3).

Video Tutorial on How to Bundle Products

WP eStore Product Bundling

WordPress eStore List of All Products Display Demo

Demo Product One
Demo Product One
This is a test description. This description is here to show how the description of this product looks like.
Price: $1.00
Demo Product Two
Demo Product Two
This is a test description. This description is here to show how the description of this product looks like.
Price: $1.00
Demo Product Three
Demo Product Three
This is a test description. This description is here to show how the description of this product looks like.
Available Qty: -133
Price: $9.50
Demo Product Four
Demo Product Four
This is a test description. This description is here to show how the description of this product looks like.
Available Qty: 12
Price: $1.75
Demo eBook
Demo eBook
This is a test description. This description is here to show how the description of this product looks like.
Available Qty: 37
Price: $1.50
123 ... Last Go to page:

Enter the following text in a post or page to display a list of all products in a stylish way similar to the one shown above.

display_all_products_tag

See the Product Categorization post to learn how you can display a list of products from a specific category.

How to Customize the URL of the Download Validation Script

Check the eStore’s link shortener feature before going through the download validation script location customization instruction (a lot of users find that the link shortener feature is all that they need):

WP eStore’s Encrypted Link Shortener Feature

WP eStore has an automatic link shortener feature which can shorten all the encrypted download links before giving it to the customer. This will make the encrypted links look short and more manageable.

Go to WP eStore settings and check the “Shorten Encrypted Download Links” option to enable the auto encrypted link shortener feature.

Customize the Validation Script Location

This customization is NOT needed for any functionality. The instruction exists merely for anyone who is interested to do this. So I recommend that you use the default value.

This customization involves a little bit of code modification so before you attempt this you must test the plugin with the default settings and make sure everything is working as expected. It is also not a good idea to try this if you are not a developer.

Since this customization involves custom code modification, we have no way of troubleshooting any issue that may arise from this change. If encrypted download stops working after this customization then you need to undo your changes. The following instruction will help with that:

  • How to Reset the Download Validation Script Location to Default Setting

The download validation script validates a download request from a client and fetches the appropriate file for download after verification so the client never knows the real location of the file.

The Instructions

1) There is a file called “custom_download.php” in the “view” directory of the plugin. Copy this file to the target location.

2) Rename the “custom_download.php” file to “download.php”.

3) Now update the value of the “Download Validation Script Location” field from the settings menu to the target directory (include trailing slashes). For example,

http://www.your-domain.com/downloads/

If your WordPress is installed in the root of your site then you are done.

If you have installed WordPress in a sub-folder on your site (example: www.yoursite.com/blog) then you need to do one extra step.

4) Open the file your just copied and renamed and edit the value of the “$wp_home_dir” variable to the name of the subdirectory that contains WordPress.

In this example, the line should look like:

$wp_home_dir='blog';

A big thank you to The Assurer for getting this new method sorted out.

How Shipping Address is Collected from the Customer

As the shop admin, you will need the shipping address of the customer to ship physical products but know that you don’t have to do anything special. PayPal handles the shipping address collection and will email you with postage information after a payment so you can ship the product.

Triggering Shipping Address Collection for Digital Items

If you are selling physical products (with a shipping fee) then it will trigger a shipping address collection during the checkout process.

By default, WP eStore plugin doesn’t trigger the shipping address collection for digital products as it’s an unnecessary step that we can skip to speed up the checkout process. If you have a product that is not really a physical product but you still want to collect shipping/mailing address, do the following to trigger address collection during checkout.

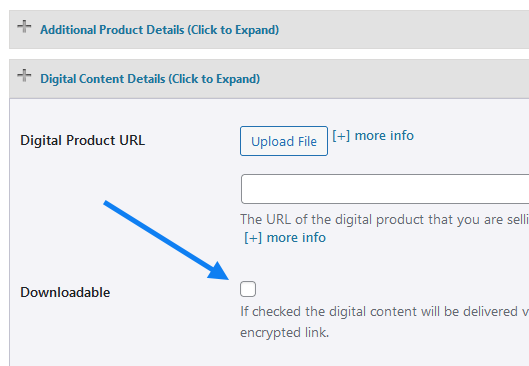
Step 1) Edit the product in question and uncheck the “Downloadable” checkbox.

Step 2) Add a value of 0.001 in the “Item Shipping Cost” field. This will make it so it doesn’t charge a shipping amount but it will trigger hte address collection.

This is how it works:

  • A customer clicks on the Pay Now/Checkout button and goes to PayPal to pay for the product or service.
  • The customer fills in the credit card details or logs into his/her PayPal account and reviews the order.
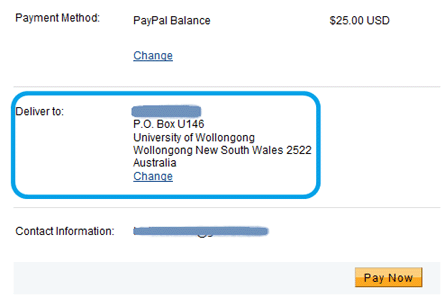
  • Now before hitting the “Pay Now” button the customer can use the default shipping address (taken from his/her PayPal account) or specify a different shipping address by clicking on “Change Shipping” that is shown below the default shipping address.
  • After payment, PayPal will send you a payment confirmation email which will have this postal address so you can ship the item.
  • The plugin will also capture the address in the “Cart Orders” menu inside your WordPress admin dashboard.

Shipping Address Collection When Paying from PayPal account

Shipping Address Collection When Paying from PayPal account

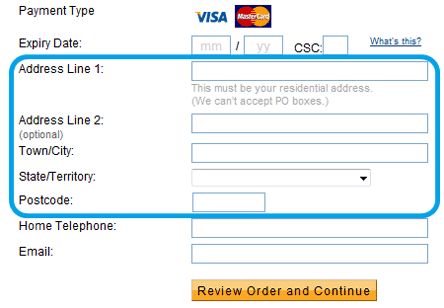
Shipping Address Collection When Paying using a Credit Card

Shipping Address Collection When Paying using a Credit Card

Alternative Option

The other option is to drop a shipping address collection form similar to the one shown in the following screenshot on the “Thank You” page. This way when the customers get redirected to the “Thank You” page after paying on PayPal, they can enter their shipping address. The content of the form (the address in this case) is mailed to you when the customer hits the submit button.

shipping-address-form

It is really easy to add a form similar to the one shown above using a WordPress contact form plugin. I use the Contact Form 7 plugin which allows you to add a customized form on any page to collect info from visitors.

« Previous Page
Next Page »

Your Shopping Cart

Shopping Cart Empty
Shopping Cart is Empty
Visit The Shop

Search

Featured Documents

Stylish Product Display Options for WP eStore WP eStore Quick Setup and Usage Video Tutorial WP eStore Shortcodes and Functions Reference WordPress eStore Plugin Features WordPress eStore Plugin Demo What Our Customers Have to Say About Our Products WordPress eStore WishList (Feature Suggestions) WordPress eStore Frequently Asked Questions (FAQ) How to Show Add to Cart buttons

Featured Plugins

WP Express Checkout Plugin
wordpress_estore_icon
wordpress membership plugin icon
wordpress_affiliate_plugin_icon

Copyright © 2025 | eCommerce Plugins